

X
Click here to view all steps
Don't show me again

Steps
- 1
- Click%20on%20stages%20to%20start%20making%20changes%20to%20the%20network%20blueprint
- Click on Virtual
- Click on Routing Zones to create a new routing zone first
- Click to create a new routing zone
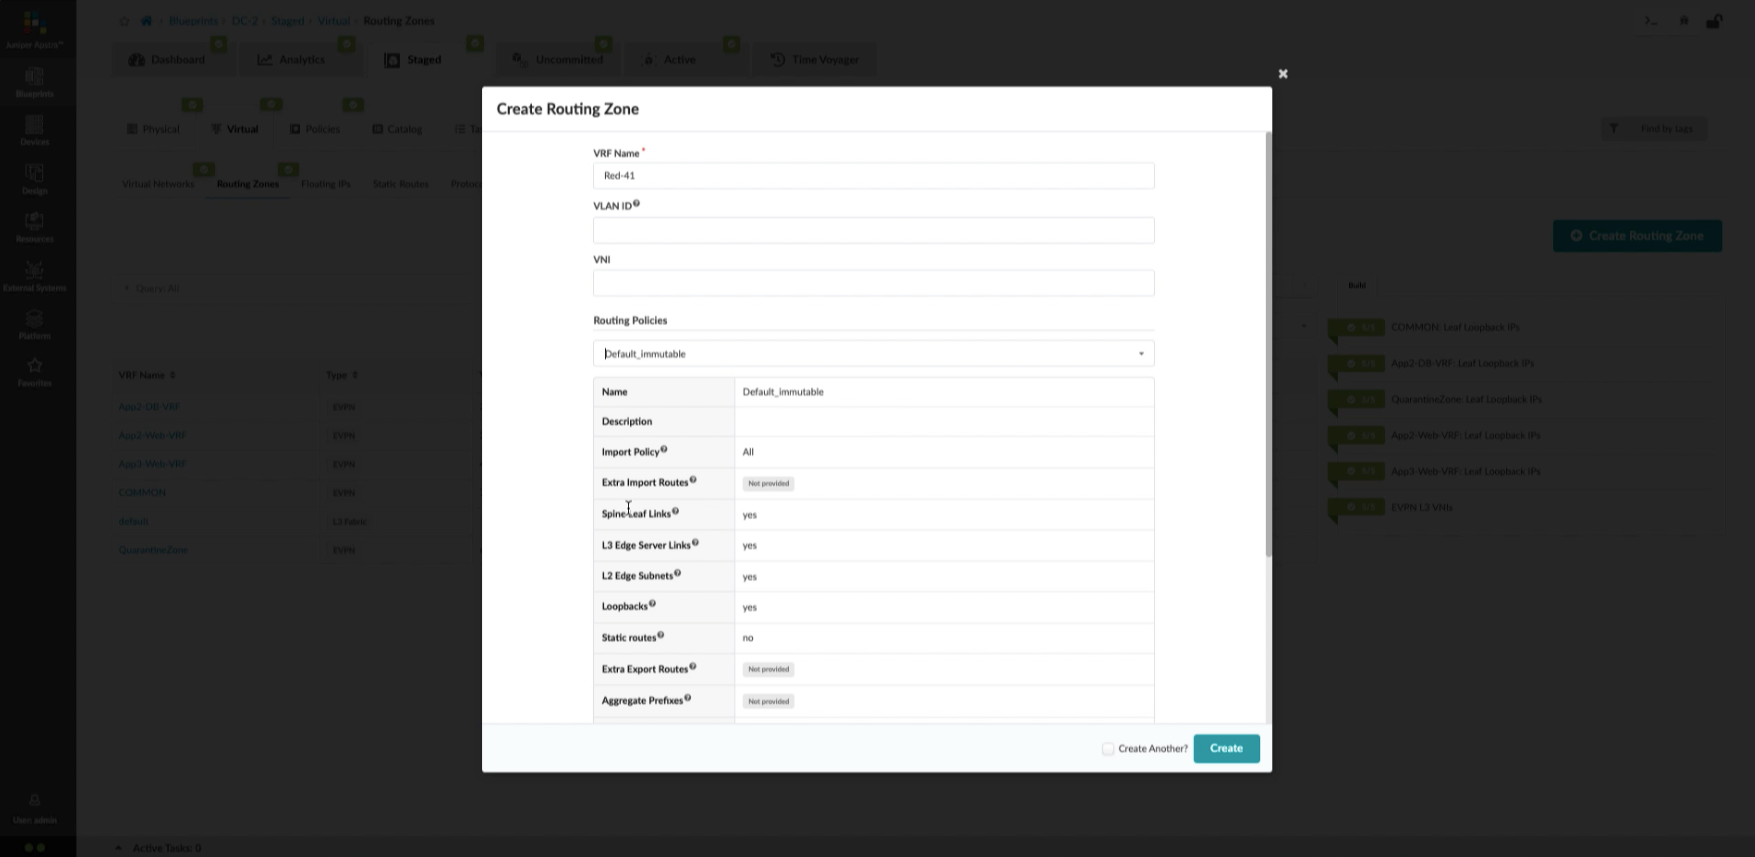
- Add a VRF name
- Choose a routing policy
- Click%20to%20finish%20creating%20a%20new%20Routing%20Zone
- %3Cp%3EWe%20notice%20the%20new%20Routing%20Zone%20has%20been%20created.%20More%20elements%20need%20to%20be%20created%20as%20indicated%20by%20the%20red%20error%20icon.%3C/p%3E
- Choose the loopback IPs from the pool
- Click to save selection
- Now let us create a virtual network
- Click here to create a new virtual network
- %3Cp%3E%3Cspan%20style%3D%22font-size%3A%2013px%3B%22%3EWe%20will%20extend%20the%20VXLAN%20to%20all%20the%20racks%20in%20the%20system.%3C/span%3E%3C/p%3E
- Let us add a name and specify the routing zone that we just created
- Choose the routing zone
- %3Cp%3EChoosing%20the%20Tagged%20option%20will%20cause%20a%20connectivity%20template%20to%20be%20created%20that%20we%20will%20use%20to%20add%20a%20tagged%20VLAN%20to%20workloads%20that%20gets%20added%20to%20the%20fabric%20later.%3C/p%3E
- Click to choose all the three racks to be assigned to this network
- Click to create the Virtual Network
- 24
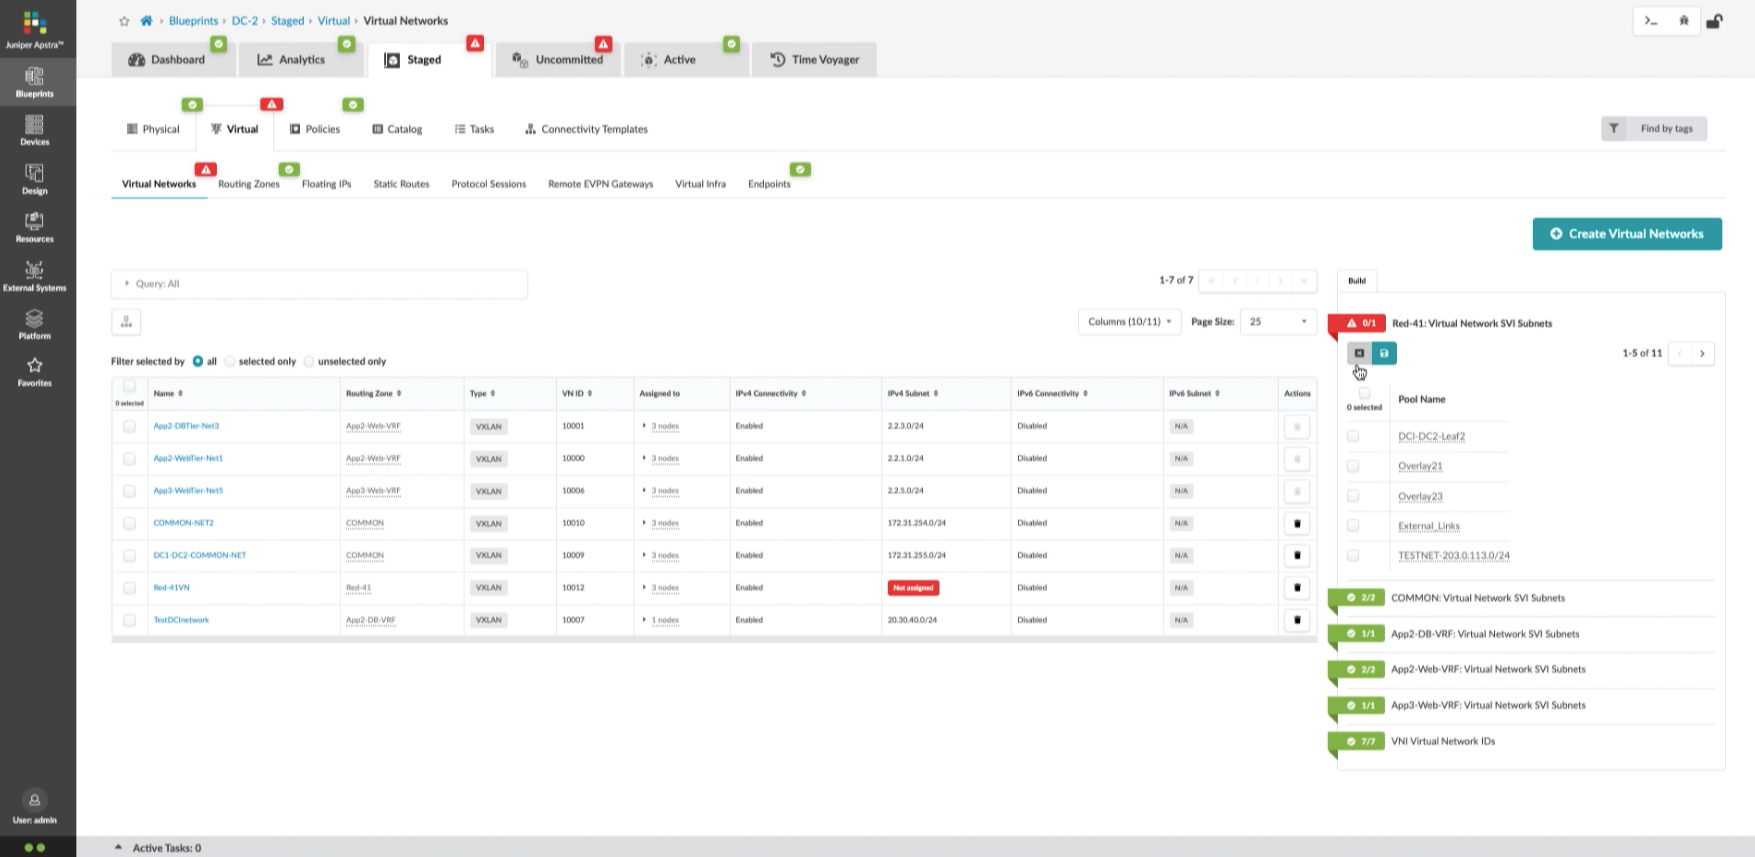
- Notice the need to specify a pool for IP addressing
- Click to make edits
- Click to view more
- Specify the Pool for IP addresses
- Click to Save selection
- Commit the new changes
- Click to commit the new changes to the network
- Specify the reason for easy identification and then click commit to make chages from Staged to active
- Choose the desired switch
- Click to view the configuration
- The changes are successfully queued and will be commited in a moment
- Scroll down to view the change
- Notice the new network is added
- Thank you

Steps
- 1
- Click%20on%20stages%20to%20start%20making%20changes%20to%20the%20network%20blueprint
- Click on Virtual
- Click on Routing Zones to create a new routing zone first
- Click to create a new routing zone
- Add a VRF name
- Choose a routing policy
- Click%20to%20finish%20creating%20a%20new%20Routing%20Zone
- %3Cp%3EWe%20notice%20the%20new%20Routing%20Zone%20has%20been%20created.%20More%20elements%20need%20to%20be%20created%20as%20indicated%20by%20the%20red%20error%20icon.%3C/p%3E
- Choose the loopback IPs from the pool
- Click to save selection
- Now let us create a virtual network
- Click here to create a new virtual network
- %3Cp%3E%3Cspan%20style%3D%22font-size%3A%2013px%3B%22%3EWe%20will%20extend%20the%20VXLAN%20to%20all%20the%20racks%20in%20the%20system.%3C/span%3E%3C/p%3E
- Let us add a name and specify the routing zone that we just created
- Choose the routing zone
- %3Cp%3EChoosing%20the%20Tagged%20option%20will%20cause%20a%20connectivity%20template%20to%20be%20created%20that%20we%20will%20use%20to%20add%20a%20tagged%20VLAN%20to%20workloads%20that%20gets%20added%20to%20the%20fabric%20later.%3C/p%3E
- Click to choose all the three racks to be assigned to this network
- Click to create the Virtual Network
- 24
- Notice the need to specify a pool for IP addressing
- Click to make edits
- Click to view more
- Specify the Pool for IP addresses
- Click to Save selection
- Commit the new changes
- Click to commit the new changes to the network
- Specify the reason for easy identification and then click commit to make chages from Staged to active
- Choose the desired switch
- Click to view the configuration
- The changes are successfully queued and will be commited in a moment
- Scroll down to view the change
- Notice the new network is added
- Thank you

1
Notice the error has been resolved and we are in the "Green"
Steps
- 1
- Click%20on%20stages%20to%20start%20making%20changes%20to%20the%20network%20blueprint
- Click on Virtual
- Click on Routing Zones to create a new routing zone first
- Click to create a new routing zone
- Add a VRF name
- Choose a routing policy
- Click%20to%20finish%20creating%20a%20new%20Routing%20Zone
- %3Cp%3EWe%20notice%20the%20new%20Routing%20Zone%20has%20been%20created.%20More%20elements%20need%20to%20be%20created%20as%20indicated%20by%20the%20red%20error%20icon.%3C/p%3E
- Choose the loopback IPs from the pool
- Click to save selection
- Now let us create a virtual network
- Click here to create a new virtual network
- %3Cp%3E%3Cspan%20style%3D%22font-size%3A%2013px%3B%22%3EWe%20will%20extend%20the%20VXLAN%20to%20all%20the%20racks%20in%20the%20system.%3C/span%3E%3C/p%3E
- Let us add a name and specify the routing zone that we just created
- Choose the routing zone
- %3Cp%3EChoosing%20the%20Tagged%20option%20will%20cause%20a%20connectivity%20template%20to%20be%20created%20that%20we%20will%20use%20to%20add%20a%20tagged%20VLAN%20to%20workloads%20that%20gets%20added%20to%20the%20fabric%20later.%3C/p%3E
- Click to choose all the three racks to be assigned to this network
- Click to create the Virtual Network
- 24
- Notice the need to specify a pool for IP addressing
- Click to make edits
- Click to view more
- Specify the Pool for IP addresses
- Click to Save selection
- Commit the new changes
- Click to commit the new changes to the network
- Specify the reason for easy identification and then click commit to make chages from Staged to active
- Choose the desired switch
- Click to view the configuration
- The changes are successfully queued and will be commited in a moment
- Scroll down to view the change
- Notice the new network is added
- Thank you

1
Notice the change is in place
Steps
- 1
- Click%20on%20stages%20to%20start%20making%20changes%20to%20the%20network%20blueprint
- Click on Virtual
- Click on Routing Zones to create a new routing zone first
- Click to create a new routing zone
- Add a VRF name
- Choose a routing policy
- Click%20to%20finish%20creating%20a%20new%20Routing%20Zone
- %3Cp%3EWe%20notice%20the%20new%20Routing%20Zone%20has%20been%20created.%20More%20elements%20need%20to%20be%20created%20as%20indicated%20by%20the%20red%20error%20icon.%3C/p%3E
- Choose the loopback IPs from the pool
- Click to save selection
- Now let us create a virtual network
- Click here to create a new virtual network
- %3Cp%3E%3Cspan%20style%3D%22font-size%3A%2013px%3B%22%3EWe%20will%20extend%20the%20VXLAN%20to%20all%20the%20racks%20in%20the%20system.%3C/span%3E%3C/p%3E
- Let us add a name and specify the routing zone that we just created
- Choose the routing zone
- %3Cp%3EChoosing%20the%20Tagged%20option%20will%20cause%20a%20connectivity%20template%20to%20be%20created%20that%20we%20will%20use%20to%20add%20a%20tagged%20VLAN%20to%20workloads%20that%20gets%20added%20to%20the%20fabric%20later.%3C/p%3E
- Click to choose all the three racks to be assigned to this network
- Click to create the Virtual Network
- 24
- Notice the need to specify a pool for IP addressing
- Click to make edits
- Click to view more
- Specify the Pool for IP addresses
- Click to Save selection
- Commit the new changes
- Click to commit the new changes to the network
- Specify the reason for easy identification and then click commit to make chages from Staged to active
- Choose the desired switch
- Click to view the configuration
- The changes are successfully queued and will be commited in a moment
- Scroll down to view the change
- Notice the new network is added
- Thank you
