Please enter your email to continue
Please enter your password to continue
For a better experience, please open this link using Chrome or Firefox
OkStatic Title
Contact us:


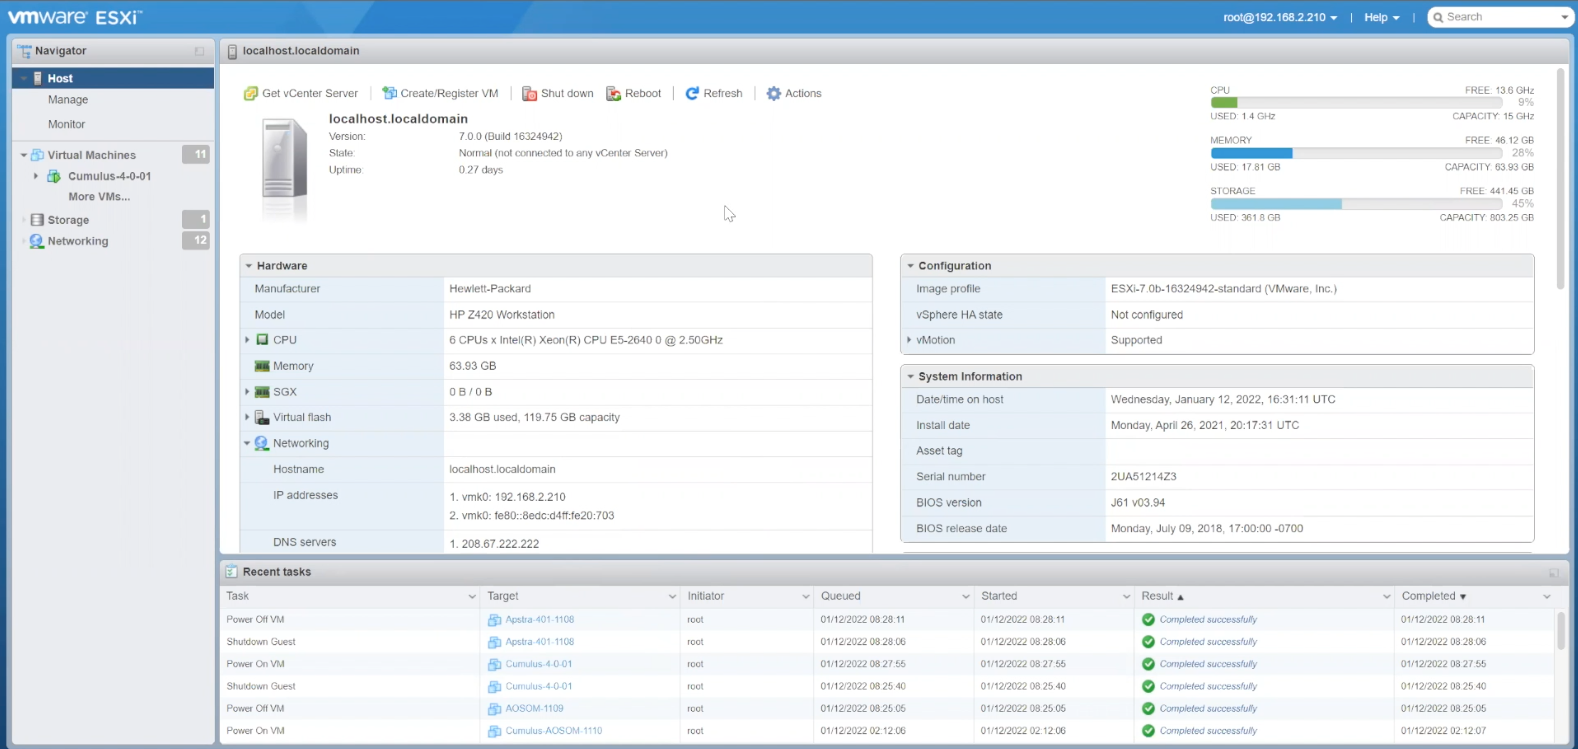
- %3Cp%3EIn%20this%20short%20walkthrough%2C%20we%5C%27re%20going%20to%20deploy%20Apstra%20starting%20with%20a%20VMware%20image%20or%20OVA%20.%20Here%20we%20have%20our%20VMware%20environment%20and%20we%5C%27re%20going%20to%20deploy%20a%20virtual%20machine%20from%20an%20OVA.%3C/p%3E
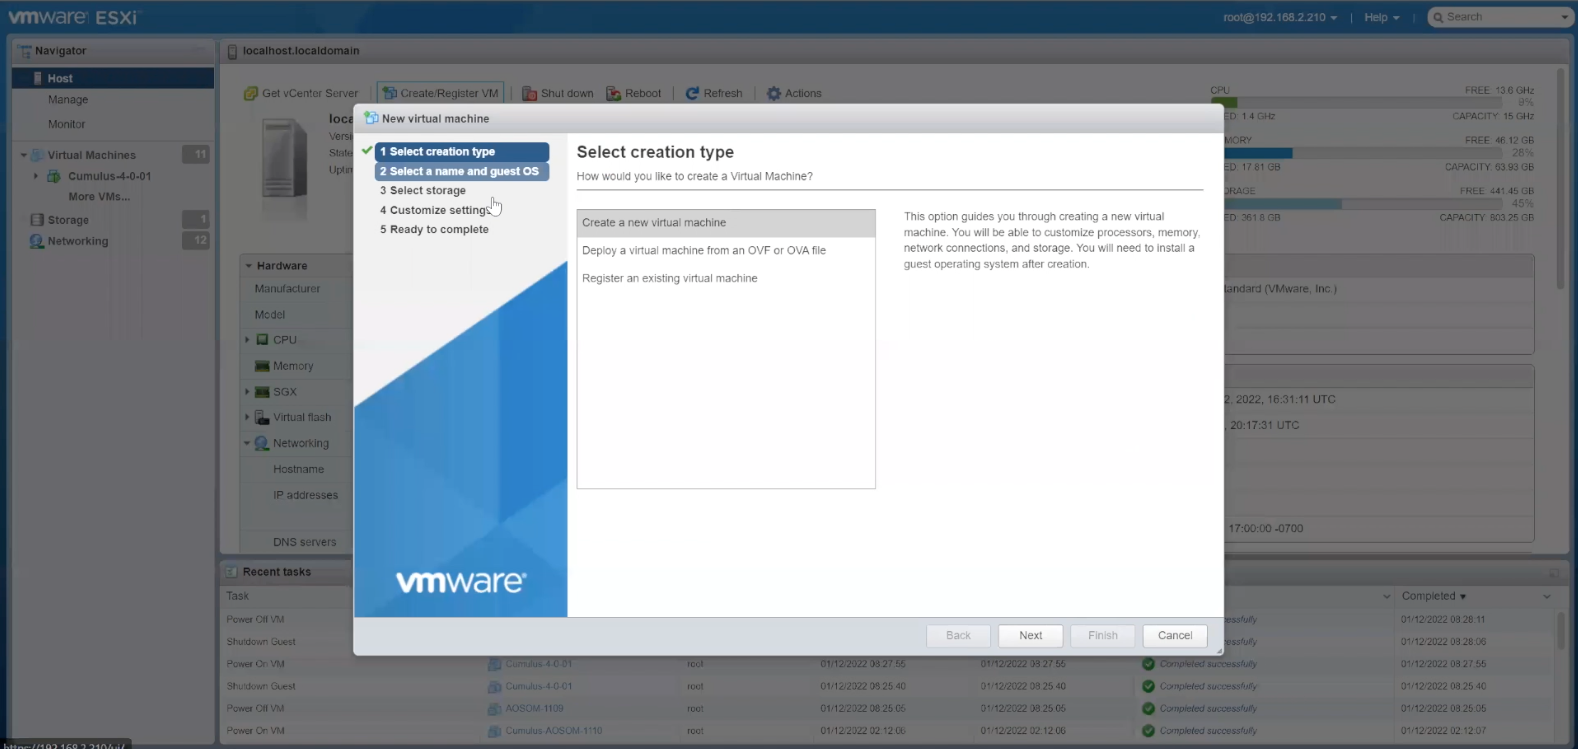
- Click%20the%20option%20to%20deploy%20a%20VM%20from%20an%20OVA%20file
- Click next to deploy the VM
- Enter a name for the Virtual machine
- Then%20we%20will%20drag%20and%20drop%20the%20OVF%20file
- Choose the OVF file
- Click Next
- Select the storage type and datastore
- Click to choose the VM Network
- Choose the VM Network from the drop down menu
- Confirm the VM Network option and the proceed to the next step
- Review the selection and then proceed to finish the set up
- %3Cp%20class%3D%22MsoNormal%22%20style%3D%22margin%3A%200in%3B%22%3ENext%20we%20need%20to%20assign%20network%20resources%20which%20can%20be%20set%20up%20with%26nbsp%3BDHCP%2C%20but%20in%20this%20example%2C%20we%20will%20pick%20an%20IP%20address%20for%20this%20device.%3C/p%3E
- Select the Network option
- Click OK
- Enter the Gateway IP address and proceed
- Add the secondary DNS and then proceed
- Confirm the settings
- Restart the network service now
- Click OK to proceed to the next step
- We are now ready to turn on the Apstra service
- Confirm the AOS status as Start
- End
1
Preview
Write
Preview
Markdown
WYSIWYG
- %3Cp%3EIn%20this%20short%20walkthrough%2C%20we%5C%27re%20going%20to%20deploy%20Apstra%20starting%20with%20a%20VMware%20image%20or%20OVA%20.%20Here%20we%20have%20our%20VMware%20environment%20and%20we%5C%27re%20going%20to%20deploy%20a%20virtual%20machine%20from%20an%20OVA.%3C/p%3E
- Click%20the%20option%20to%20deploy%20a%20VM%20from%20an%20OVA%20file
- Click next to deploy the VM
- Enter a name for the Virtual machine
- Then%20we%20will%20drag%20and%20drop%20the%20OVF%20file
- Choose the OVF file
- Click Next
- Select the storage type and datastore
- Click to choose the VM Network
- Choose the VM Network from the drop down menu
- Confirm the VM Network option and the proceed to the next step
- Review the selection and then proceed to finish the set up
- %3Cp%20class%3D%22MsoNormal%22%20style%3D%22margin%3A%200in%3B%22%3ENext%20we%20need%20to%20assign%20network%20resources%20which%20can%20be%20set%20up%20with%26nbsp%3BDHCP%2C%20but%20in%20this%20example%2C%20we%20will%20pick%20an%20IP%20address%20for%20this%20device.%3C/p%3E
- Select the Network option
- Click OK
- Enter the Gateway IP address and proceed
- Add the secondary DNS and then proceed
- Confirm the settings
- Restart the network service now
- Click OK to proceed to the next step
- We are now ready to turn on the Apstra service
- Confirm the AOS status as Start
- End

%3Cp%3EIn%20this%20short%20walkthrough%2C%20we%5C%27re%20going%20to%20deploy%20Apstra%20starting%20with%20a%20VMware%20image%20or%20OVA%20.%20Here%20we%20have%20our%20VMware%20environment%20and%20we%5C%27re%20going%20to%20deploy%20a%20virtual%20machine%20from%20an%20OVA.%3C/p%3E
%3Cp%3EIn%20this%20short%20walkthrough%2C%20we%5C%27re%20going%20to%20deploy%20Apstra%20starting%20with%20a%20VMware%20image%20or%20OVA%20.%20Here%20we%20have%20our%20VMware%20environment%20and%20we%5C%27re%20going%20to%20deploy%20a%20virtual%20machine%20from%20an%20OVA.%3C/p%3E
Preview
Write<br>
Preview<br>
Write<br>
Preview<br>
Markdown<br>
WYSIWYG
- %3Cp%3EIn%20this%20short%20walkthrough%2C%20we%5C%27re%20going%20to%20deploy%20Apstra%20starting%20with%20a%20VMware%20image%20or%20OVA%20.%20Here%20we%20have%20our%20VMware%20environment%20and%20we%5C%27re%20going%20to%20deploy%20a%20virtual%20machine%20from%20an%20OVA.%3C/p%3E
- Click%20the%20option%20to%20deploy%20a%20VM%20from%20an%20OVA%20file
- Click next to deploy the VM
- Enter a name for the Virtual machine
- Then%20we%20will%20drag%20and%20drop%20the%20OVF%20file
- Choose the OVF file
- Click Next
- Select the storage type and datastore
- Click to choose the VM Network
- Choose the VM Network from the drop down menu
- Confirm the VM Network option and the proceed to the next step
- Review the selection and then proceed to finish the set up
- %3Cp%20class%3D%22MsoNormal%22%20style%3D%22margin%3A%200in%3B%22%3ENext%20we%20need%20to%20assign%20network%20resources%20which%20can%20be%20set%20up%20with%26nbsp%3BDHCP%2C%20but%20in%20this%20example%2C%20we%20will%20pick%20an%20IP%20address%20for%20this%20device.%3C/p%3E
- Select the Network option
- Click OK
- Enter the Gateway IP address and proceed
- Add the secondary DNS and then proceed
- Confirm the settings
- Restart the network service now
- Click OK to proceed to the next step
- We are now ready to turn on the Apstra service
- Confirm the AOS status as Start
- End
Click%20the%20option%20to%20deploy%20a%20VM%20from%20an%20OVA%20file
Click%20the%20option%20to%20deploy%20a%20VM%20from%20an%20OVA%20file
- %3Cp%3EIn%20this%20short%20walkthrough%2C%20we%5C%27re%20going%20to%20deploy%20Apstra%20starting%20with%20a%20VMware%20image%20or%20OVA%20.%20Here%20we%20have%20our%20VMware%20environment%20and%20we%5C%27re%20going%20to%20deploy%20a%20virtual%20machine%20from%20an%20OVA.%3C/p%3E
- Click%20the%20option%20to%20deploy%20a%20VM%20from%20an%20OVA%20file
- Click next to deploy the VM
- Enter a name for the Virtual machine
- Then%20we%20will%20drag%20and%20drop%20the%20OVF%20file
- Choose the OVF file
- Click Next
- Select the storage type and datastore
- Click to choose the VM Network
- Choose the VM Network from the drop down menu
- Confirm the VM Network option and the proceed to the next step
- Review the selection and then proceed to finish the set up
- %3Cp%20class%3D%22MsoNormal%22%20style%3D%22margin%3A%200in%3B%22%3ENext%20we%20need%20to%20assign%20network%20resources%20which%20can%20be%20set%20up%20with%26nbsp%3BDHCP%2C%20but%20in%20this%20example%2C%20we%20will%20pick%20an%20IP%20address%20for%20this%20device.%3C/p%3E
- Select the Network option
- Click OK
- Enter the Gateway IP address and proceed
- Add the secondary DNS and then proceed
- Confirm the settings
- Restart the network service now
- Click OK to proceed to the next step
- We are now ready to turn on the Apstra service
- Confirm the AOS status as Start
- End
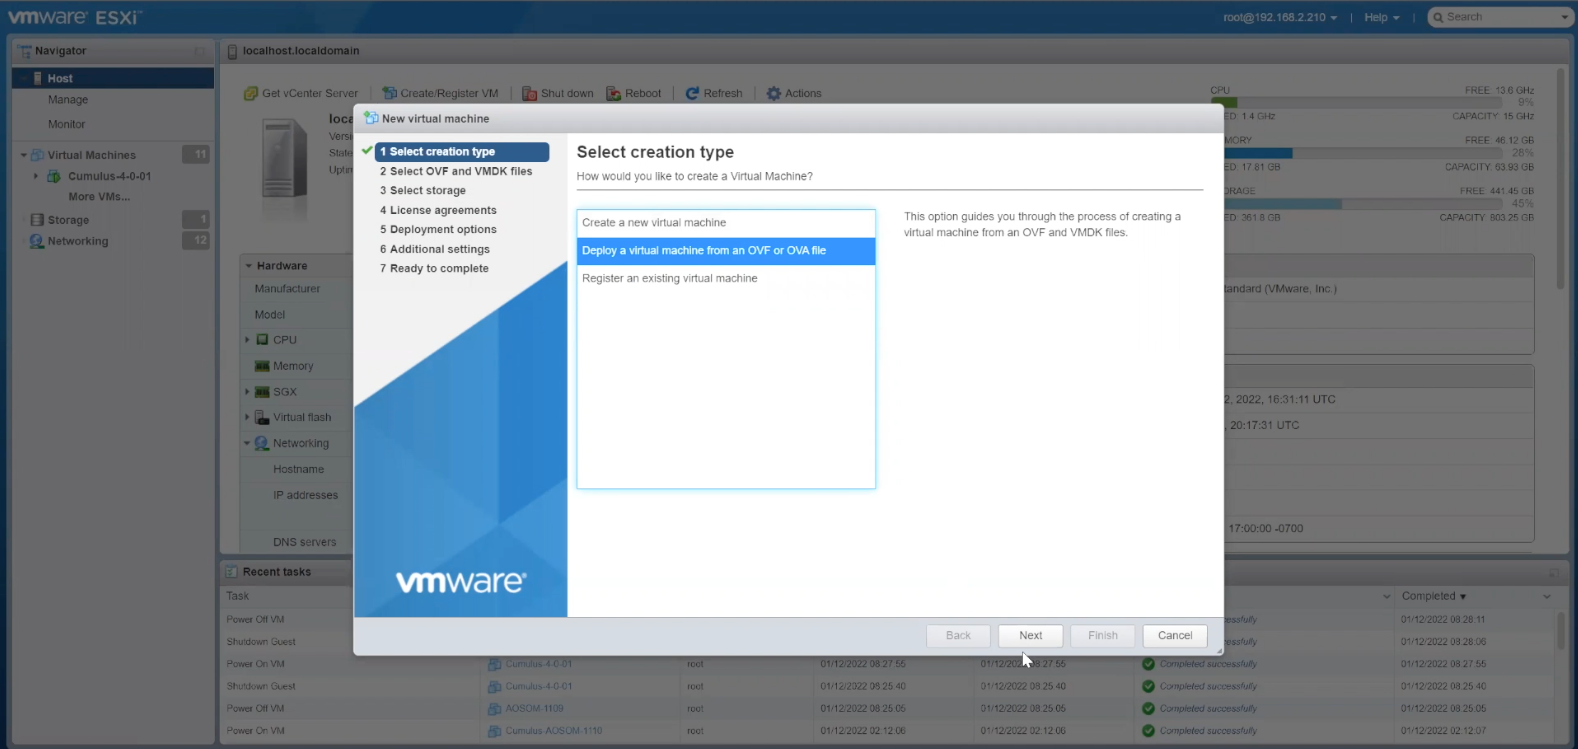
Click next to deploy the VM
- %3Cp%3EIn%20this%20short%20walkthrough%2C%20we%5C%27re%20going%20to%20deploy%20Apstra%20starting%20with%20a%20VMware%20image%20or%20OVA%20.%20Here%20we%20have%20our%20VMware%20environment%20and%20we%5C%27re%20going%20to%20deploy%20a%20virtual%20machine%20from%20an%20OVA.%3C/p%3E
- Click%20the%20option%20to%20deploy%20a%20VM%20from%20an%20OVA%20file
- Click next to deploy the VM
- Enter a name for the Virtual machine
- Then%20we%20will%20drag%20and%20drop%20the%20OVF%20file
- Choose the OVF file
- Click Next
- Select the storage type and datastore
- Click to choose the VM Network
- Choose the VM Network from the drop down menu
- Confirm the VM Network option and the proceed to the next step
- Review the selection and then proceed to finish the set up
- %3Cp%20class%3D%22MsoNormal%22%20style%3D%22margin%3A%200in%3B%22%3ENext%20we%20need%20to%20assign%20network%20resources%20which%20can%20be%20set%20up%20with%26nbsp%3BDHCP%2C%20but%20in%20this%20example%2C%20we%20will%20pick%20an%20IP%20address%20for%20this%20device.%3C/p%3E
- Select the Network option
- Click OK
- Enter the Gateway IP address and proceed
- Add the secondary DNS and then proceed
- Confirm the settings
- Restart the network service now
- Click OK to proceed to the next step
- We are now ready to turn on the Apstra service
- Confirm the AOS status as Start
- End
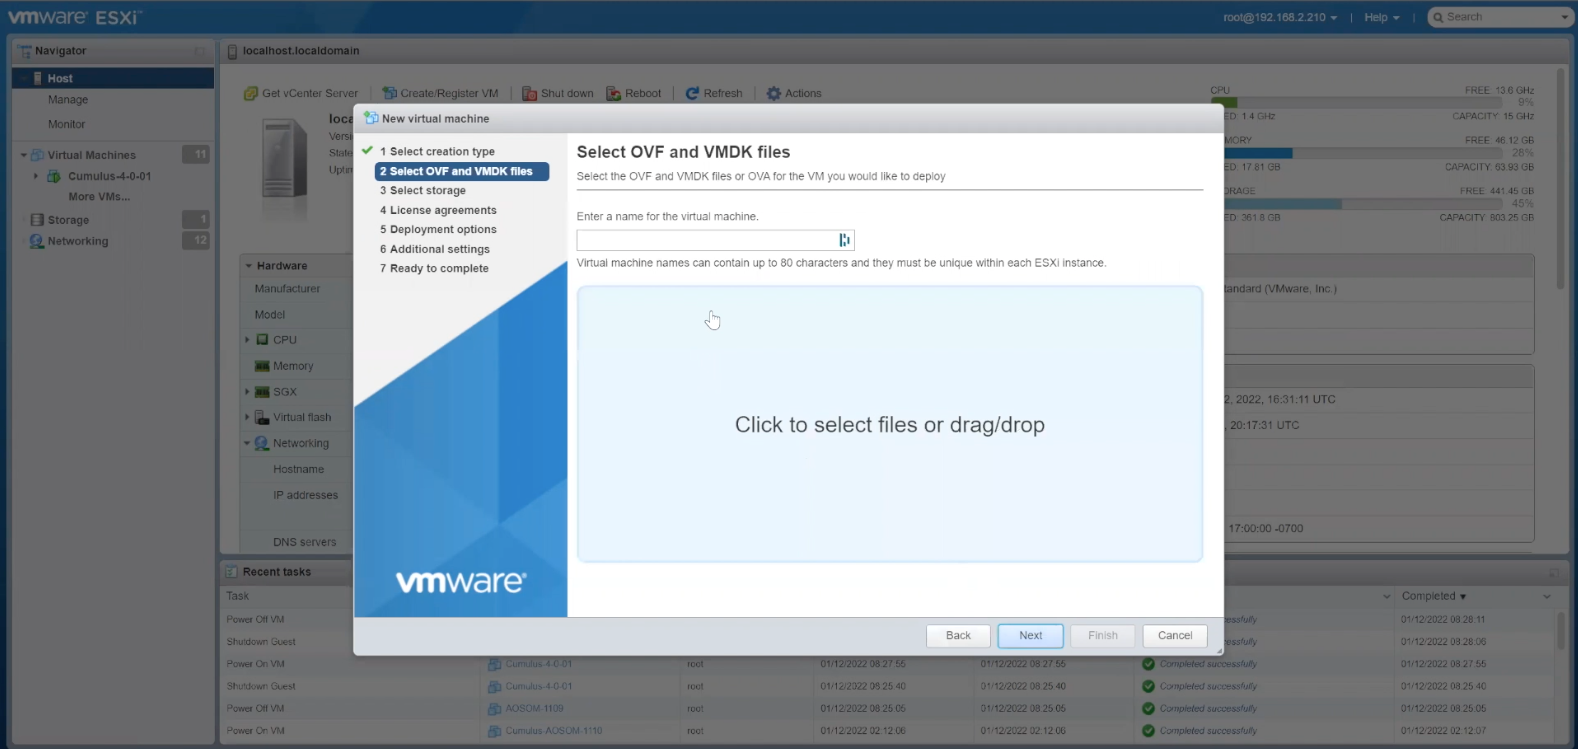
Enter a name for the Virtual machine
Preview
Write
Preview
Write
Preview
Write
Preview
Write\\\\\
Preview\\\\\
Write\\\\\
Preview\\\\\
Markdown\\\\\
WYSIWYG
\\\
Markdown
WYSIWYG
\<br>
\<br>
Markdown
WYSIWYG
<br>
<br>
Markdown
WYSIWYG
- %3Cp%3EIn%20this%20short%20walkthrough%2C%20we%5C%27re%20going%20to%20deploy%20Apstra%20starting%20with%20a%20VMware%20image%20or%20OVA%20.%20Here%20we%20have%20our%20VMware%20environment%20and%20we%5C%27re%20going%20to%20deploy%20a%20virtual%20machine%20from%20an%20OVA.%3C/p%3E
- Click%20the%20option%20to%20deploy%20a%20VM%20from%20an%20OVA%20file
- Click next to deploy the VM
- Enter a name for the Virtual machine
- Then%20we%20will%20drag%20and%20drop%20the%20OVF%20file
- Choose the OVF file
- Click Next
- Select the storage type and datastore
- Click to choose the VM Network
- Choose the VM Network from the drop down menu
- Confirm the VM Network option and the proceed to the next step
- Review the selection and then proceed to finish the set up
- %3Cp%20class%3D%22MsoNormal%22%20style%3D%22margin%3A%200in%3B%22%3ENext%20we%20need%20to%20assign%20network%20resources%20which%20can%20be%20set%20up%20with%26nbsp%3BDHCP%2C%20but%20in%20this%20example%2C%20we%20will%20pick%20an%20IP%20address%20for%20this%20device.%3C/p%3E
- Select the Network option
- Click OK
- Enter the Gateway IP address and proceed
- Add the secondary DNS and then proceed
- Confirm the settings
- Restart the network service now
- Click OK to proceed to the next step
- We are now ready to turn on the Apstra service
- Confirm the AOS status as Start
- End
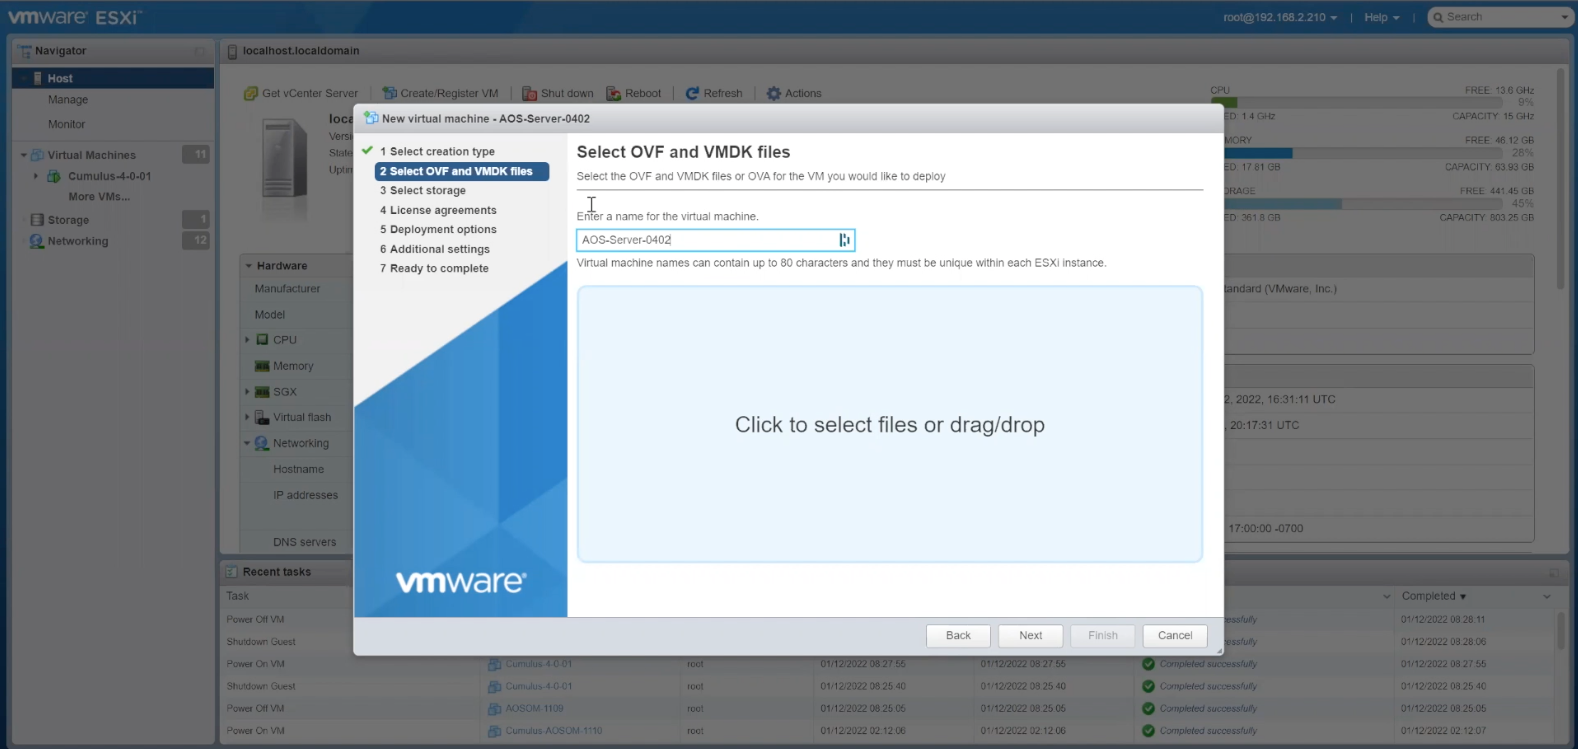
Then%20we%20will%20drag%20and%20drop%20the%20OVF%20file
Then%20we%20will%20drag%20and%20drop%20the%20OVF%20file
- %3Cp%3EIn%20this%20short%20walkthrough%2C%20we%5C%27re%20going%20to%20deploy%20Apstra%20starting%20with%20a%20VMware%20image%20or%20OVA%20.%20Here%20we%20have%20our%20VMware%20environment%20and%20we%5C%27re%20going%20to%20deploy%20a%20virtual%20machine%20from%20an%20OVA.%3C/p%3E
- Click%20the%20option%20to%20deploy%20a%20VM%20from%20an%20OVA%20file
- Click next to deploy the VM
- Enter a name for the Virtual machine
- Then%20we%20will%20drag%20and%20drop%20the%20OVF%20file
- Choose the OVF file
- Click Next
- Select the storage type and datastore
- Click to choose the VM Network
- Choose the VM Network from the drop down menu
- Confirm the VM Network option and the proceed to the next step
- Review the selection and then proceed to finish the set up
- %3Cp%20class%3D%22MsoNormal%22%20style%3D%22margin%3A%200in%3B%22%3ENext%20we%20need%20to%20assign%20network%20resources%20which%20can%20be%20set%20up%20with%26nbsp%3BDHCP%2C%20but%20in%20this%20example%2C%20we%20will%20pick%20an%20IP%20address%20for%20this%20device.%3C/p%3E
- Select the Network option
- Click OK
- Enter the Gateway IP address and proceed
- Add the secondary DNS and then proceed
- Confirm the settings
- Restart the network service now
- Click OK to proceed to the next step
- We are now ready to turn on the Apstra service
- Confirm the AOS status as Start
- End
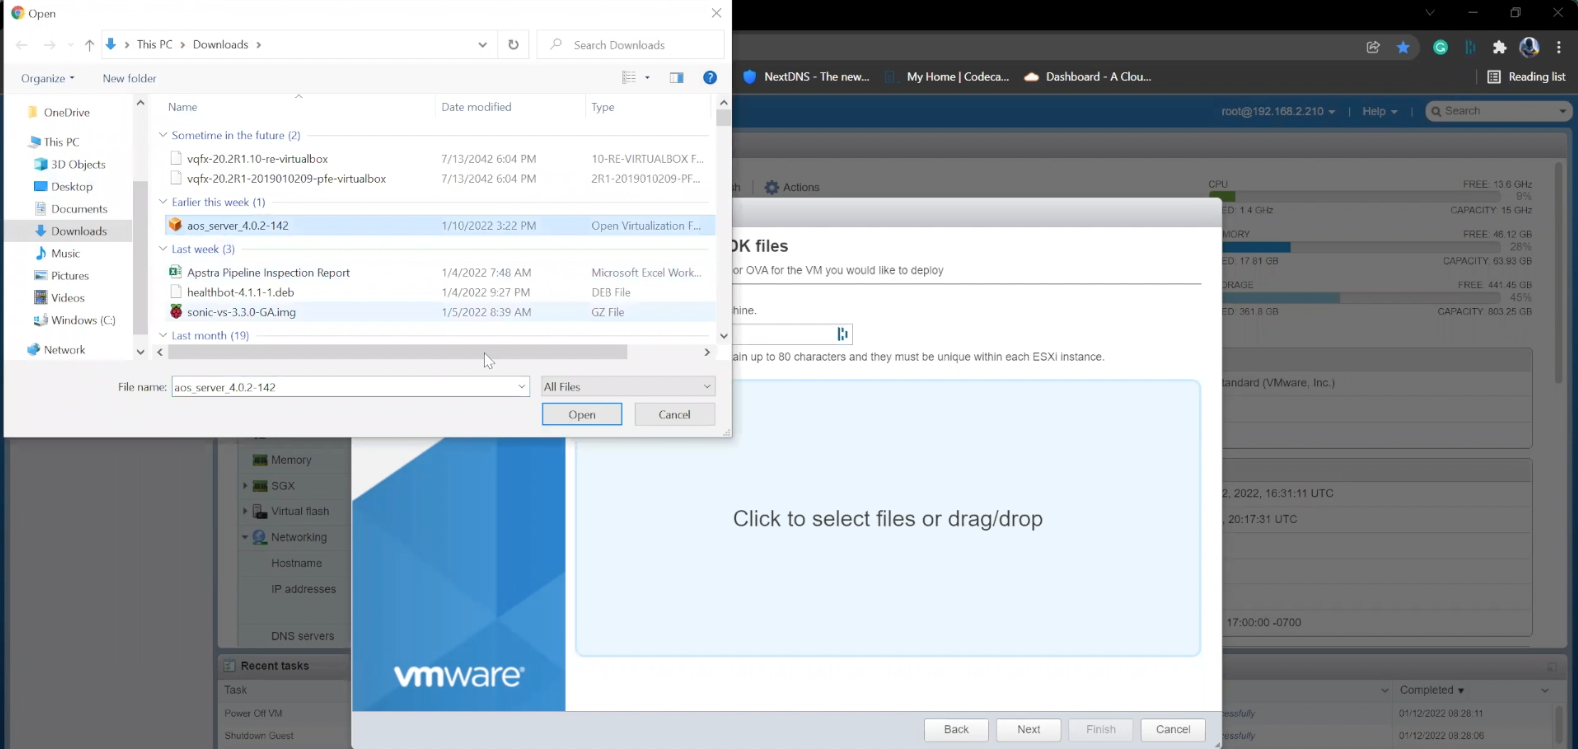
Choose the OVF file
- %3Cp%3EIn%20this%20short%20walkthrough%2C%20we%5C%27re%20going%20to%20deploy%20Apstra%20starting%20with%20a%20VMware%20image%20or%20OVA%20.%20Here%20we%20have%20our%20VMware%20environment%20and%20we%5C%27re%20going%20to%20deploy%20a%20virtual%20machine%20from%20an%20OVA.%3C/p%3E
- Click%20the%20option%20to%20deploy%20a%20VM%20from%20an%20OVA%20file
- Click next to deploy the VM
- Enter a name for the Virtual machine
- Then%20we%20will%20drag%20and%20drop%20the%20OVF%20file
- Choose the OVF file
- Click Next
- Select the storage type and datastore
- Click to choose the VM Network
- Choose the VM Network from the drop down menu
- Confirm the VM Network option and the proceed to the next step
- Review the selection and then proceed to finish the set up
- %3Cp%20class%3D%22MsoNormal%22%20style%3D%22margin%3A%200in%3B%22%3ENext%20we%20need%20to%20assign%20network%20resources%20which%20can%20be%20set%20up%20with%26nbsp%3BDHCP%2C%20but%20in%20this%20example%2C%20we%20will%20pick%20an%20IP%20address%20for%20this%20device.%3C/p%3E
- Select the Network option
- Click OK
- Enter the Gateway IP address and proceed
- Add the secondary DNS and then proceed
- Confirm the settings
- Restart the network service now
- Click OK to proceed to the next step
- We are now ready to turn on the Apstra service
- Confirm the AOS status as Start
- End
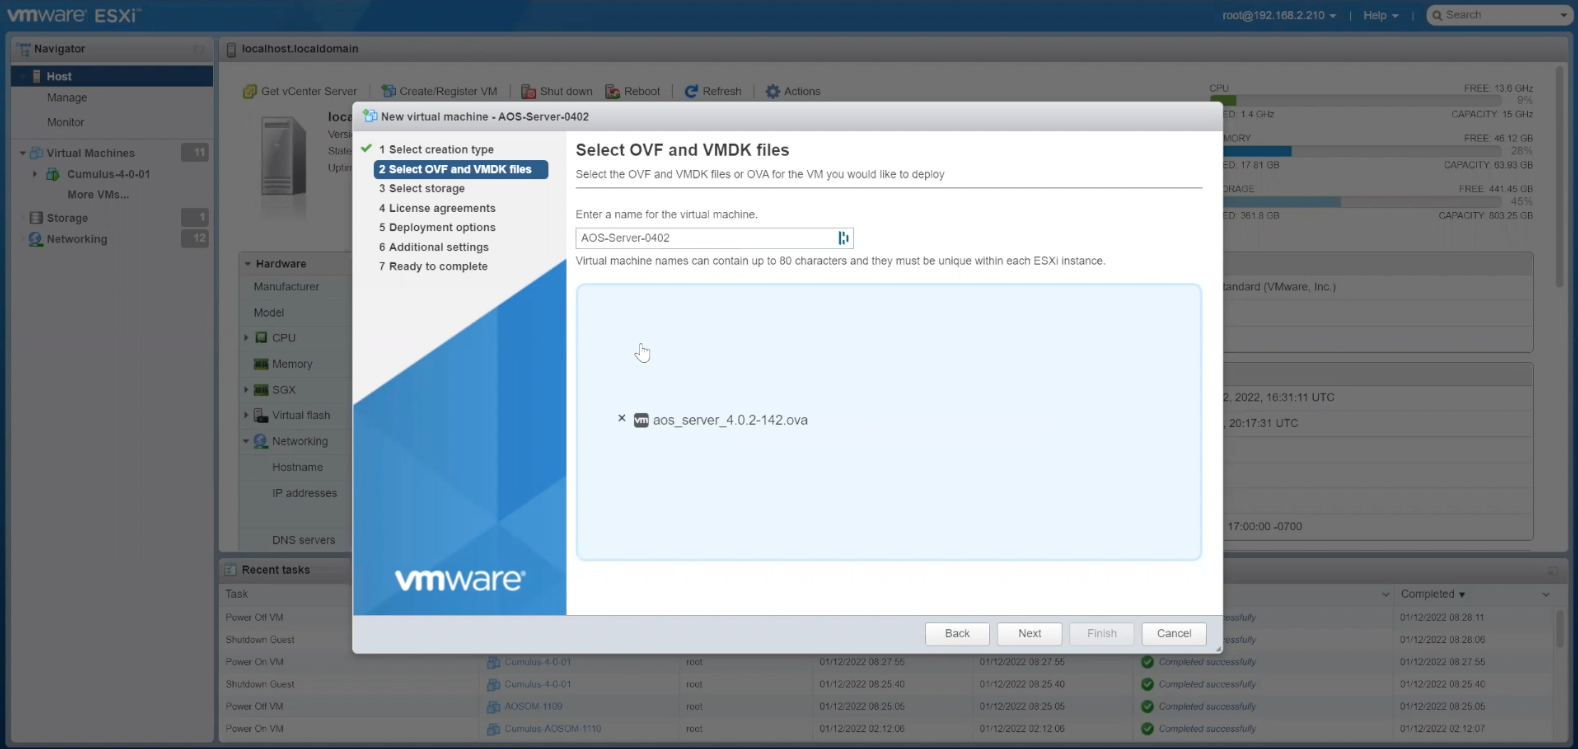
Click Next
- %3Cp%3EIn%20this%20short%20walkthrough%2C%20we%5C%27re%20going%20to%20deploy%20Apstra%20starting%20with%20a%20VMware%20image%20or%20OVA%20.%20Here%20we%20have%20our%20VMware%20environment%20and%20we%5C%27re%20going%20to%20deploy%20a%20virtual%20machine%20from%20an%20OVA.%3C/p%3E
- Click%20the%20option%20to%20deploy%20a%20VM%20from%20an%20OVA%20file
- Click next to deploy the VM
- Enter a name for the Virtual machine
- Then%20we%20will%20drag%20and%20drop%20the%20OVF%20file
- Choose the OVF file
- Click Next
- Select the storage type and datastore
- Click to choose the VM Network
- Choose the VM Network from the drop down menu
- Confirm the VM Network option and the proceed to the next step
- Review the selection and then proceed to finish the set up
- %3Cp%20class%3D%22MsoNormal%22%20style%3D%22margin%3A%200in%3B%22%3ENext%20we%20need%20to%20assign%20network%20resources%20which%20can%20be%20set%20up%20with%26nbsp%3BDHCP%2C%20but%20in%20this%20example%2C%20we%20will%20pick%20an%20IP%20address%20for%20this%20device.%3C/p%3E
- Select the Network option
- Click OK
- Enter the Gateway IP address and proceed
- Add the secondary DNS and then proceed
- Confirm the settings
- Restart the network service now
- Click OK to proceed to the next step
- We are now ready to turn on the Apstra service
- Confirm the AOS status as Start
- End
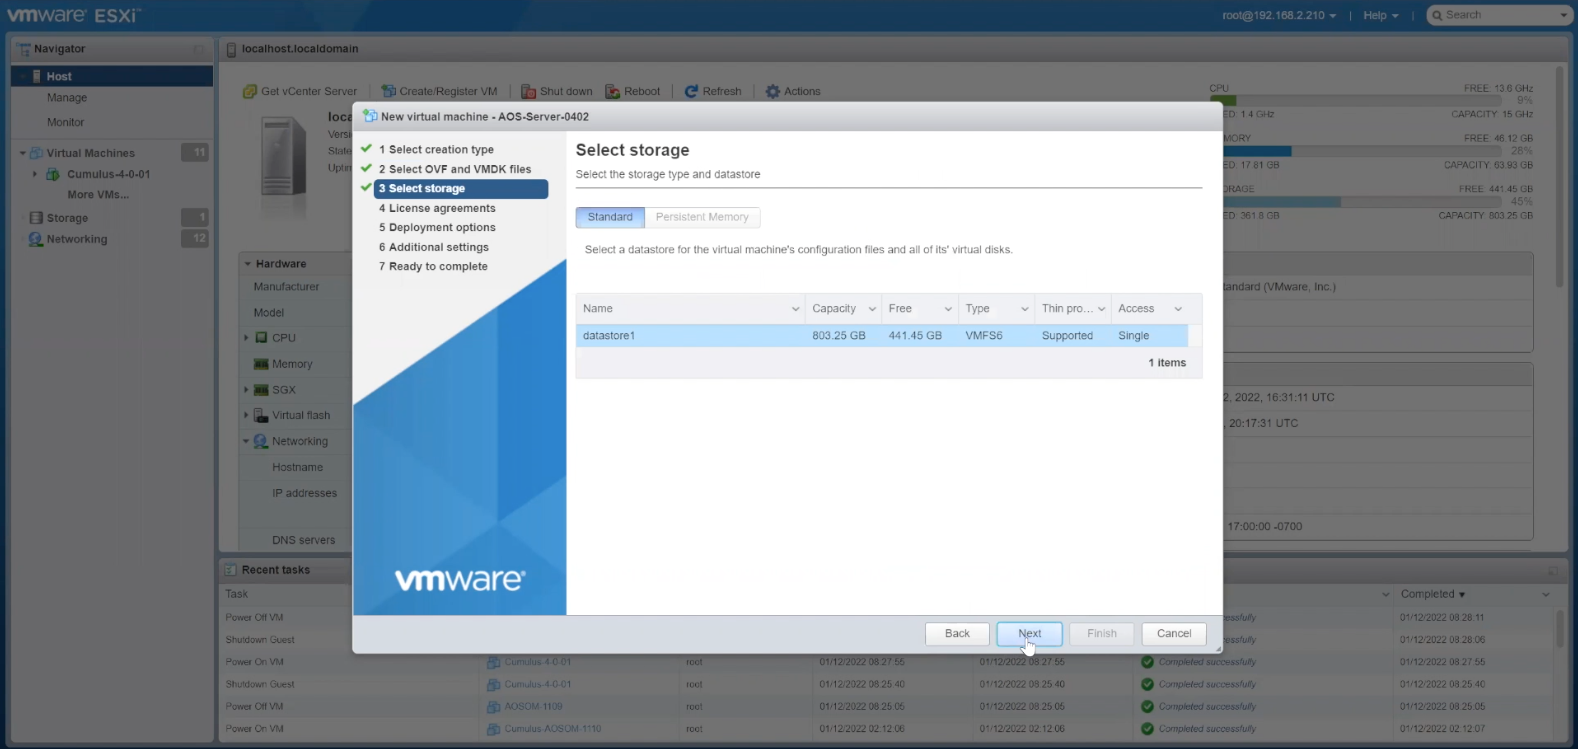
Select the storage type and datastore
- %3Cp%3EIn%20this%20short%20walkthrough%2C%20we%5C%27re%20going%20to%20deploy%20Apstra%20starting%20with%20a%20VMware%20image%20or%20OVA%20.%20Here%20we%20have%20our%20VMware%20environment%20and%20we%5C%27re%20going%20to%20deploy%20a%20virtual%20machine%20from%20an%20OVA.%3C/p%3E
- Click%20the%20option%20to%20deploy%20a%20VM%20from%20an%20OVA%20file
- Click next to deploy the VM
- Enter a name for the Virtual machine
- Then%20we%20will%20drag%20and%20drop%20the%20OVF%20file
- Choose the OVF file
- Click Next
- Select the storage type and datastore
- Click to choose the VM Network
- Choose the VM Network from the drop down menu
- Confirm the VM Network option and the proceed to the next step
- Review the selection and then proceed to finish the set up
- %3Cp%20class%3D%22MsoNormal%22%20style%3D%22margin%3A%200in%3B%22%3ENext%20we%20need%20to%20assign%20network%20resources%20which%20can%20be%20set%20up%20with%26nbsp%3BDHCP%2C%20but%20in%20this%20example%2C%20we%20will%20pick%20an%20IP%20address%20for%20this%20device.%3C/p%3E
- Select the Network option
- Click OK
- Enter the Gateway IP address and proceed
- Add the secondary DNS and then proceed
- Confirm the settings
- Restart the network service now
- Click OK to proceed to the next step
- We are now ready to turn on the Apstra service
- Confirm the AOS status as Start
- End
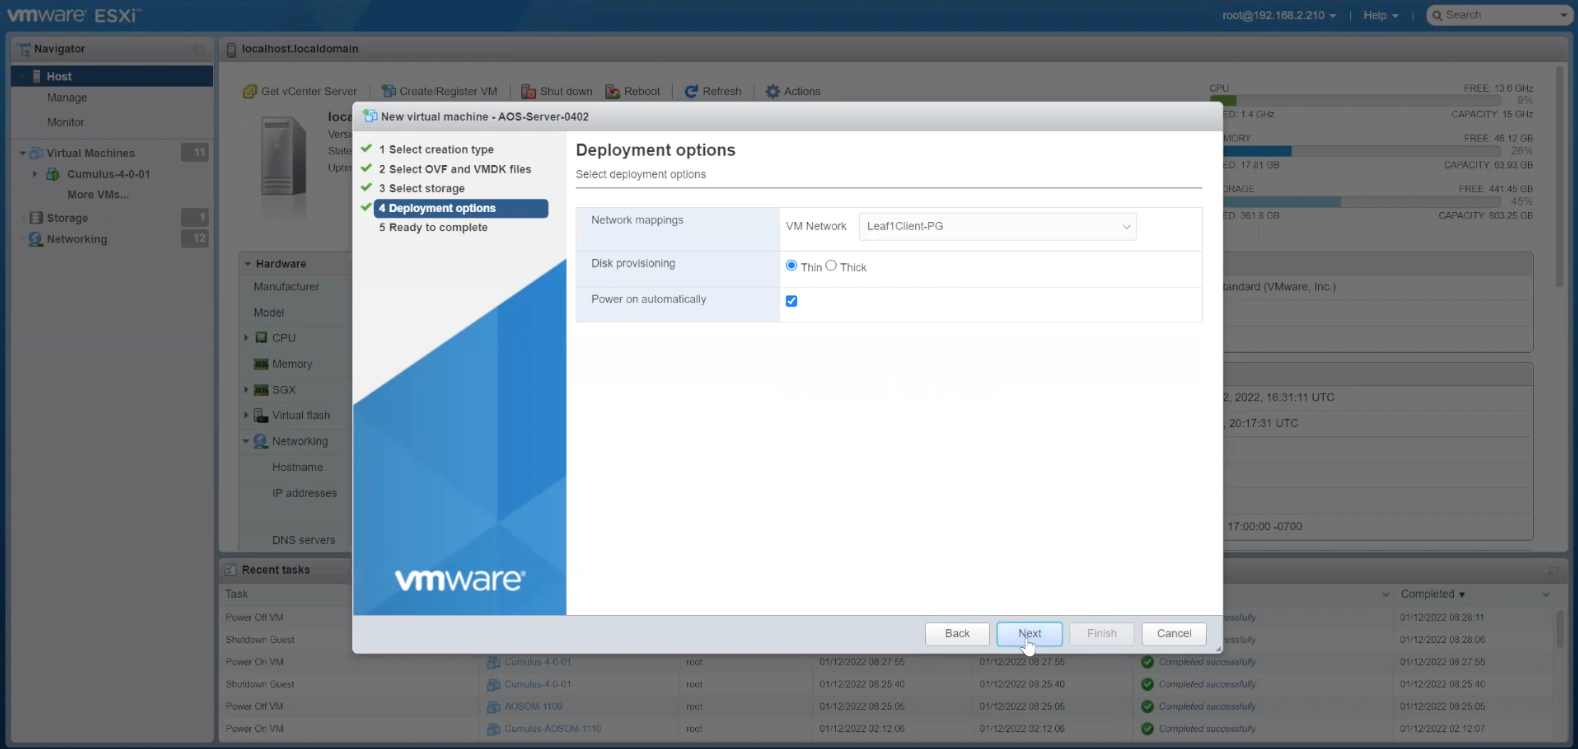
Click to choose the VM Network
- %3Cp%3EIn%20this%20short%20walkthrough%2C%20we%5C%27re%20going%20to%20deploy%20Apstra%20starting%20with%20a%20VMware%20image%20or%20OVA%20.%20Here%20we%20have%20our%20VMware%20environment%20and%20we%5C%27re%20going%20to%20deploy%20a%20virtual%20machine%20from%20an%20OVA.%3C/p%3E
- Click%20the%20option%20to%20deploy%20a%20VM%20from%20an%20OVA%20file
- Click next to deploy the VM
- Enter a name for the Virtual machine
- Then%20we%20will%20drag%20and%20drop%20the%20OVF%20file
- Choose the OVF file
- Click Next
- Select the storage type and datastore
- Click to choose the VM Network
- Choose the VM Network from the drop down menu
- Confirm the VM Network option and the proceed to the next step
- Review the selection and then proceed to finish the set up
- %3Cp%20class%3D%22MsoNormal%22%20style%3D%22margin%3A%200in%3B%22%3ENext%20we%20need%20to%20assign%20network%20resources%20which%20can%20be%20set%20up%20with%26nbsp%3BDHCP%2C%20but%20in%20this%20example%2C%20we%20will%20pick%20an%20IP%20address%20for%20this%20device.%3C/p%3E
- Select the Network option
- Click OK
- Enter the Gateway IP address and proceed
- Add the secondary DNS and then proceed
- Confirm the settings
- Restart the network service now
- Click OK to proceed to the next step
- We are now ready to turn on the Apstra service
- Confirm the AOS status as Start
- End
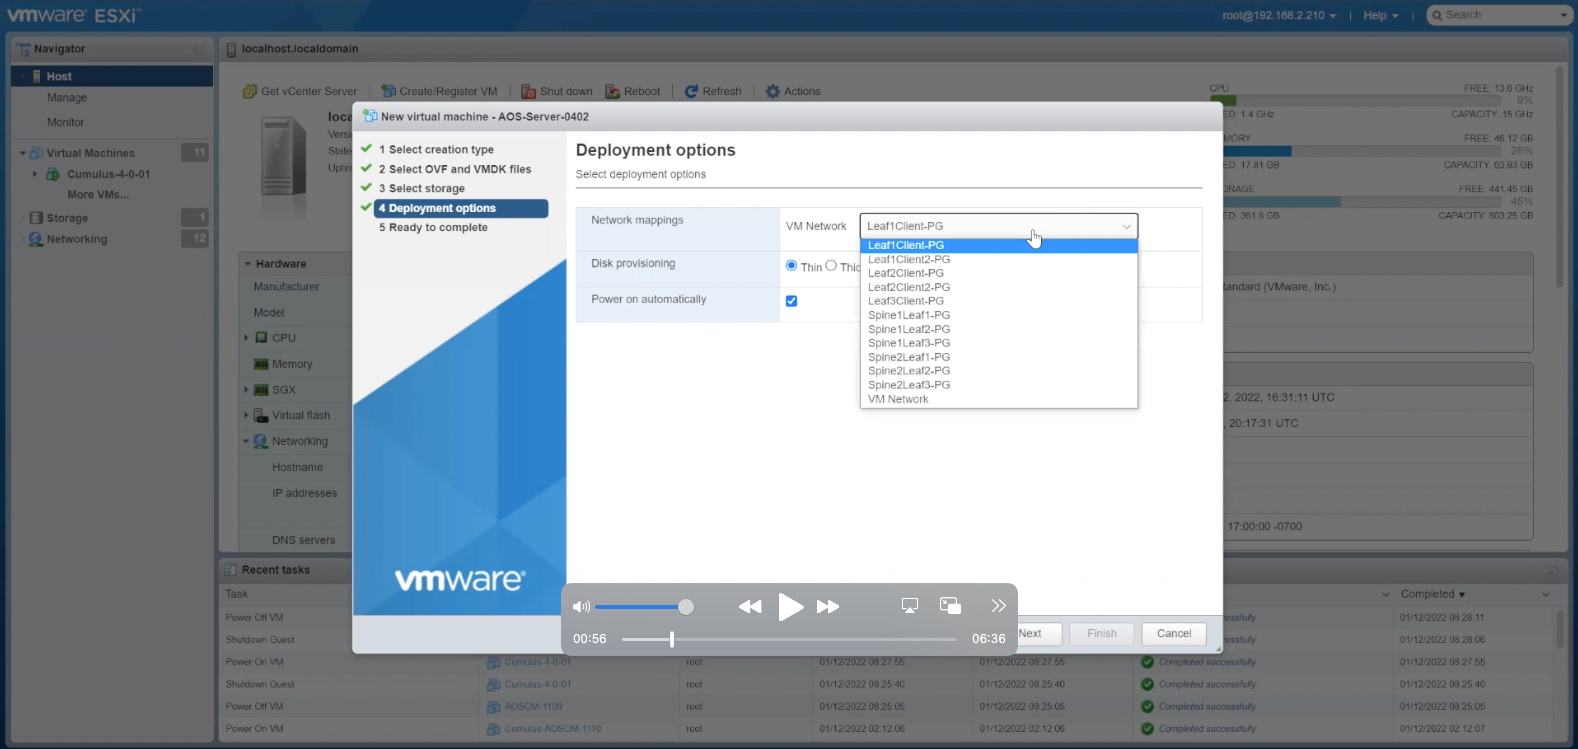
Choose the VM Network from the drop down menu
- %3Cp%3EIn%20this%20short%20walkthrough%2C%20we%5C%27re%20going%20to%20deploy%20Apstra%20starting%20with%20a%20VMware%20image%20or%20OVA%20.%20Here%20we%20have%20our%20VMware%20environment%20and%20we%5C%27re%20going%20to%20deploy%20a%20virtual%20machine%20from%20an%20OVA.%3C/p%3E
- Click%20the%20option%20to%20deploy%20a%20VM%20from%20an%20OVA%20file
- Click next to deploy the VM
- Enter a name for the Virtual machine
- Then%20we%20will%20drag%20and%20drop%20the%20OVF%20file
- Choose the OVF file
- Click Next
- Select the storage type and datastore
- Click to choose the VM Network
- Choose the VM Network from the drop down menu
- Confirm the VM Network option and the proceed to the next step
- Review the selection and then proceed to finish the set up
- %3Cp%20class%3D%22MsoNormal%22%20style%3D%22margin%3A%200in%3B%22%3ENext%20we%20need%20to%20assign%20network%20resources%20which%20can%20be%20set%20up%20with%26nbsp%3BDHCP%2C%20but%20in%20this%20example%2C%20we%20will%20pick%20an%20IP%20address%20for%20this%20device.%3C/p%3E
- Select the Network option
- Click OK
- Enter the Gateway IP address and proceed
- Add the secondary DNS and then proceed
- Confirm the settings
- Restart the network service now
- Click OK to proceed to the next step
- We are now ready to turn on the Apstra service
- Confirm the AOS status as Start
- End
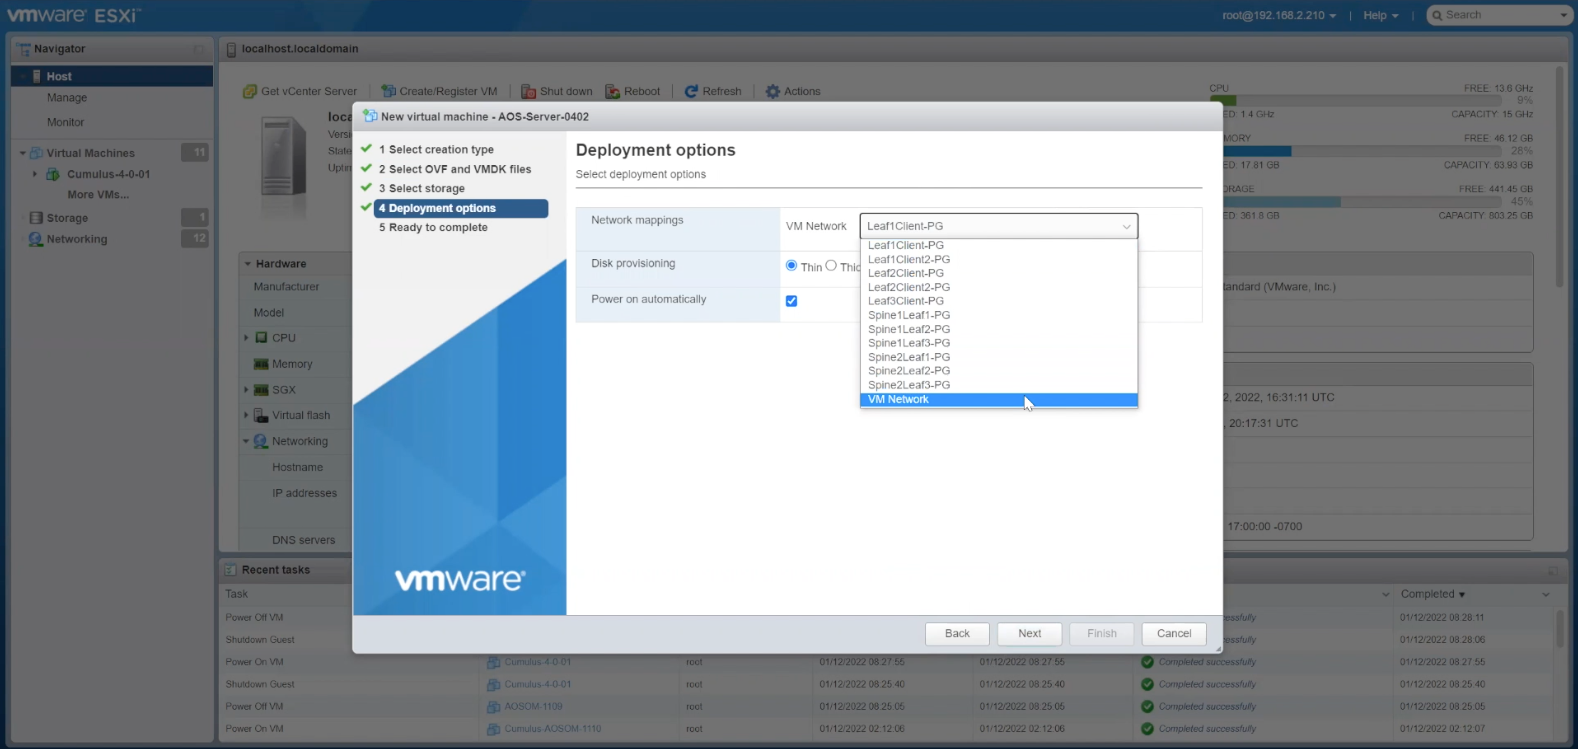
Confirm the VM Network option and the proceed to the next step
- %3Cp%3EIn%20this%20short%20walkthrough%2C%20we%5C%27re%20going%20to%20deploy%20Apstra%20starting%20with%20a%20VMware%20image%20or%20OVA%20.%20Here%20we%20have%20our%20VMware%20environment%20and%20we%5C%27re%20going%20to%20deploy%20a%20virtual%20machine%20from%20an%20OVA.%3C/p%3E
- Click%20the%20option%20to%20deploy%20a%20VM%20from%20an%20OVA%20file
- Click next to deploy the VM
- Enter a name for the Virtual machine
- Then%20we%20will%20drag%20and%20drop%20the%20OVF%20file
- Choose the OVF file
- Click Next
- Select the storage type and datastore
- Click to choose the VM Network
- Choose the VM Network from the drop down menu
- Confirm the VM Network option and the proceed to the next step
- Review the selection and then proceed to finish the set up
- %3Cp%20class%3D%22MsoNormal%22%20style%3D%22margin%3A%200in%3B%22%3ENext%20we%20need%20to%20assign%20network%20resources%20which%20can%20be%20set%20up%20with%26nbsp%3BDHCP%2C%20but%20in%20this%20example%2C%20we%20will%20pick%20an%20IP%20address%20for%20this%20device.%3C/p%3E
- Select the Network option
- Click OK
- Enter the Gateway IP address and proceed
- Add the secondary DNS and then proceed
- Confirm the settings
- Restart the network service now
- Click OK to proceed to the next step
- We are now ready to turn on the Apstra service
- Confirm the AOS status as Start
- End
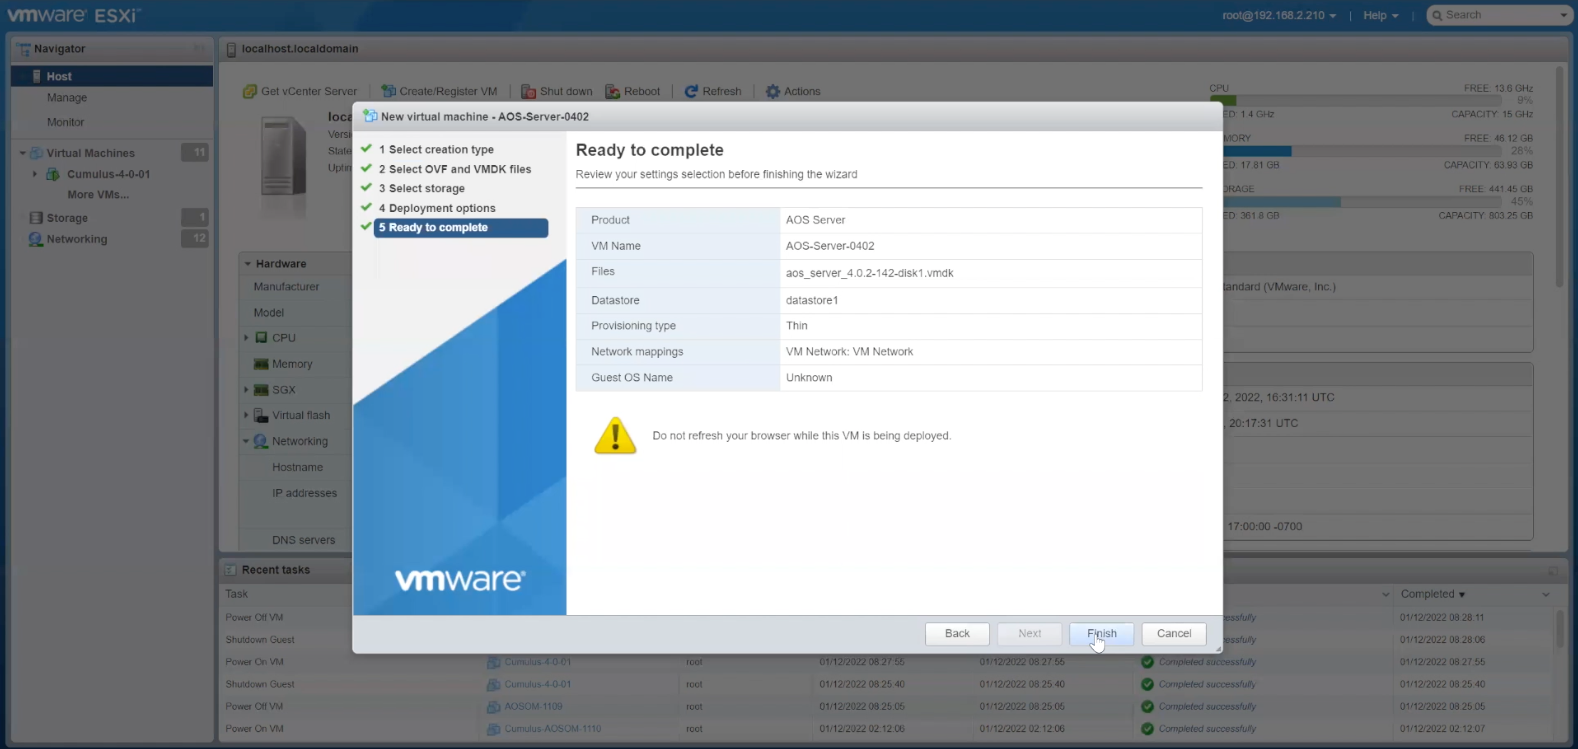
Review the selection and then proceed to finish the set up
Preview
Write
Preview
Write
Preview
Write
Preview
Write
Preview
Write
Preview
Write
Preview
Write
Preview
Write
Preview
Write
Preview
Write
Preview
Write
Preview
Write
Preview
Write
Preview
Write
Preview
Write
Preview
Markdown
WYSIWYG
\\\\\\\\\\\\\\\\\\\\\\\\\\\\\\\\\\\\\\\\\\\\\\\\\\\\\\\\\\\\\\\\\\\\\\\\\\\\\\\\\\\\\\\\\\\\\\\\\\\\\\\\\\\\\\\\\\\\\\\\\\\\\\\\\\\\\\\\\\\\\\\\\\\\\\\\\\\\\\\\\\\\\\\\\\\\\\\\\\\\\\\\\\\\\\\\\\\\\\\\\\\\\\\\\\\\\\\\\\\\\\\\\\\\\\\\\\\\\\\\\\\\\\\\\\\\\\\\\\\\\\\\\\\\\\\\\\\\\\\\\\\\\\\\\\\\\\\\\\\\\\\\\\\\\\\\\\\\\\\\\\\\\\\\\\\\\\\\\\\\\\\\\\\\\\\\\\
\\\\\\\\\\\\\\\\\\\\\\\\\\\\\\\\\\\\\\\\\\\\\\\\\\\\\\\\\\\\\\\\\\\\\\\\\\\\\\\\\\\\\\\\\\\\\\\\\\\\\\\\\\\\\\\\\\\\\\\\\\\\\\\\\\\\\\\\\\\\\\\\\\\\\\\\\\\\\\\\\\\\\\\\\\\\\\\\\\\\\\\\\\\\\\\\\\\\\\\\\\\\\\\\\\\\\\\\\\\\\\\\\\\\\\\\\\\\\\\\\\\\\\\\\\\\\\\\\\\\\\\\\\\\\\\\\\\\\\\\\\\\\\\\\\\\\\\\\\\\\\\\\\\\\\\\\\\\\\\\\\\\\\\\\\\\\\\\\\\\\\\\\\\\\\\\\\
Markdown
WYSIWYG
\\\\\\\\\\\\\\\\\\\\\\\\\\\\\\\\\\\\\\\\\\\\\\\\\\\\\\\\\\\\\\\\\\\\\\\\\\\\\\\\\\\\\\\\\\\\\\\\\\\\\\\\\\\\\\\\\\\\\\\\\\\\\\\\\\\\\\\\\\\\\\\\\\\\\\\\\\\\\\\\\\\\\\\\\\\\\\\\\\\\\\\\\\\\\\\\\\\\\\\\\\\\\\\\\\\\\\\\\\\\\\\\\\\\\\\\\\\<br>
\\\\\\\\\\\\\\\\\\\\\\\\\\\\\\\\\\\\\\\\\\\\\\\\\\\\\\\\\\\\\\\\\\\\\\\\\\\\\\\\\\\\\\\\\\\\\\\\\\\\\\\\\\\\\\\\\\\\\\\\\\\\\\\\\\\\\\\\\\\\\\\\\\\\\\\\\\\\\\\\\\\\\\\\\\\\\\\\\\\\\\\\\\\\\\\\\\\\\\\\\\\\\\\\\\\\\\\\\\\\\\\\\\\\\\\\\\\<br>
Markdown
WYSIWYG
\\\\\\\\\\\\\\\\\\\\\\\\\\\\\\\\\\\\\\\\\\\\\\\\\\\\\\\\\\\\\\\\\\\\\\\\\\\\\\\\\\\\\\\\\\\\\\\\\\\\\\\\\\\\\\\\\\\\\\\\\\\\\\\\\\\\\\\\\\\\\\\\\\\\\\\\\\\\<br>
\\\\\\\\\\\\\\\\\\\\\\\\\\\\\\\\\\\\\\\\\\\\\\\\\\\\\\\\\\\\\\\\\\\\\\\\\\\\\\\\\\\\\\\\\\\\\\\\\\\\\\\\\\\\\\\\\\\\\\\\\\\\\\\\\\\\\\\\\\\\\\\\\\\\\\\\\\\\<br>
Markdown
WYSIWYG
\\\\\\\\\\\\\\\\\\\\\\\\\\\\\\\\\\\\\\\\\\\\\\\\\\\\\\\\\\\\\\\\\\\\\\\\\\\\\\\\\\\\\\\\\\\\\\\\\\\\\\\\
\\\\\\\\\\\\\\\\\\\\\\\\\\\\\\\\\\\\\\\\\\\\\\\\\\\\\\\\\\\\\\\\\\\\\\\\\\\\\\\\\\\\\\\\\\\\\\\\\\\\\\\\
Markdown
WYSIWYG
\\\\\\\\\\\\\\\\\\\\\\\\\\\\\\\\\\\\\\\\\\\\\\\\\\\\\\\\\\\\\\\\\\\\\
\\\\\\\\\\\\\\\\\\\\\\\\\\\\\\\\\\\\\\\\\\\\\\\\\\\\\\\\\\\\\\\\\\\\\
Markdown
WYSIWYG
\\\\\\\\\\\\\\\\\\\\\\\\\\\\\\\\\\\\\\\\\\\\\<br>
\\\\\\\\\\\\\\\\\\\\\\\\\\\\\\\\\\\\\\\\\\\\\<br>
Markdown
WYSIWYG
\\\\\\\\\\\\\\\\\\\\\\\\\\\\\\
\\\\\\\\\\\\\\\\\\\\\\\\\\\\\\
Markdown
WYSIWYG
\\\\\\\\\\\\\\\\\\\<br>
\\\\\\\\\\\\\\\\\\\<br>
Markdown
WYSIWYG
\\\\\\\\\\\\<br>
\\\\\\\\\\\\<br>
Markdown
WYSIWYG
\\\\\\\\
\\\\\\\\
Markdown
WYSIWYG
\\\\\
\\\\\
Markdown
WYSIWYG
\\\
\\\
Markdown
WYSIWYG
\<br>
\<br>
Markdown
WYSIWYG
<br>
<br>
Markdown
WYSIWYG
- %3Cp%3EIn%20this%20short%20walkthrough%2C%20we%5C%27re%20going%20to%20deploy%20Apstra%20starting%20with%20a%20VMware%20image%20or%20OVA%20.%20Here%20we%20have%20our%20VMware%20environment%20and%20we%5C%27re%20going%20to%20deploy%20a%20virtual%20machine%20from%20an%20OVA.%3C/p%3E
- Click%20the%20option%20to%20deploy%20a%20VM%20from%20an%20OVA%20file
- Click next to deploy the VM
- Enter a name for the Virtual machine
- Then%20we%20will%20drag%20and%20drop%20the%20OVF%20file
- Choose the OVF file
- Click Next
- Select the storage type and datastore
- Click to choose the VM Network
- Choose the VM Network from the drop down menu
- Confirm the VM Network option and the proceed to the next step
- Review the selection and then proceed to finish the set up
- %3Cp%20class%3D%22MsoNormal%22%20style%3D%22margin%3A%200in%3B%22%3ENext%20we%20need%20to%20assign%20network%20resources%20which%20can%20be%20set%20up%20with%26nbsp%3BDHCP%2C%20but%20in%20this%20example%2C%20we%20will%20pick%20an%20IP%20address%20for%20this%20device.%3C/p%3E
- Select the Network option
- Click OK
- Enter the Gateway IP address and proceed
- Add the secondary DNS and then proceed
- Confirm the settings
- Restart the network service now
- Click OK to proceed to the next step
- We are now ready to turn on the Apstra service
- Confirm the AOS status as Start
- End
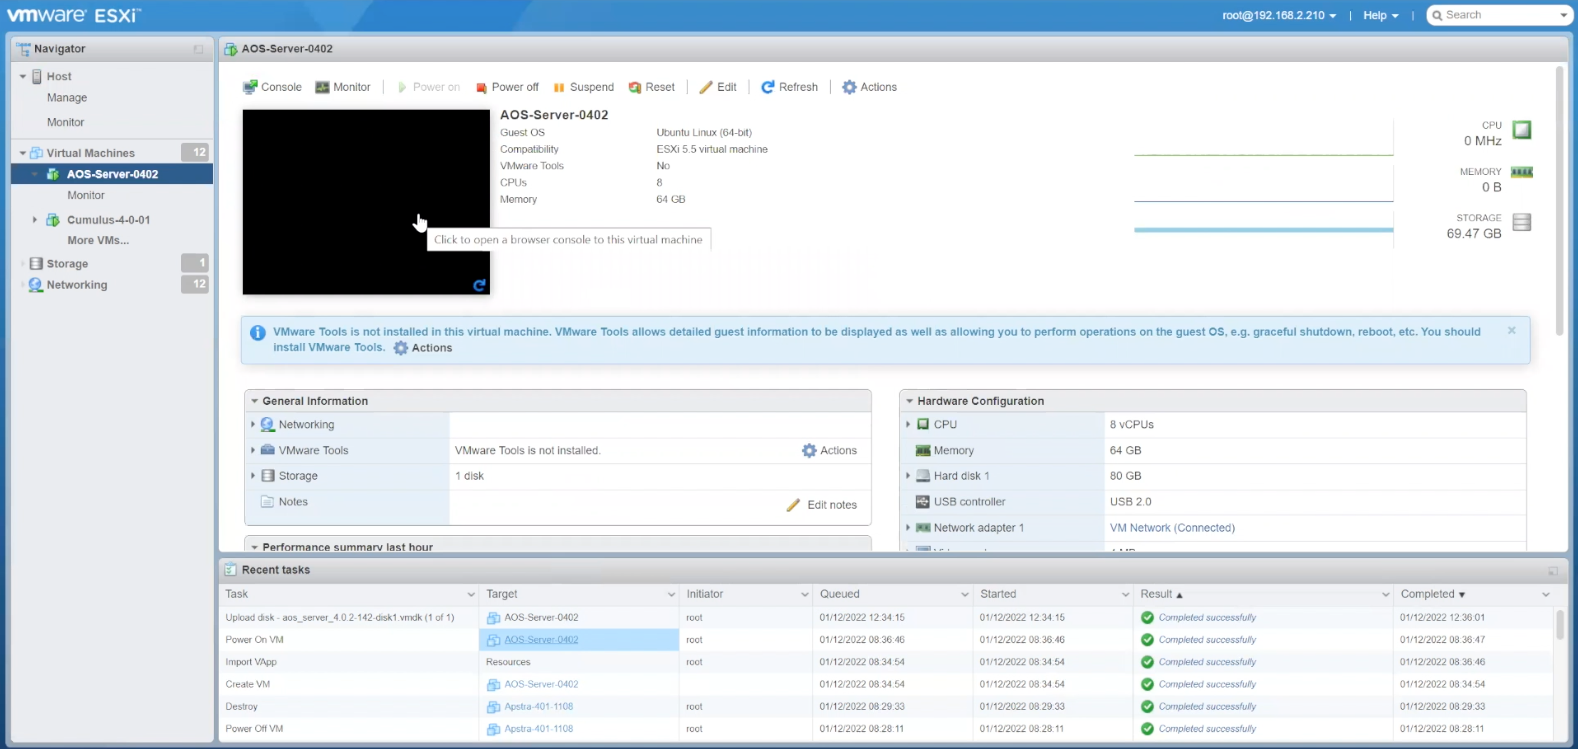
%3Cp%20class%3D%22MsoNormal%22%20style%3D%22margin%3A%200in%3B%22%3ENext%20we%20need%20to%20assign%20network%20resources%20which%20can%20be%20set%20up%20with%26nbsp%3BDHCP%2C%20but%20in%20this%20example%2C%20we%20will%20pick%20an%20IP%20address%20for%20this%20device.%3C/p%3E
%3Cp%20class%3D%22MsoNormal%22%20style%3D%22margin%3A%200in%3B%22%3ENext%20we%20need%20to%20assign%20network%20resources%20which%20can%20be%20set%20up%20with%26nbsp%3BDHCP%2C%20but%20in%20this%20example%2C%20we%20will%20pick%20an%20IP%20address%20for%20this%20device.%3C/p%3E
- %3Cp%3EIn%20this%20short%20walkthrough%2C%20we%5C%27re%20going%20to%20deploy%20Apstra%20starting%20with%20a%20VMware%20image%20or%20OVA%20.%20Here%20we%20have%20our%20VMware%20environment%20and%20we%5C%27re%20going%20to%20deploy%20a%20virtual%20machine%20from%20an%20OVA.%3C/p%3E
- Click%20the%20option%20to%20deploy%20a%20VM%20from%20an%20OVA%20file
- Click next to deploy the VM
- Enter a name for the Virtual machine
- Then%20we%20will%20drag%20and%20drop%20the%20OVF%20file
- Choose the OVF file
- Click Next
- Select the storage type and datastore
- Click to choose the VM Network
- Choose the VM Network from the drop down menu
- Confirm the VM Network option and the proceed to the next step
- Review the selection and then proceed to finish the set up
- %3Cp%20class%3D%22MsoNormal%22%20style%3D%22margin%3A%200in%3B%22%3ENext%20we%20need%20to%20assign%20network%20resources%20which%20can%20be%20set%20up%20with%26nbsp%3BDHCP%2C%20but%20in%20this%20example%2C%20we%20will%20pick%20an%20IP%20address%20for%20this%20device.%3C/p%3E
- Select the Network option
- Click OK
- Enter the Gateway IP address and proceed
- Add the secondary DNS and then proceed
- Confirm the settings
- Restart the network service now
- Click OK to proceed to the next step
- We are now ready to turn on the Apstra service
- Confirm the AOS status as Start
- End
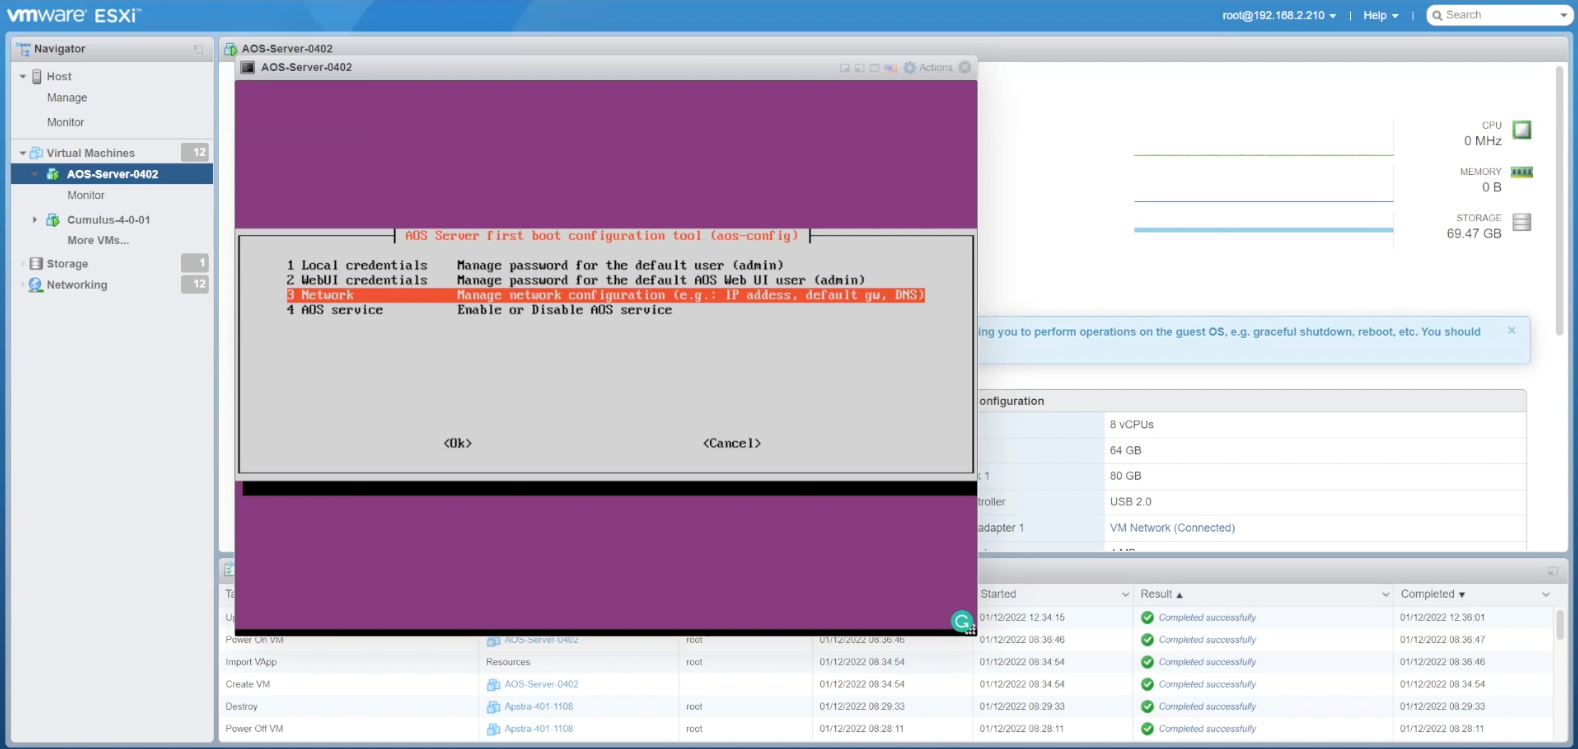
Select the Network option
- %3Cp%3EIn%20this%20short%20walkthrough%2C%20we%5C%27re%20going%20to%20deploy%20Apstra%20starting%20with%20a%20VMware%20image%20or%20OVA%20.%20Here%20we%20have%20our%20VMware%20environment%20and%20we%5C%27re%20going%20to%20deploy%20a%20virtual%20machine%20from%20an%20OVA.%3C/p%3E
- Click%20the%20option%20to%20deploy%20a%20VM%20from%20an%20OVA%20file
- Click next to deploy the VM
- Enter a name for the Virtual machine
- Then%20we%20will%20drag%20and%20drop%20the%20OVF%20file
- Choose the OVF file
- Click Next
- Select the storage type and datastore
- Click to choose the VM Network
- Choose the VM Network from the drop down menu
- Confirm the VM Network option and the proceed to the next step
- Review the selection and then proceed to finish the set up
- %3Cp%20class%3D%22MsoNormal%22%20style%3D%22margin%3A%200in%3B%22%3ENext%20we%20need%20to%20assign%20network%20resources%20which%20can%20be%20set%20up%20with%26nbsp%3BDHCP%2C%20but%20in%20this%20example%2C%20we%20will%20pick%20an%20IP%20address%20for%20this%20device.%3C/p%3E
- Select the Network option
- Click OK
- Enter the Gateway IP address and proceed
- Add the secondary DNS and then proceed
- Confirm the settings
- Restart the network service now
- Click OK to proceed to the next step
- We are now ready to turn on the Apstra service
- Confirm the AOS status as Start
- End
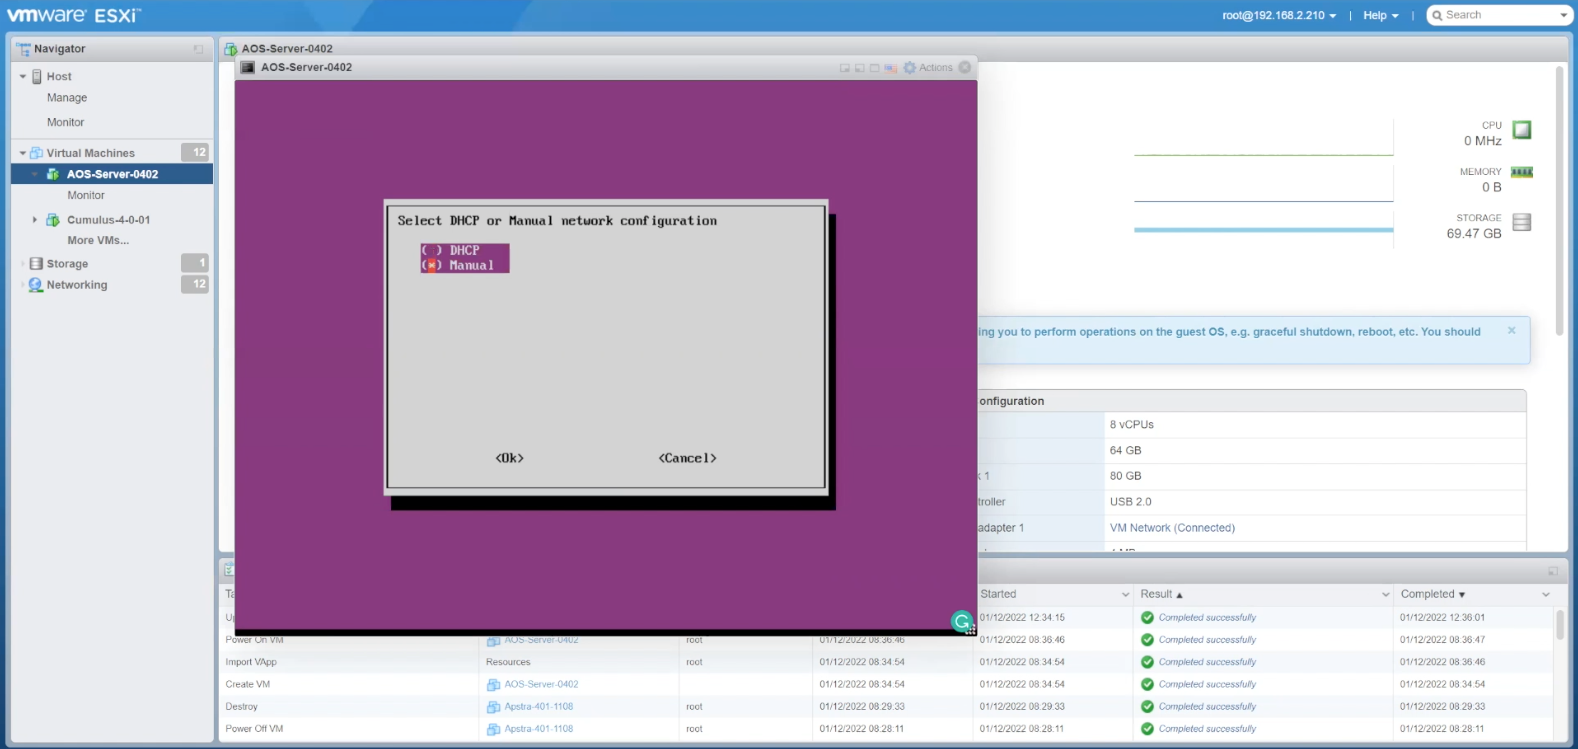
Click OK
- %3Cp%3EIn%20this%20short%20walkthrough%2C%20we%5C%27re%20going%20to%20deploy%20Apstra%20starting%20with%20a%20VMware%20image%20or%20OVA%20.%20Here%20we%20have%20our%20VMware%20environment%20and%20we%5C%27re%20going%20to%20deploy%20a%20virtual%20machine%20from%20an%20OVA.%3C/p%3E
- Click%20the%20option%20to%20deploy%20a%20VM%20from%20an%20OVA%20file
- Click next to deploy the VM
- Enter a name for the Virtual machine
- Then%20we%20will%20drag%20and%20drop%20the%20OVF%20file
- Choose the OVF file
- Click Next
- Select the storage type and datastore
- Click to choose the VM Network
- Choose the VM Network from the drop down menu
- Confirm the VM Network option and the proceed to the next step
- Review the selection and then proceed to finish the set up
- %3Cp%20class%3D%22MsoNormal%22%20style%3D%22margin%3A%200in%3B%22%3ENext%20we%20need%20to%20assign%20network%20resources%20which%20can%20be%20set%20up%20with%26nbsp%3BDHCP%2C%20but%20in%20this%20example%2C%20we%20will%20pick%20an%20IP%20address%20for%20this%20device.%3C/p%3E
- Select the Network option
- Click OK
- Enter the Gateway IP address and proceed
- Add the secondary DNS and then proceed
- Confirm the settings
- Restart the network service now
- Click OK to proceed to the next step
- We are now ready to turn on the Apstra service
- Confirm the AOS status as Start
- End
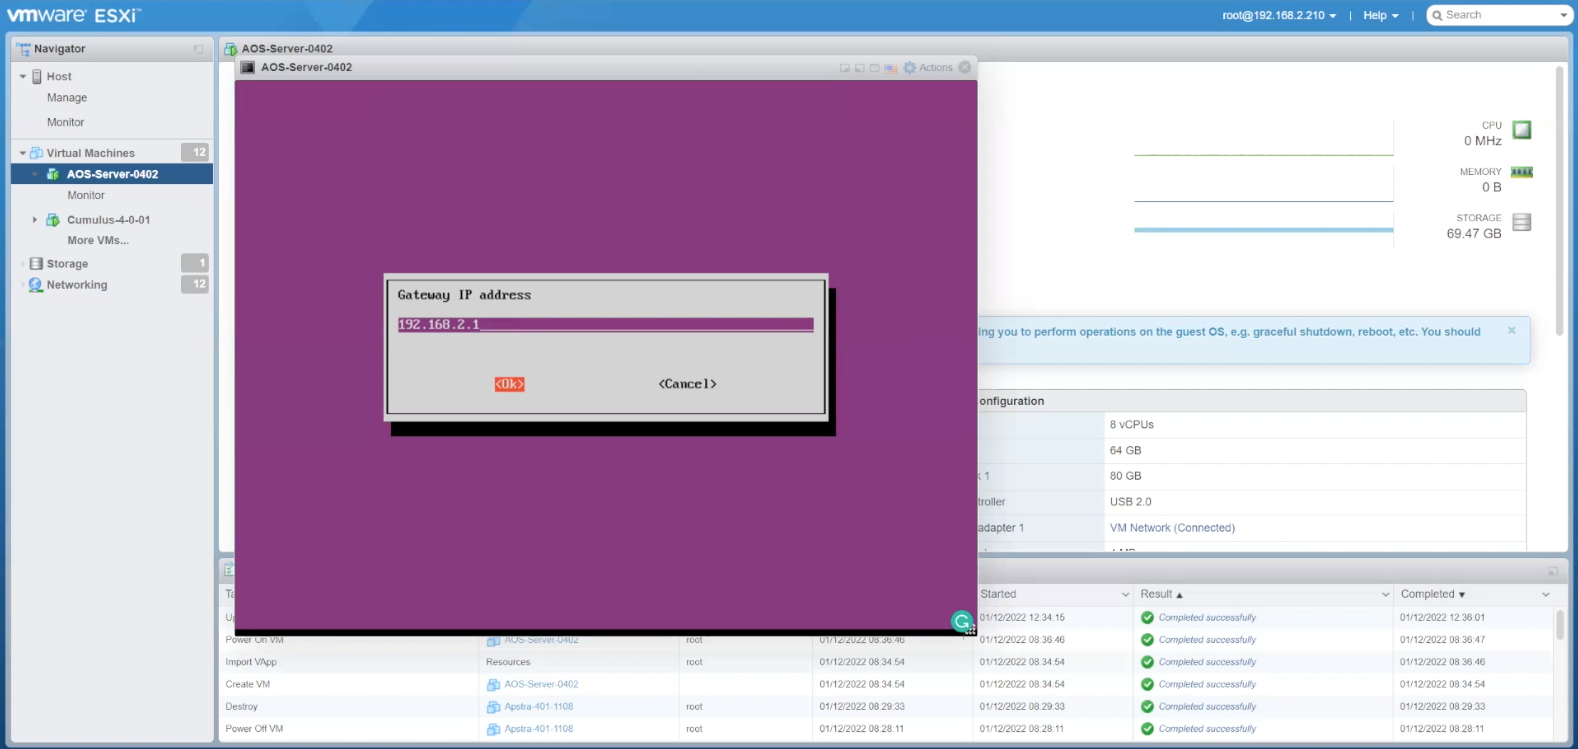
Enter the Gateway IP address and proceed
- %3Cp%3EIn%20this%20short%20walkthrough%2C%20we%5C%27re%20going%20to%20deploy%20Apstra%20starting%20with%20a%20VMware%20image%20or%20OVA%20.%20Here%20we%20have%20our%20VMware%20environment%20and%20we%5C%27re%20going%20to%20deploy%20a%20virtual%20machine%20from%20an%20OVA.%3C/p%3E
- Click%20the%20option%20to%20deploy%20a%20VM%20from%20an%20OVA%20file
- Click next to deploy the VM
- Enter a name for the Virtual machine
- Then%20we%20will%20drag%20and%20drop%20the%20OVF%20file
- Choose the OVF file
- Click Next
- Select the storage type and datastore
- Click to choose the VM Network
- Choose the VM Network from the drop down menu
- Confirm the VM Network option and the proceed to the next step
- Review the selection and then proceed to finish the set up
- %3Cp%20class%3D%22MsoNormal%22%20style%3D%22margin%3A%200in%3B%22%3ENext%20we%20need%20to%20assign%20network%20resources%20which%20can%20be%20set%20up%20with%26nbsp%3BDHCP%2C%20but%20in%20this%20example%2C%20we%20will%20pick%20an%20IP%20address%20for%20this%20device.%3C/p%3E
- Select the Network option
- Click OK
- Enter the Gateway IP address and proceed
- Add the secondary DNS and then proceed
- Confirm the settings
- Restart the network service now
- Click OK to proceed to the next step
- We are now ready to turn on the Apstra service
- Confirm the AOS status as Start
- End
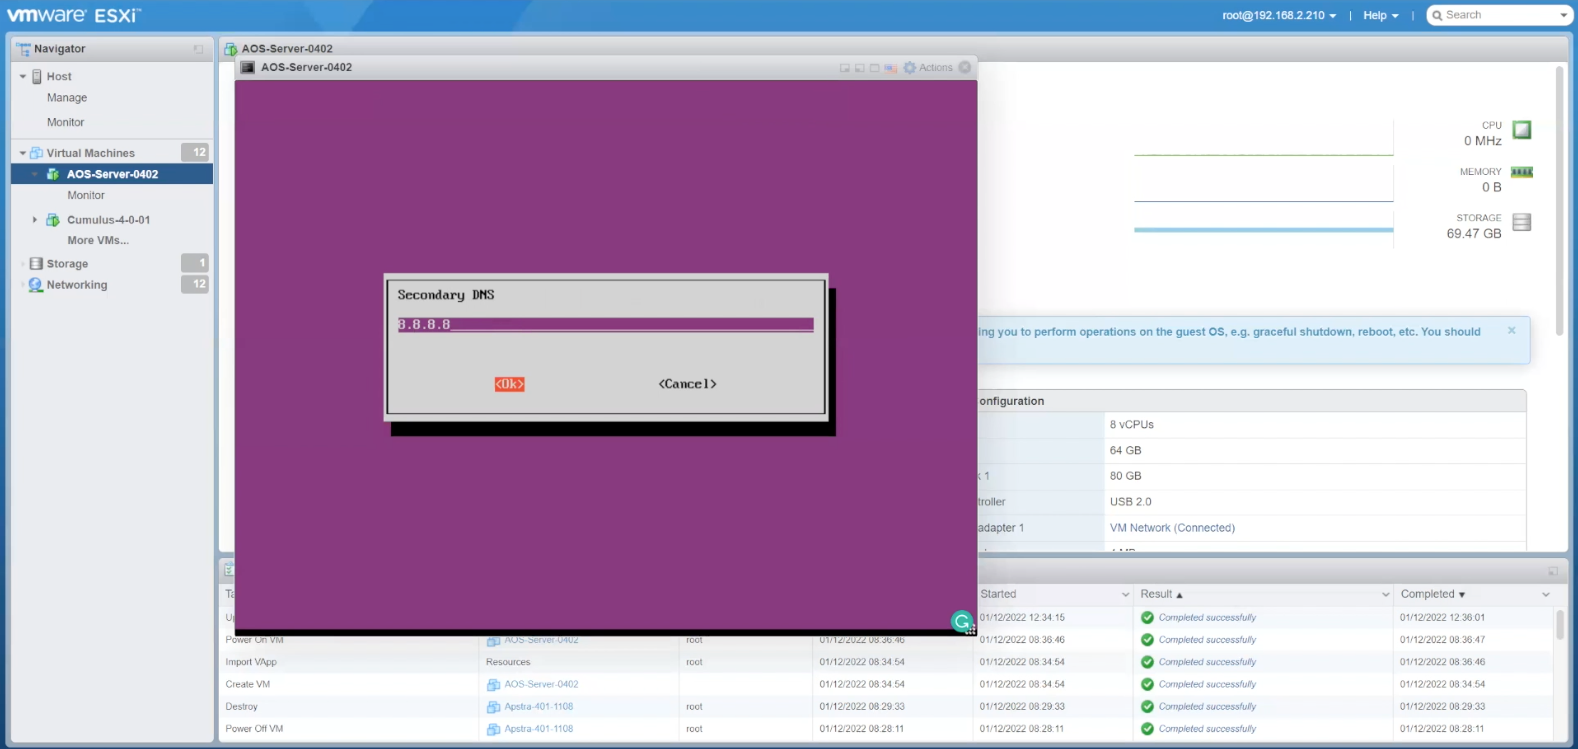
Add the secondary DNS and then proceed
- %3Cp%3EIn%20this%20short%20walkthrough%2C%20we%5C%27re%20going%20to%20deploy%20Apstra%20starting%20with%20a%20VMware%20image%20or%20OVA%20.%20Here%20we%20have%20our%20VMware%20environment%20and%20we%5C%27re%20going%20to%20deploy%20a%20virtual%20machine%20from%20an%20OVA.%3C/p%3E
- Click%20the%20option%20to%20deploy%20a%20VM%20from%20an%20OVA%20file
- Click next to deploy the VM
- Enter a name for the Virtual machine
- Then%20we%20will%20drag%20and%20drop%20the%20OVF%20file
- Choose the OVF file
- Click Next
- Select the storage type and datastore
- Click to choose the VM Network
- Choose the VM Network from the drop down menu
- Confirm the VM Network option and the proceed to the next step
- Review the selection and then proceed to finish the set up
- %3Cp%20class%3D%22MsoNormal%22%20style%3D%22margin%3A%200in%3B%22%3ENext%20we%20need%20to%20assign%20network%20resources%20which%20can%20be%20set%20up%20with%26nbsp%3BDHCP%2C%20but%20in%20this%20example%2C%20we%20will%20pick%20an%20IP%20address%20for%20this%20device.%3C/p%3E
- Select the Network option
- Click OK
- Enter the Gateway IP address and proceed
- Add the secondary DNS and then proceed
- Confirm the settings
- Restart the network service now
- Click OK to proceed to the next step
- We are now ready to turn on the Apstra service
- Confirm the AOS status as Start
- End
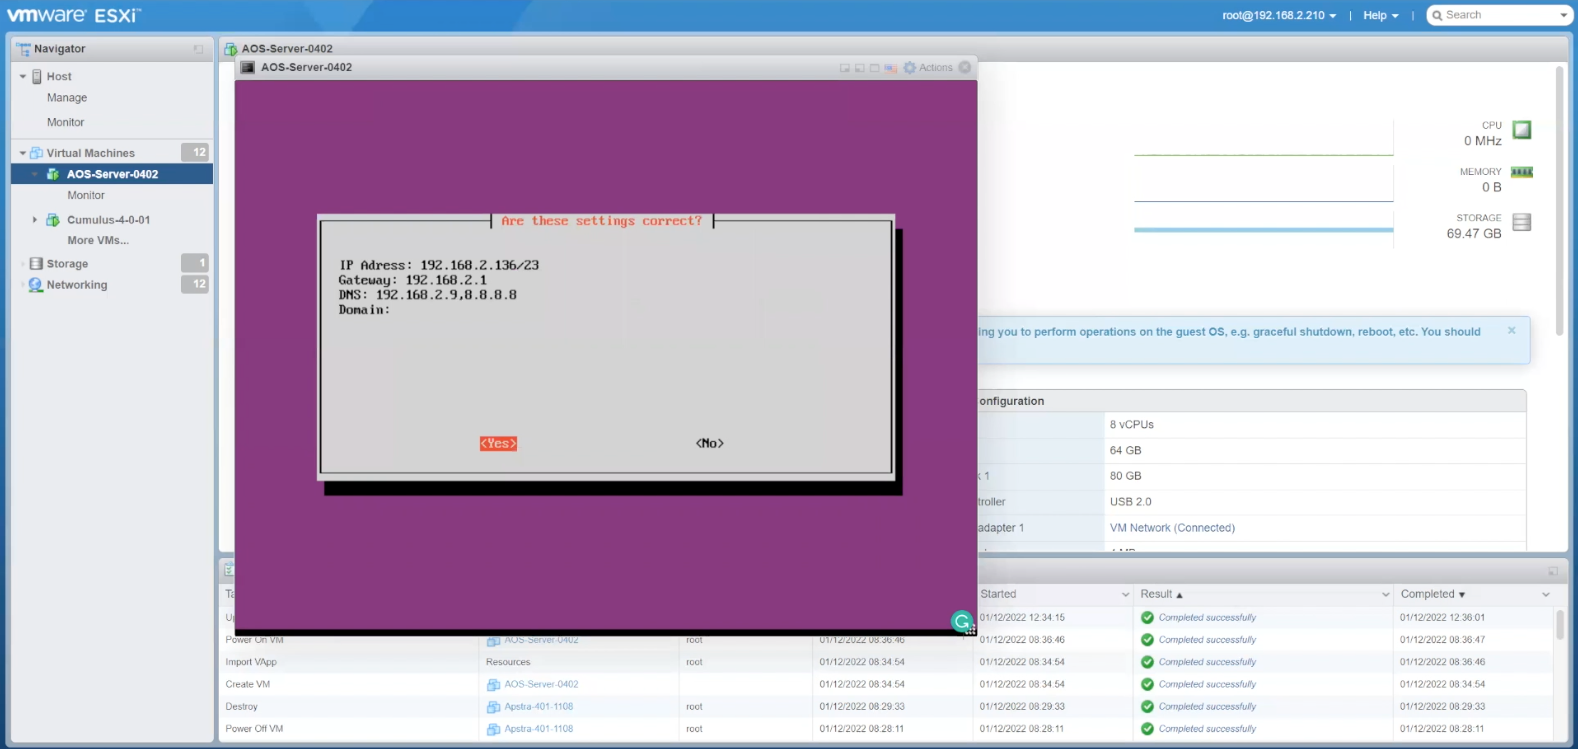
Confirm the settings
- %3Cp%3EIn%20this%20short%20walkthrough%2C%20we%5C%27re%20going%20to%20deploy%20Apstra%20starting%20with%20a%20VMware%20image%20or%20OVA%20.%20Here%20we%20have%20our%20VMware%20environment%20and%20we%5C%27re%20going%20to%20deploy%20a%20virtual%20machine%20from%20an%20OVA.%3C/p%3E
- Click%20the%20option%20to%20deploy%20a%20VM%20from%20an%20OVA%20file
- Click next to deploy the VM
- Enter a name for the Virtual machine
- Then%20we%20will%20drag%20and%20drop%20the%20OVF%20file
- Choose the OVF file
- Click Next
- Select the storage type and datastore
- Click to choose the VM Network
- Choose the VM Network from the drop down menu
- Confirm the VM Network option and the proceed to the next step
- Review the selection and then proceed to finish the set up
- %3Cp%20class%3D%22MsoNormal%22%20style%3D%22margin%3A%200in%3B%22%3ENext%20we%20need%20to%20assign%20network%20resources%20which%20can%20be%20set%20up%20with%26nbsp%3BDHCP%2C%20but%20in%20this%20example%2C%20we%20will%20pick%20an%20IP%20address%20for%20this%20device.%3C/p%3E
- Select the Network option
- Click OK
- Enter the Gateway IP address and proceed
- Add the secondary DNS and then proceed
- Confirm the settings
- Restart the network service now
- Click OK to proceed to the next step
- We are now ready to turn on the Apstra service
- Confirm the AOS status as Start
- End
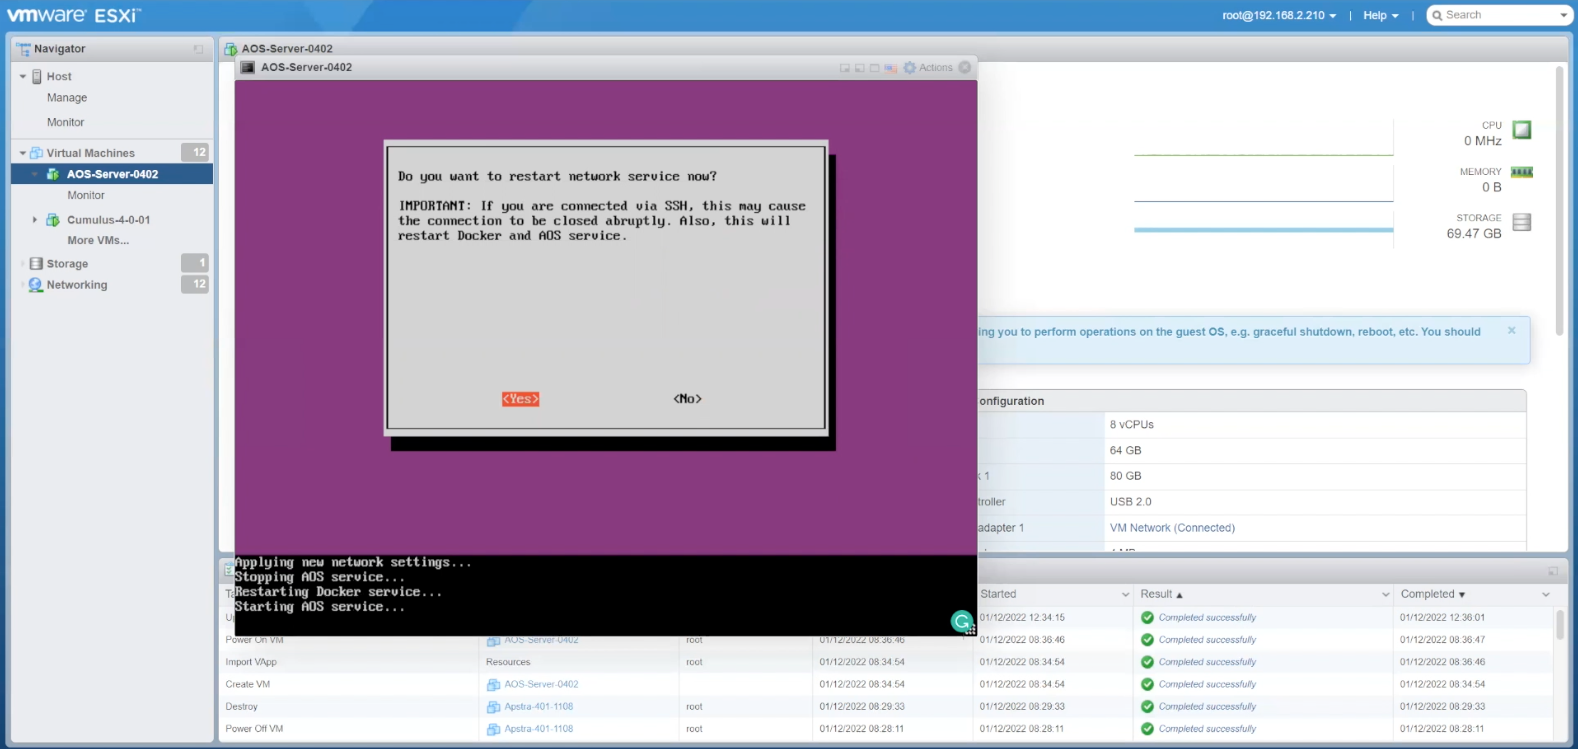
Restart the network service now
- %3Cp%3EIn%20this%20short%20walkthrough%2C%20we%5C%27re%20going%20to%20deploy%20Apstra%20starting%20with%20a%20VMware%20image%20or%20OVA%20.%20Here%20we%20have%20our%20VMware%20environment%20and%20we%5C%27re%20going%20to%20deploy%20a%20virtual%20machine%20from%20an%20OVA.%3C/p%3E
- Click%20the%20option%20to%20deploy%20a%20VM%20from%20an%20OVA%20file
- Click next to deploy the VM
- Enter a name for the Virtual machine
- Then%20we%20will%20drag%20and%20drop%20the%20OVF%20file
- Choose the OVF file
- Click Next
- Select the storage type and datastore
- Click to choose the VM Network
- Choose the VM Network from the drop down menu
- Confirm the VM Network option and the proceed to the next step
- Review the selection and then proceed to finish the set up
- %3Cp%20class%3D%22MsoNormal%22%20style%3D%22margin%3A%200in%3B%22%3ENext%20we%20need%20to%20assign%20network%20resources%20which%20can%20be%20set%20up%20with%26nbsp%3BDHCP%2C%20but%20in%20this%20example%2C%20we%20will%20pick%20an%20IP%20address%20for%20this%20device.%3C/p%3E
- Select the Network option
- Click OK
- Enter the Gateway IP address and proceed
- Add the secondary DNS and then proceed
- Confirm the settings
- Restart the network service now
- Click OK to proceed to the next step
- We are now ready to turn on the Apstra service
- Confirm the AOS status as Start
- End
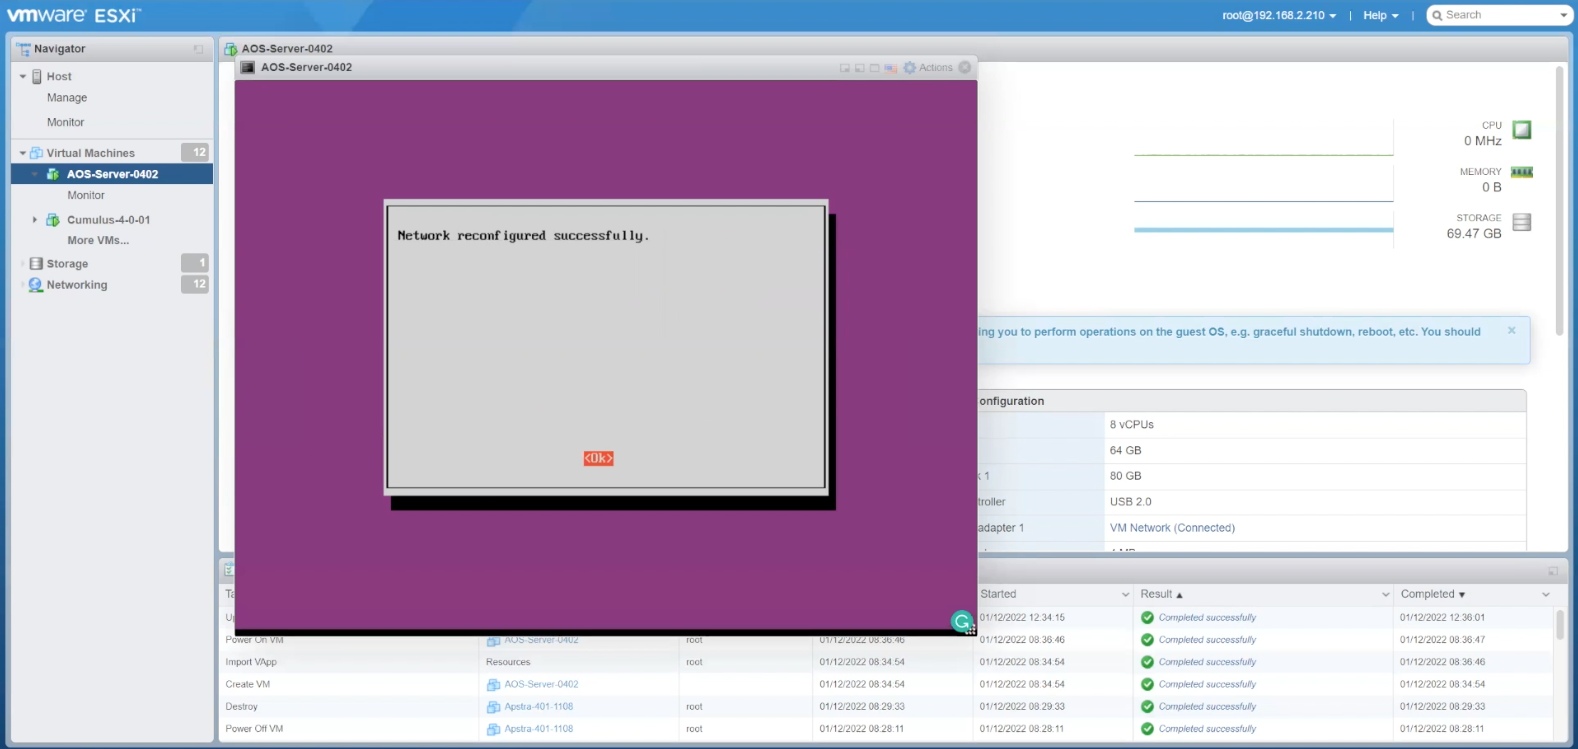
Click OK to proceed to the next step
- %3Cp%3EIn%20this%20short%20walkthrough%2C%20we%5C%27re%20going%20to%20deploy%20Apstra%20starting%20with%20a%20VMware%20image%20or%20OVA%20.%20Here%20we%20have%20our%20VMware%20environment%20and%20we%5C%27re%20going%20to%20deploy%20a%20virtual%20machine%20from%20an%20OVA.%3C/p%3E
- Click%20the%20option%20to%20deploy%20a%20VM%20from%20an%20OVA%20file
- Click next to deploy the VM
- Enter a name for the Virtual machine
- Then%20we%20will%20drag%20and%20drop%20the%20OVF%20file
- Choose the OVF file
- Click Next
- Select the storage type and datastore
- Click to choose the VM Network
- Choose the VM Network from the drop down menu
- Confirm the VM Network option and the proceed to the next step
- Review the selection and then proceed to finish the set up
- %3Cp%20class%3D%22MsoNormal%22%20style%3D%22margin%3A%200in%3B%22%3ENext%20we%20need%20to%20assign%20network%20resources%20which%20can%20be%20set%20up%20with%26nbsp%3BDHCP%2C%20but%20in%20this%20example%2C%20we%20will%20pick%20an%20IP%20address%20for%20this%20device.%3C/p%3E
- Select the Network option
- Click OK
- Enter the Gateway IP address and proceed
- Add the secondary DNS and then proceed
- Confirm the settings
- Restart the network service now
- Click OK to proceed to the next step
- We are now ready to turn on the Apstra service
- Confirm the AOS status as Start
- End
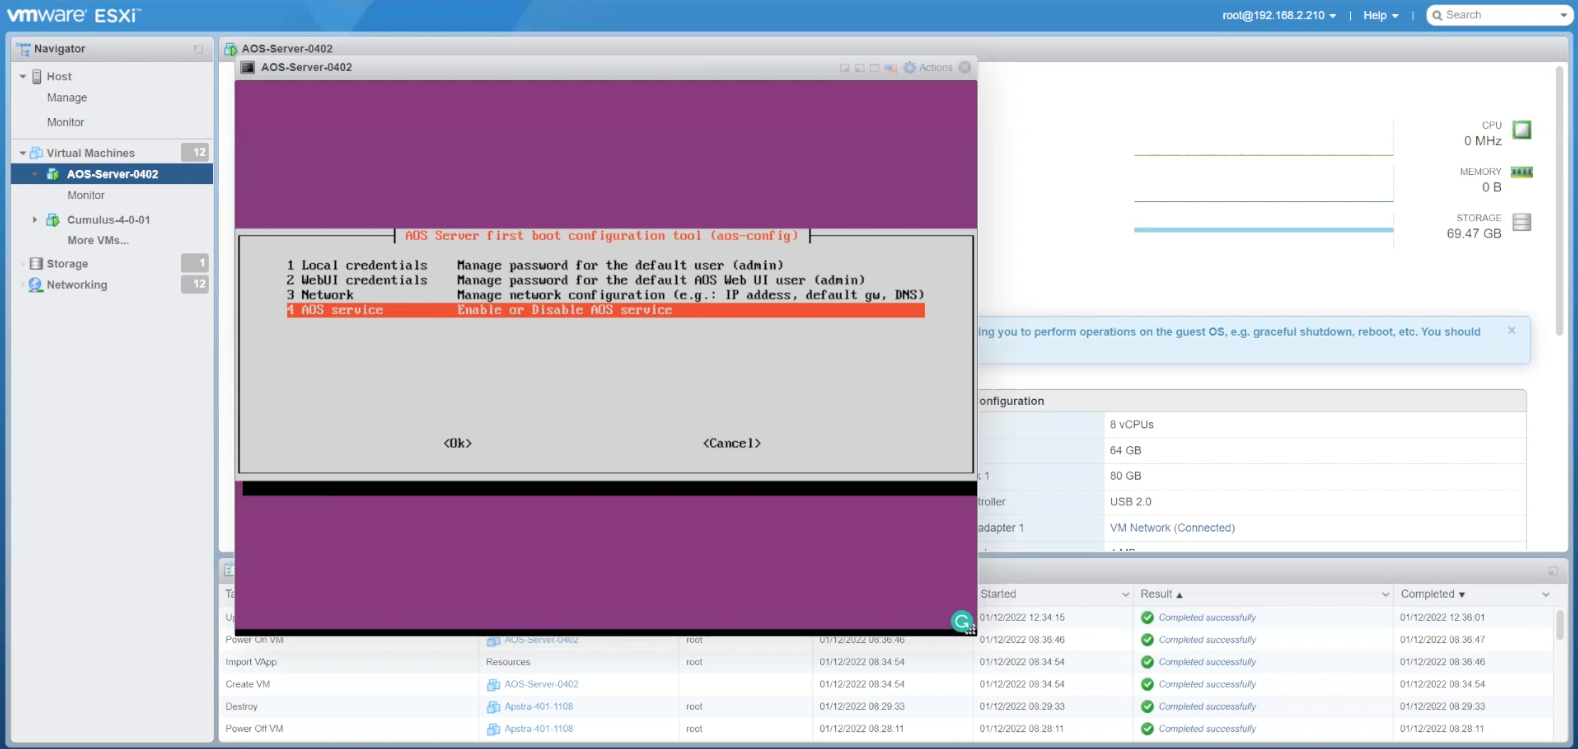
We are now ready to turn on the Apstra service
By doing so, we are able to access the Apstra service from the web UI.
- %3Cp%3EIn%20this%20short%20walkthrough%2C%20we%5C%27re%20going%20to%20deploy%20Apstra%20starting%20with%20a%20VMware%20image%20or%20OVA%20.%20Here%20we%20have%20our%20VMware%20environment%20and%20we%5C%27re%20going%20to%20deploy%20a%20virtual%20machine%20from%20an%20OVA.%3C/p%3E
- Click%20the%20option%20to%20deploy%20a%20VM%20from%20an%20OVA%20file
- Click next to deploy the VM
- Enter a name for the Virtual machine
- Then%20we%20will%20drag%20and%20drop%20the%20OVF%20file
- Choose the OVF file
- Click Next
- Select the storage type and datastore
- Click to choose the VM Network
- Choose the VM Network from the drop down menu
- Confirm the VM Network option and the proceed to the next step
- Review the selection and then proceed to finish the set up
- %3Cp%20class%3D%22MsoNormal%22%20style%3D%22margin%3A%200in%3B%22%3ENext%20we%20need%20to%20assign%20network%20resources%20which%20can%20be%20set%20up%20with%26nbsp%3BDHCP%2C%20but%20in%20this%20example%2C%20we%20will%20pick%20an%20IP%20address%20for%20this%20device.%3C/p%3E
- Select the Network option
- Click OK
- Enter the Gateway IP address and proceed
- Add the secondary DNS and then proceed
- Confirm the settings
- Restart the network service now
- Click OK to proceed to the next step
- We are now ready to turn on the Apstra service
- Confirm the AOS status as Start
- End
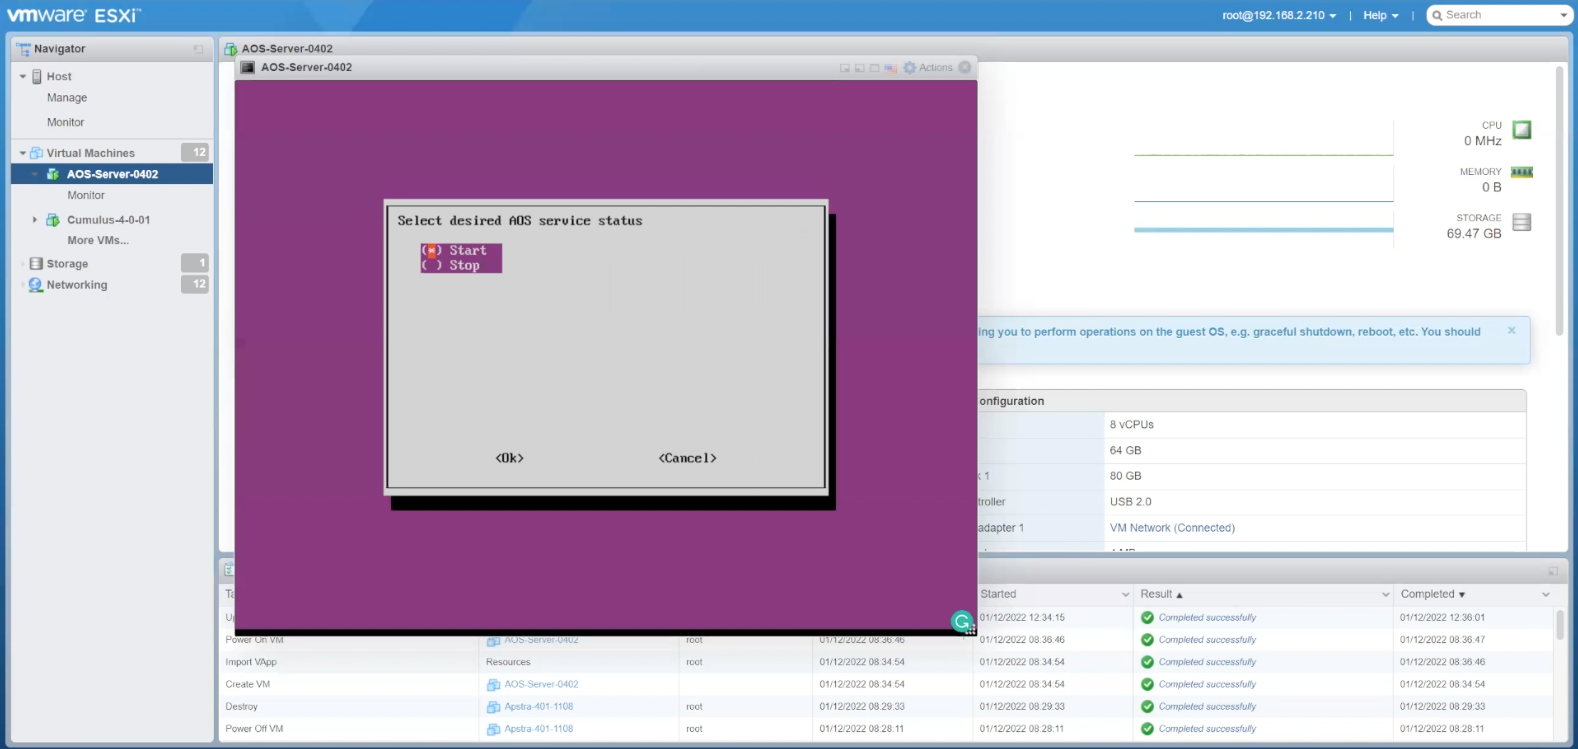
Confirm the AOS status as Start
- %3Cp%3EIn%20this%20short%20walkthrough%2C%20we%5C%27re%20going%20to%20deploy%20Apstra%20starting%20with%20a%20VMware%20image%20or%20OVA%20.%20Here%20we%20have%20our%20VMware%20environment%20and%20we%5C%27re%20going%20to%20deploy%20a%20virtual%20machine%20from%20an%20OVA.%3C/p%3E
- Click%20the%20option%20to%20deploy%20a%20VM%20from%20an%20OVA%20file
- Click next to deploy the VM
- Enter a name for the Virtual machine
- Then%20we%20will%20drag%20and%20drop%20the%20OVF%20file
- Choose the OVF file
- Click Next
- Select the storage type and datastore
- Click to choose the VM Network
- Choose the VM Network from the drop down menu
- Confirm the VM Network option and the proceed to the next step
- Review the selection and then proceed to finish the set up
- %3Cp%20class%3D%22MsoNormal%22%20style%3D%22margin%3A%200in%3B%22%3ENext%20we%20need%20to%20assign%20network%20resources%20which%20can%20be%20set%20up%20with%26nbsp%3BDHCP%2C%20but%20in%20this%20example%2C%20we%20will%20pick%20an%20IP%20address%20for%20this%20device.%3C/p%3E
- Select the Network option
- Click OK
- Enter the Gateway IP address and proceed
- Add the secondary DNS and then proceed
- Confirm the settings
- Restart the network service now
- Click OK to proceed to the next step
- We are now ready to turn on the Apstra service
- Confirm the AOS status as Start
- End
End
End
