Please enter your email to continue
Please enter your password to continue
For a better experience, please open this link using Chrome or Firefox
OkStatic Title
Contact us:


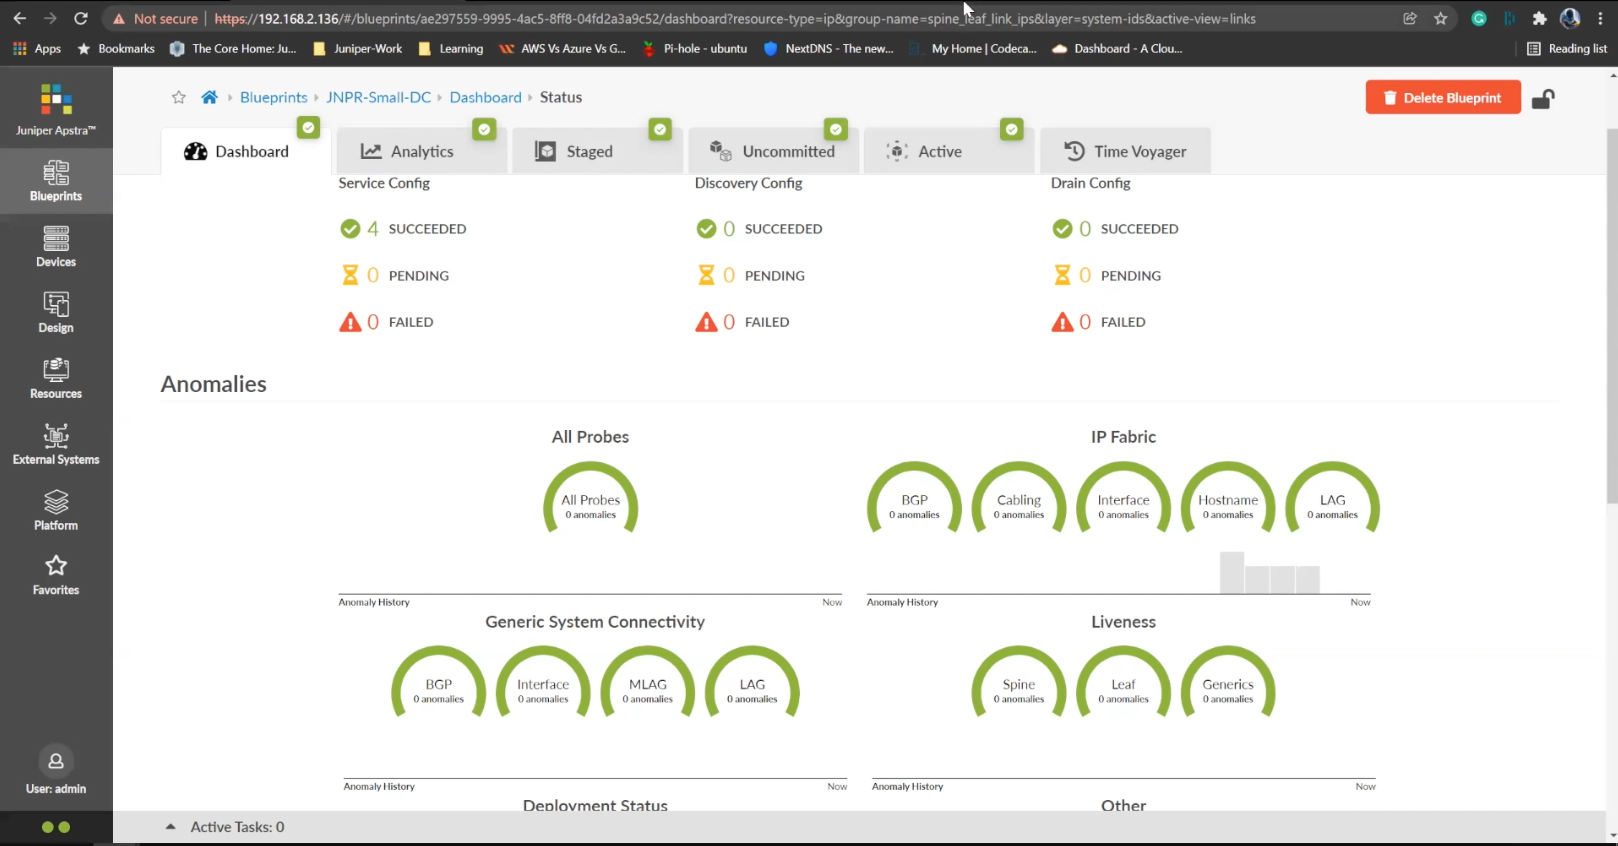
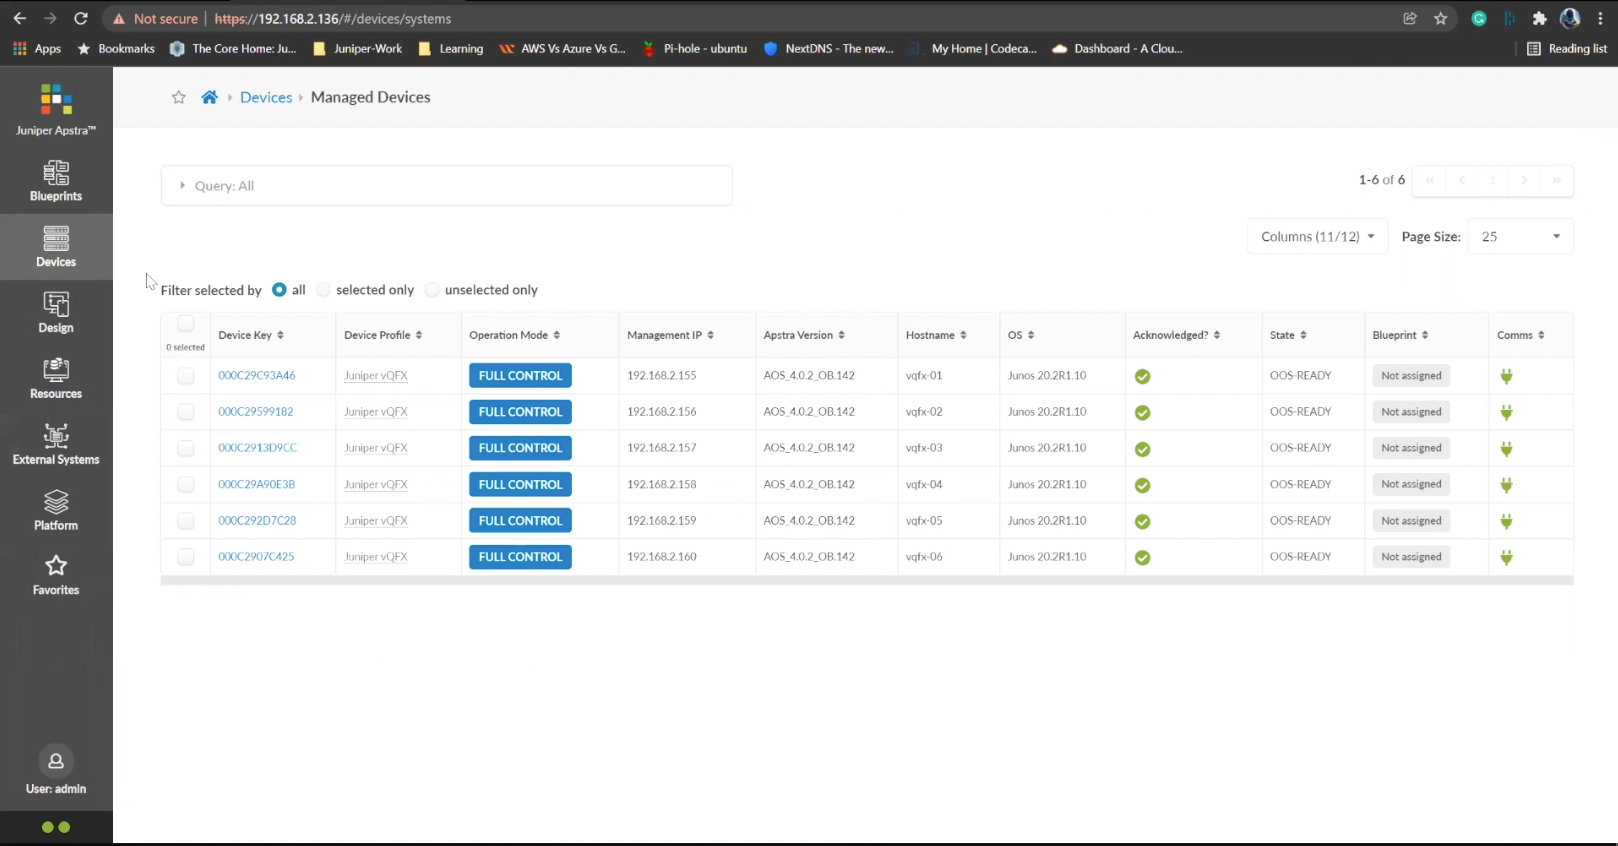
- %3Cp%3EWe%20have%20our%20switches%20already%20managed%20by%20Apstra%2C%20a%20series%20of%20Juniper%20virtual%20QFX%20switches%20in%20this%20example.%20We%20wil%20start%20by%20creating%20logical%20devices.%3C/p%3E
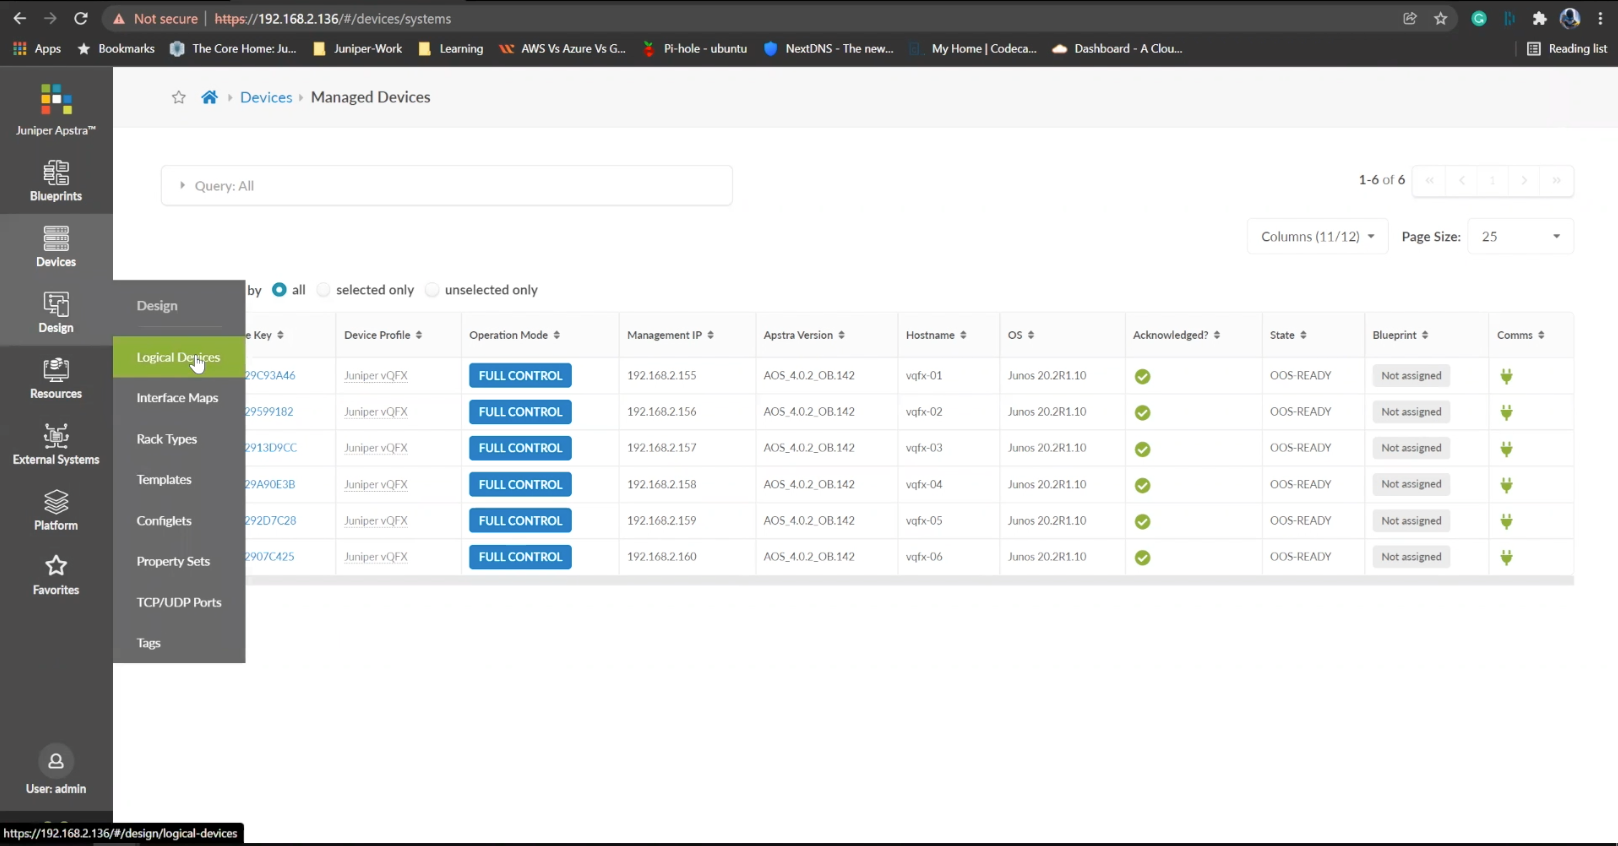
- Click%20on%20logical%20devices%20option%20from%20the%20menu
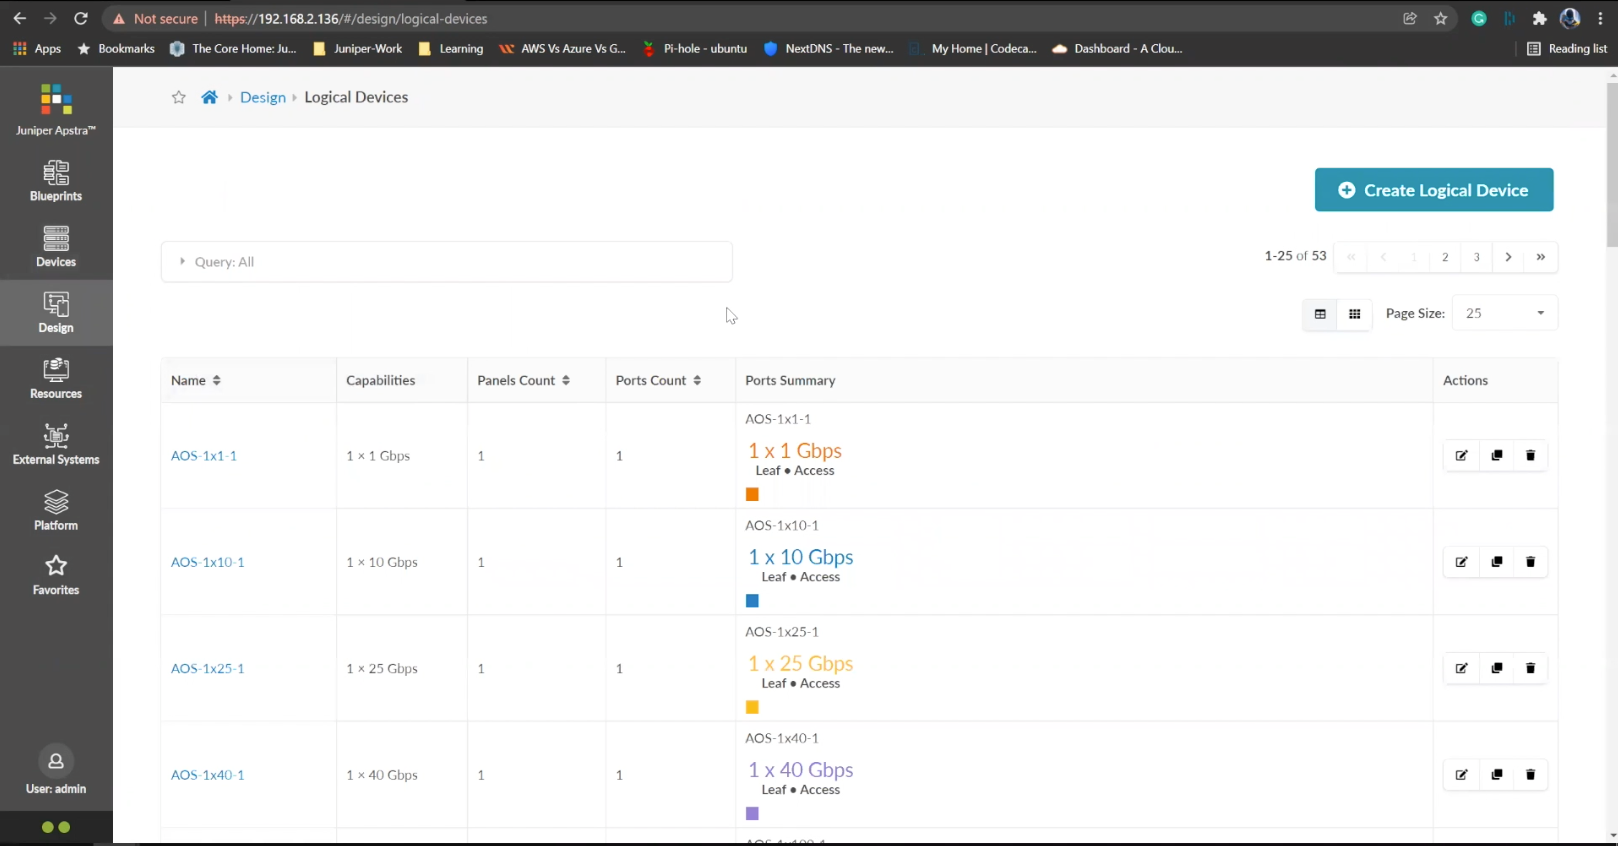
- %3Cp%3E%3Cspan%20style%3D%22font-size%3A%2013px%3B%22%3ETo%20start%20the%20process%2C%20we%20will%20creat%20a%20leaf%20device%20first.%20%3C/span%3E%3C/p%3E%0A%3Cp%3E%3Cspan%20style%3D%22font-size%3A%2015px%3B%22%3EPlease%20Note%3A%20%3C/span%3E%3C/p%3E%0A%3Cp%3E%3Cspan%20style%3D%22font-size%3A%2013px%3B%22%3EThe%20same%20process%20can%20be%20replicated%20for%20a%20spine%20logical%20device%20too.%20For%20the%20purpose%20of%20this%20demo%2C%20we%20will%20skip%20the%20spine%20logical%20device%20creation%20process.%3C/span%3E%3C/p%3E
- Enter a name for the logical device
- Choose the number of ports
- Create a port group
- Click to finish the creation
- %3Cp%3E%3Cspan%20style%3D%22font-size%3A%2013px%3B%22%3E%3Cspan%20style%3D%22font-family%3A%20Calibri%2C%20sans-serif%3B%22%3ENext%20we%20will%20set%20up%20interface%20maps.%20An%20Interface%20map%20maps%20the%20logical%20device%20to%20the%20actual%20physical%20device.%20ie%3A%20a%20specific%20switch%20and%20model%20that%20is%20used%20in%20the%20actual%20typology.%3C/span%3E%3C/span%3E%3C/p%3E
- Click on the Interface maps option from the menu
- Click to create a new interface map
- Add a name
- Choose a logical device that will be mapped to a physical entity
- Choose from the drop down list
- Choose a device profile from the drop down menu
- Choose the Juniper QFX device as shown
- Choose the interfaces
- %3Cp%3E%3Cspan%20style%3D%22font-size%3A%2013px%3B%22%3EWe%20will%20repeat%20the%20same%20process%20for%20the%20spine%20devices%20defined%20earlier.%20We%20will%20be%20mapping%20it%20to%20the%20Juniper%20QFX%20devices%20as%20well.%3C/span%3E%3C/p%3E
- Next we will add a few racks
- Click on the rack type from the menu
- Click to create a rack type
- Add a name for the new rack
- Name the leaf switch
- Choose a logical leaf device that was previously defined
- Choose the desired logical device from the list
- Click to add a new Generic system
- Add a name to the Generic System Group
- Enter a desired name
- FInish the process of creating a new rack
- Let us add another generic system
- Click to edit the rack type
- Navigate to the leafs tab
- Click on generic systems tab
- Up the Generic system count to 2 and then update the rack type
- Bring everything together in the next steps
- Choose templates from the menu
- Click to create a template
- Add a name first
- Enter more details and then scroll down
- To choose a rack type click on the drop down menu
- Choose the rack type that we created earlier from the menu
- Click to select the desired spine logical device
- Choose the logical spine device from the list
- Enter the desired count
- Click on create to complete the configuration
- Next step is to create a blueprint for the entire Datacenter fabric
- Click to create a new blueprint
- Enter a name for the Blueprint
- Choose the template from the drop down menu
- Choose the desired template
- Click to display the links
- Click on create to finish the process
- Click to view the Blueprint
- Click on staged
- Select the spines to allocate an Autonomous ID
- Click on the edit icon
- Choose the IP address from the Pool
- Save the configuration
- Repeat the same process for the other leaf devices
- Next we need to configure the interface mappings
- Click on one of the spine devices
- Click on the edit icon
- Choose the interface mappings from the the drop down menu
- Make the desired selection
- Click to update the assignments
- Click to assign system IDs next
- Click on the Assigned System IDs tab
- Click on the edit icon
- Choose from the list of System IDs
- Finalize the assignments
- Click on links
- Recitify any cabling errors as shown automatically
- Update the cabling assingments
- Notice the success message once the cabling mapping is sorted out
- Click on commit
- Add the description and click on the commit button
- Success
1
- %3Cp%3EWe%20have%20our%20switches%20already%20managed%20by%20Apstra%2C%20a%20series%20of%20Juniper%20virtual%20QFX%20switches%20in%20this%20example.%20We%20wil%20start%20by%20creating%20logical%20devices.%3C/p%3E
- Click%20on%20logical%20devices%20option%20from%20the%20menu
- %3Cp%3E%3Cspan%20style%3D%22font-size%3A%2013px%3B%22%3ETo%20start%20the%20process%2C%20we%20will%20creat%20a%20leaf%20device%20first.%20%3C/span%3E%3C/p%3E%0A%3Cp%3E%3Cspan%20style%3D%22font-size%3A%2015px%3B%22%3EPlease%20Note%3A%20%3C/span%3E%3C/p%3E%0A%3Cp%3E%3Cspan%20style%3D%22font-size%3A%2013px%3B%22%3EThe%20same%20process%20can%20be%20replicated%20for%20a%20spine%20logical%20device%20too.%20For%20the%20purpose%20of%20this%20demo%2C%20we%20will%20skip%20the%20spine%20logical%20device%20creation%20process.%3C/span%3E%3C/p%3E
- Enter a name for the logical device
- Choose the number of ports
- Create a port group
- Click to finish the creation
- %3Cp%3E%3Cspan%20style%3D%22font-size%3A%2013px%3B%22%3E%3Cspan%20style%3D%22font-family%3A%20Calibri%2C%20sans-serif%3B%22%3ENext%20we%20will%20set%20up%20interface%20maps.%20An%20Interface%20map%20maps%20the%20logical%20device%20to%20the%20actual%20physical%20device.%20ie%3A%20a%20specific%20switch%20and%20model%20that%20is%20used%20in%20the%20actual%20typology.%3C/span%3E%3C/span%3E%3C/p%3E
- Click on the Interface maps option from the menu
- Click to create a new interface map
- Add a name
- Choose a logical device that will be mapped to a physical entity
- Choose from the drop down list
- Choose a device profile from the drop down menu
- Choose the Juniper QFX device as shown
- Choose the interfaces
- %3Cp%3E%3Cspan%20style%3D%22font-size%3A%2013px%3B%22%3EWe%20will%20repeat%20the%20same%20process%20for%20the%20spine%20devices%20defined%20earlier.%20We%20will%20be%20mapping%20it%20to%20the%20Juniper%20QFX%20devices%20as%20well.%3C/span%3E%3C/p%3E
- Next we will add a few racks
- Click on the rack type from the menu
- Click to create a rack type
- Add a name for the new rack
- Name the leaf switch
- Choose a logical leaf device that was previously defined
- Choose the desired logical device from the list
- Click to add a new Generic system
- Add a name to the Generic System Group
- Enter a desired name
- FInish the process of creating a new rack
- Let us add another generic system
- Click to edit the rack type
- Navigate to the leafs tab
- Click on generic systems tab
- Up the Generic system count to 2 and then update the rack type
- Bring everything together in the next steps
- Choose templates from the menu
- Click to create a template
- Add a name first
- Enter more details and then scroll down
- To choose a rack type click on the drop down menu
- Choose the rack type that we created earlier from the menu
- Click to select the desired spine logical device
- Choose the logical spine device from the list
- Enter the desired count
- Click on create to complete the configuration
- Next step is to create a blueprint for the entire Datacenter fabric
- Click to create a new blueprint
- Enter a name for the Blueprint
- Choose the template from the drop down menu
- Choose the desired template
- Click to display the links
- Click on create to finish the process
- Click to view the Blueprint
- Click on staged
- Select the spines to allocate an Autonomous ID
- Click on the edit icon
- Choose the IP address from the Pool
- Save the configuration
- Repeat the same process for the other leaf devices
- Next we need to configure the interface mappings
- Click on one of the spine devices
- Click on the edit icon
- Choose the interface mappings from the the drop down menu
- Make the desired selection
- Click to update the assignments
- Click to assign system IDs next
- Click on the Assigned System IDs tab
- Click on the edit icon
- Choose from the list of System IDs
- Finalize the assignments
- Click on links
- Recitify any cabling errors as shown automatically
- Update the cabling assingments
- Notice the success message once the cabling mapping is sorted out
- Click on commit
- Add the description and click on the commit button
- Success

%3Cp%3EWe%20have%20our%20switches%20already%20managed%20by%20Apstra%2C%20a%20series%20of%20Juniper%20virtual%20QFX%20switches%20in%20this%20example.%20We%20wil%20start%20by%20creating%20logical%20devices.%3C/p%3E
%3Cp%3EWe%20have%20our%20switches%20already%20managed%20by%20Apstra%2C%20a%20series%20of%20Juniper%20virtual%20QFX%20switches%20in%20this%20example.%20We%20wil%20start%20by%20creating%20logical%20devices.%3C/p%3E
Preview
Write<br>
Preview<br>
Write<br>
Preview<br>
Markdown<br>
WYSIWYG
- %3Cp%3EWe%20have%20our%20switches%20already%20managed%20by%20Apstra%2C%20a%20series%20of%20Juniper%20virtual%20QFX%20switches%20in%20this%20example.%20We%20wil%20start%20by%20creating%20logical%20devices.%3C/p%3E
- Click%20on%20logical%20devices%20option%20from%20the%20menu
- %3Cp%3E%3Cspan%20style%3D%22font-size%3A%2013px%3B%22%3ETo%20start%20the%20process%2C%20we%20will%20creat%20a%20leaf%20device%20first.%20%3C/span%3E%3C/p%3E%0A%3Cp%3E%3Cspan%20style%3D%22font-size%3A%2015px%3B%22%3EPlease%20Note%3A%20%3C/span%3E%3C/p%3E%0A%3Cp%3E%3Cspan%20style%3D%22font-size%3A%2013px%3B%22%3EThe%20same%20process%20can%20be%20replicated%20for%20a%20spine%20logical%20device%20too.%20For%20the%20purpose%20of%20this%20demo%2C%20we%20will%20skip%20the%20spine%20logical%20device%20creation%20process.%3C/span%3E%3C/p%3E
- Enter a name for the logical device
- Choose the number of ports
- Create a port group
- Click to finish the creation
- %3Cp%3E%3Cspan%20style%3D%22font-size%3A%2013px%3B%22%3E%3Cspan%20style%3D%22font-family%3A%20Calibri%2C%20sans-serif%3B%22%3ENext%20we%20will%20set%20up%20interface%20maps.%20An%20Interface%20map%20maps%20the%20logical%20device%20to%20the%20actual%20physical%20device.%20ie%3A%20a%20specific%20switch%20and%20model%20that%20is%20used%20in%20the%20actual%20typology.%3C/span%3E%3C/span%3E%3C/p%3E
- Click on the Interface maps option from the menu
- Click to create a new interface map
- Add a name
- Choose a logical device that will be mapped to a physical entity
- Choose from the drop down list
- Choose a device profile from the drop down menu
- Choose the Juniper QFX device as shown
- Choose the interfaces
- %3Cp%3E%3Cspan%20style%3D%22font-size%3A%2013px%3B%22%3EWe%20will%20repeat%20the%20same%20process%20for%20the%20spine%20devices%20defined%20earlier.%20We%20will%20be%20mapping%20it%20to%20the%20Juniper%20QFX%20devices%20as%20well.%3C/span%3E%3C/p%3E
- Next we will add a few racks
- Click on the rack type from the menu
- Click to create a rack type
- Add a name for the new rack
- Name the leaf switch
- Choose a logical leaf device that was previously defined
- Choose the desired logical device from the list
- Click to add a new Generic system
- Add a name to the Generic System Group
- Enter a desired name
- FInish the process of creating a new rack
- Let us add another generic system
- Click to edit the rack type
- Navigate to the leafs tab
- Click on generic systems tab
- Up the Generic system count to 2 and then update the rack type
- Bring everything together in the next steps
- Choose templates from the menu
- Click to create a template
- Add a name first
- Enter more details and then scroll down
- To choose a rack type click on the drop down menu
- Choose the rack type that we created earlier from the menu
- Click to select the desired spine logical device
- Choose the logical spine device from the list
- Enter the desired count
- Click on create to complete the configuration
- Next step is to create a blueprint for the entire Datacenter fabric
- Click to create a new blueprint
- Enter a name for the Blueprint
- Choose the template from the drop down menu
- Choose the desired template
- Click to display the links
- Click on create to finish the process
- Click to view the Blueprint
- Click on staged
- Select the spines to allocate an Autonomous ID
- Click on the edit icon
- Choose the IP address from the Pool
- Save the configuration
- Repeat the same process for the other leaf devices
- Next we need to configure the interface mappings
- Click on one of the spine devices
- Click on the edit icon
- Choose the interface mappings from the the drop down menu
- Make the desired selection
- Click to update the assignments
- Click to assign system IDs next
- Click on the Assigned System IDs tab
- Click on the edit icon
- Choose from the list of System IDs
- Finalize the assignments
- Click on links
- Recitify any cabling errors as shown automatically
- Update the cabling assingments
- Notice the success message once the cabling mapping is sorted out
- Click on commit
- Add the description and click on the commit button
- Success
Click%20on%20logical%20devices%20option%20from%20the%20menu
Click%20on%20logical%20devices%20option%20from%20the%20menu
Preview
Write
Preview
Write\<br>
Preview\<br>
Write\<br>
Preview\<br>
Markdown\<br>
WYSIWYG
<br>
Markdown
WYSIWYG
- %3Cp%3EWe%20have%20our%20switches%20already%20managed%20by%20Apstra%2C%20a%20series%20of%20Juniper%20virtual%20QFX%20switches%20in%20this%20example.%20We%20wil%20start%20by%20creating%20logical%20devices.%3C/p%3E
- Click%20on%20logical%20devices%20option%20from%20the%20menu
- %3Cp%3E%3Cspan%20style%3D%22font-size%3A%2013px%3B%22%3ETo%20start%20the%20process%2C%20we%20will%20creat%20a%20leaf%20device%20first.%20%3C/span%3E%3C/p%3E%0A%3Cp%3E%3Cspan%20style%3D%22font-size%3A%2015px%3B%22%3EPlease%20Note%3A%20%3C/span%3E%3C/p%3E%0A%3Cp%3E%3Cspan%20style%3D%22font-size%3A%2013px%3B%22%3EThe%20same%20process%20can%20be%20replicated%20for%20a%20spine%20logical%20device%20too.%20For%20the%20purpose%20of%20this%20demo%2C%20we%20will%20skip%20the%20spine%20logical%20device%20creation%20process.%3C/span%3E%3C/p%3E
- Enter a name for the logical device
- Choose the number of ports
- Create a port group
- Click to finish the creation
- %3Cp%3E%3Cspan%20style%3D%22font-size%3A%2013px%3B%22%3E%3Cspan%20style%3D%22font-family%3A%20Calibri%2C%20sans-serif%3B%22%3ENext%20we%20will%20set%20up%20interface%20maps.%20An%20Interface%20map%20maps%20the%20logical%20device%20to%20the%20actual%20physical%20device.%20ie%3A%20a%20specific%20switch%20and%20model%20that%20is%20used%20in%20the%20actual%20typology.%3C/span%3E%3C/span%3E%3C/p%3E
- Click on the Interface maps option from the menu
- Click to create a new interface map
- Add a name
- Choose a logical device that will be mapped to a physical entity
- Choose from the drop down list
- Choose a device profile from the drop down menu
- Choose the Juniper QFX device as shown
- Choose the interfaces
- %3Cp%3E%3Cspan%20style%3D%22font-size%3A%2013px%3B%22%3EWe%20will%20repeat%20the%20same%20process%20for%20the%20spine%20devices%20defined%20earlier.%20We%20will%20be%20mapping%20it%20to%20the%20Juniper%20QFX%20devices%20as%20well.%3C/span%3E%3C/p%3E
- Next we will add a few racks
- Click on the rack type from the menu
- Click to create a rack type
- Add a name for the new rack
- Name the leaf switch
- Choose a logical leaf device that was previously defined
- Choose the desired logical device from the list
- Click to add a new Generic system
- Add a name to the Generic System Group
- Enter a desired name
- FInish the process of creating a new rack
- Let us add another generic system
- Click to edit the rack type
- Navigate to the leafs tab
- Click on generic systems tab
- Up the Generic system count to 2 and then update the rack type
- Bring everything together in the next steps
- Choose templates from the menu
- Click to create a template
- Add a name first
- Enter more details and then scroll down
- To choose a rack type click on the drop down menu
- Choose the rack type that we created earlier from the menu
- Click to select the desired spine logical device
- Choose the logical spine device from the list
- Enter the desired count
- Click on create to complete the configuration
- Next step is to create a blueprint for the entire Datacenter fabric
- Click to create a new blueprint
- Enter a name for the Blueprint
- Choose the template from the drop down menu
- Choose the desired template
- Click to display the links
- Click on create to finish the process
- Click to view the Blueprint
- Click on staged
- Select the spines to allocate an Autonomous ID
- Click on the edit icon
- Choose the IP address from the Pool
- Save the configuration
- Repeat the same process for the other leaf devices
- Next we need to configure the interface mappings
- Click on one of the spine devices
- Click on the edit icon
- Choose the interface mappings from the the drop down menu
- Make the desired selection
- Click to update the assignments
- Click to assign system IDs next
- Click on the Assigned System IDs tab
- Click on the edit icon
- Choose from the list of System IDs
- Finalize the assignments
- Click on links
- Recitify any cabling errors as shown automatically
- Update the cabling assingments
- Notice the success message once the cabling mapping is sorted out
- Click on commit
- Add the description and click on the commit button
- Success
%3Cp%3E%3Cspan%20style%3D%22font-size%3A%2013px%3B%22%3ETo%20start%20the%20process%2C%20we%20will%20creat%20a%20leaf%20device%20first.%20%3C/span%3E%3C/p%3E%0A%3Cp%3E%3Cspan%20style%3D%22font-size%3A%2015px%3B%22%3EPlease%20Note%3A%20%3C/span%3E%3C/p%3E%0A%3Cp%3E%3Cspan%20style%3D%22font-size%3A%2013px%3B%22%3EThe%20same%20process%20can%20be%20replicated%20for%20a%20spine%20logical%20device%20too.%20For%20the%20purpose%20of%20this%20demo%2C%20we%20will%20skip%20the%20spine%20logical%20device%20creation%20process.%3C/span%3E%3C/p%3E
%3Cp%3E%3Cspan%20style%3D%22font-size%3A%2013px%3B%22%3ETo%20start%20the%20process%2C%20we%20will%20creat%20a%20leaf%20device%20first.%20%3C/span%3E%3C/p%3E%0A%3Cp%3E%3Cspan%20style%3D%22font-size%3A%2015px%3B%22%3EPlease%20Note%3A%20%3C/span%3E%3C/p%3E%0A%3Cp%3E%3Cspan%20style%3D%22font-size%3A%2013px%3B%22%3EThe%20same%20process%20can%20be%20replicated%20for%20a%20spine%20logical%20device%20too.%20For%20the%20purpose%20of%20this%20demo%2C%20we%20will%20skip%20the%20spine%20logical%20device%20creation%20process.%3C/span%3E%3C/p%3E
- %3Cp%3EWe%20have%20our%20switches%20already%20managed%20by%20Apstra%2C%20a%20series%20of%20Juniper%20virtual%20QFX%20switches%20in%20this%20example.%20We%20wil%20start%20by%20creating%20logical%20devices.%3C/p%3E
- Click%20on%20logical%20devices%20option%20from%20the%20menu
- %3Cp%3E%3Cspan%20style%3D%22font-size%3A%2013px%3B%22%3ETo%20start%20the%20process%2C%20we%20will%20creat%20a%20leaf%20device%20first.%20%3C/span%3E%3C/p%3E%0A%3Cp%3E%3Cspan%20style%3D%22font-size%3A%2015px%3B%22%3EPlease%20Note%3A%20%3C/span%3E%3C/p%3E%0A%3Cp%3E%3Cspan%20style%3D%22font-size%3A%2013px%3B%22%3EThe%20same%20process%20can%20be%20replicated%20for%20a%20spine%20logical%20device%20too.%20For%20the%20purpose%20of%20this%20demo%2C%20we%20will%20skip%20the%20spine%20logical%20device%20creation%20process.%3C/span%3E%3C/p%3E
- Enter a name for the logical device
- Choose the number of ports
- Create a port group
- Click to finish the creation
- %3Cp%3E%3Cspan%20style%3D%22font-size%3A%2013px%3B%22%3E%3Cspan%20style%3D%22font-family%3A%20Calibri%2C%20sans-serif%3B%22%3ENext%20we%20will%20set%20up%20interface%20maps.%20An%20Interface%20map%20maps%20the%20logical%20device%20to%20the%20actual%20physical%20device.%20ie%3A%20a%20specific%20switch%20and%20model%20that%20is%20used%20in%20the%20actual%20typology.%3C/span%3E%3C/span%3E%3C/p%3E
- Click on the Interface maps option from the menu
- Click to create a new interface map
- Add a name
- Choose a logical device that will be mapped to a physical entity
- Choose from the drop down list
- Choose a device profile from the drop down menu
- Choose the Juniper QFX device as shown
- Choose the interfaces
- %3Cp%3E%3Cspan%20style%3D%22font-size%3A%2013px%3B%22%3EWe%20will%20repeat%20the%20same%20process%20for%20the%20spine%20devices%20defined%20earlier.%20We%20will%20be%20mapping%20it%20to%20the%20Juniper%20QFX%20devices%20as%20well.%3C/span%3E%3C/p%3E
- Next we will add a few racks
- Click on the rack type from the menu
- Click to create a rack type
- Add a name for the new rack
- Name the leaf switch
- Choose a logical leaf device that was previously defined
- Choose the desired logical device from the list
- Click to add a new Generic system
- Add a name to the Generic System Group
- Enter a desired name
- FInish the process of creating a new rack
- Let us add another generic system
- Click to edit the rack type
- Navigate to the leafs tab
- Click on generic systems tab
- Up the Generic system count to 2 and then update the rack type
- Bring everything together in the next steps
- Choose templates from the menu
- Click to create a template
- Add a name first
- Enter more details and then scroll down
- To choose a rack type click on the drop down menu
- Choose the rack type that we created earlier from the menu
- Click to select the desired spine logical device
- Choose the logical spine device from the list
- Enter the desired count
- Click on create to complete the configuration
- Next step is to create a blueprint for the entire Datacenter fabric
- Click to create a new blueprint
- Enter a name for the Blueprint
- Choose the template from the drop down menu
- Choose the desired template
- Click to display the links
- Click on create to finish the process
- Click to view the Blueprint
- Click on staged
- Select the spines to allocate an Autonomous ID
- Click on the edit icon
- Choose the IP address from the Pool
- Save the configuration
- Repeat the same process for the other leaf devices
- Next we need to configure the interface mappings
- Click on one of the spine devices
- Click on the edit icon
- Choose the interface mappings from the the drop down menu
- Make the desired selection
- Click to update the assignments
- Click to assign system IDs next
- Click on the Assigned System IDs tab
- Click on the edit icon
- Choose from the list of System IDs
- Finalize the assignments
- Click on links
- Recitify any cabling errors as shown automatically
- Update the cabling assingments
- Notice the success message once the cabling mapping is sorted out
- Click on commit
- Add the description and click on the commit button
- Success
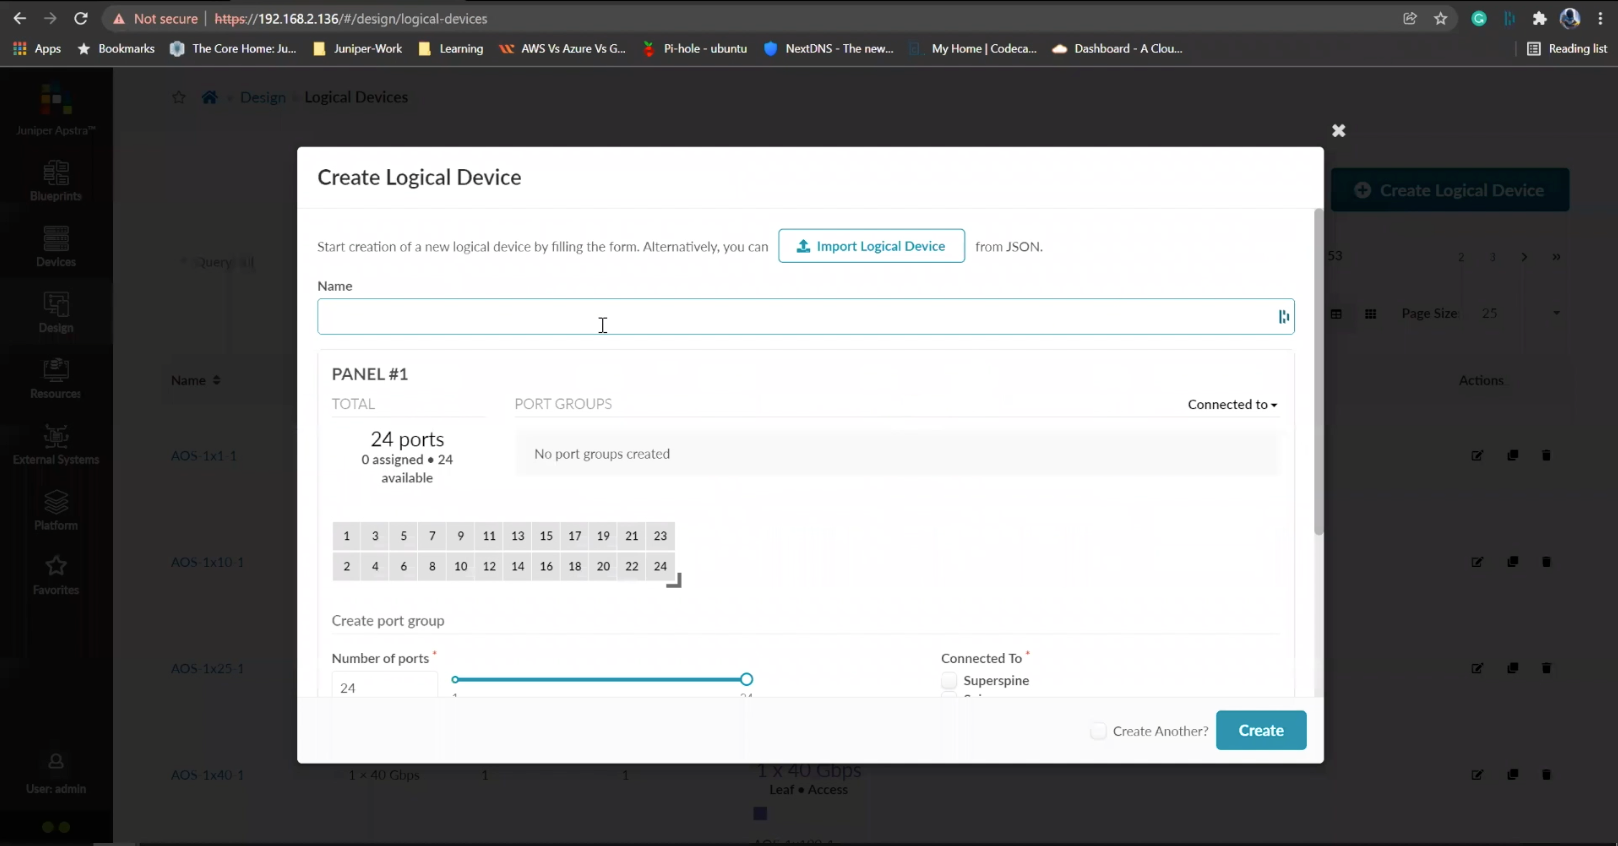
Enter a name for the logical device
- %3Cp%3EWe%20have%20our%20switches%20already%20managed%20by%20Apstra%2C%20a%20series%20of%20Juniper%20virtual%20QFX%20switches%20in%20this%20example.%20We%20wil%20start%20by%20creating%20logical%20devices.%3C/p%3E
- Click%20on%20logical%20devices%20option%20from%20the%20menu
- %3Cp%3E%3Cspan%20style%3D%22font-size%3A%2013px%3B%22%3ETo%20start%20the%20process%2C%20we%20will%20creat%20a%20leaf%20device%20first.%20%3C/span%3E%3C/p%3E%0A%3Cp%3E%3Cspan%20style%3D%22font-size%3A%2015px%3B%22%3EPlease%20Note%3A%20%3C/span%3E%3C/p%3E%0A%3Cp%3E%3Cspan%20style%3D%22font-size%3A%2013px%3B%22%3EThe%20same%20process%20can%20be%20replicated%20for%20a%20spine%20logical%20device%20too.%20For%20the%20purpose%20of%20this%20demo%2C%20we%20will%20skip%20the%20spine%20logical%20device%20creation%20process.%3C/span%3E%3C/p%3E
- Enter a name for the logical device
- Choose the number of ports
- Create a port group
- Click to finish the creation
- %3Cp%3E%3Cspan%20style%3D%22font-size%3A%2013px%3B%22%3E%3Cspan%20style%3D%22font-family%3A%20Calibri%2C%20sans-serif%3B%22%3ENext%20we%20will%20set%20up%20interface%20maps.%20An%20Interface%20map%20maps%20the%20logical%20device%20to%20the%20actual%20physical%20device.%20ie%3A%20a%20specific%20switch%20and%20model%20that%20is%20used%20in%20the%20actual%20typology.%3C/span%3E%3C/span%3E%3C/p%3E
- Click on the Interface maps option from the menu
- Click to create a new interface map
- Add a name
- Choose a logical device that will be mapped to a physical entity
- Choose from the drop down list
- Choose a device profile from the drop down menu
- Choose the Juniper QFX device as shown
- Choose the interfaces
- %3Cp%3E%3Cspan%20style%3D%22font-size%3A%2013px%3B%22%3EWe%20will%20repeat%20the%20same%20process%20for%20the%20spine%20devices%20defined%20earlier.%20We%20will%20be%20mapping%20it%20to%20the%20Juniper%20QFX%20devices%20as%20well.%3C/span%3E%3C/p%3E
- Next we will add a few racks
- Click on the rack type from the menu
- Click to create a rack type
- Add a name for the new rack
- Name the leaf switch
- Choose a logical leaf device that was previously defined
- Choose the desired logical device from the list
- Click to add a new Generic system
- Add a name to the Generic System Group
- Enter a desired name
- FInish the process of creating a new rack
- Let us add another generic system
- Click to edit the rack type
- Navigate to the leafs tab
- Click on generic systems tab
- Up the Generic system count to 2 and then update the rack type
- Bring everything together in the next steps
- Choose templates from the menu
- Click to create a template
- Add a name first
- Enter more details and then scroll down
- To choose a rack type click on the drop down menu
- Choose the rack type that we created earlier from the menu
- Click to select the desired spine logical device
- Choose the logical spine device from the list
- Enter the desired count
- Click on create to complete the configuration
- Next step is to create a blueprint for the entire Datacenter fabric
- Click to create a new blueprint
- Enter a name for the Blueprint
- Choose the template from the drop down menu
- Choose the desired template
- Click to display the links
- Click on create to finish the process
- Click to view the Blueprint
- Click on staged
- Select the spines to allocate an Autonomous ID
- Click on the edit icon
- Choose the IP address from the Pool
- Save the configuration
- Repeat the same process for the other leaf devices
- Next we need to configure the interface mappings
- Click on one of the spine devices
- Click on the edit icon
- Choose the interface mappings from the the drop down menu
- Make the desired selection
- Click to update the assignments
- Click to assign system IDs next
- Click on the Assigned System IDs tab
- Click on the edit icon
- Choose from the list of System IDs
- Finalize the assignments
- Click on links
- Recitify any cabling errors as shown automatically
- Update the cabling assingments
- Notice the success message once the cabling mapping is sorted out
- Click on commit
- Add the description and click on the commit button
- Success
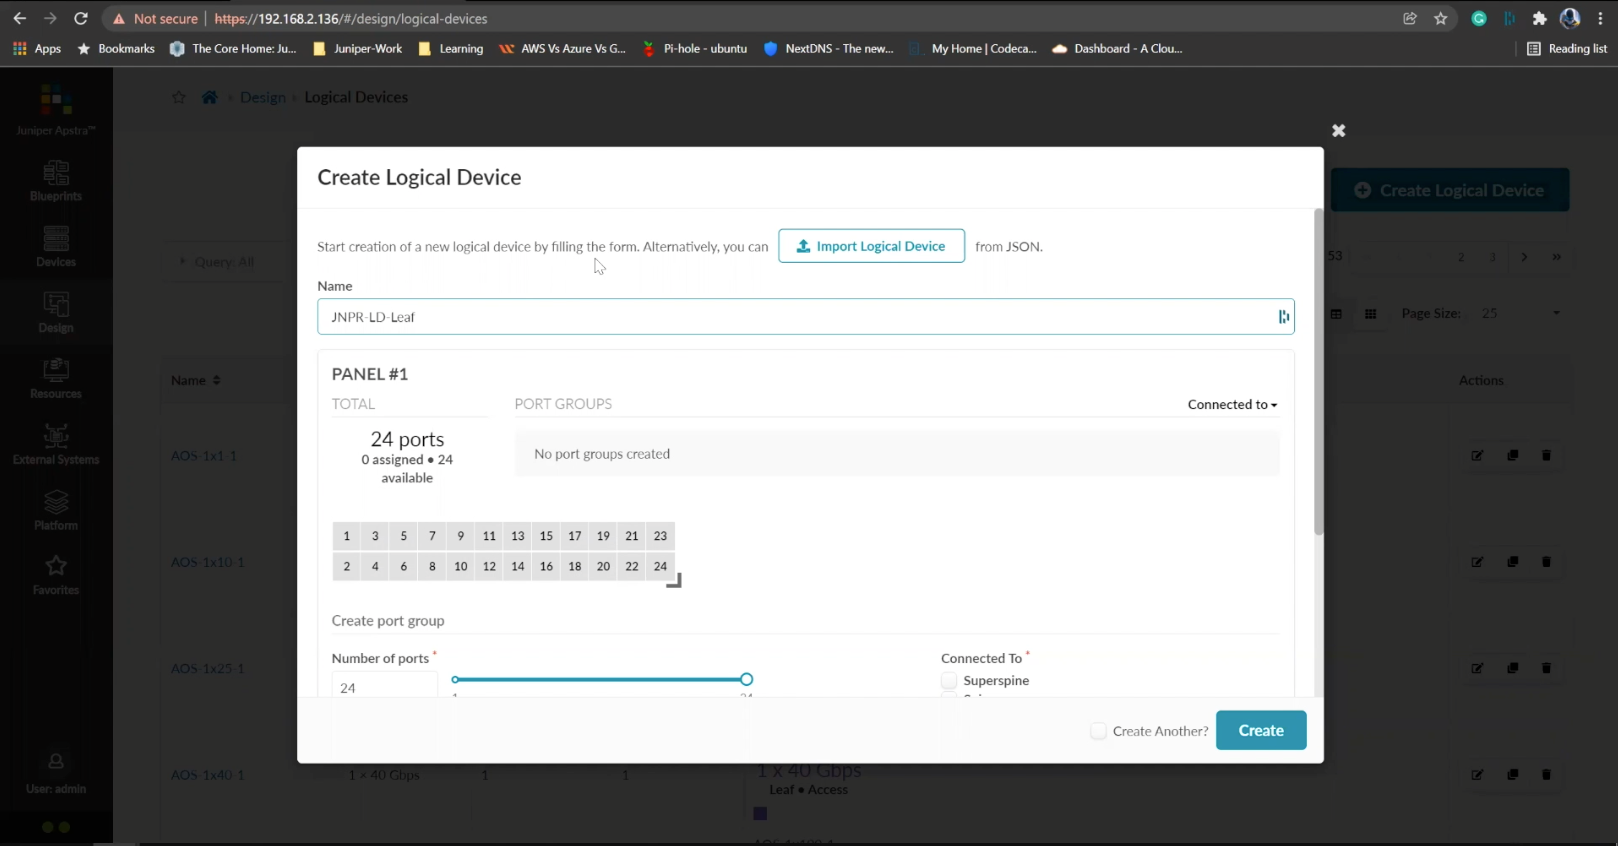
Choose the number of ports
- %3Cp%3EWe%20have%20our%20switches%20already%20managed%20by%20Apstra%2C%20a%20series%20of%20Juniper%20virtual%20QFX%20switches%20in%20this%20example.%20We%20wil%20start%20by%20creating%20logical%20devices.%3C/p%3E
- Click%20on%20logical%20devices%20option%20from%20the%20menu
- %3Cp%3E%3Cspan%20style%3D%22font-size%3A%2013px%3B%22%3ETo%20start%20the%20process%2C%20we%20will%20creat%20a%20leaf%20device%20first.%20%3C/span%3E%3C/p%3E%0A%3Cp%3E%3Cspan%20style%3D%22font-size%3A%2015px%3B%22%3EPlease%20Note%3A%20%3C/span%3E%3C/p%3E%0A%3Cp%3E%3Cspan%20style%3D%22font-size%3A%2013px%3B%22%3EThe%20same%20process%20can%20be%20replicated%20for%20a%20spine%20logical%20device%20too.%20For%20the%20purpose%20of%20this%20demo%2C%20we%20will%20skip%20the%20spine%20logical%20device%20creation%20process.%3C/span%3E%3C/p%3E
- Enter a name for the logical device
- Choose the number of ports
- Create a port group
- Click to finish the creation
- %3Cp%3E%3Cspan%20style%3D%22font-size%3A%2013px%3B%22%3E%3Cspan%20style%3D%22font-family%3A%20Calibri%2C%20sans-serif%3B%22%3ENext%20we%20will%20set%20up%20interface%20maps.%20An%20Interface%20map%20maps%20the%20logical%20device%20to%20the%20actual%20physical%20device.%20ie%3A%20a%20specific%20switch%20and%20model%20that%20is%20used%20in%20the%20actual%20typology.%3C/span%3E%3C/span%3E%3C/p%3E
- Click on the Interface maps option from the menu
- Click to create a new interface map
- Add a name
- Choose a logical device that will be mapped to a physical entity
- Choose from the drop down list
- Choose a device profile from the drop down menu
- Choose the Juniper QFX device as shown
- Choose the interfaces
- %3Cp%3E%3Cspan%20style%3D%22font-size%3A%2013px%3B%22%3EWe%20will%20repeat%20the%20same%20process%20for%20the%20spine%20devices%20defined%20earlier.%20We%20will%20be%20mapping%20it%20to%20the%20Juniper%20QFX%20devices%20as%20well.%3C/span%3E%3C/p%3E
- Next we will add a few racks
- Click on the rack type from the menu
- Click to create a rack type
- Add a name for the new rack
- Name the leaf switch
- Choose a logical leaf device that was previously defined
- Choose the desired logical device from the list
- Click to add a new Generic system
- Add a name to the Generic System Group
- Enter a desired name
- FInish the process of creating a new rack
- Let us add another generic system
- Click to edit the rack type
- Navigate to the leafs tab
- Click on generic systems tab
- Up the Generic system count to 2 and then update the rack type
- Bring everything together in the next steps
- Choose templates from the menu
- Click to create a template
- Add a name first
- Enter more details and then scroll down
- To choose a rack type click on the drop down menu
- Choose the rack type that we created earlier from the menu
- Click to select the desired spine logical device
- Choose the logical spine device from the list
- Enter the desired count
- Click on create to complete the configuration
- Next step is to create a blueprint for the entire Datacenter fabric
- Click to create a new blueprint
- Enter a name for the Blueprint
- Choose the template from the drop down menu
- Choose the desired template
- Click to display the links
- Click on create to finish the process
- Click to view the Blueprint
- Click on staged
- Select the spines to allocate an Autonomous ID
- Click on the edit icon
- Choose the IP address from the Pool
- Save the configuration
- Repeat the same process for the other leaf devices
- Next we need to configure the interface mappings
- Click on one of the spine devices
- Click on the edit icon
- Choose the interface mappings from the the drop down menu
- Make the desired selection
- Click to update the assignments
- Click to assign system IDs next
- Click on the Assigned System IDs tab
- Click on the edit icon
- Choose from the list of System IDs
- Finalize the assignments
- Click on links
- Recitify any cabling errors as shown automatically
- Update the cabling assingments
- Notice the success message once the cabling mapping is sorted out
- Click on commit
- Add the description and click on the commit button
- Success
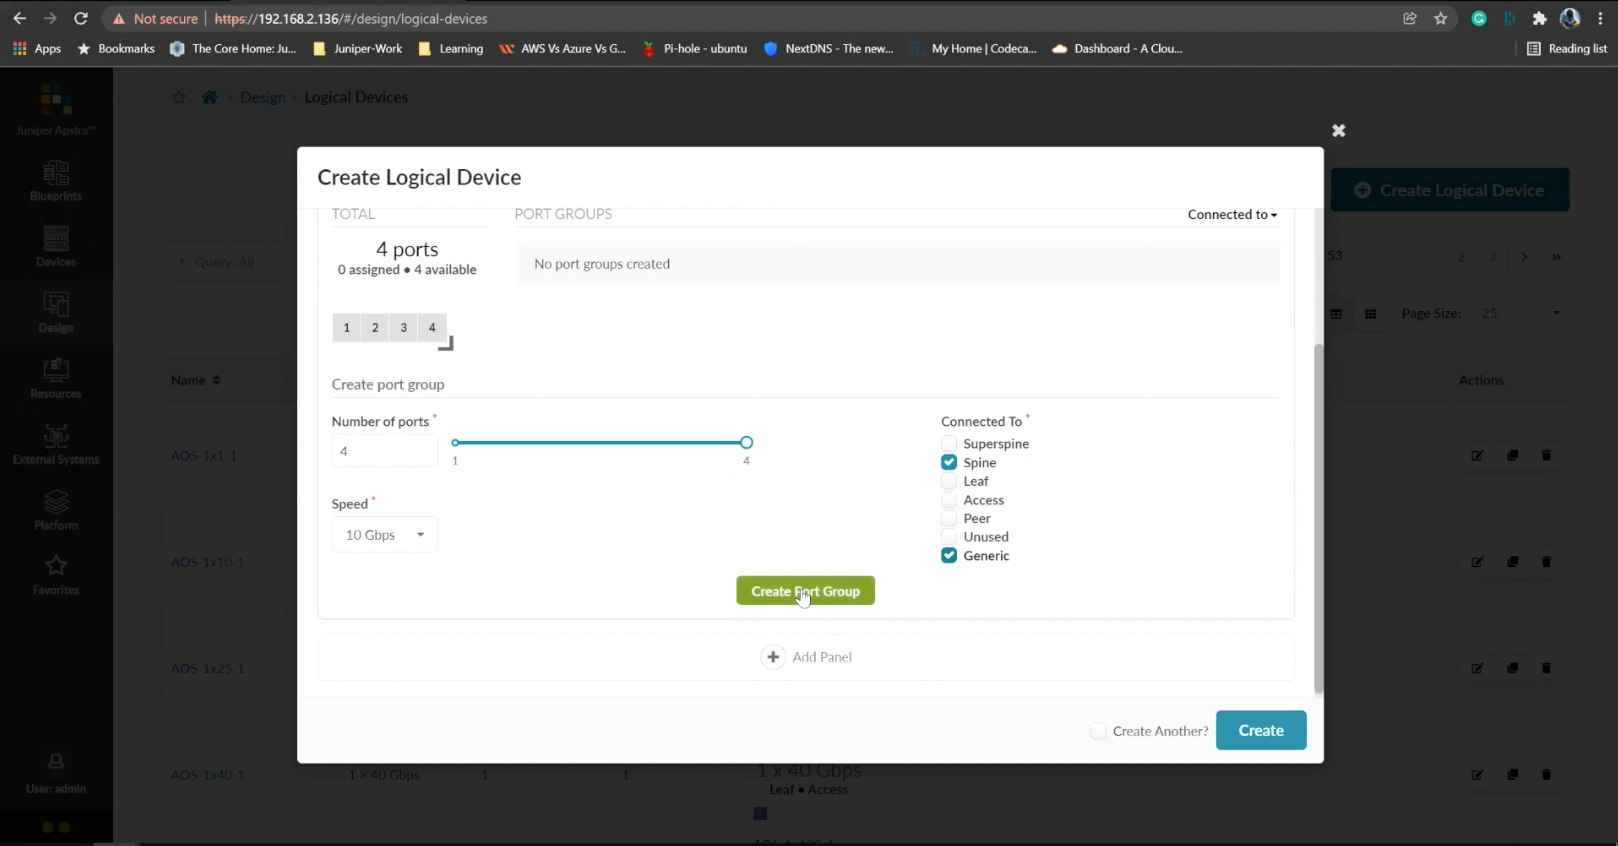
Create a port group
Addthe details including number of ports, the speed and the connection details.
- %3Cp%3EWe%20have%20our%20switches%20already%20managed%20by%20Apstra%2C%20a%20series%20of%20Juniper%20virtual%20QFX%20switches%20in%20this%20example.%20We%20wil%20start%20by%20creating%20logical%20devices.%3C/p%3E
- Click%20on%20logical%20devices%20option%20from%20the%20menu
- %3Cp%3E%3Cspan%20style%3D%22font-size%3A%2013px%3B%22%3ETo%20start%20the%20process%2C%20we%20will%20creat%20a%20leaf%20device%20first.%20%3C/span%3E%3C/p%3E%0A%3Cp%3E%3Cspan%20style%3D%22font-size%3A%2015px%3B%22%3EPlease%20Note%3A%20%3C/span%3E%3C/p%3E%0A%3Cp%3E%3Cspan%20style%3D%22font-size%3A%2013px%3B%22%3EThe%20same%20process%20can%20be%20replicated%20for%20a%20spine%20logical%20device%20too.%20For%20the%20purpose%20of%20this%20demo%2C%20we%20will%20skip%20the%20spine%20logical%20device%20creation%20process.%3C/span%3E%3C/p%3E
- Enter a name for the logical device
- Choose the number of ports
- Create a port group
- Click to finish the creation
- %3Cp%3E%3Cspan%20style%3D%22font-size%3A%2013px%3B%22%3E%3Cspan%20style%3D%22font-family%3A%20Calibri%2C%20sans-serif%3B%22%3ENext%20we%20will%20set%20up%20interface%20maps.%20An%20Interface%20map%20maps%20the%20logical%20device%20to%20the%20actual%20physical%20device.%20ie%3A%20a%20specific%20switch%20and%20model%20that%20is%20used%20in%20the%20actual%20typology.%3C/span%3E%3C/span%3E%3C/p%3E
- Click on the Interface maps option from the menu
- Click to create a new interface map
- Add a name
- Choose a logical device that will be mapped to a physical entity
- Choose from the drop down list
- Choose a device profile from the drop down menu
- Choose the Juniper QFX device as shown
- Choose the interfaces
- %3Cp%3E%3Cspan%20style%3D%22font-size%3A%2013px%3B%22%3EWe%20will%20repeat%20the%20same%20process%20for%20the%20spine%20devices%20defined%20earlier.%20We%20will%20be%20mapping%20it%20to%20the%20Juniper%20QFX%20devices%20as%20well.%3C/span%3E%3C/p%3E
- Next we will add a few racks
- Click on the rack type from the menu
- Click to create a rack type
- Add a name for the new rack
- Name the leaf switch
- Choose a logical leaf device that was previously defined
- Choose the desired logical device from the list
- Click to add a new Generic system
- Add a name to the Generic System Group
- Enter a desired name
- FInish the process of creating a new rack
- Let us add another generic system
- Click to edit the rack type
- Navigate to the leafs tab
- Click on generic systems tab
- Up the Generic system count to 2 and then update the rack type
- Bring everything together in the next steps
- Choose templates from the menu
- Click to create a template
- Add a name first
- Enter more details and then scroll down
- To choose a rack type click on the drop down menu
- Choose the rack type that we created earlier from the menu
- Click to select the desired spine logical device
- Choose the logical spine device from the list
- Enter the desired count
- Click on create to complete the configuration
- Next step is to create a blueprint for the entire Datacenter fabric
- Click to create a new blueprint
- Enter a name for the Blueprint
- Choose the template from the drop down menu
- Choose the desired template
- Click to display the links
- Click on create to finish the process
- Click to view the Blueprint
- Click on staged
- Select the spines to allocate an Autonomous ID
- Click on the edit icon
- Choose the IP address from the Pool
- Save the configuration
- Repeat the same process for the other leaf devices
- Next we need to configure the interface mappings
- Click on one of the spine devices
- Click on the edit icon
- Choose the interface mappings from the the drop down menu
- Make the desired selection
- Click to update the assignments
- Click to assign system IDs next
- Click on the Assigned System IDs tab
- Click on the edit icon
- Choose from the list of System IDs
- Finalize the assignments
- Click on links
- Recitify any cabling errors as shown automatically
- Update the cabling assingments
- Notice the success message once the cabling mapping is sorted out
- Click on commit
- Add the description and click on the commit button
- Success
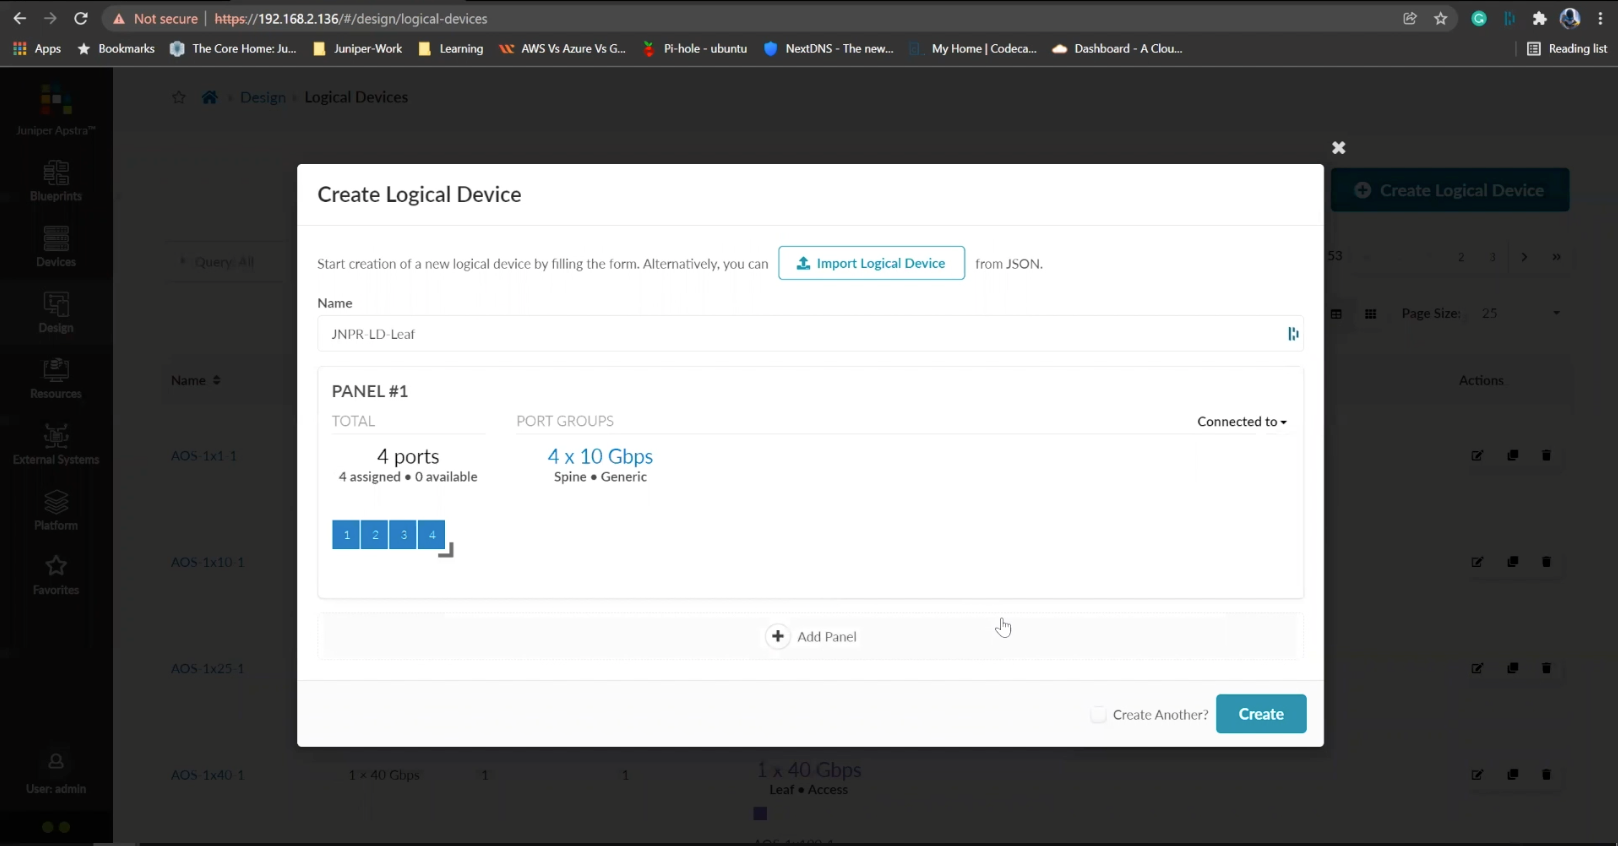
Click to finish the creation
As noted earlier, we will repeat this process multiple times for every new logical device we wish to create including the spine switches.
Preview
Write
Preview
Write
Preview
Write
Preview
Write
Preview
Markdown
WYSIWYG
\\\
\\\
Markdown
WYSIWYG
\<br>
\<br>
Markdown
WYSIWYG
<br>
<br>
Markdown
WYSIWYG
- %3Cp%3EWe%20have%20our%20switches%20already%20managed%20by%20Apstra%2C%20a%20series%20of%20Juniper%20virtual%20QFX%20switches%20in%20this%20example.%20We%20wil%20start%20by%20creating%20logical%20devices.%3C/p%3E
- Click%20on%20logical%20devices%20option%20from%20the%20menu
- %3Cp%3E%3Cspan%20style%3D%22font-size%3A%2013px%3B%22%3ETo%20start%20the%20process%2C%20we%20will%20creat%20a%20leaf%20device%20first.%20%3C/span%3E%3C/p%3E%0A%3Cp%3E%3Cspan%20style%3D%22font-size%3A%2015px%3B%22%3EPlease%20Note%3A%20%3C/span%3E%3C/p%3E%0A%3Cp%3E%3Cspan%20style%3D%22font-size%3A%2013px%3B%22%3EThe%20same%20process%20can%20be%20replicated%20for%20a%20spine%20logical%20device%20too.%20For%20the%20purpose%20of%20this%20demo%2C%20we%20will%20skip%20the%20spine%20logical%20device%20creation%20process.%3C/span%3E%3C/p%3E
- Enter a name for the logical device
- Choose the number of ports
- Create a port group
- Click to finish the creation
- %3Cp%3E%3Cspan%20style%3D%22font-size%3A%2013px%3B%22%3E%3Cspan%20style%3D%22font-family%3A%20Calibri%2C%20sans-serif%3B%22%3ENext%20we%20will%20set%20up%20interface%20maps.%20An%20Interface%20map%20maps%20the%20logical%20device%20to%20the%20actual%20physical%20device.%20ie%3A%20a%20specific%20switch%20and%20model%20that%20is%20used%20in%20the%20actual%20typology.%3C/span%3E%3C/span%3E%3C/p%3E
- Click on the Interface maps option from the menu
- Click to create a new interface map
- Add a name
- Choose a logical device that will be mapped to a physical entity
- Choose from the drop down list
- Choose a device profile from the drop down menu
- Choose the Juniper QFX device as shown
- Choose the interfaces
- %3Cp%3E%3Cspan%20style%3D%22font-size%3A%2013px%3B%22%3EWe%20will%20repeat%20the%20same%20process%20for%20the%20spine%20devices%20defined%20earlier.%20We%20will%20be%20mapping%20it%20to%20the%20Juniper%20QFX%20devices%20as%20well.%3C/span%3E%3C/p%3E
- Next we will add a few racks
- Click on the rack type from the menu
- Click to create a rack type
- Add a name for the new rack
- Name the leaf switch
- Choose a logical leaf device that was previously defined
- Choose the desired logical device from the list
- Click to add a new Generic system
- Add a name to the Generic System Group
- Enter a desired name
- FInish the process of creating a new rack
- Let us add another generic system
- Click to edit the rack type
- Navigate to the leafs tab
- Click on generic systems tab
- Up the Generic system count to 2 and then update the rack type
- Bring everything together in the next steps
- Choose templates from the menu
- Click to create a template
- Add a name first
- Enter more details and then scroll down
- To choose a rack type click on the drop down menu
- Choose the rack type that we created earlier from the menu
- Click to select the desired spine logical device
- Choose the logical spine device from the list
- Enter the desired count
- Click on create to complete the configuration
- Next step is to create a blueprint for the entire Datacenter fabric
- Click to create a new blueprint
- Enter a name for the Blueprint
- Choose the template from the drop down menu
- Choose the desired template
- Click to display the links
- Click on create to finish the process
- Click to view the Blueprint
- Click on staged
- Select the spines to allocate an Autonomous ID
- Click on the edit icon
- Choose the IP address from the Pool
- Save the configuration
- Repeat the same process for the other leaf devices
- Next we need to configure the interface mappings
- Click on one of the spine devices
- Click on the edit icon
- Choose the interface mappings from the the drop down menu
- Make the desired selection
- Click to update the assignments
- Click to assign system IDs next
- Click on the Assigned System IDs tab
- Click on the edit icon
- Choose from the list of System IDs
- Finalize the assignments
- Click on links
- Recitify any cabling errors as shown automatically
- Update the cabling assingments
- Notice the success message once the cabling mapping is sorted out
- Click on commit
- Add the description and click on the commit button
- Success
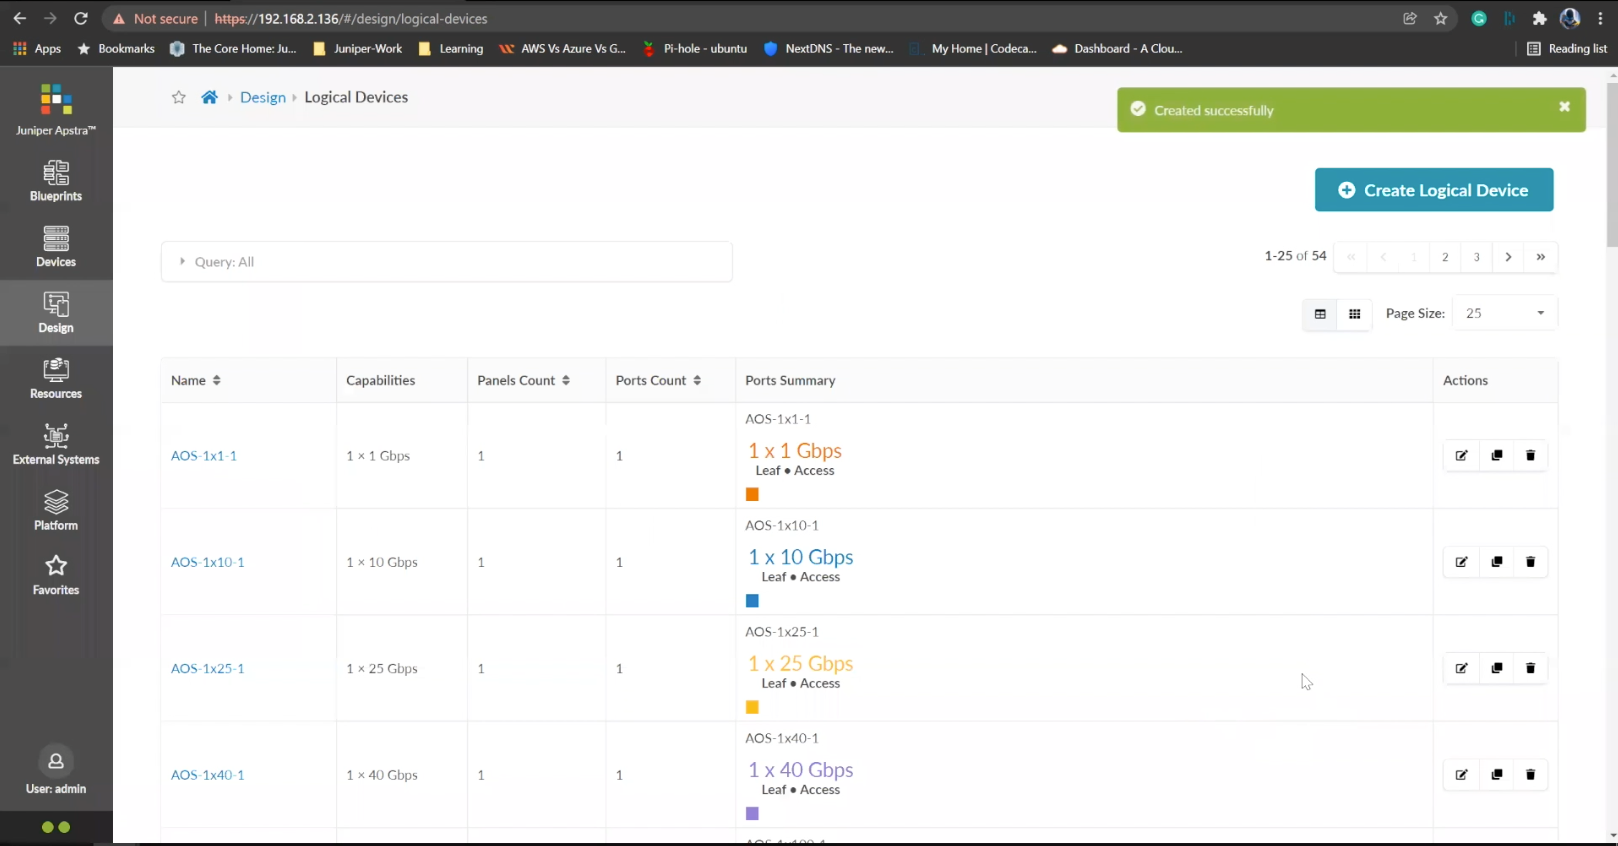
%3Cp%3E%3Cspan%20style%3D%22font-size%3A%2013px%3B%22%3E%3Cspan%20style%3D%22font-family%3A%20Calibri%2C%20sans-serif%3B%22%3ENext%20we%20will%20set%20up%20interface%20maps.%20An%20Interface%20map%20maps%20the%20logical%20device%20to%20the%20actual%20physical%20device.%20ie%3A%20a%20specific%20switch%20and%20model%20that%20is%20used%20in%20the%20actual%20typology.%3C/span%3E%3C/span%3E%3C/p%3E
%3Cp%3E%3Cspan%20style%3D%22font-size%3A%2013px%3B%22%3E%3Cspan%20style%3D%22font-family%3A%20Calibri%2C%20sans-serif%3B%22%3ENext%20we%20will%20set%20up%20interface%20maps.%20An%20Interface%20map%20maps%20the%20logical%20device%20to%20the%20actual%20physical%20device.%20ie%3A%20a%20specific%20switch%20and%20model%20that%20is%20used%20in%20the%20actual%20typology.%3C/span%3E%3C/span%3E%3C/p%3E
- %3Cp%3EWe%20have%20our%20switches%20already%20managed%20by%20Apstra%2C%20a%20series%20of%20Juniper%20virtual%20QFX%20switches%20in%20this%20example.%20We%20wil%20start%20by%20creating%20logical%20devices.%3C/p%3E
- Click%20on%20logical%20devices%20option%20from%20the%20menu
- %3Cp%3E%3Cspan%20style%3D%22font-size%3A%2013px%3B%22%3ETo%20start%20the%20process%2C%20we%20will%20creat%20a%20leaf%20device%20first.%20%3C/span%3E%3C/p%3E%0A%3Cp%3E%3Cspan%20style%3D%22font-size%3A%2015px%3B%22%3EPlease%20Note%3A%20%3C/span%3E%3C/p%3E%0A%3Cp%3E%3Cspan%20style%3D%22font-size%3A%2013px%3B%22%3EThe%20same%20process%20can%20be%20replicated%20for%20a%20spine%20logical%20device%20too.%20For%20the%20purpose%20of%20this%20demo%2C%20we%20will%20skip%20the%20spine%20logical%20device%20creation%20process.%3C/span%3E%3C/p%3E
- Enter a name for the logical device
- Choose the number of ports
- Create a port group
- Click to finish the creation
- %3Cp%3E%3Cspan%20style%3D%22font-size%3A%2013px%3B%22%3E%3Cspan%20style%3D%22font-family%3A%20Calibri%2C%20sans-serif%3B%22%3ENext%20we%20will%20set%20up%20interface%20maps.%20An%20Interface%20map%20maps%20the%20logical%20device%20to%20the%20actual%20physical%20device.%20ie%3A%20a%20specific%20switch%20and%20model%20that%20is%20used%20in%20the%20actual%20typology.%3C/span%3E%3C/span%3E%3C/p%3E
- Click on the Interface maps option from the menu
- Click to create a new interface map
- Add a name
- Choose a logical device that will be mapped to a physical entity
- Choose from the drop down list
- Choose a device profile from the drop down menu
- Choose the Juniper QFX device as shown
- Choose the interfaces
- %3Cp%3E%3Cspan%20style%3D%22font-size%3A%2013px%3B%22%3EWe%20will%20repeat%20the%20same%20process%20for%20the%20spine%20devices%20defined%20earlier.%20We%20will%20be%20mapping%20it%20to%20the%20Juniper%20QFX%20devices%20as%20well.%3C/span%3E%3C/p%3E
- Next we will add a few racks
- Click on the rack type from the menu
- Click to create a rack type
- Add a name for the new rack
- Name the leaf switch
- Choose a logical leaf device that was previously defined
- Choose the desired logical device from the list
- Click to add a new Generic system
- Add a name to the Generic System Group
- Enter a desired name
- FInish the process of creating a new rack
- Let us add another generic system
- Click to edit the rack type
- Navigate to the leafs tab
- Click on generic systems tab
- Up the Generic system count to 2 and then update the rack type
- Bring everything together in the next steps
- Choose templates from the menu
- Click to create a template
- Add a name first
- Enter more details and then scroll down
- To choose a rack type click on the drop down menu
- Choose the rack type that we created earlier from the menu
- Click to select the desired spine logical device
- Choose the logical spine device from the list
- Enter the desired count
- Click on create to complete the configuration
- Next step is to create a blueprint for the entire Datacenter fabric
- Click to create a new blueprint
- Enter a name for the Blueprint
- Choose the template from the drop down menu
- Choose the desired template
- Click to display the links
- Click on create to finish the process
- Click to view the Blueprint
- Click on staged
- Select the spines to allocate an Autonomous ID
- Click on the edit icon
- Choose the IP address from the Pool
- Save the configuration
- Repeat the same process for the other leaf devices
- Next we need to configure the interface mappings
- Click on one of the spine devices
- Click on the edit icon
- Choose the interface mappings from the the drop down menu
- Make the desired selection
- Click to update the assignments
- Click to assign system IDs next
- Click on the Assigned System IDs tab
- Click on the edit icon
- Choose from the list of System IDs
- Finalize the assignments
- Click on links
- Recitify any cabling errors as shown automatically
- Update the cabling assingments
- Notice the success message once the cabling mapping is sorted out
- Click on commit
- Add the description and click on the commit button
- Success
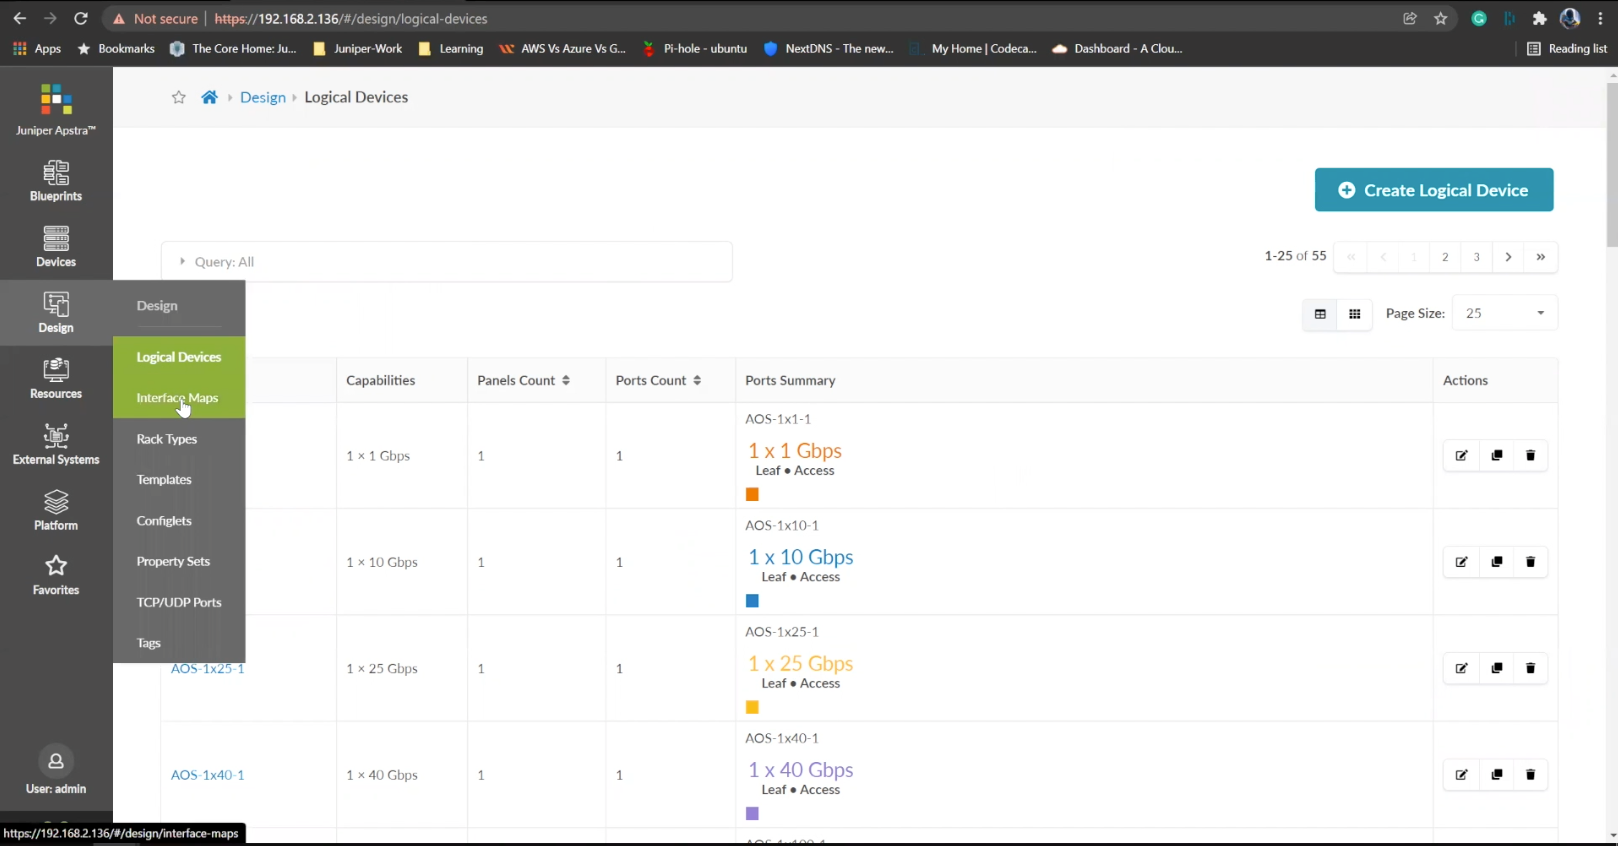
Click on the Interface maps option from the menu
- %3Cp%3EWe%20have%20our%20switches%20already%20managed%20by%20Apstra%2C%20a%20series%20of%20Juniper%20virtual%20QFX%20switches%20in%20this%20example.%20We%20wil%20start%20by%20creating%20logical%20devices.%3C/p%3E
- Click%20on%20logical%20devices%20option%20from%20the%20menu
- %3Cp%3E%3Cspan%20style%3D%22font-size%3A%2013px%3B%22%3ETo%20start%20the%20process%2C%20we%20will%20creat%20a%20leaf%20device%20first.%20%3C/span%3E%3C/p%3E%0A%3Cp%3E%3Cspan%20style%3D%22font-size%3A%2015px%3B%22%3EPlease%20Note%3A%20%3C/span%3E%3C/p%3E%0A%3Cp%3E%3Cspan%20style%3D%22font-size%3A%2013px%3B%22%3EThe%20same%20process%20can%20be%20replicated%20for%20a%20spine%20logical%20device%20too.%20For%20the%20purpose%20of%20this%20demo%2C%20we%20will%20skip%20the%20spine%20logical%20device%20creation%20process.%3C/span%3E%3C/p%3E
- Enter a name for the logical device
- Choose the number of ports
- Create a port group
- Click to finish the creation
- %3Cp%3E%3Cspan%20style%3D%22font-size%3A%2013px%3B%22%3E%3Cspan%20style%3D%22font-family%3A%20Calibri%2C%20sans-serif%3B%22%3ENext%20we%20will%20set%20up%20interface%20maps.%20An%20Interface%20map%20maps%20the%20logical%20device%20to%20the%20actual%20physical%20device.%20ie%3A%20a%20specific%20switch%20and%20model%20that%20is%20used%20in%20the%20actual%20typology.%3C/span%3E%3C/span%3E%3C/p%3E
- Click on the Interface maps option from the menu
- Click to create a new interface map
- Add a name
- Choose a logical device that will be mapped to a physical entity
- Choose from the drop down list
- Choose a device profile from the drop down menu
- Choose the Juniper QFX device as shown
- Choose the interfaces
- %3Cp%3E%3Cspan%20style%3D%22font-size%3A%2013px%3B%22%3EWe%20will%20repeat%20the%20same%20process%20for%20the%20spine%20devices%20defined%20earlier.%20We%20will%20be%20mapping%20it%20to%20the%20Juniper%20QFX%20devices%20as%20well.%3C/span%3E%3C/p%3E
- Next we will add a few racks
- Click on the rack type from the menu
- Click to create a rack type
- Add a name for the new rack
- Name the leaf switch
- Choose a logical leaf device that was previously defined
- Choose the desired logical device from the list
- Click to add a new Generic system
- Add a name to the Generic System Group
- Enter a desired name
- FInish the process of creating a new rack
- Let us add another generic system
- Click to edit the rack type
- Navigate to the leafs tab
- Click on generic systems tab
- Up the Generic system count to 2 and then update the rack type
- Bring everything together in the next steps
- Choose templates from the menu
- Click to create a template
- Add a name first
- Enter more details and then scroll down
- To choose a rack type click on the drop down menu
- Choose the rack type that we created earlier from the menu
- Click to select the desired spine logical device
- Choose the logical spine device from the list
- Enter the desired count
- Click on create to complete the configuration
- Next step is to create a blueprint for the entire Datacenter fabric
- Click to create a new blueprint
- Enter a name for the Blueprint
- Choose the template from the drop down menu
- Choose the desired template
- Click to display the links
- Click on create to finish the process
- Click to view the Blueprint
- Click on staged
- Select the spines to allocate an Autonomous ID
- Click on the edit icon
- Choose the IP address from the Pool
- Save the configuration
- Repeat the same process for the other leaf devices
- Next we need to configure the interface mappings
- Click on one of the spine devices
- Click on the edit icon
- Choose the interface mappings from the the drop down menu
- Make the desired selection
- Click to update the assignments
- Click to assign system IDs next
- Click on the Assigned System IDs tab
- Click on the edit icon
- Choose from the list of System IDs
- Finalize the assignments
- Click on links
- Recitify any cabling errors as shown automatically
- Update the cabling assingments
- Notice the success message once the cabling mapping is sorted out
- Click on commit
- Add the description and click on the commit button
- Success
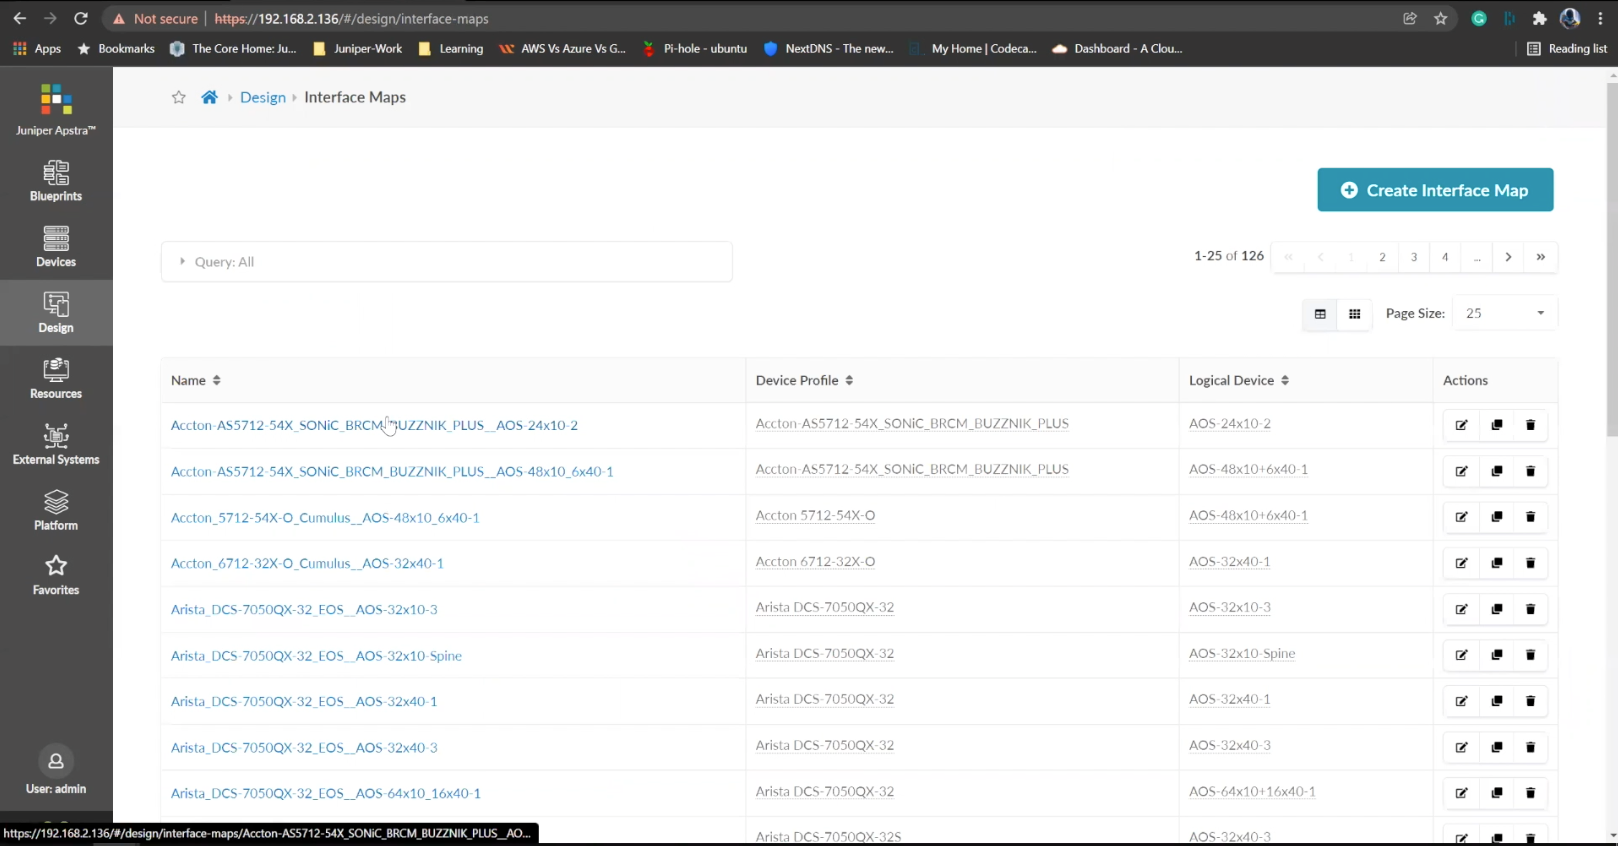
Click to create a new interface map
- %3Cp%3EWe%20have%20our%20switches%20already%20managed%20by%20Apstra%2C%20a%20series%20of%20Juniper%20virtual%20QFX%20switches%20in%20this%20example.%20We%20wil%20start%20by%20creating%20logical%20devices.%3C/p%3E
- Click%20on%20logical%20devices%20option%20from%20the%20menu
- %3Cp%3E%3Cspan%20style%3D%22font-size%3A%2013px%3B%22%3ETo%20start%20the%20process%2C%20we%20will%20creat%20a%20leaf%20device%20first.%20%3C/span%3E%3C/p%3E%0A%3Cp%3E%3Cspan%20style%3D%22font-size%3A%2015px%3B%22%3EPlease%20Note%3A%20%3C/span%3E%3C/p%3E%0A%3Cp%3E%3Cspan%20style%3D%22font-size%3A%2013px%3B%22%3EThe%20same%20process%20can%20be%20replicated%20for%20a%20spine%20logical%20device%20too.%20For%20the%20purpose%20of%20this%20demo%2C%20we%20will%20skip%20the%20spine%20logical%20device%20creation%20process.%3C/span%3E%3C/p%3E
- Enter a name for the logical device
- Choose the number of ports
- Create a port group
- Click to finish the creation
- %3Cp%3E%3Cspan%20style%3D%22font-size%3A%2013px%3B%22%3E%3Cspan%20style%3D%22font-family%3A%20Calibri%2C%20sans-serif%3B%22%3ENext%20we%20will%20set%20up%20interface%20maps.%20An%20Interface%20map%20maps%20the%20logical%20device%20to%20the%20actual%20physical%20device.%20ie%3A%20a%20specific%20switch%20and%20model%20that%20is%20used%20in%20the%20actual%20typology.%3C/span%3E%3C/span%3E%3C/p%3E
- Click on the Interface maps option from the menu
- Click to create a new interface map
- Add a name
- Choose a logical device that will be mapped to a physical entity
- Choose from the drop down list
- Choose a device profile from the drop down menu
- Choose the Juniper QFX device as shown
- Choose the interfaces
- %3Cp%3E%3Cspan%20style%3D%22font-size%3A%2013px%3B%22%3EWe%20will%20repeat%20the%20same%20process%20for%20the%20spine%20devices%20defined%20earlier.%20We%20will%20be%20mapping%20it%20to%20the%20Juniper%20QFX%20devices%20as%20well.%3C/span%3E%3C/p%3E
- Next we will add a few racks
- Click on the rack type from the menu
- Click to create a rack type
- Add a name for the new rack
- Name the leaf switch
- Choose a logical leaf device that was previously defined
- Choose the desired logical device from the list
- Click to add a new Generic system
- Add a name to the Generic System Group
- Enter a desired name
- FInish the process of creating a new rack
- Let us add another generic system
- Click to edit the rack type
- Navigate to the leafs tab
- Click on generic systems tab
- Up the Generic system count to 2 and then update the rack type
- Bring everything together in the next steps
- Choose templates from the menu
- Click to create a template
- Add a name first
- Enter more details and then scroll down
- To choose a rack type click on the drop down menu
- Choose the rack type that we created earlier from the menu
- Click to select the desired spine logical device
- Choose the logical spine device from the list
- Enter the desired count
- Click on create to complete the configuration
- Next step is to create a blueprint for the entire Datacenter fabric
- Click to create a new blueprint
- Enter a name for the Blueprint
- Choose the template from the drop down menu
- Choose the desired template
- Click to display the links
- Click on create to finish the process
- Click to view the Blueprint
- Click on staged
- Select the spines to allocate an Autonomous ID
- Click on the edit icon
- Choose the IP address from the Pool
- Save the configuration
- Repeat the same process for the other leaf devices
- Next we need to configure the interface mappings
- Click on one of the spine devices
- Click on the edit icon
- Choose the interface mappings from the the drop down menu
- Make the desired selection
- Click to update the assignments
- Click to assign system IDs next
- Click on the Assigned System IDs tab
- Click on the edit icon
- Choose from the list of System IDs
- Finalize the assignments
- Click on links
- Recitify any cabling errors as shown automatically
- Update the cabling assingments
- Notice the success message once the cabling mapping is sorted out
- Click on commit
- Add the description and click on the commit button
- Success
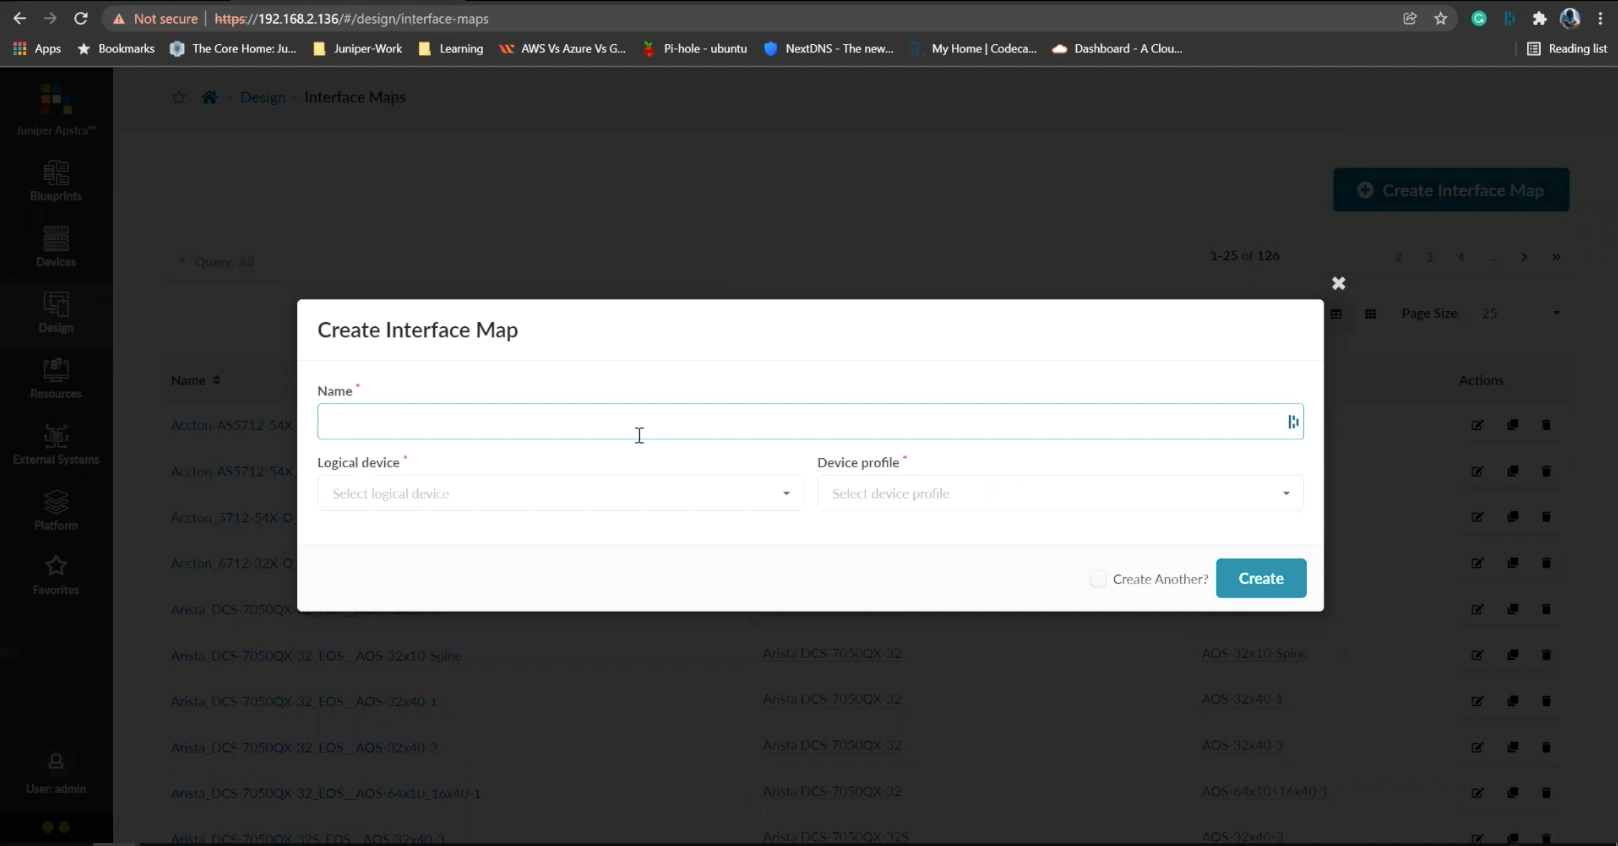
Add a name
- %3Cp%3EWe%20have%20our%20switches%20already%20managed%20by%20Apstra%2C%20a%20series%20of%20Juniper%20virtual%20QFX%20switches%20in%20this%20example.%20We%20wil%20start%20by%20creating%20logical%20devices.%3C/p%3E
- Click%20on%20logical%20devices%20option%20from%20the%20menu
- %3Cp%3E%3Cspan%20style%3D%22font-size%3A%2013px%3B%22%3ETo%20start%20the%20process%2C%20we%20will%20creat%20a%20leaf%20device%20first.%20%3C/span%3E%3C/p%3E%0A%3Cp%3E%3Cspan%20style%3D%22font-size%3A%2015px%3B%22%3EPlease%20Note%3A%20%3C/span%3E%3C/p%3E%0A%3Cp%3E%3Cspan%20style%3D%22font-size%3A%2013px%3B%22%3EThe%20same%20process%20can%20be%20replicated%20for%20a%20spine%20logical%20device%20too.%20For%20the%20purpose%20of%20this%20demo%2C%20we%20will%20skip%20the%20spine%20logical%20device%20creation%20process.%3C/span%3E%3C/p%3E
- Enter a name for the logical device
- Choose the number of ports
- Create a port group
- Click to finish the creation
- %3Cp%3E%3Cspan%20style%3D%22font-size%3A%2013px%3B%22%3E%3Cspan%20style%3D%22font-family%3A%20Calibri%2C%20sans-serif%3B%22%3ENext%20we%20will%20set%20up%20interface%20maps.%20An%20Interface%20map%20maps%20the%20logical%20device%20to%20the%20actual%20physical%20device.%20ie%3A%20a%20specific%20switch%20and%20model%20that%20is%20used%20in%20the%20actual%20typology.%3C/span%3E%3C/span%3E%3C/p%3E
- Click on the Interface maps option from the menu
- Click to create a new interface map
- Add a name
- Choose a logical device that will be mapped to a physical entity
- Choose from the drop down list
- Choose a device profile from the drop down menu
- Choose the Juniper QFX device as shown
- Choose the interfaces
- %3Cp%3E%3Cspan%20style%3D%22font-size%3A%2013px%3B%22%3EWe%20will%20repeat%20the%20same%20process%20for%20the%20spine%20devices%20defined%20earlier.%20We%20will%20be%20mapping%20it%20to%20the%20Juniper%20QFX%20devices%20as%20well.%3C/span%3E%3C/p%3E
- Next we will add a few racks
- Click on the rack type from the menu
- Click to create a rack type
- Add a name for the new rack
- Name the leaf switch
- Choose a logical leaf device that was previously defined
- Choose the desired logical device from the list
- Click to add a new Generic system
- Add a name to the Generic System Group
- Enter a desired name
- FInish the process of creating a new rack
- Let us add another generic system
- Click to edit the rack type
- Navigate to the leafs tab
- Click on generic systems tab
- Up the Generic system count to 2 and then update the rack type
- Bring everything together in the next steps
- Choose templates from the menu
- Click to create a template
- Add a name first
- Enter more details and then scroll down
- To choose a rack type click on the drop down menu
- Choose the rack type that we created earlier from the menu
- Click to select the desired spine logical device
- Choose the logical spine device from the list
- Enter the desired count
- Click on create to complete the configuration
- Next step is to create a blueprint for the entire Datacenter fabric
- Click to create a new blueprint
- Enter a name for the Blueprint
- Choose the template from the drop down menu
- Choose the desired template
- Click to display the links
- Click on create to finish the process
- Click to view the Blueprint
- Click on staged
- Select the spines to allocate an Autonomous ID
- Click on the edit icon
- Choose the IP address from the Pool
- Save the configuration
- Repeat the same process for the other leaf devices
- Next we need to configure the interface mappings
- Click on one of the spine devices
- Click on the edit icon
- Choose the interface mappings from the the drop down menu
- Make the desired selection
- Click to update the assignments
- Click to assign system IDs next
- Click on the Assigned System IDs tab
- Click on the edit icon
- Choose from the list of System IDs
- Finalize the assignments
- Click on links
- Recitify any cabling errors as shown automatically
- Update the cabling assingments
- Notice the success message once the cabling mapping is sorted out
- Click on commit
- Add the description and click on the commit button
- Success
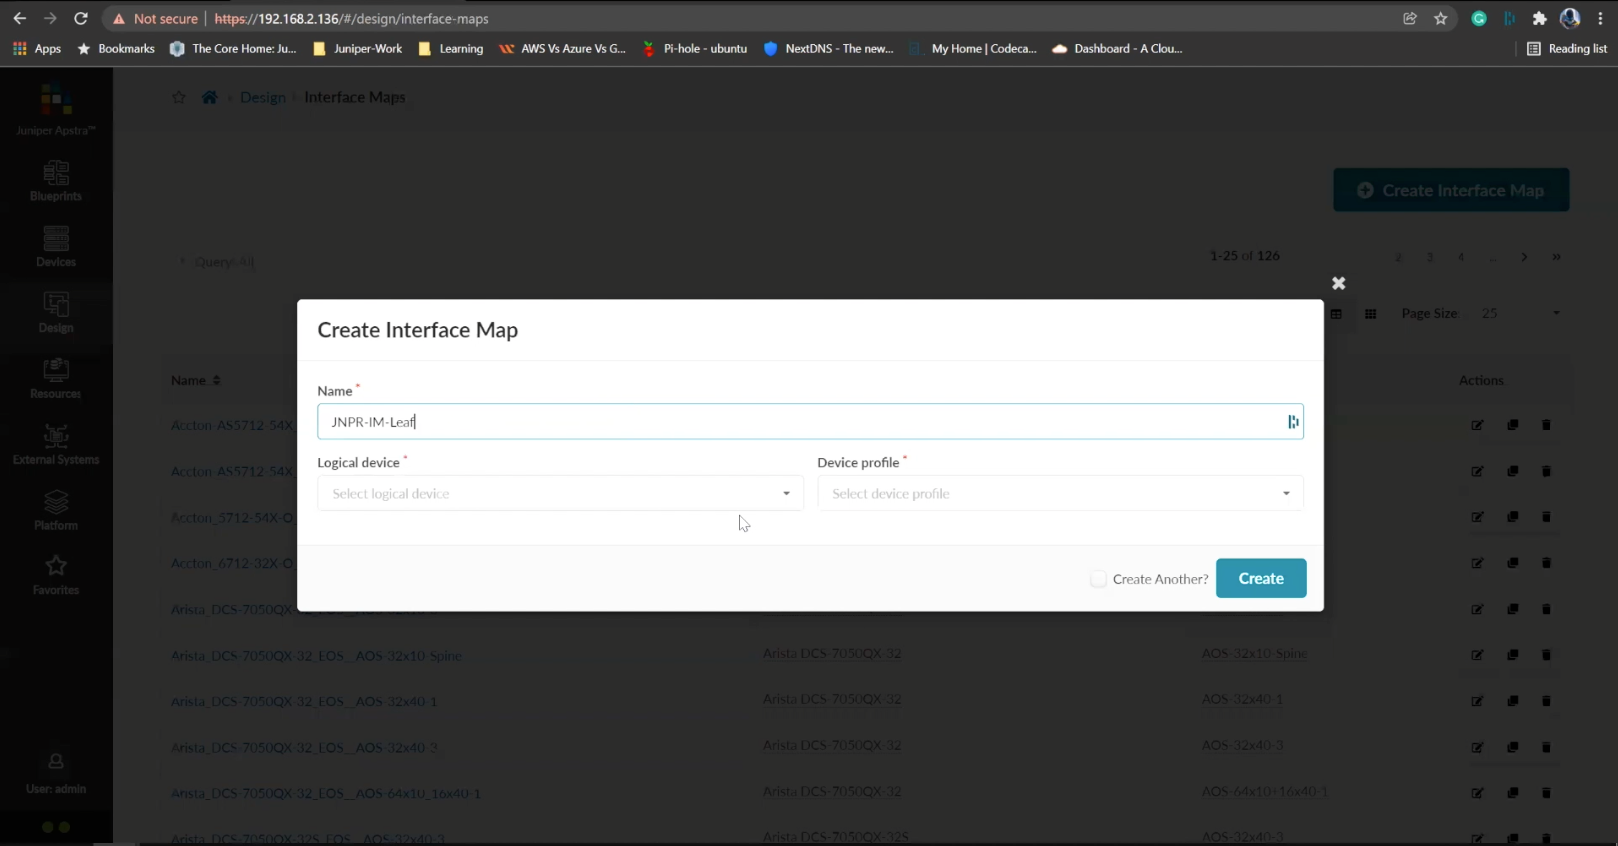
Choose a logical device that will be mapped to a physical entity
- %3Cp%3EWe%20have%20our%20switches%20already%20managed%20by%20Apstra%2C%20a%20series%20of%20Juniper%20virtual%20QFX%20switches%20in%20this%20example.%20We%20wil%20start%20by%20creating%20logical%20devices.%3C/p%3E
- Click%20on%20logical%20devices%20option%20from%20the%20menu
- %3Cp%3E%3Cspan%20style%3D%22font-size%3A%2013px%3B%22%3ETo%20start%20the%20process%2C%20we%20will%20creat%20a%20leaf%20device%20first.%20%3C/span%3E%3C/p%3E%0A%3Cp%3E%3Cspan%20style%3D%22font-size%3A%2015px%3B%22%3EPlease%20Note%3A%20%3C/span%3E%3C/p%3E%0A%3Cp%3E%3Cspan%20style%3D%22font-size%3A%2013px%3B%22%3EThe%20same%20process%20can%20be%20replicated%20for%20a%20spine%20logical%20device%20too.%20For%20the%20purpose%20of%20this%20demo%2C%20we%20will%20skip%20the%20spine%20logical%20device%20creation%20process.%3C/span%3E%3C/p%3E
- Enter a name for the logical device
- Choose the number of ports
- Create a port group
- Click to finish the creation
- %3Cp%3E%3Cspan%20style%3D%22font-size%3A%2013px%3B%22%3E%3Cspan%20style%3D%22font-family%3A%20Calibri%2C%20sans-serif%3B%22%3ENext%20we%20will%20set%20up%20interface%20maps.%20An%20Interface%20map%20maps%20the%20logical%20device%20to%20the%20actual%20physical%20device.%20ie%3A%20a%20specific%20switch%20and%20model%20that%20is%20used%20in%20the%20actual%20typology.%3C/span%3E%3C/span%3E%3C/p%3E
- Click on the Interface maps option from the menu
- Click to create a new interface map
- Add a name
- Choose a logical device that will be mapped to a physical entity
- Choose from the drop down list
- Choose a device profile from the drop down menu
- Choose the Juniper QFX device as shown
- Choose the interfaces
- %3Cp%3E%3Cspan%20style%3D%22font-size%3A%2013px%3B%22%3EWe%20will%20repeat%20the%20same%20process%20for%20the%20spine%20devices%20defined%20earlier.%20We%20will%20be%20mapping%20it%20to%20the%20Juniper%20QFX%20devices%20as%20well.%3C/span%3E%3C/p%3E
- Next we will add a few racks
- Click on the rack type from the menu
- Click to create a rack type
- Add a name for the new rack
- Name the leaf switch
- Choose a logical leaf device that was previously defined
- Choose the desired logical device from the list
- Click to add a new Generic system
- Add a name to the Generic System Group
- Enter a desired name
- FInish the process of creating a new rack
- Let us add another generic system
- Click to edit the rack type
- Navigate to the leafs tab
- Click on generic systems tab
- Up the Generic system count to 2 and then update the rack type
- Bring everything together in the next steps
- Choose templates from the menu
- Click to create a template
- Add a name first
- Enter more details and then scroll down
- To choose a rack type click on the drop down menu
- Choose the rack type that we created earlier from the menu
- Click to select the desired spine logical device
- Choose the logical spine device from the list
- Enter the desired count
- Click on create to complete the configuration
- Next step is to create a blueprint for the entire Datacenter fabric
- Click to create a new blueprint
- Enter a name for the Blueprint
- Choose the template from the drop down menu
- Choose the desired template
- Click to display the links
- Click on create to finish the process
- Click to view the Blueprint
- Click on staged
- Select the spines to allocate an Autonomous ID
- Click on the edit icon
- Choose the IP address from the Pool
- Save the configuration
- Repeat the same process for the other leaf devices
- Next we need to configure the interface mappings
- Click on one of the spine devices
- Click on the edit icon
- Choose the interface mappings from the the drop down menu
- Make the desired selection
- Click to update the assignments
- Click to assign system IDs next
- Click on the Assigned System IDs tab
- Click on the edit icon
- Choose from the list of System IDs
- Finalize the assignments
- Click on links
- Recitify any cabling errors as shown automatically
- Update the cabling assingments
- Notice the success message once the cabling mapping is sorted out
- Click on commit
- Add the description and click on the commit button
- Success
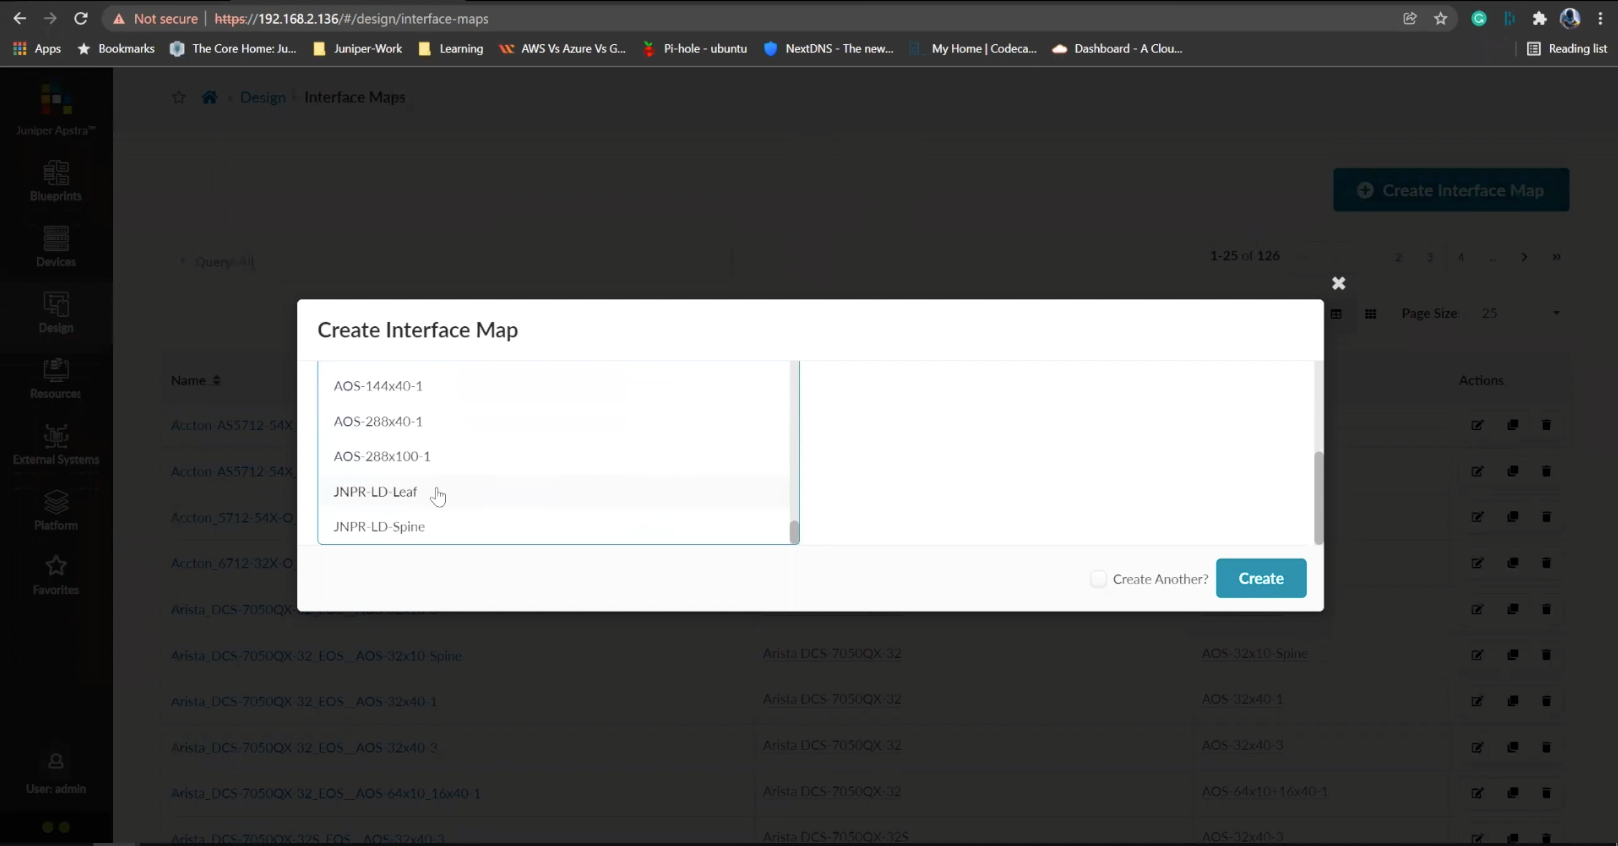
Choose from the drop down list
- %3Cp%3EWe%20have%20our%20switches%20already%20managed%20by%20Apstra%2C%20a%20series%20of%20Juniper%20virtual%20QFX%20switches%20in%20this%20example.%20We%20wil%20start%20by%20creating%20logical%20devices.%3C/p%3E
- Click%20on%20logical%20devices%20option%20from%20the%20menu
- %3Cp%3E%3Cspan%20style%3D%22font-size%3A%2013px%3B%22%3ETo%20start%20the%20process%2C%20we%20will%20creat%20a%20leaf%20device%20first.%20%3C/span%3E%3C/p%3E%0A%3Cp%3E%3Cspan%20style%3D%22font-size%3A%2015px%3B%22%3EPlease%20Note%3A%20%3C/span%3E%3C/p%3E%0A%3Cp%3E%3Cspan%20style%3D%22font-size%3A%2013px%3B%22%3EThe%20same%20process%20can%20be%20replicated%20for%20a%20spine%20logical%20device%20too.%20For%20the%20purpose%20of%20this%20demo%2C%20we%20will%20skip%20the%20spine%20logical%20device%20creation%20process.%3C/span%3E%3C/p%3E
- Enter a name for the logical device
- Choose the number of ports
- Create a port group
- Click to finish the creation
- %3Cp%3E%3Cspan%20style%3D%22font-size%3A%2013px%3B%22%3E%3Cspan%20style%3D%22font-family%3A%20Calibri%2C%20sans-serif%3B%22%3ENext%20we%20will%20set%20up%20interface%20maps.%20An%20Interface%20map%20maps%20the%20logical%20device%20to%20the%20actual%20physical%20device.%20ie%3A%20a%20specific%20switch%20and%20model%20that%20is%20used%20in%20the%20actual%20typology.%3C/span%3E%3C/span%3E%3C/p%3E
- Click on the Interface maps option from the menu
- Click to create a new interface map
- Add a name
- Choose a logical device that will be mapped to a physical entity
- Choose from the drop down list
- Choose a device profile from the drop down menu
- Choose the Juniper QFX device as shown
- Choose the interfaces
- %3Cp%3E%3Cspan%20style%3D%22font-size%3A%2013px%3B%22%3EWe%20will%20repeat%20the%20same%20process%20for%20the%20spine%20devices%20defined%20earlier.%20We%20will%20be%20mapping%20it%20to%20the%20Juniper%20QFX%20devices%20as%20well.%3C/span%3E%3C/p%3E
- Next we will add a few racks
- Click on the rack type from the menu
- Click to create a rack type
- Add a name for the new rack
- Name the leaf switch
- Choose a logical leaf device that was previously defined
- Choose the desired logical device from the list
- Click to add a new Generic system
- Add a name to the Generic System Group
- Enter a desired name
- FInish the process of creating a new rack
- Let us add another generic system
- Click to edit the rack type
- Navigate to the leafs tab
- Click on generic systems tab
- Up the Generic system count to 2 and then update the rack type
- Bring everything together in the next steps
- Choose templates from the menu
- Click to create a template
- Add a name first
- Enter more details and then scroll down
- To choose a rack type click on the drop down menu
- Choose the rack type that we created earlier from the menu
- Click to select the desired spine logical device
- Choose the logical spine device from the list
- Enter the desired count
- Click on create to complete the configuration
- Next step is to create a blueprint for the entire Datacenter fabric
- Click to create a new blueprint
- Enter a name for the Blueprint
- Choose the template from the drop down menu
- Choose the desired template
- Click to display the links
- Click on create to finish the process
- Click to view the Blueprint
- Click on staged
- Select the spines to allocate an Autonomous ID
- Click on the edit icon
- Choose the IP address from the Pool
- Save the configuration
- Repeat the same process for the other leaf devices
- Next we need to configure the interface mappings
- Click on one of the spine devices
- Click on the edit icon
- Choose the interface mappings from the the drop down menu
- Make the desired selection
- Click to update the assignments
- Click to assign system IDs next
- Click on the Assigned System IDs tab
- Click on the edit icon
- Choose from the list of System IDs
- Finalize the assignments
- Click on links
- Recitify any cabling errors as shown automatically
- Update the cabling assingments
- Notice the success message once the cabling mapping is sorted out
- Click on commit
- Add the description and click on the commit button
- Success
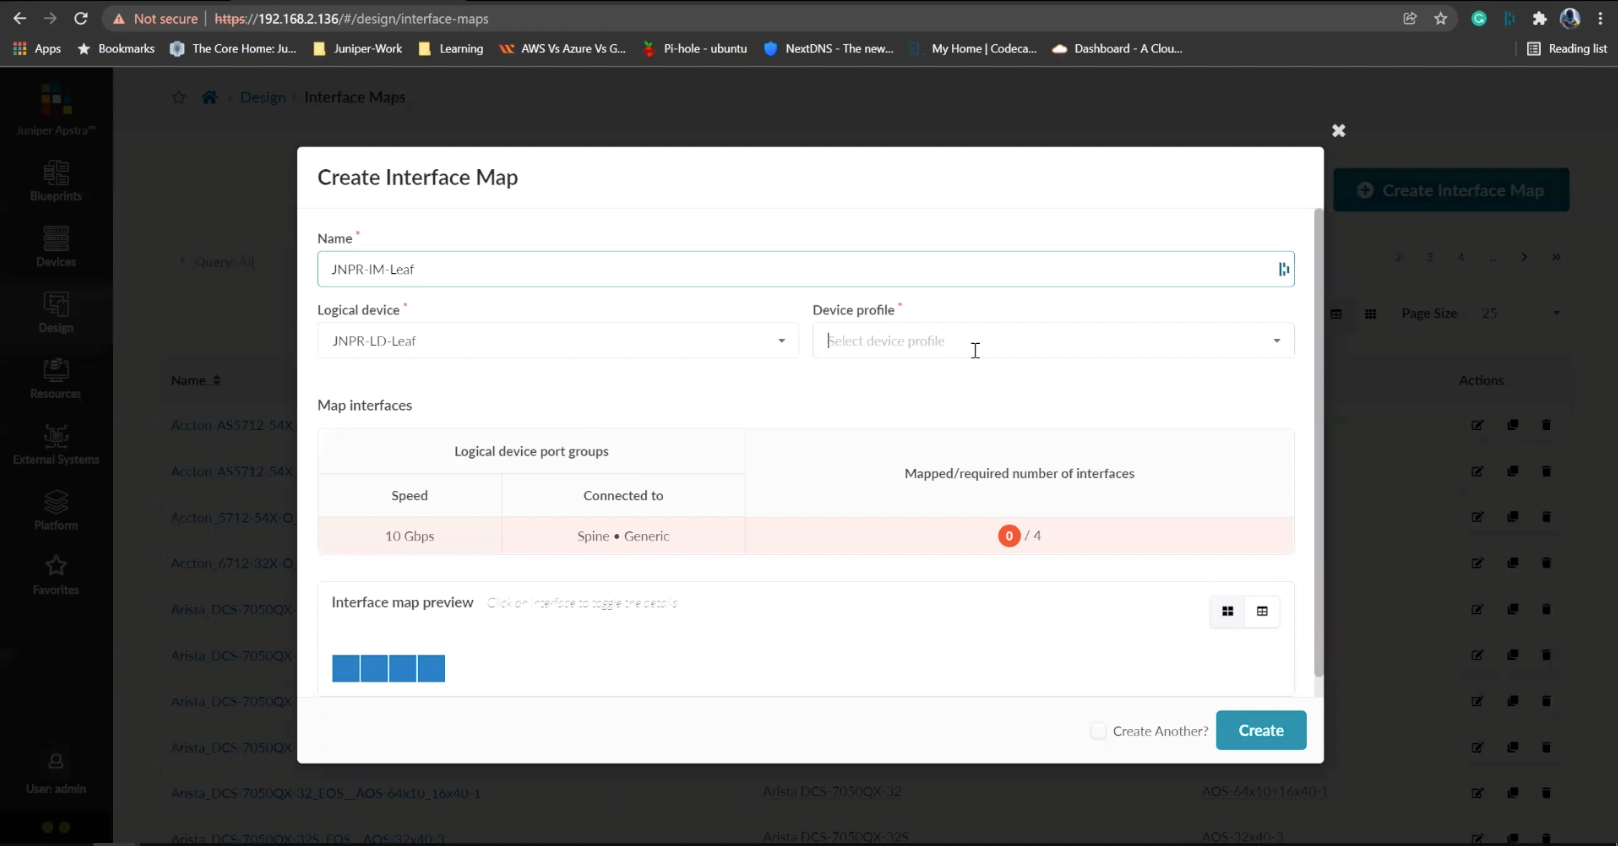
Choose a device profile from the drop down menu
- %3Cp%3EWe%20have%20our%20switches%20already%20managed%20by%20Apstra%2C%20a%20series%20of%20Juniper%20virtual%20QFX%20switches%20in%20this%20example.%20We%20wil%20start%20by%20creating%20logical%20devices.%3C/p%3E
- Click%20on%20logical%20devices%20option%20from%20the%20menu
- %3Cp%3E%3Cspan%20style%3D%22font-size%3A%2013px%3B%22%3ETo%20start%20the%20process%2C%20we%20will%20creat%20a%20leaf%20device%20first.%20%3C/span%3E%3C/p%3E%0A%3Cp%3E%3Cspan%20style%3D%22font-size%3A%2015px%3B%22%3EPlease%20Note%3A%20%3C/span%3E%3C/p%3E%0A%3Cp%3E%3Cspan%20style%3D%22font-size%3A%2013px%3B%22%3EThe%20same%20process%20can%20be%20replicated%20for%20a%20spine%20logical%20device%20too.%20For%20the%20purpose%20of%20this%20demo%2C%20we%20will%20skip%20the%20spine%20logical%20device%20creation%20process.%3C/span%3E%3C/p%3E
- Enter a name for the logical device
- Choose the number of ports
- Create a port group
- Click to finish the creation
- %3Cp%3E%3Cspan%20style%3D%22font-size%3A%2013px%3B%22%3E%3Cspan%20style%3D%22font-family%3A%20Calibri%2C%20sans-serif%3B%22%3ENext%20we%20will%20set%20up%20interface%20maps.%20An%20Interface%20map%20maps%20the%20logical%20device%20to%20the%20actual%20physical%20device.%20ie%3A%20a%20specific%20switch%20and%20model%20that%20is%20used%20in%20the%20actual%20typology.%3C/span%3E%3C/span%3E%3C/p%3E
- Click on the Interface maps option from the menu
- Click to create a new interface map
- Add a name
- Choose a logical device that will be mapped to a physical entity
- Choose from the drop down list
- Choose a device profile from the drop down menu
- Choose the Juniper QFX device as shown
- Choose the interfaces
- %3Cp%3E%3Cspan%20style%3D%22font-size%3A%2013px%3B%22%3EWe%20will%20repeat%20the%20same%20process%20for%20the%20spine%20devices%20defined%20earlier.%20We%20will%20be%20mapping%20it%20to%20the%20Juniper%20QFX%20devices%20as%20well.%3C/span%3E%3C/p%3E
- Next we will add a few racks
- Click on the rack type from the menu
- Click to create a rack type
- Add a name for the new rack
- Name the leaf switch
- Choose a logical leaf device that was previously defined
- Choose the desired logical device from the list
- Click to add a new Generic system
- Add a name to the Generic System Group
- Enter a desired name
- FInish the process of creating a new rack
- Let us add another generic system
- Click to edit the rack type
- Navigate to the leafs tab
- Click on generic systems tab
- Up the Generic system count to 2 and then update the rack type
- Bring everything together in the next steps
- Choose templates from the menu
- Click to create a template
- Add a name first
- Enter more details and then scroll down
- To choose a rack type click on the drop down menu
- Choose the rack type that we created earlier from the menu
- Click to select the desired spine logical device
- Choose the logical spine device from the list
- Enter the desired count
- Click on create to complete the configuration
- Next step is to create a blueprint for the entire Datacenter fabric
- Click to create a new blueprint
- Enter a name for the Blueprint
- Choose the template from the drop down menu
- Choose the desired template
- Click to display the links
- Click on create to finish the process
- Click to view the Blueprint
- Click on staged
- Select the spines to allocate an Autonomous ID
- Click on the edit icon
- Choose the IP address from the Pool
- Save the configuration
- Repeat the same process for the other leaf devices
- Next we need to configure the interface mappings
- Click on one of the spine devices
- Click on the edit icon
- Choose the interface mappings from the the drop down menu
- Make the desired selection
- Click to update the assignments
- Click to assign system IDs next
- Click on the Assigned System IDs tab
- Click on the edit icon
- Choose from the list of System IDs
- Finalize the assignments
- Click on links
- Recitify any cabling errors as shown automatically
- Update the cabling assingments
- Notice the success message once the cabling mapping is sorted out
- Click on commit
- Add the description and click on the commit button
- Success
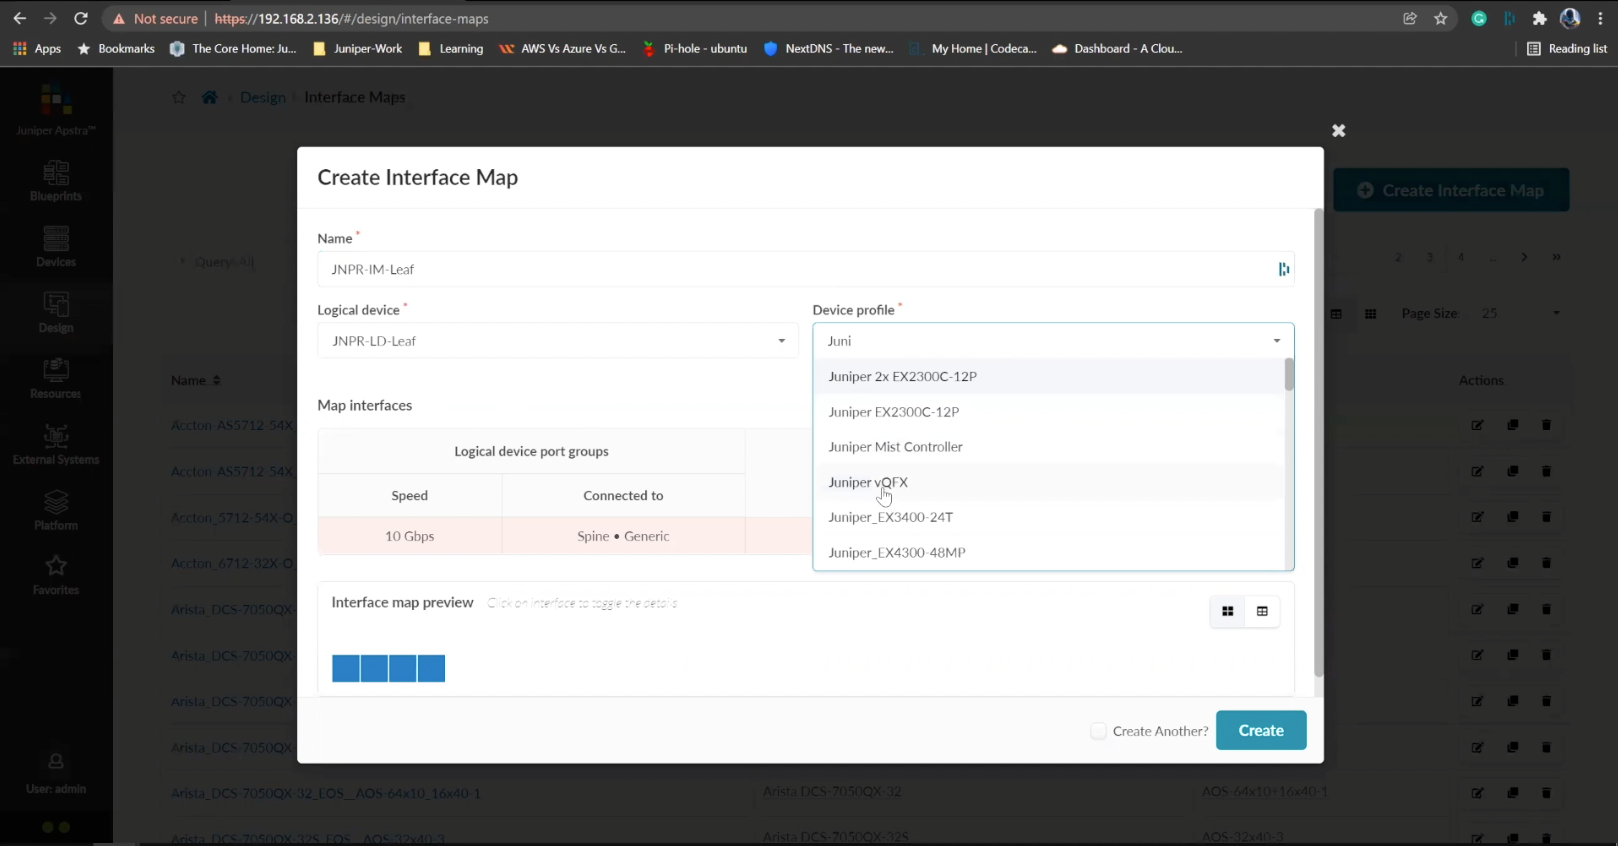
Choose the Juniper QFX device as shown
- %3Cp%3EWe%20have%20our%20switches%20already%20managed%20by%20Apstra%2C%20a%20series%20of%20Juniper%20virtual%20QFX%20switches%20in%20this%20example.%20We%20wil%20start%20by%20creating%20logical%20devices.%3C/p%3E
- Click%20on%20logical%20devices%20option%20from%20the%20menu
- %3Cp%3E%3Cspan%20style%3D%22font-size%3A%2013px%3B%22%3ETo%20start%20the%20process%2C%20we%20will%20creat%20a%20leaf%20device%20first.%20%3C/span%3E%3C/p%3E%0A%3Cp%3E%3Cspan%20style%3D%22font-size%3A%2015px%3B%22%3EPlease%20Note%3A%20%3C/span%3E%3C/p%3E%0A%3Cp%3E%3Cspan%20style%3D%22font-size%3A%2013px%3B%22%3EThe%20same%20process%20can%20be%20replicated%20for%20a%20spine%20logical%20device%20too.%20For%20the%20purpose%20of%20this%20demo%2C%20we%20will%20skip%20the%20spine%20logical%20device%20creation%20process.%3C/span%3E%3C/p%3E
- Enter a name for the logical device
- Choose the number of ports
- Create a port group
- Click to finish the creation
- %3Cp%3E%3Cspan%20style%3D%22font-size%3A%2013px%3B%22%3E%3Cspan%20style%3D%22font-family%3A%20Calibri%2C%20sans-serif%3B%22%3ENext%20we%20will%20set%20up%20interface%20maps.%20An%20Interface%20map%20maps%20the%20logical%20device%20to%20the%20actual%20physical%20device.%20ie%3A%20a%20specific%20switch%20and%20model%20that%20is%20used%20in%20the%20actual%20typology.%3C/span%3E%3C/span%3E%3C/p%3E
- Click on the Interface maps option from the menu
- Click to create a new interface map
- Add a name
- Choose a logical device that will be mapped to a physical entity
- Choose from the drop down list
- Choose a device profile from the drop down menu
- Choose the Juniper QFX device as shown
- Choose the interfaces
- %3Cp%3E%3Cspan%20style%3D%22font-size%3A%2013px%3B%22%3EWe%20will%20repeat%20the%20same%20process%20for%20the%20spine%20devices%20defined%20earlier.%20We%20will%20be%20mapping%20it%20to%20the%20Juniper%20QFX%20devices%20as%20well.%3C/span%3E%3C/p%3E
- Next we will add a few racks
- Click on the rack type from the menu
- Click to create a rack type
- Add a name for the new rack
- Name the leaf switch
- Choose a logical leaf device that was previously defined
- Choose the desired logical device from the list
- Click to add a new Generic system
- Add a name to the Generic System Group
- Enter a desired name
- FInish the process of creating a new rack
- Let us add another generic system
- Click to edit the rack type
- Navigate to the leafs tab
- Click on generic systems tab
- Up the Generic system count to 2 and then update the rack type
- Bring everything together in the next steps
- Choose templates from the menu
- Click to create a template
- Add a name first
- Enter more details and then scroll down
- To choose a rack type click on the drop down menu
- Choose the rack type that we created earlier from the menu
- Click to select the desired spine logical device
- Choose the logical spine device from the list
- Enter the desired count
- Click on create to complete the configuration
- Next step is to create a blueprint for the entire Datacenter fabric
- Click to create a new blueprint
- Enter a name for the Blueprint
- Choose the template from the drop down menu
- Choose the desired template
- Click to display the links
- Click on create to finish the process
- Click to view the Blueprint
- Click on staged
- Select the spines to allocate an Autonomous ID
- Click on the edit icon
- Choose the IP address from the Pool
- Save the configuration
- Repeat the same process for the other leaf devices
- Next we need to configure the interface mappings
- Click on one of the spine devices
- Click on the edit icon
- Choose the interface mappings from the the drop down menu
- Make the desired selection
- Click to update the assignments
- Click to assign system IDs next
- Click on the Assigned System IDs tab
- Click on the edit icon
- Choose from the list of System IDs
- Finalize the assignments
- Click on links
- Recitify any cabling errors as shown automatically
- Update the cabling assingments
- Notice the success message once the cabling mapping is sorted out
- Click on commit
- Add the description and click on the commit button
- Success
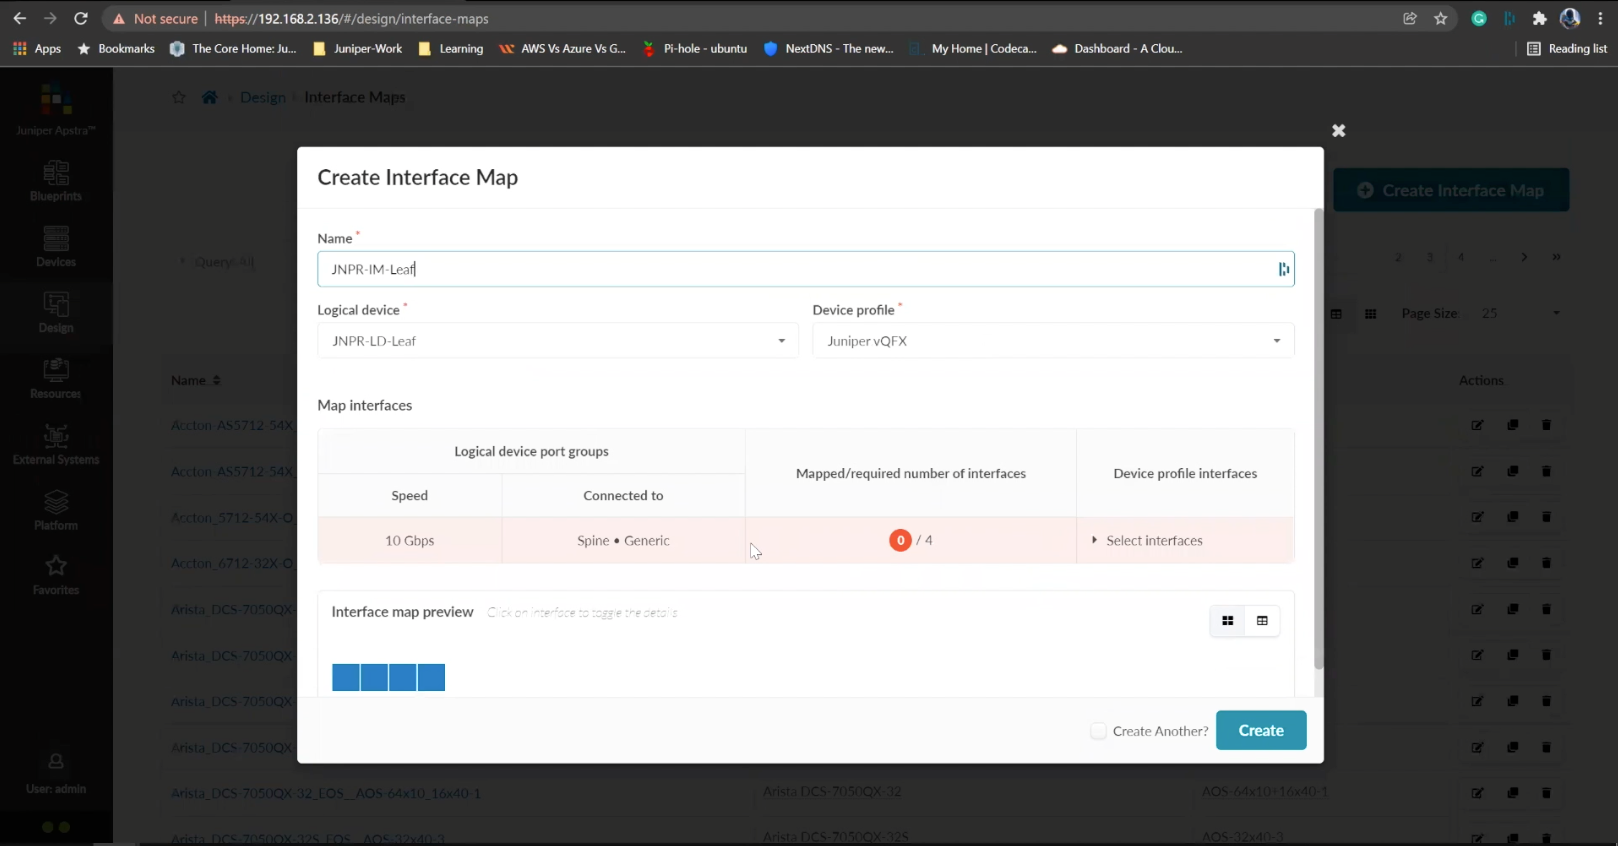
Choose the interfaces
Preview
Write
Preview
Write
Preview
Markdown
WYSIWYG
<br>
<br>
Markdown
WYSIWYG
- %3Cp%3EWe%20have%20our%20switches%20already%20managed%20by%20Apstra%2C%20a%20series%20of%20Juniper%20virtual%20QFX%20switches%20in%20this%20example.%20We%20wil%20start%20by%20creating%20logical%20devices.%3C/p%3E
- Click%20on%20logical%20devices%20option%20from%20the%20menu
- %3Cp%3E%3Cspan%20style%3D%22font-size%3A%2013px%3B%22%3ETo%20start%20the%20process%2C%20we%20will%20creat%20a%20leaf%20device%20first.%20%3C/span%3E%3C/p%3E%0A%3Cp%3E%3Cspan%20style%3D%22font-size%3A%2015px%3B%22%3EPlease%20Note%3A%20%3C/span%3E%3C/p%3E%0A%3Cp%3E%3Cspan%20style%3D%22font-size%3A%2013px%3B%22%3EThe%20same%20process%20can%20be%20replicated%20for%20a%20spine%20logical%20device%20too.%20For%20the%20purpose%20of%20this%20demo%2C%20we%20will%20skip%20the%20spine%20logical%20device%20creation%20process.%3C/span%3E%3C/p%3E
- Enter a name for the logical device
- Choose the number of ports
- Create a port group
- Click to finish the creation
- %3Cp%3E%3Cspan%20style%3D%22font-size%3A%2013px%3B%22%3E%3Cspan%20style%3D%22font-family%3A%20Calibri%2C%20sans-serif%3B%22%3ENext%20we%20will%20set%20up%20interface%20maps.%20An%20Interface%20map%20maps%20the%20logical%20device%20to%20the%20actual%20physical%20device.%20ie%3A%20a%20specific%20switch%20and%20model%20that%20is%20used%20in%20the%20actual%20typology.%3C/span%3E%3C/span%3E%3C/p%3E
- Click on the Interface maps option from the menu
- Click to create a new interface map
- Add a name
- Choose a logical device that will be mapped to a physical entity
- Choose from the drop down list
- Choose a device profile from the drop down menu
- Choose the Juniper QFX device as shown
- Choose the interfaces
- %3Cp%3E%3Cspan%20style%3D%22font-size%3A%2013px%3B%22%3EWe%20will%20repeat%20the%20same%20process%20for%20the%20spine%20devices%20defined%20earlier.%20We%20will%20be%20mapping%20it%20to%20the%20Juniper%20QFX%20devices%20as%20well.%3C/span%3E%3C/p%3E
- Next we will add a few racks
- Click on the rack type from the menu
- Click to create a rack type
- Add a name for the new rack
- Name the leaf switch
- Choose a logical leaf device that was previously defined
- Choose the desired logical device from the list
- Click to add a new Generic system
- Add a name to the Generic System Group
- Enter a desired name
- FInish the process of creating a new rack
- Let us add another generic system
- Click to edit the rack type
- Navigate to the leafs tab
- Click on generic systems tab
- Up the Generic system count to 2 and then update the rack type
- Bring everything together in the next steps
- Choose templates from the menu
- Click to create a template
- Add a name first
- Enter more details and then scroll down
- To choose a rack type click on the drop down menu
- Choose the rack type that we created earlier from the menu
- Click to select the desired spine logical device
- Choose the logical spine device from the list
- Enter the desired count
- Click on create to complete the configuration
- Next step is to create a blueprint for the entire Datacenter fabric
- Click to create a new blueprint
- Enter a name for the Blueprint
- Choose the template from the drop down menu
- Choose the desired template
- Click to display the links
- Click on create to finish the process
- Click to view the Blueprint
- Click on staged
- Select the spines to allocate an Autonomous ID
- Click on the edit icon
- Choose the IP address from the Pool
- Save the configuration
- Repeat the same process for the other leaf devices
- Next we need to configure the interface mappings
- Click on one of the spine devices
- Click on the edit icon
- Choose the interface mappings from the the drop down menu
- Make the desired selection
- Click to update the assignments
- Click to assign system IDs next
- Click on the Assigned System IDs tab
- Click on the edit icon
- Choose from the list of System IDs
- Finalize the assignments
- Click on links
- Recitify any cabling errors as shown automatically
- Update the cabling assingments
- Notice the success message once the cabling mapping is sorted out
- Click on commit
- Add the description and click on the commit button
- Success
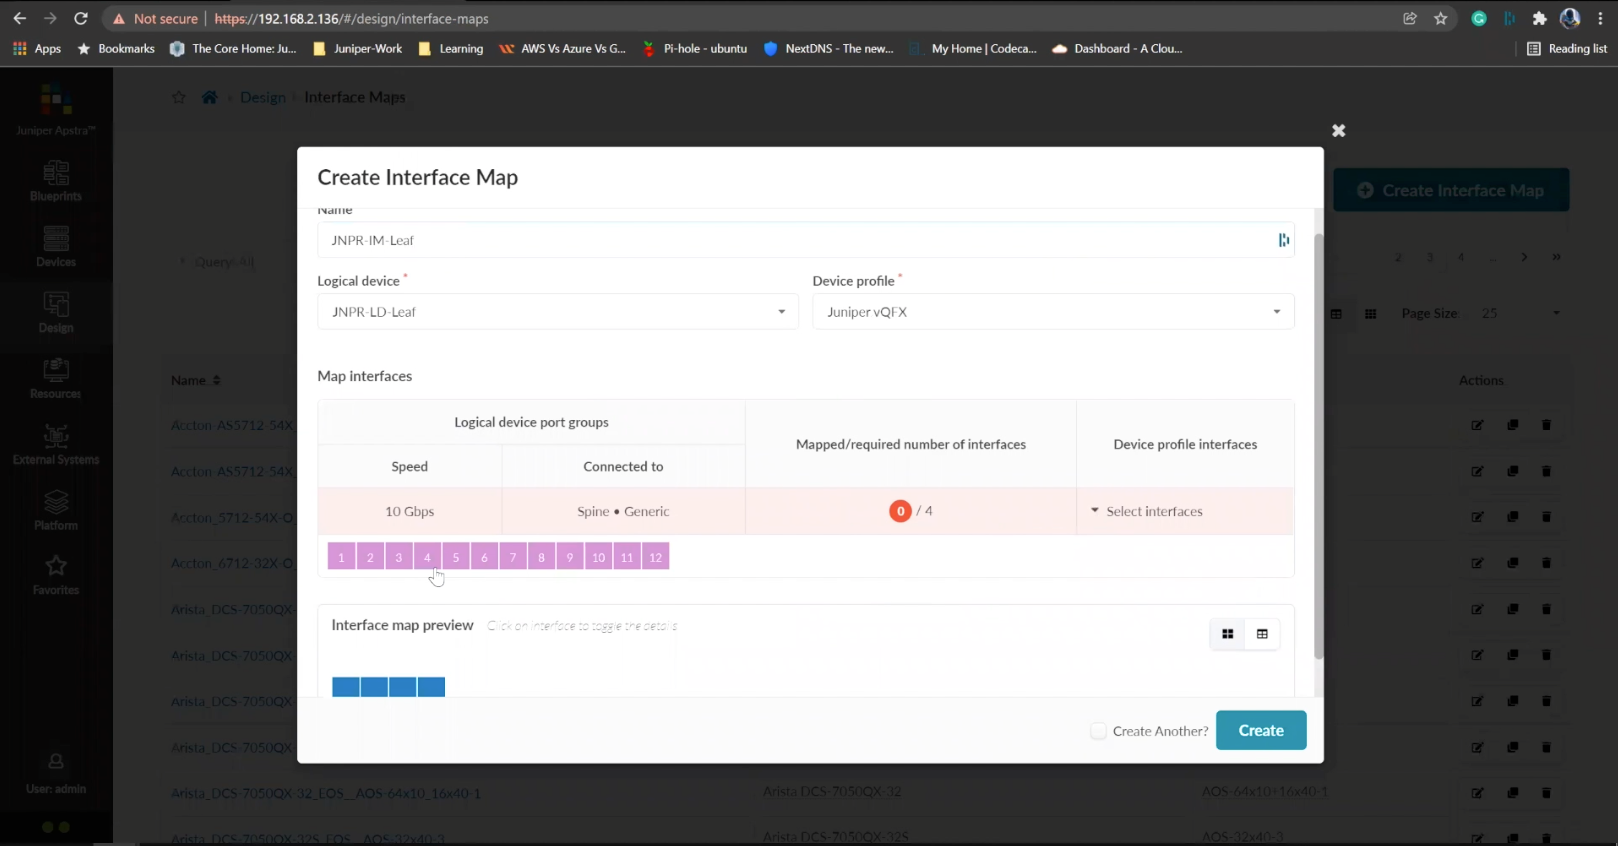
%3Cp%3E%3Cspan%20style%3D%22font-size%3A%2013px%3B%22%3EWe%20will%20repeat%20the%20same%20process%20for%20the%20spine%20devices%20defined%20earlier.%20We%20will%20be%20mapping%20it%20to%20the%20Juniper%20QFX%20devices%20as%20well.%3C/span%3E%3C/p%3E
%3Cp%3E%3Cspan%20style%3D%22font-size%3A%2013px%3B%22%3EWe%20will%20repeat%20the%20same%20process%20for%20the%20spine%20devices%20defined%20earlier.%20We%20will%20be%20mapping%20it%20to%20the%20Juniper%20QFX%20devices%20as%20well.%3C/span%3E%3C/p%3E
- %3Cp%3EWe%20have%20our%20switches%20already%20managed%20by%20Apstra%2C%20a%20series%20of%20Juniper%20virtual%20QFX%20switches%20in%20this%20example.%20We%20wil%20start%20by%20creating%20logical%20devices.%3C/p%3E
- Click%20on%20logical%20devices%20option%20from%20the%20menu
- %3Cp%3E%3Cspan%20style%3D%22font-size%3A%2013px%3B%22%3ETo%20start%20the%20process%2C%20we%20will%20creat%20a%20leaf%20device%20first.%20%3C/span%3E%3C/p%3E%0A%3Cp%3E%3Cspan%20style%3D%22font-size%3A%2015px%3B%22%3EPlease%20Note%3A%20%3C/span%3E%3C/p%3E%0A%3Cp%3E%3Cspan%20style%3D%22font-size%3A%2013px%3B%22%3EThe%20same%20process%20can%20be%20replicated%20for%20a%20spine%20logical%20device%20too.%20For%20the%20purpose%20of%20this%20demo%2C%20we%20will%20skip%20the%20spine%20logical%20device%20creation%20process.%3C/span%3E%3C/p%3E
- Enter a name for the logical device
- Choose the number of ports
- Create a port group
- Click to finish the creation
- %3Cp%3E%3Cspan%20style%3D%22font-size%3A%2013px%3B%22%3E%3Cspan%20style%3D%22font-family%3A%20Calibri%2C%20sans-serif%3B%22%3ENext%20we%20will%20set%20up%20interface%20maps.%20An%20Interface%20map%20maps%20the%20logical%20device%20to%20the%20actual%20physical%20device.%20ie%3A%20a%20specific%20switch%20and%20model%20that%20is%20used%20in%20the%20actual%20typology.%3C/span%3E%3C/span%3E%3C/p%3E
- Click on the Interface maps option from the menu
- Click to create a new interface map
- Add a name
- Choose a logical device that will be mapped to a physical entity
- Choose from the drop down list
- Choose a device profile from the drop down menu
- Choose the Juniper QFX device as shown
- Choose the interfaces
- %3Cp%3E%3Cspan%20style%3D%22font-size%3A%2013px%3B%22%3EWe%20will%20repeat%20the%20same%20process%20for%20the%20spine%20devices%20defined%20earlier.%20We%20will%20be%20mapping%20it%20to%20the%20Juniper%20QFX%20devices%20as%20well.%3C/span%3E%3C/p%3E
- Next we will add a few racks
- Click on the rack type from the menu
- Click to create a rack type
- Add a name for the new rack
- Name the leaf switch
- Choose a logical leaf device that was previously defined
- Choose the desired logical device from the list
- Click to add a new Generic system
- Add a name to the Generic System Group
- Enter a desired name
- FInish the process of creating a new rack
- Let us add another generic system
- Click to edit the rack type
- Navigate to the leafs tab
- Click on generic systems tab
- Up the Generic system count to 2 and then update the rack type
- Bring everything together in the next steps
- Choose templates from the menu
- Click to create a template
- Add a name first
- Enter more details and then scroll down
- To choose a rack type click on the drop down menu
- Choose the rack type that we created earlier from the menu
- Click to select the desired spine logical device
- Choose the logical spine device from the list
- Enter the desired count
- Click on create to complete the configuration
- Next step is to create a blueprint for the entire Datacenter fabric
- Click to create a new blueprint
- Enter a name for the Blueprint
- Choose the template from the drop down menu
- Choose the desired template
- Click to display the links
- Click on create to finish the process
- Click to view the Blueprint
- Click on staged
- Select the spines to allocate an Autonomous ID
- Click on the edit icon
- Choose the IP address from the Pool
- Save the configuration
- Repeat the same process for the other leaf devices
- Next we need to configure the interface mappings
- Click on one of the spine devices
- Click on the edit icon
- Choose the interface mappings from the the drop down menu
- Make the desired selection
- Click to update the assignments
- Click to assign system IDs next
- Click on the Assigned System IDs tab
- Click on the edit icon
- Choose from the list of System IDs
- Finalize the assignments
- Click on links
- Recitify any cabling errors as shown automatically
- Update the cabling assingments
- Notice the success message once the cabling mapping is sorted out
- Click on commit
- Add the description and click on the commit button
- Success
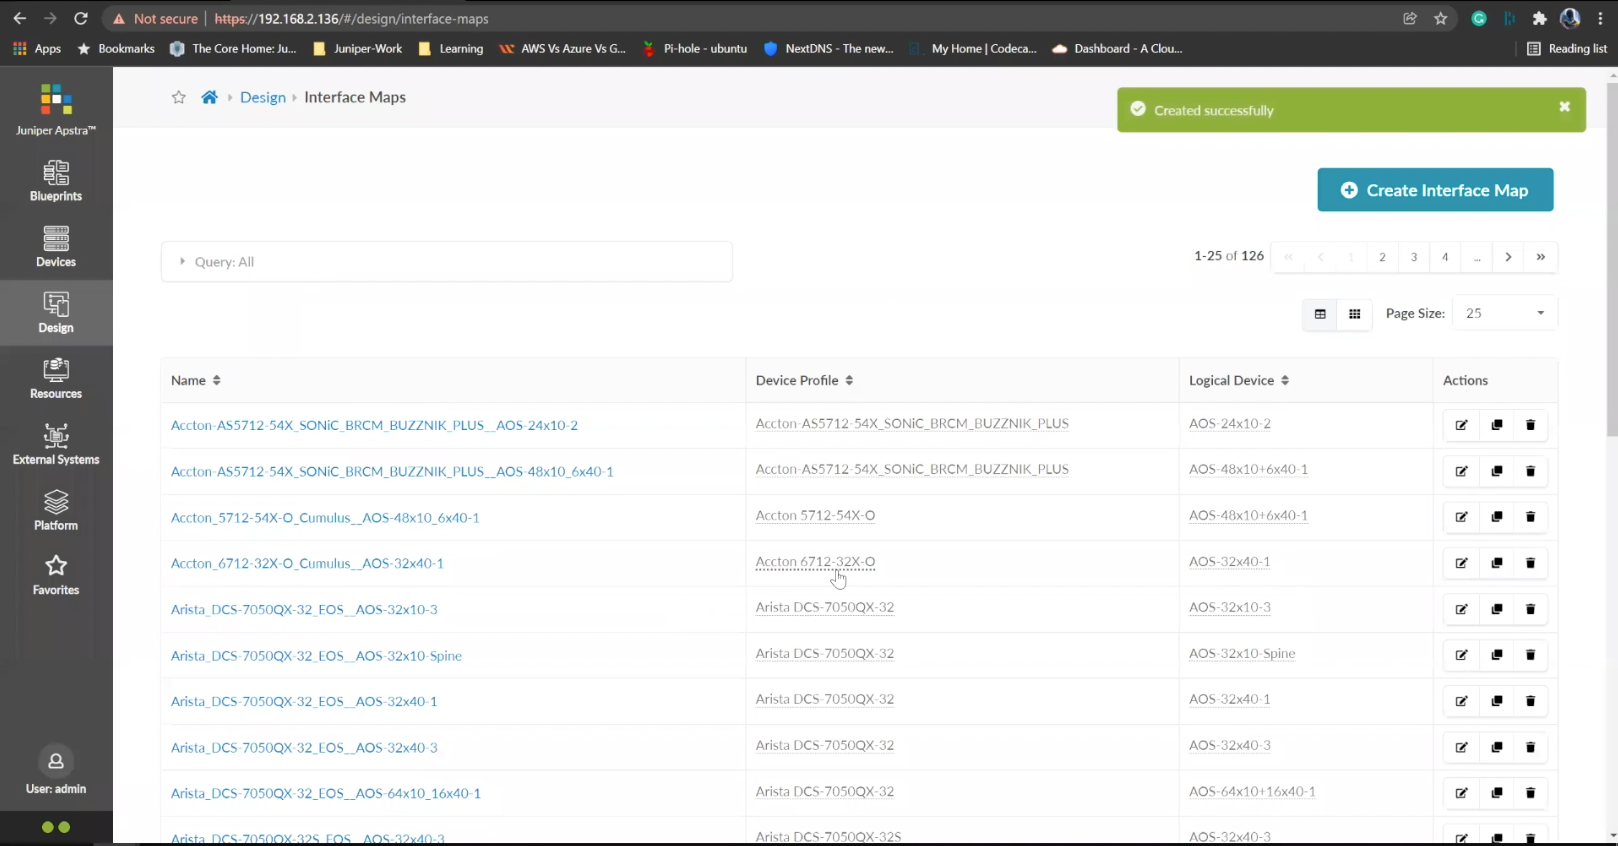
Next we will add a few racks
We will need the racks to host the servers that will be in our data center.
- %3Cp%3EWe%20have%20our%20switches%20already%20managed%20by%20Apstra%2C%20a%20series%20of%20Juniper%20virtual%20QFX%20switches%20in%20this%20example.%20We%20wil%20start%20by%20creating%20logical%20devices.%3C/p%3E
- Click%20on%20logical%20devices%20option%20from%20the%20menu
- %3Cp%3E%3Cspan%20style%3D%22font-size%3A%2013px%3B%22%3ETo%20start%20the%20process%2C%20we%20will%20creat%20a%20leaf%20device%20first.%20%3C/span%3E%3C/p%3E%0A%3Cp%3E%3Cspan%20style%3D%22font-size%3A%2015px%3B%22%3EPlease%20Note%3A%20%3C/span%3E%3C/p%3E%0A%3Cp%3E%3Cspan%20style%3D%22font-size%3A%2013px%3B%22%3EThe%20same%20process%20can%20be%20replicated%20for%20a%20spine%20logical%20device%20too.%20For%20the%20purpose%20of%20this%20demo%2C%20we%20will%20skip%20the%20spine%20logical%20device%20creation%20process.%3C/span%3E%3C/p%3E
- Enter a name for the logical device
- Choose the number of ports
- Create a port group
- Click to finish the creation
- %3Cp%3E%3Cspan%20style%3D%22font-size%3A%2013px%3B%22%3E%3Cspan%20style%3D%22font-family%3A%20Calibri%2C%20sans-serif%3B%22%3ENext%20we%20will%20set%20up%20interface%20maps.%20An%20Interface%20map%20maps%20the%20logical%20device%20to%20the%20actual%20physical%20device.%20ie%3A%20a%20specific%20switch%20and%20model%20that%20is%20used%20in%20the%20actual%20typology.%3C/span%3E%3C/span%3E%3C/p%3E
- Click on the Interface maps option from the menu
- Click to create a new interface map
- Add a name
- Choose a logical device that will be mapped to a physical entity
- Choose from the drop down list
- Choose a device profile from the drop down menu
- Choose the Juniper QFX device as shown
- Choose the interfaces
- %3Cp%3E%3Cspan%20style%3D%22font-size%3A%2013px%3B%22%3EWe%20will%20repeat%20the%20same%20process%20for%20the%20spine%20devices%20defined%20earlier.%20We%20will%20be%20mapping%20it%20to%20the%20Juniper%20QFX%20devices%20as%20well.%3C/span%3E%3C/p%3E
- Next we will add a few racks
- Click on the rack type from the menu
- Click to create a rack type
- Add a name for the new rack
- Name the leaf switch
- Choose a logical leaf device that was previously defined
- Choose the desired logical device from the list
- Click to add a new Generic system
- Add a name to the Generic System Group
- Enter a desired name
- FInish the process of creating a new rack
- Let us add another generic system
- Click to edit the rack type
- Navigate to the leafs tab
- Click on generic systems tab
- Up the Generic system count to 2 and then update the rack type
- Bring everything together in the next steps
- Choose templates from the menu
- Click to create a template
- Add a name first
- Enter more details and then scroll down
- To choose a rack type click on the drop down menu
- Choose the rack type that we created earlier from the menu
- Click to select the desired spine logical device
- Choose the logical spine device from the list
- Enter the desired count
- Click on create to complete the configuration
- Next step is to create a blueprint for the entire Datacenter fabric
- Click to create a new blueprint
- Enter a name for the Blueprint
- Choose the template from the drop down menu
- Choose the desired template
- Click to display the links
- Click on create to finish the process
- Click to view the Blueprint
- Click on staged
- Select the spines to allocate an Autonomous ID
- Click on the edit icon
- Choose the IP address from the Pool
- Save the configuration
- Repeat the same process for the other leaf devices
- Next we need to configure the interface mappings
- Click on one of the spine devices
- Click on the edit icon
- Choose the interface mappings from the the drop down menu
- Make the desired selection
- Click to update the assignments
- Click to assign system IDs next
- Click on the Assigned System IDs tab
- Click on the edit icon
- Choose from the list of System IDs
- Finalize the assignments
- Click on links
- Recitify any cabling errors as shown automatically
- Update the cabling assingments
- Notice the success message once the cabling mapping is sorted out
- Click on commit
- Add the description and click on the commit button
- Success
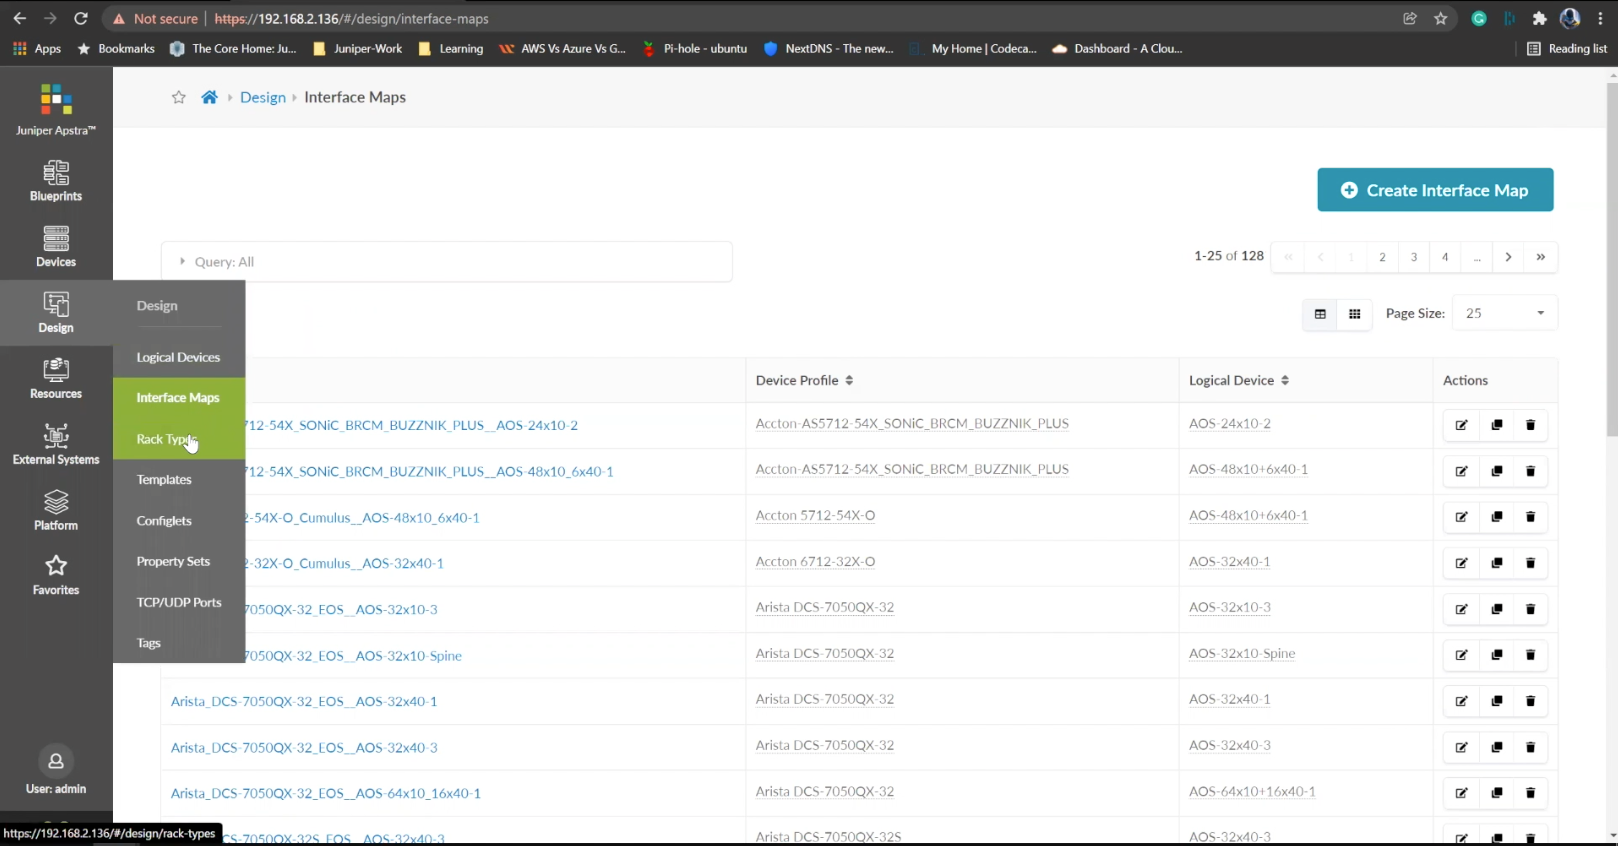
Click on the rack type from the menu
- %3Cp%3EWe%20have%20our%20switches%20already%20managed%20by%20Apstra%2C%20a%20series%20of%20Juniper%20virtual%20QFX%20switches%20in%20this%20example.%20We%20wil%20start%20by%20creating%20logical%20devices.%3C/p%3E
- Click%20on%20logical%20devices%20option%20from%20the%20menu
- %3Cp%3E%3Cspan%20style%3D%22font-size%3A%2013px%3B%22%3ETo%20start%20the%20process%2C%20we%20will%20creat%20a%20leaf%20device%20first.%20%3C/span%3E%3C/p%3E%0A%3Cp%3E%3Cspan%20style%3D%22font-size%3A%2015px%3B%22%3EPlease%20Note%3A%20%3C/span%3E%3C/p%3E%0A%3Cp%3E%3Cspan%20style%3D%22font-size%3A%2013px%3B%22%3EThe%20same%20process%20can%20be%20replicated%20for%20a%20spine%20logical%20device%20too.%20For%20the%20purpose%20of%20this%20demo%2C%20we%20will%20skip%20the%20spine%20logical%20device%20creation%20process.%3C/span%3E%3C/p%3E
- Enter a name for the logical device
- Choose the number of ports
- Create a port group
- Click to finish the creation
- %3Cp%3E%3Cspan%20style%3D%22font-size%3A%2013px%3B%22%3E%3Cspan%20style%3D%22font-family%3A%20Calibri%2C%20sans-serif%3B%22%3ENext%20we%20will%20set%20up%20interface%20maps.%20An%20Interface%20map%20maps%20the%20logical%20device%20to%20the%20actual%20physical%20device.%20ie%3A%20a%20specific%20switch%20and%20model%20that%20is%20used%20in%20the%20actual%20typology.%3C/span%3E%3C/span%3E%3C/p%3E
- Click on the Interface maps option from the menu
- Click to create a new interface map
- Add a name
- Choose a logical device that will be mapped to a physical entity
- Choose from the drop down list
- Choose a device profile from the drop down menu
- Choose the Juniper QFX device as shown
- Choose the interfaces
- %3Cp%3E%3Cspan%20style%3D%22font-size%3A%2013px%3B%22%3EWe%20will%20repeat%20the%20same%20process%20for%20the%20spine%20devices%20defined%20earlier.%20We%20will%20be%20mapping%20it%20to%20the%20Juniper%20QFX%20devices%20as%20well.%3C/span%3E%3C/p%3E
- Next we will add a few racks
- Click on the rack type from the menu
- Click to create a rack type
- Add a name for the new rack
- Name the leaf switch
- Choose a logical leaf device that was previously defined
- Choose the desired logical device from the list
- Click to add a new Generic system
- Add a name to the Generic System Group
- Enter a desired name
- FInish the process of creating a new rack
- Let us add another generic system
- Click to edit the rack type
- Navigate to the leafs tab
- Click on generic systems tab
- Up the Generic system count to 2 and then update the rack type
- Bring everything together in the next steps
- Choose templates from the menu
- Click to create a template
- Add a name first
- Enter more details and then scroll down
- To choose a rack type click on the drop down menu
- Choose the rack type that we created earlier from the menu
- Click to select the desired spine logical device
- Choose the logical spine device from the list
- Enter the desired count
- Click on create to complete the configuration
- Next step is to create a blueprint for the entire Datacenter fabric
- Click to create a new blueprint
- Enter a name for the Blueprint
- Choose the template from the drop down menu
- Choose the desired template
- Click to display the links
- Click on create to finish the process
- Click to view the Blueprint
- Click on staged
- Select the spines to allocate an Autonomous ID
- Click on the edit icon
- Choose the IP address from the Pool
- Save the configuration
- Repeat the same process for the other leaf devices
- Next we need to configure the interface mappings
- Click on one of the spine devices
- Click on the edit icon
- Choose the interface mappings from the the drop down menu
- Make the desired selection
- Click to update the assignments
- Click to assign system IDs next
- Click on the Assigned System IDs tab
- Click on the edit icon
- Choose from the list of System IDs
- Finalize the assignments
- Click on links
- Recitify any cabling errors as shown automatically
- Update the cabling assingments
- Notice the success message once the cabling mapping is sorted out
- Click on commit
- Add the description and click on the commit button
- Success
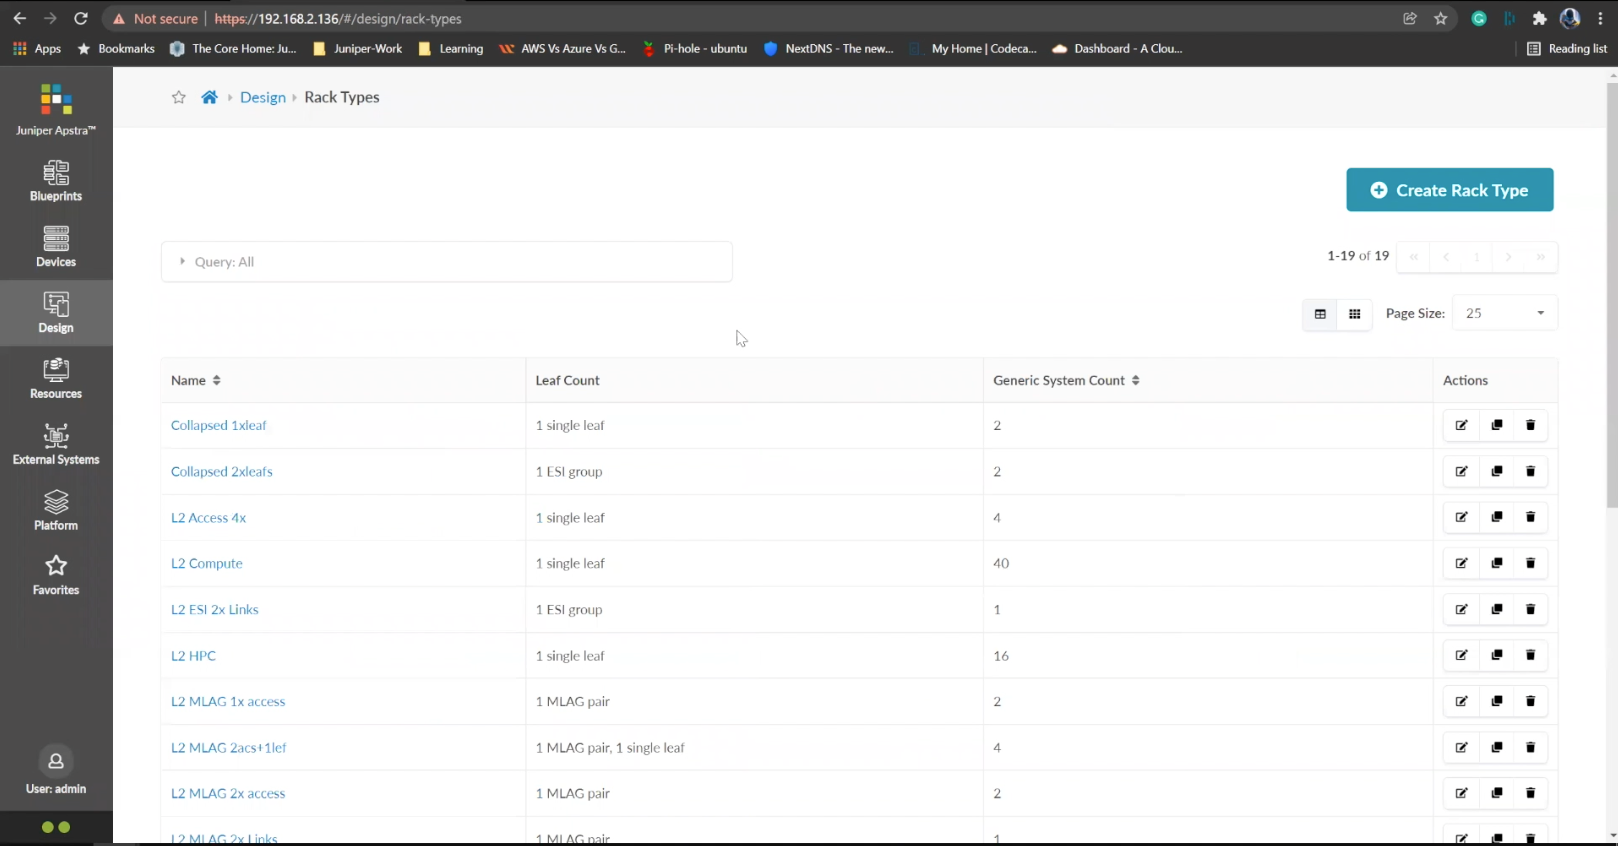
Click to create a rack type
- %3Cp%3EWe%20have%20our%20switches%20already%20managed%20by%20Apstra%2C%20a%20series%20of%20Juniper%20virtual%20QFX%20switches%20in%20this%20example.%20We%20wil%20start%20by%20creating%20logical%20devices.%3C/p%3E
- Click%20on%20logical%20devices%20option%20from%20the%20menu
- %3Cp%3E%3Cspan%20style%3D%22font-size%3A%2013px%3B%22%3ETo%20start%20the%20process%2C%20we%20will%20creat%20a%20leaf%20device%20first.%20%3C/span%3E%3C/p%3E%0A%3Cp%3E%3Cspan%20style%3D%22font-size%3A%2015px%3B%22%3EPlease%20Note%3A%20%3C/span%3E%3C/p%3E%0A%3Cp%3E%3Cspan%20style%3D%22font-size%3A%2013px%3B%22%3EThe%20same%20process%20can%20be%20replicated%20for%20a%20spine%20logical%20device%20too.%20For%20the%20purpose%20of%20this%20demo%2C%20we%20will%20skip%20the%20spine%20logical%20device%20creation%20process.%3C/span%3E%3C/p%3E
- Enter a name for the logical device
- Choose the number of ports
- Create a port group
- Click to finish the creation
- %3Cp%3E%3Cspan%20style%3D%22font-size%3A%2013px%3B%22%3E%3Cspan%20style%3D%22font-family%3A%20Calibri%2C%20sans-serif%3B%22%3ENext%20we%20will%20set%20up%20interface%20maps.%20An%20Interface%20map%20maps%20the%20logical%20device%20to%20the%20actual%20physical%20device.%20ie%3A%20a%20specific%20switch%20and%20model%20that%20is%20used%20in%20the%20actual%20typology.%3C/span%3E%3C/span%3E%3C/p%3E
- Click on the Interface maps option from the menu
- Click to create a new interface map
- Add a name
- Choose a logical device that will be mapped to a physical entity
- Choose from the drop down list
- Choose a device profile from the drop down menu
- Choose the Juniper QFX device as shown
- Choose the interfaces
- %3Cp%3E%3Cspan%20style%3D%22font-size%3A%2013px%3B%22%3EWe%20will%20repeat%20the%20same%20process%20for%20the%20spine%20devices%20defined%20earlier.%20We%20will%20be%20mapping%20it%20to%20the%20Juniper%20QFX%20devices%20as%20well.%3C/span%3E%3C/p%3E
- Next we will add a few racks
- Click on the rack type from the menu
- Click to create a rack type
- Add a name for the new rack
- Name the leaf switch
- Choose a logical leaf device that was previously defined
- Choose the desired logical device from the list
- Click to add a new Generic system
- Add a name to the Generic System Group
- Enter a desired name
- FInish the process of creating a new rack
- Let us add another generic system
- Click to edit the rack type
- Navigate to the leafs tab
- Click on generic systems tab
- Up the Generic system count to 2 and then update the rack type
- Bring everything together in the next steps
- Choose templates from the menu
- Click to create a template
- Add a name first
- Enter more details and then scroll down
- To choose a rack type click on the drop down menu
- Choose the rack type that we created earlier from the menu
- Click to select the desired spine logical device
- Choose the logical spine device from the list
- Enter the desired count
- Click on create to complete the configuration
- Next step is to create a blueprint for the entire Datacenter fabric
- Click to create a new blueprint
- Enter a name for the Blueprint
- Choose the template from the drop down menu
- Choose the desired template
- Click to display the links
- Click on create to finish the process
- Click to view the Blueprint
- Click on staged
- Select the spines to allocate an Autonomous ID
- Click on the edit icon
- Choose the IP address from the Pool
- Save the configuration
- Repeat the same process for the other leaf devices
- Next we need to configure the interface mappings
- Click on one of the spine devices
- Click on the edit icon
- Choose the interface mappings from the the drop down menu
- Make the desired selection
- Click to update the assignments
- Click to assign system IDs next
- Click on the Assigned System IDs tab
- Click on the edit icon
- Choose from the list of System IDs
- Finalize the assignments
- Click on links
- Recitify any cabling errors as shown automatically
- Update the cabling assingments
- Notice the success message once the cabling mapping is sorted out
- Click on commit
- Add the description and click on the commit button
- Success
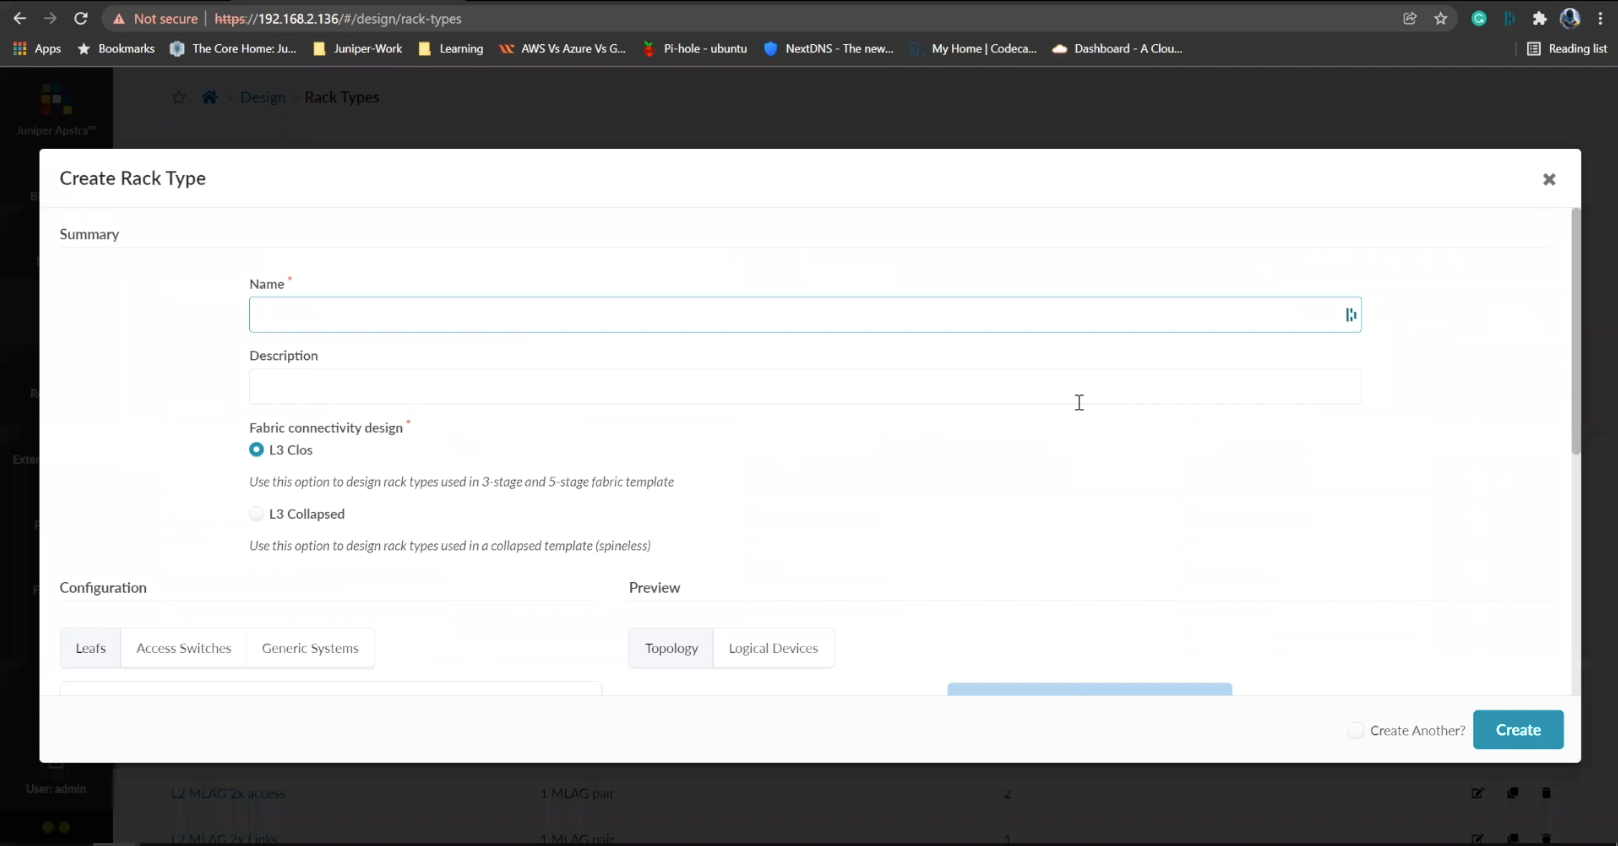
Add a name for the new rack
- %3Cp%3EWe%20have%20our%20switches%20already%20managed%20by%20Apstra%2C%20a%20series%20of%20Juniper%20virtual%20QFX%20switches%20in%20this%20example.%20We%20wil%20start%20by%20creating%20logical%20devices.%3C/p%3E
- Click%20on%20logical%20devices%20option%20from%20the%20menu
- %3Cp%3E%3Cspan%20style%3D%22font-size%3A%2013px%3B%22%3ETo%20start%20the%20process%2C%20we%20will%20creat%20a%20leaf%20device%20first.%20%3C/span%3E%3C/p%3E%0A%3Cp%3E%3Cspan%20style%3D%22font-size%3A%2015px%3B%22%3EPlease%20Note%3A%20%3C/span%3E%3C/p%3E%0A%3Cp%3E%3Cspan%20style%3D%22font-size%3A%2013px%3B%22%3EThe%20same%20process%20can%20be%20replicated%20for%20a%20spine%20logical%20device%20too.%20For%20the%20purpose%20of%20this%20demo%2C%20we%20will%20skip%20the%20spine%20logical%20device%20creation%20process.%3C/span%3E%3C/p%3E
- Enter a name for the logical device
- Choose the number of ports
- Create a port group
- Click to finish the creation
- %3Cp%3E%3Cspan%20style%3D%22font-size%3A%2013px%3B%22%3E%3Cspan%20style%3D%22font-family%3A%20Calibri%2C%20sans-serif%3B%22%3ENext%20we%20will%20set%20up%20interface%20maps.%20An%20Interface%20map%20maps%20the%20logical%20device%20to%20the%20actual%20physical%20device.%20ie%3A%20a%20specific%20switch%20and%20model%20that%20is%20used%20in%20the%20actual%20typology.%3C/span%3E%3C/span%3E%3C/p%3E
- Click on the Interface maps option from the menu
- Click to create a new interface map
- Add a name
- Choose a logical device that will be mapped to a physical entity
- Choose from the drop down list
- Choose a device profile from the drop down menu
- Choose the Juniper QFX device as shown
- Choose the interfaces
- %3Cp%3E%3Cspan%20style%3D%22font-size%3A%2013px%3B%22%3EWe%20will%20repeat%20the%20same%20process%20for%20the%20spine%20devices%20defined%20earlier.%20We%20will%20be%20mapping%20it%20to%20the%20Juniper%20QFX%20devices%20as%20well.%3C/span%3E%3C/p%3E
- Next we will add a few racks
- Click on the rack type from the menu
- Click to create a rack type
- Add a name for the new rack
- Name the leaf switch
- Choose a logical leaf device that was previously defined
- Choose the desired logical device from the list
- Click to add a new Generic system
- Add a name to the Generic System Group
- Enter a desired name
- FInish the process of creating a new rack
- Let us add another generic system
- Click to edit the rack type
- Navigate to the leafs tab
- Click on generic systems tab
- Up the Generic system count to 2 and then update the rack type
- Bring everything together in the next steps
- Choose templates from the menu
- Click to create a template
- Add a name first
- Enter more details and then scroll down
- To choose a rack type click on the drop down menu
- Choose the rack type that we created earlier from the menu
- Click to select the desired spine logical device
- Choose the logical spine device from the list
- Enter the desired count
- Click on create to complete the configuration
- Next step is to create a blueprint for the entire Datacenter fabric
- Click to create a new blueprint
- Enter a name for the Blueprint
- Choose the template from the drop down menu
- Choose the desired template
- Click to display the links
- Click on create to finish the process
- Click to view the Blueprint
- Click on staged
- Select the spines to allocate an Autonomous ID
- Click on the edit icon
- Choose the IP address from the Pool
- Save the configuration
- Repeat the same process for the other leaf devices
- Next we need to configure the interface mappings
- Click on one of the spine devices
- Click on the edit icon
- Choose the interface mappings from the the drop down menu
- Make the desired selection
- Click to update the assignments
- Click to assign system IDs next
- Click on the Assigned System IDs tab
- Click on the edit icon
- Choose from the list of System IDs
- Finalize the assignments
- Click on links
- Recitify any cabling errors as shown automatically
- Update the cabling assingments
- Notice the success message once the cabling mapping is sorted out
- Click on commit
- Add the description and click on the commit button
- Success
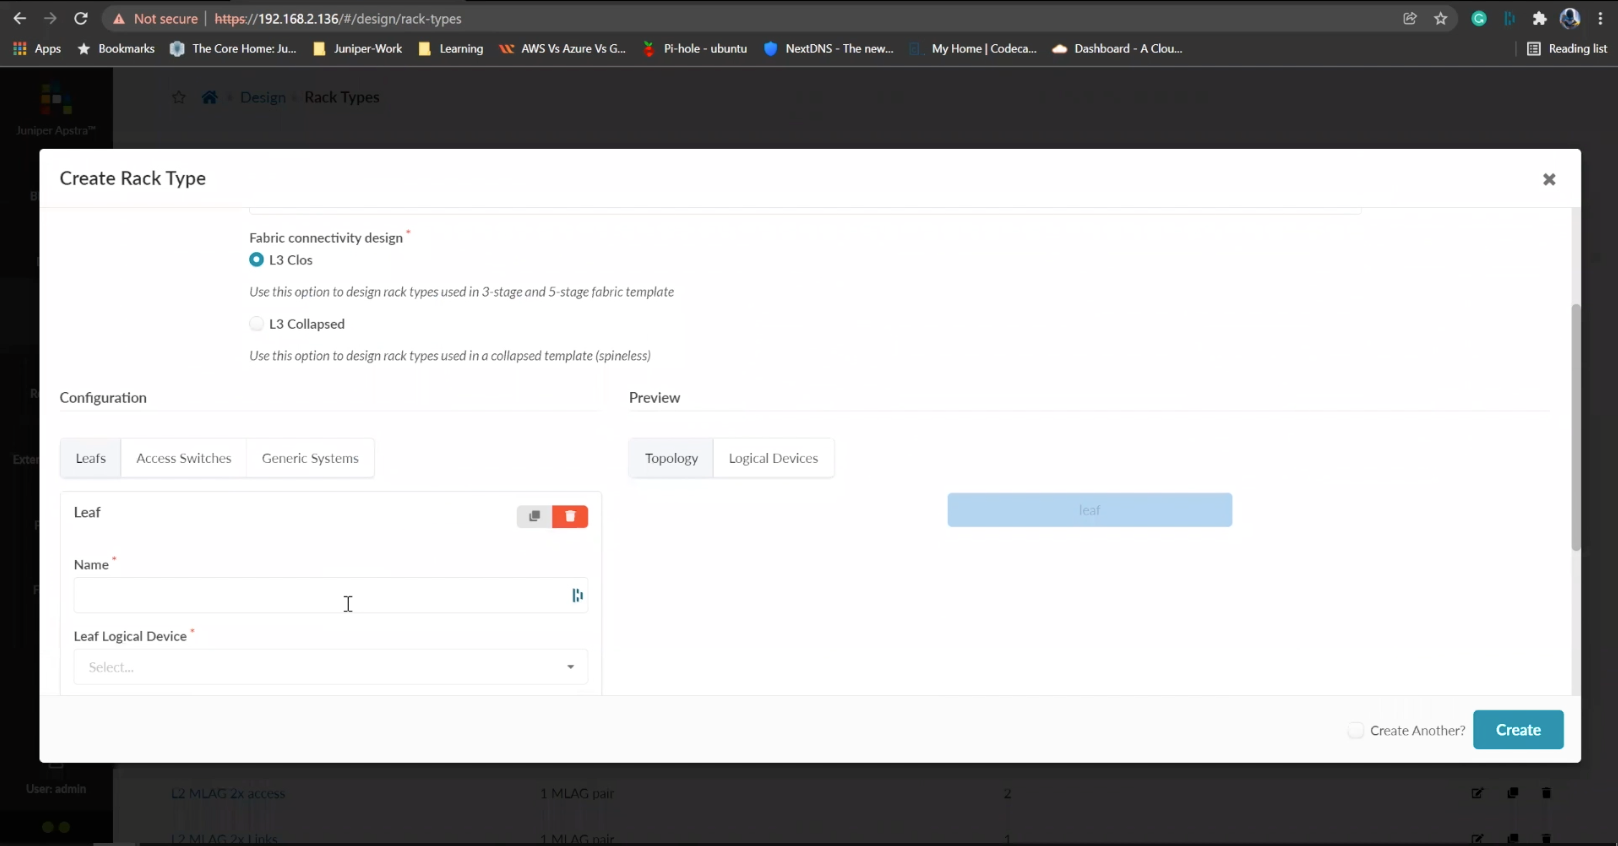
Name the leaf switch
- %3Cp%3EWe%20have%20our%20switches%20already%20managed%20by%20Apstra%2C%20a%20series%20of%20Juniper%20virtual%20QFX%20switches%20in%20this%20example.%20We%20wil%20start%20by%20creating%20logical%20devices.%3C/p%3E
- Click%20on%20logical%20devices%20option%20from%20the%20menu
- %3Cp%3E%3Cspan%20style%3D%22font-size%3A%2013px%3B%22%3ETo%20start%20the%20process%2C%20we%20will%20creat%20a%20leaf%20device%20first.%20%3C/span%3E%3C/p%3E%0A%3Cp%3E%3Cspan%20style%3D%22font-size%3A%2015px%3B%22%3EPlease%20Note%3A%20%3C/span%3E%3C/p%3E%0A%3Cp%3E%3Cspan%20style%3D%22font-size%3A%2013px%3B%22%3EThe%20same%20process%20can%20be%20replicated%20for%20a%20spine%20logical%20device%20too.%20For%20the%20purpose%20of%20this%20demo%2C%20we%20will%20skip%20the%20spine%20logical%20device%20creation%20process.%3C/span%3E%3C/p%3E
- Enter a name for the logical device
- Choose the number of ports
- Create a port group
- Click to finish the creation
- %3Cp%3E%3Cspan%20style%3D%22font-size%3A%2013px%3B%22%3E%3Cspan%20style%3D%22font-family%3A%20Calibri%2C%20sans-serif%3B%22%3ENext%20we%20will%20set%20up%20interface%20maps.%20An%20Interface%20map%20maps%20the%20logical%20device%20to%20the%20actual%20physical%20device.%20ie%3A%20a%20specific%20switch%20and%20model%20that%20is%20used%20in%20the%20actual%20typology.%3C/span%3E%3C/span%3E%3C/p%3E
- Click on the Interface maps option from the menu
- Click to create a new interface map
- Add a name
- Choose a logical device that will be mapped to a physical entity
- Choose from the drop down list
- Choose a device profile from the drop down menu
- Choose the Juniper QFX device as shown
- Choose the interfaces
- %3Cp%3E%3Cspan%20style%3D%22font-size%3A%2013px%3B%22%3EWe%20will%20repeat%20the%20same%20process%20for%20the%20spine%20devices%20defined%20earlier.%20We%20will%20be%20mapping%20it%20to%20the%20Juniper%20QFX%20devices%20as%20well.%3C/span%3E%3C/p%3E
- Next we will add a few racks
- Click on the rack type from the menu
- Click to create a rack type
- Add a name for the new rack
- Name the leaf switch
- Choose a logical leaf device that was previously defined
- Choose the desired logical device from the list
- Click to add a new Generic system
- Add a name to the Generic System Group
- Enter a desired name
- FInish the process of creating a new rack
- Let us add another generic system
- Click to edit the rack type
- Navigate to the leafs tab
- Click on generic systems tab
- Up the Generic system count to 2 and then update the rack type
- Bring everything together in the next steps
- Choose templates from the menu
- Click to create a template
- Add a name first
- Enter more details and then scroll down
- To choose a rack type click on the drop down menu
- Choose the rack type that we created earlier from the menu
- Click to select the desired spine logical device
- Choose the logical spine device from the list
- Enter the desired count
- Click on create to complete the configuration
- Next step is to create a blueprint for the entire Datacenter fabric
- Click to create a new blueprint
- Enter a name for the Blueprint
- Choose the template from the drop down menu
- Choose the desired template
- Click to display the links
- Click on create to finish the process
- Click to view the Blueprint
- Click on staged
- Select the spines to allocate an Autonomous ID
- Click on the edit icon
- Choose the IP address from the Pool
- Save the configuration
- Repeat the same process for the other leaf devices
- Next we need to configure the interface mappings
- Click on one of the spine devices
- Click on the edit icon
- Choose the interface mappings from the the drop down menu
- Make the desired selection
- Click to update the assignments
- Click to assign system IDs next
- Click on the Assigned System IDs tab
- Click on the edit icon
- Choose from the list of System IDs
- Finalize the assignments
- Click on links
- Recitify any cabling errors as shown automatically
- Update the cabling assingments
- Notice the success message once the cabling mapping is sorted out
- Click on commit
- Add the description and click on the commit button
- Success
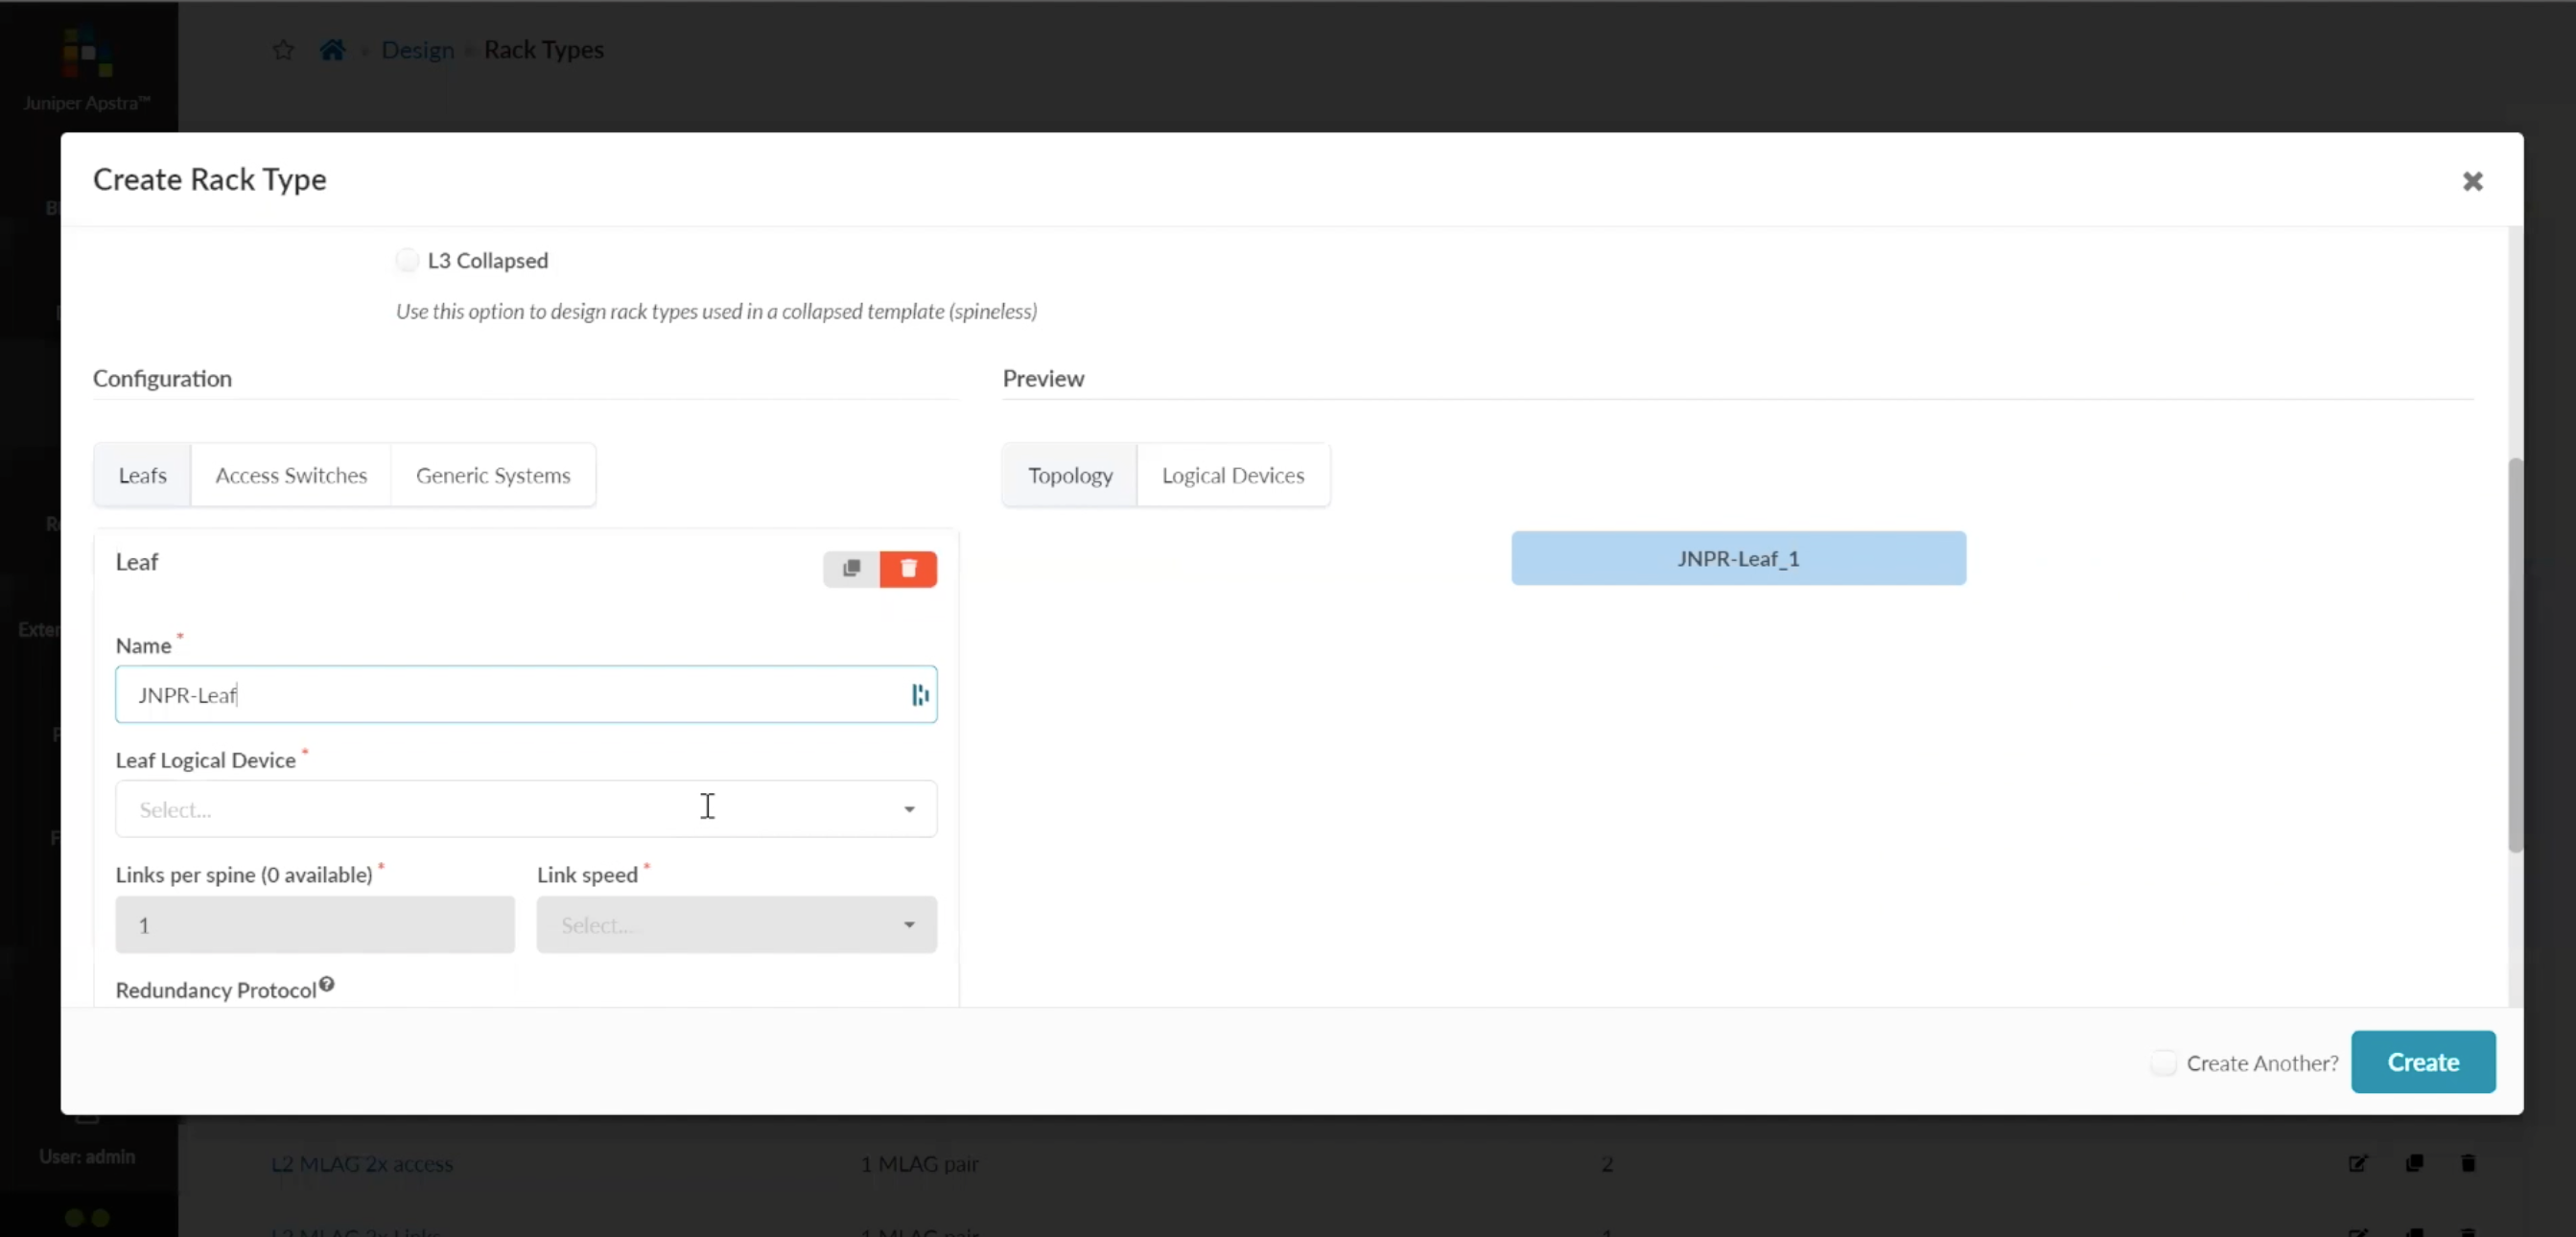
Choose a logical leaf device that was previously defined
- %3Cp%3EWe%20have%20our%20switches%20already%20managed%20by%20Apstra%2C%20a%20series%20of%20Juniper%20virtual%20QFX%20switches%20in%20this%20example.%20We%20wil%20start%20by%20creating%20logical%20devices.%3C/p%3E
- Click%20on%20logical%20devices%20option%20from%20the%20menu
- %3Cp%3E%3Cspan%20style%3D%22font-size%3A%2013px%3B%22%3ETo%20start%20the%20process%2C%20we%20will%20creat%20a%20leaf%20device%20first.%20%3C/span%3E%3C/p%3E%0A%3Cp%3E%3Cspan%20style%3D%22font-size%3A%2015px%3B%22%3EPlease%20Note%3A%20%3C/span%3E%3C/p%3E%0A%3Cp%3E%3Cspan%20style%3D%22font-size%3A%2013px%3B%22%3EThe%20same%20process%20can%20be%20replicated%20for%20a%20spine%20logical%20device%20too.%20For%20the%20purpose%20of%20this%20demo%2C%20we%20will%20skip%20the%20spine%20logical%20device%20creation%20process.%3C/span%3E%3C/p%3E
- Enter a name for the logical device
- Choose the number of ports
- Create a port group
- Click to finish the creation
- %3Cp%3E%3Cspan%20style%3D%22font-size%3A%2013px%3B%22%3E%3Cspan%20style%3D%22font-family%3A%20Calibri%2C%20sans-serif%3B%22%3ENext%20we%20will%20set%20up%20interface%20maps.%20An%20Interface%20map%20maps%20the%20logical%20device%20to%20the%20actual%20physical%20device.%20ie%3A%20a%20specific%20switch%20and%20model%20that%20is%20used%20in%20the%20actual%20typology.%3C/span%3E%3C/span%3E%3C/p%3E
- Click on the Interface maps option from the menu
- Click to create a new interface map
- Add a name
- Choose a logical device that will be mapped to a physical entity
- Choose from the drop down list
- Choose a device profile from the drop down menu
- Choose the Juniper QFX device as shown
- Choose the interfaces
- %3Cp%3E%3Cspan%20style%3D%22font-size%3A%2013px%3B%22%3EWe%20will%20repeat%20the%20same%20process%20for%20the%20spine%20devices%20defined%20earlier.%20We%20will%20be%20mapping%20it%20to%20the%20Juniper%20QFX%20devices%20as%20well.%3C/span%3E%3C/p%3E
- Next we will add a few racks
- Click on the rack type from the menu
- Click to create a rack type
- Add a name for the new rack
- Name the leaf switch
- Choose a logical leaf device that was previously defined
- Choose the desired logical device from the list
- Click to add a new Generic system
- Add a name to the Generic System Group
- Enter a desired name
- FInish the process of creating a new rack
- Let us add another generic system
- Click to edit the rack type
- Navigate to the leafs tab
- Click on generic systems tab
- Up the Generic system count to 2 and then update the rack type
- Bring everything together in the next steps
- Choose templates from the menu
- Click to create a template
- Add a name first
- Enter more details and then scroll down
- To choose a rack type click on the drop down menu
- Choose the rack type that we created earlier from the menu
- Click to select the desired spine logical device
- Choose the logical spine device from the list
- Enter the desired count
- Click on create to complete the configuration
- Next step is to create a blueprint for the entire Datacenter fabric
- Click to create a new blueprint
- Enter a name for the Blueprint
- Choose the template from the drop down menu
- Choose the desired template
- Click to display the links
- Click on create to finish the process
- Click to view the Blueprint
- Click on staged
- Select the spines to allocate an Autonomous ID
- Click on the edit icon
- Choose the IP address from the Pool
- Save the configuration
- Repeat the same process for the other leaf devices
- Next we need to configure the interface mappings
- Click on one of the spine devices
- Click on the edit icon
- Choose the interface mappings from the the drop down menu
- Make the desired selection
- Click to update the assignments
- Click to assign system IDs next
- Click on the Assigned System IDs tab
- Click on the edit icon
- Choose from the list of System IDs
- Finalize the assignments
- Click on links
- Recitify any cabling errors as shown automatically
- Update the cabling assingments
- Notice the success message once the cabling mapping is sorted out
- Click on commit
- Add the description and click on the commit button
- Success
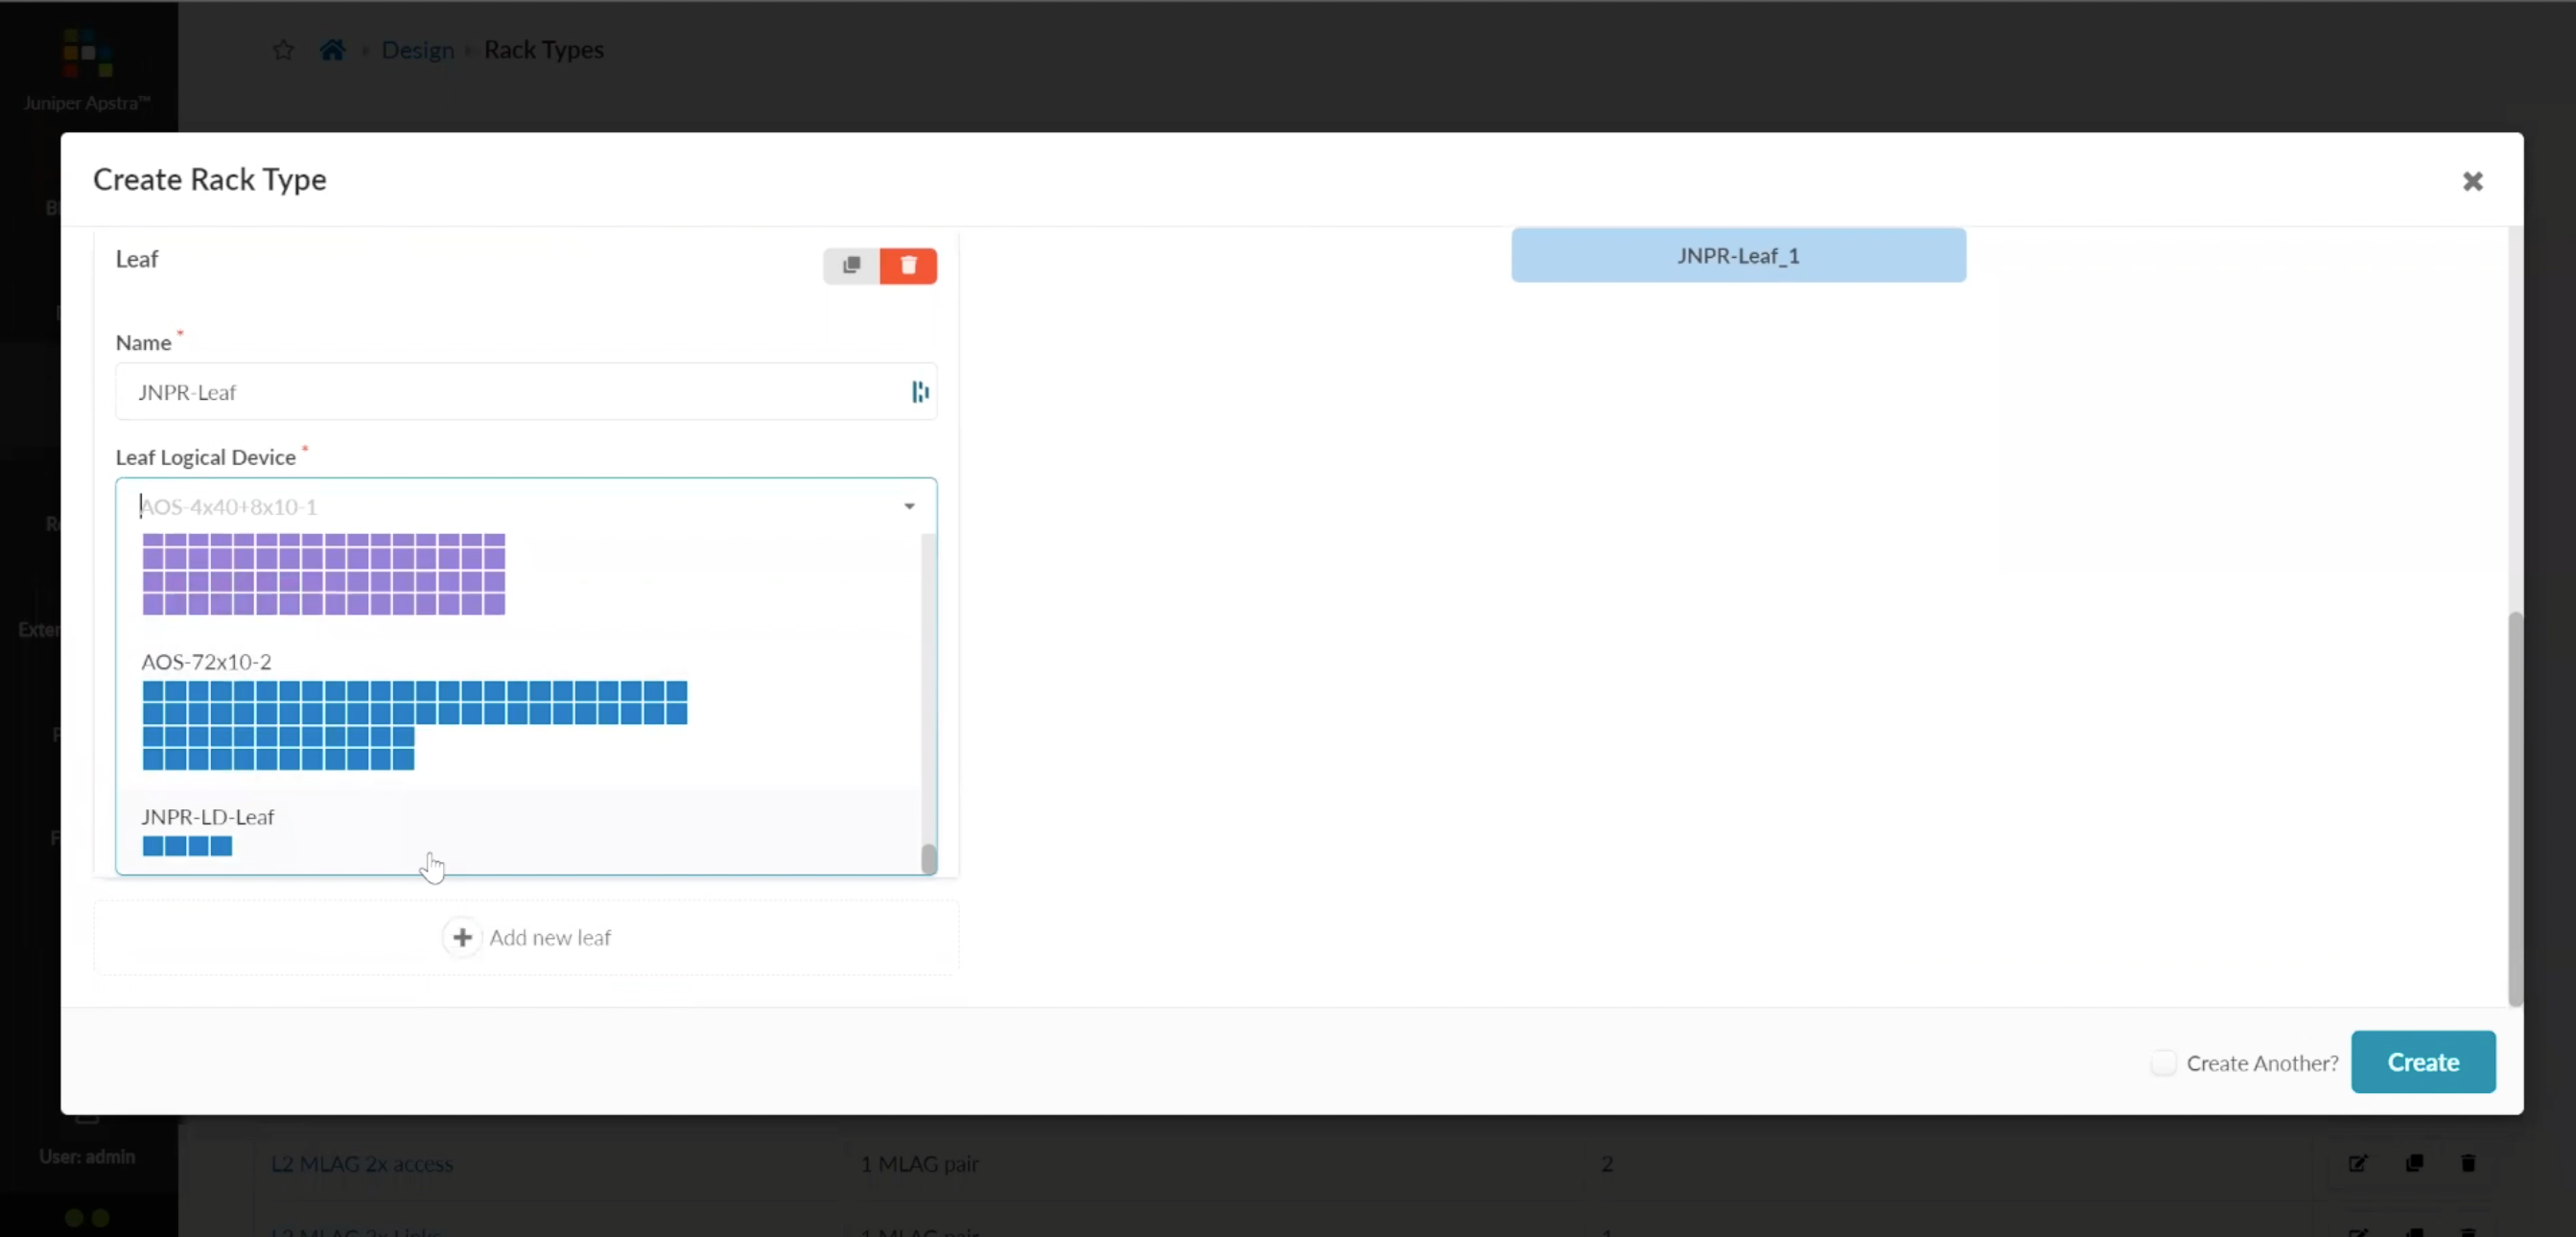
Choose the desired logical device from the list
- %3Cp%3EWe%20have%20our%20switches%20already%20managed%20by%20Apstra%2C%20a%20series%20of%20Juniper%20virtual%20QFX%20switches%20in%20this%20example.%20We%20wil%20start%20by%20creating%20logical%20devices.%3C/p%3E
- Click%20on%20logical%20devices%20option%20from%20the%20menu
- %3Cp%3E%3Cspan%20style%3D%22font-size%3A%2013px%3B%22%3ETo%20start%20the%20process%2C%20we%20will%20creat%20a%20leaf%20device%20first.%20%3C/span%3E%3C/p%3E%0A%3Cp%3E%3Cspan%20style%3D%22font-size%3A%2015px%3B%22%3EPlease%20Note%3A%20%3C/span%3E%3C/p%3E%0A%3Cp%3E%3Cspan%20style%3D%22font-size%3A%2013px%3B%22%3EThe%20same%20process%20can%20be%20replicated%20for%20a%20spine%20logical%20device%20too.%20For%20the%20purpose%20of%20this%20demo%2C%20we%20will%20skip%20the%20spine%20logical%20device%20creation%20process.%3C/span%3E%3C/p%3E
- Enter a name for the logical device
- Choose the number of ports
- Create a port group
- Click to finish the creation
- %3Cp%3E%3Cspan%20style%3D%22font-size%3A%2013px%3B%22%3E%3Cspan%20style%3D%22font-family%3A%20Calibri%2C%20sans-serif%3B%22%3ENext%20we%20will%20set%20up%20interface%20maps.%20An%20Interface%20map%20maps%20the%20logical%20device%20to%20the%20actual%20physical%20device.%20ie%3A%20a%20specific%20switch%20and%20model%20that%20is%20used%20in%20the%20actual%20typology.%3C/span%3E%3C/span%3E%3C/p%3E
- Click on the Interface maps option from the menu
- Click to create a new interface map
- Add a name
- Choose a logical device that will be mapped to a physical entity
- Choose from the drop down list
- Choose a device profile from the drop down menu
- Choose the Juniper QFX device as shown
- Choose the interfaces
- %3Cp%3E%3Cspan%20style%3D%22font-size%3A%2013px%3B%22%3EWe%20will%20repeat%20the%20same%20process%20for%20the%20spine%20devices%20defined%20earlier.%20We%20will%20be%20mapping%20it%20to%20the%20Juniper%20QFX%20devices%20as%20well.%3C/span%3E%3C/p%3E
- Next we will add a few racks
- Click on the rack type from the menu
- Click to create a rack type
- Add a name for the new rack
- Name the leaf switch
- Choose a logical leaf device that was previously defined
- Choose the desired logical device from the list
- Click to add a new Generic system
- Add a name to the Generic System Group
- Enter a desired name
- FInish the process of creating a new rack
- Let us add another generic system
- Click to edit the rack type
- Navigate to the leafs tab
- Click on generic systems tab
- Up the Generic system count to 2 and then update the rack type
- Bring everything together in the next steps
- Choose templates from the menu
- Click to create a template
- Add a name first
- Enter more details and then scroll down
- To choose a rack type click on the drop down menu
- Choose the rack type that we created earlier from the menu
- Click to select the desired spine logical device
- Choose the logical spine device from the list
- Enter the desired count
- Click on create to complete the configuration
- Next step is to create a blueprint for the entire Datacenter fabric
- Click to create a new blueprint
- Enter a name for the Blueprint
- Choose the template from the drop down menu
- Choose the desired template
- Click to display the links
- Click on create to finish the process
- Click to view the Blueprint
- Click on staged
- Select the spines to allocate an Autonomous ID
- Click on the edit icon
- Choose the IP address from the Pool
- Save the configuration
- Repeat the same process for the other leaf devices
- Next we need to configure the interface mappings
- Click on one of the spine devices
- Click on the edit icon
- Choose the interface mappings from the the drop down menu
- Make the desired selection
- Click to update the assignments
- Click to assign system IDs next
- Click on the Assigned System IDs tab
- Click on the edit icon
- Choose from the list of System IDs
- Finalize the assignments
- Click on links
- Recitify any cabling errors as shown automatically
- Update the cabling assingments
- Notice the success message once the cabling mapping is sorted out
- Click on commit
- Add the description and click on the commit button
- Success
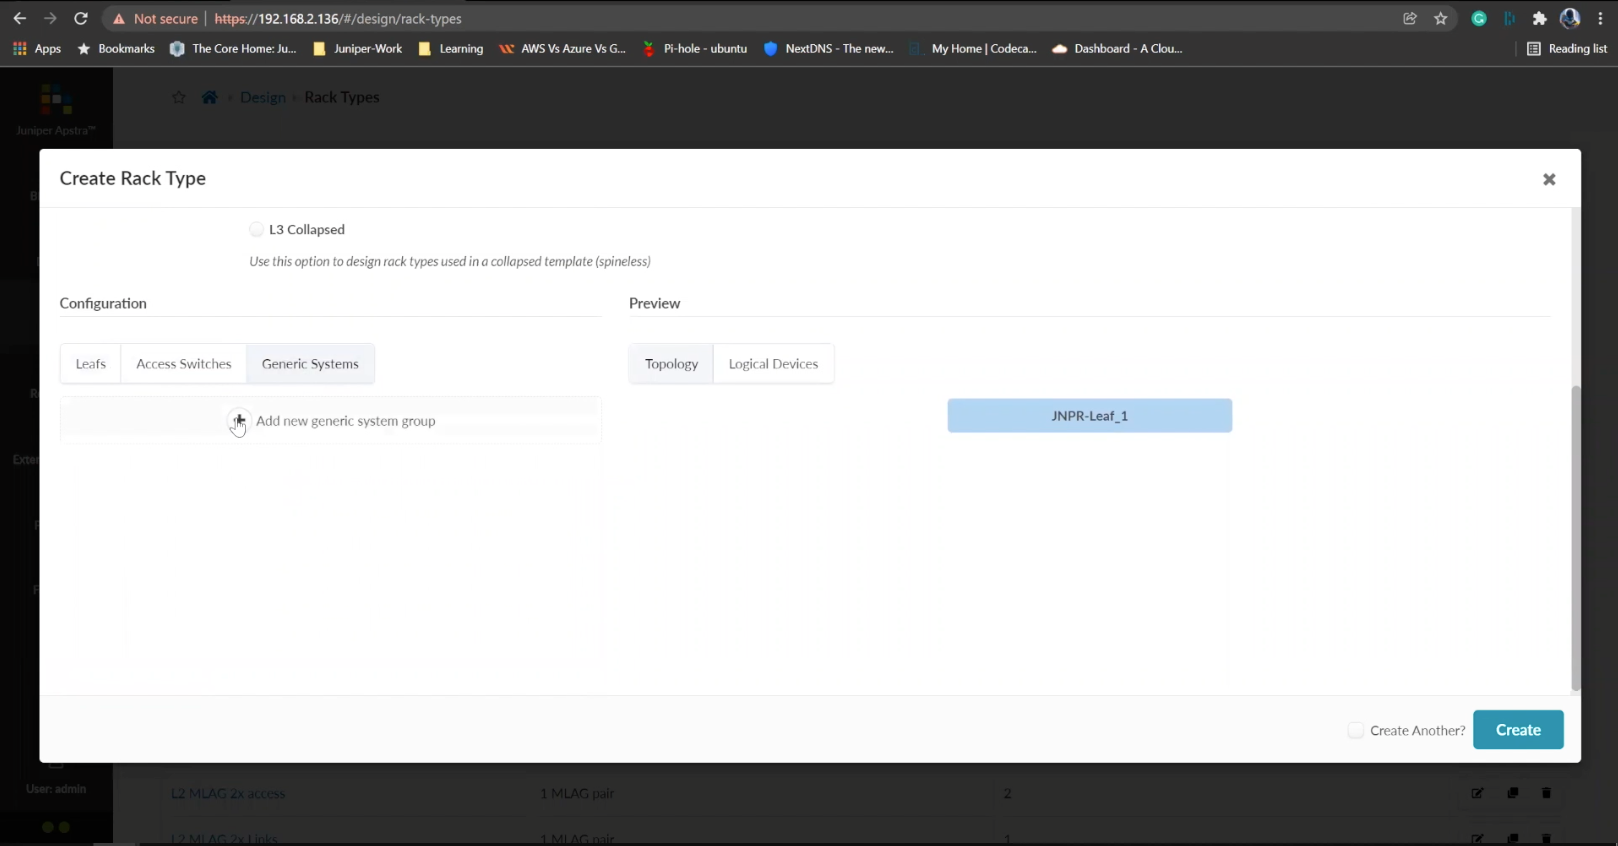
Click to add a new Generic system
Note: Sometimes, we want the Apstra-managed fabric to connect to a system that is not managed by Apstra. This system can be a server, firewall, or something else. A generic system can be connected to leaf devices within the same rack only.
- %3Cp%3EWe%20have%20our%20switches%20already%20managed%20by%20Apstra%2C%20a%20series%20of%20Juniper%20virtual%20QFX%20switches%20in%20this%20example.%20We%20wil%20start%20by%20creating%20logical%20devices.%3C/p%3E
- Click%20on%20logical%20devices%20option%20from%20the%20menu
- %3Cp%3E%3Cspan%20style%3D%22font-size%3A%2013px%3B%22%3ETo%20start%20the%20process%2C%20we%20will%20creat%20a%20leaf%20device%20first.%20%3C/span%3E%3C/p%3E%0A%3Cp%3E%3Cspan%20style%3D%22font-size%3A%2015px%3B%22%3EPlease%20Note%3A%20%3C/span%3E%3C/p%3E%0A%3Cp%3E%3Cspan%20style%3D%22font-size%3A%2013px%3B%22%3EThe%20same%20process%20can%20be%20replicated%20for%20a%20spine%20logical%20device%20too.%20For%20the%20purpose%20of%20this%20demo%2C%20we%20will%20skip%20the%20spine%20logical%20device%20creation%20process.%3C/span%3E%3C/p%3E
- Enter a name for the logical device
- Choose the number of ports
- Create a port group
- Click to finish the creation
- %3Cp%3E%3Cspan%20style%3D%22font-size%3A%2013px%3B%22%3E%3Cspan%20style%3D%22font-family%3A%20Calibri%2C%20sans-serif%3B%22%3ENext%20we%20will%20set%20up%20interface%20maps.%20An%20Interface%20map%20maps%20the%20logical%20device%20to%20the%20actual%20physical%20device.%20ie%3A%20a%20specific%20switch%20and%20model%20that%20is%20used%20in%20the%20actual%20typology.%3C/span%3E%3C/span%3E%3C/p%3E
- Click on the Interface maps option from the menu
- Click to create a new interface map
- Add a name
- Choose a logical device that will be mapped to a physical entity
- Choose from the drop down list
- Choose a device profile from the drop down menu
- Choose the Juniper QFX device as shown
- Choose the interfaces
- %3Cp%3E%3Cspan%20style%3D%22font-size%3A%2013px%3B%22%3EWe%20will%20repeat%20the%20same%20process%20for%20the%20spine%20devices%20defined%20earlier.%20We%20will%20be%20mapping%20it%20to%20the%20Juniper%20QFX%20devices%20as%20well.%3C/span%3E%3C/p%3E
- Next we will add a few racks
- Click on the rack type from the menu
- Click to create a rack type
- Add a name for the new rack
- Name the leaf switch
- Choose a logical leaf device that was previously defined
- Choose the desired logical device from the list
- Click to add a new Generic system
- Add a name to the Generic System Group
- Enter a desired name
- FInish the process of creating a new rack
- Let us add another generic system
- Click to edit the rack type
- Navigate to the leafs tab
- Click on generic systems tab
- Up the Generic system count to 2 and then update the rack type
- Bring everything together in the next steps
- Choose templates from the menu
- Click to create a template
- Add a name first
- Enter more details and then scroll down
- To choose a rack type click on the drop down menu
- Choose the rack type that we created earlier from the menu
- Click to select the desired spine logical device
- Choose the logical spine device from the list
- Enter the desired count
- Click on create to complete the configuration
- Next step is to create a blueprint for the entire Datacenter fabric
- Click to create a new blueprint
- Enter a name for the Blueprint
- Choose the template from the drop down menu
- Choose the desired template
- Click to display the links
- Click on create to finish the process
- Click to view the Blueprint
- Click on staged
- Select the spines to allocate an Autonomous ID
- Click on the edit icon
- Choose the IP address from the Pool
- Save the configuration
- Repeat the same process for the other leaf devices
- Next we need to configure the interface mappings
- Click on one of the spine devices
- Click on the edit icon
- Choose the interface mappings from the the drop down menu
- Make the desired selection
- Click to update the assignments
- Click to assign system IDs next
- Click on the Assigned System IDs tab
- Click on the edit icon
- Choose from the list of System IDs
- Finalize the assignments
- Click on links
- Recitify any cabling errors as shown automatically
- Update the cabling assingments
- Notice the success message once the cabling mapping is sorted out
- Click on commit
- Add the description and click on the commit button
- Success
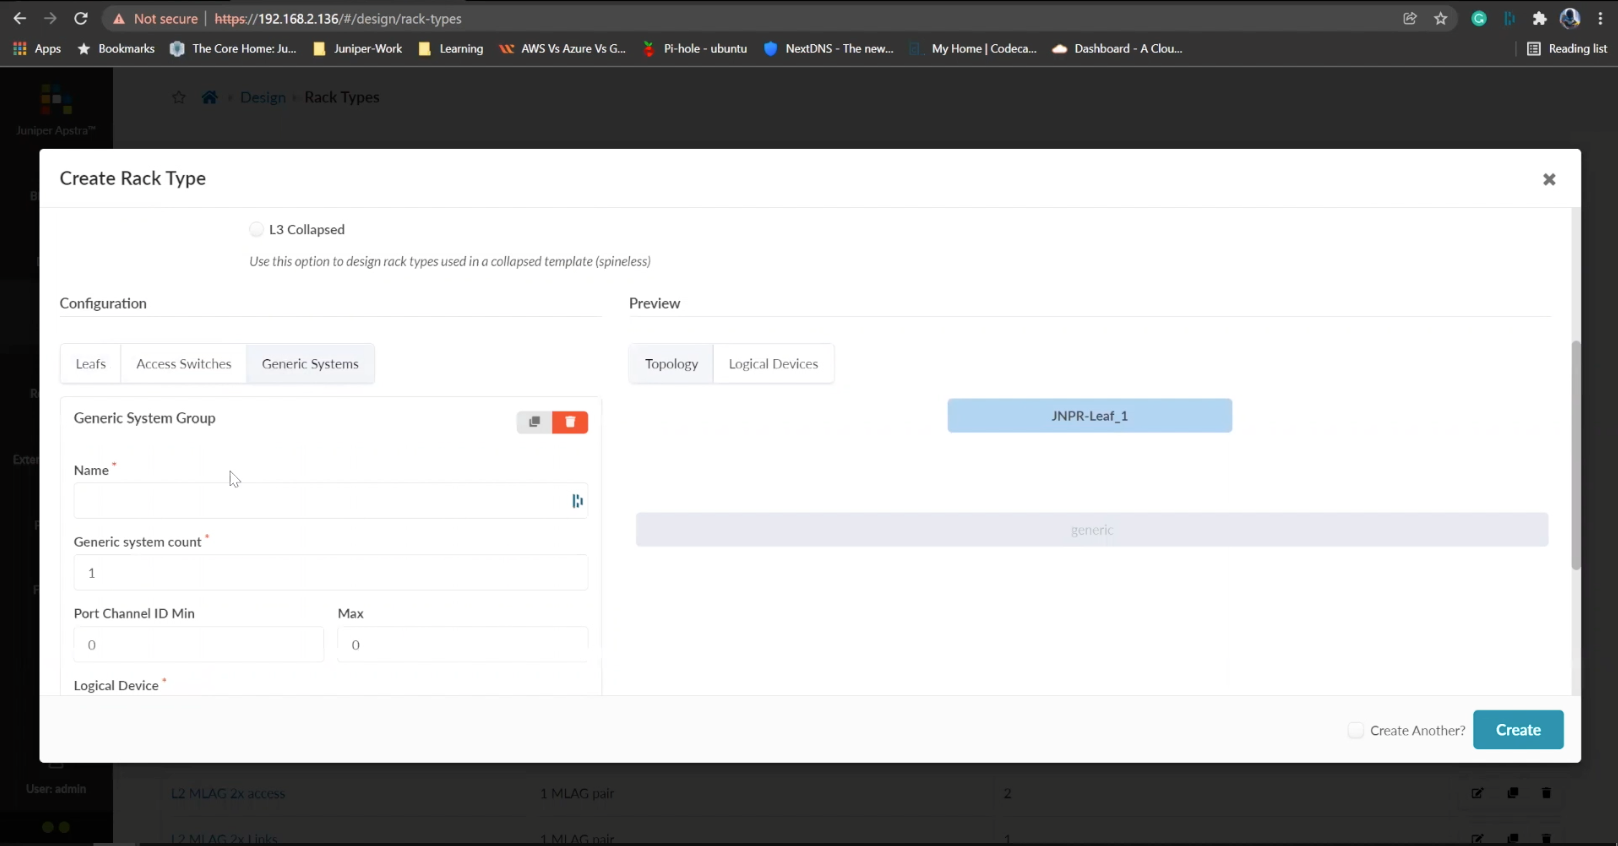
Add a name to the Generic System Group
- %3Cp%3EWe%20have%20our%20switches%20already%20managed%20by%20Apstra%2C%20a%20series%20of%20Juniper%20virtual%20QFX%20switches%20in%20this%20example.%20We%20wil%20start%20by%20creating%20logical%20devices.%3C/p%3E
- Click%20on%20logical%20devices%20option%20from%20the%20menu
- %3Cp%3E%3Cspan%20style%3D%22font-size%3A%2013px%3B%22%3ETo%20start%20the%20process%2C%20we%20will%20creat%20a%20leaf%20device%20first.%20%3C/span%3E%3C/p%3E%0A%3Cp%3E%3Cspan%20style%3D%22font-size%3A%2015px%3B%22%3EPlease%20Note%3A%20%3C/span%3E%3C/p%3E%0A%3Cp%3E%3Cspan%20style%3D%22font-size%3A%2013px%3B%22%3EThe%20same%20process%20can%20be%20replicated%20for%20a%20spine%20logical%20device%20too.%20For%20the%20purpose%20of%20this%20demo%2C%20we%20will%20skip%20the%20spine%20logical%20device%20creation%20process.%3C/span%3E%3C/p%3E
- Enter a name for the logical device
- Choose the number of ports
- Create a port group
- Click to finish the creation
- %3Cp%3E%3Cspan%20style%3D%22font-size%3A%2013px%3B%22%3E%3Cspan%20style%3D%22font-family%3A%20Calibri%2C%20sans-serif%3B%22%3ENext%20we%20will%20set%20up%20interface%20maps.%20An%20Interface%20map%20maps%20the%20logical%20device%20to%20the%20actual%20physical%20device.%20ie%3A%20a%20specific%20switch%20and%20model%20that%20is%20used%20in%20the%20actual%20typology.%3C/span%3E%3C/span%3E%3C/p%3E
- Click on the Interface maps option from the menu
- Click to create a new interface map
- Add a name
- Choose a logical device that will be mapped to a physical entity
- Choose from the drop down list
- Choose a device profile from the drop down menu
- Choose the Juniper QFX device as shown
- Choose the interfaces
- %3Cp%3E%3Cspan%20style%3D%22font-size%3A%2013px%3B%22%3EWe%20will%20repeat%20the%20same%20process%20for%20the%20spine%20devices%20defined%20earlier.%20We%20will%20be%20mapping%20it%20to%20the%20Juniper%20QFX%20devices%20as%20well.%3C/span%3E%3C/p%3E
- Next we will add a few racks
- Click on the rack type from the menu
- Click to create a rack type
- Add a name for the new rack
- Name the leaf switch
- Choose a logical leaf device that was previously defined
- Choose the desired logical device from the list
- Click to add a new Generic system
- Add a name to the Generic System Group
- Enter a desired name
- FInish the process of creating a new rack
- Let us add another generic system
- Click to edit the rack type
- Navigate to the leafs tab
- Click on generic systems tab
- Up the Generic system count to 2 and then update the rack type
- Bring everything together in the next steps
- Choose templates from the menu
- Click to create a template
- Add a name first
- Enter more details and then scroll down
- To choose a rack type click on the drop down menu
- Choose the rack type that we created earlier from the menu
- Click to select the desired spine logical device
- Choose the logical spine device from the list
- Enter the desired count
- Click on create to complete the configuration
- Next step is to create a blueprint for the entire Datacenter fabric
- Click to create a new blueprint
- Enter a name for the Blueprint
- Choose the template from the drop down menu
- Choose the desired template
- Click to display the links
- Click on create to finish the process
- Click to view the Blueprint
- Click on staged
- Select the spines to allocate an Autonomous ID
- Click on the edit icon
- Choose the IP address from the Pool
- Save the configuration
- Repeat the same process for the other leaf devices
- Next we need to configure the interface mappings
- Click on one of the spine devices
- Click on the edit icon
- Choose the interface mappings from the the drop down menu
- Make the desired selection
- Click to update the assignments
- Click to assign system IDs next
- Click on the Assigned System IDs tab
- Click on the edit icon
- Choose from the list of System IDs
- Finalize the assignments
- Click on links
- Recitify any cabling errors as shown automatically
- Update the cabling assingments
- Notice the success message once the cabling mapping is sorted out
- Click on commit
- Add the description and click on the commit button
- Success
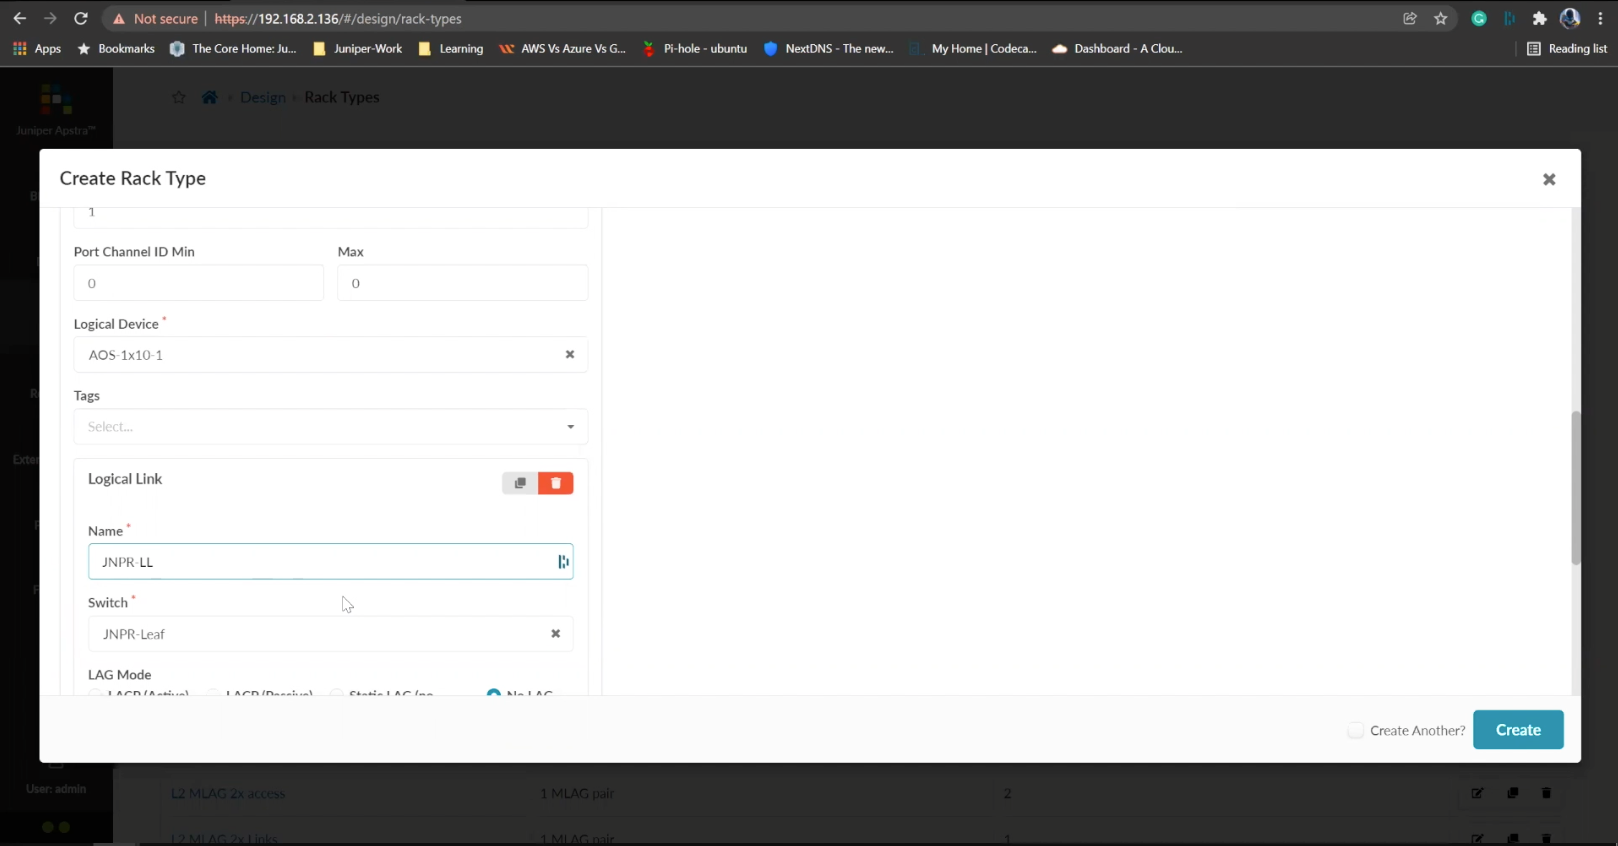
Enter a desired name
- %3Cp%3EWe%20have%20our%20switches%20already%20managed%20by%20Apstra%2C%20a%20series%20of%20Juniper%20virtual%20QFX%20switches%20in%20this%20example.%20We%20wil%20start%20by%20creating%20logical%20devices.%3C/p%3E
- Click%20on%20logical%20devices%20option%20from%20the%20menu
- %3Cp%3E%3Cspan%20style%3D%22font-size%3A%2013px%3B%22%3ETo%20start%20the%20process%2C%20we%20will%20creat%20a%20leaf%20device%20first.%20%3C/span%3E%3C/p%3E%0A%3Cp%3E%3Cspan%20style%3D%22font-size%3A%2015px%3B%22%3EPlease%20Note%3A%20%3C/span%3E%3C/p%3E%0A%3Cp%3E%3Cspan%20style%3D%22font-size%3A%2013px%3B%22%3EThe%20same%20process%20can%20be%20replicated%20for%20a%20spine%20logical%20device%20too.%20For%20the%20purpose%20of%20this%20demo%2C%20we%20will%20skip%20the%20spine%20logical%20device%20creation%20process.%3C/span%3E%3C/p%3E
- Enter a name for the logical device
- Choose the number of ports
- Create a port group
- Click to finish the creation
- %3Cp%3E%3Cspan%20style%3D%22font-size%3A%2013px%3B%22%3E%3Cspan%20style%3D%22font-family%3A%20Calibri%2C%20sans-serif%3B%22%3ENext%20we%20will%20set%20up%20interface%20maps.%20An%20Interface%20map%20maps%20the%20logical%20device%20to%20the%20actual%20physical%20device.%20ie%3A%20a%20specific%20switch%20and%20model%20that%20is%20used%20in%20the%20actual%20typology.%3C/span%3E%3C/span%3E%3C/p%3E
- Click on the Interface maps option from the menu
- Click to create a new interface map
- Add a name
- Choose a logical device that will be mapped to a physical entity
- Choose from the drop down list
- Choose a device profile from the drop down menu
- Choose the Juniper QFX device as shown
- Choose the interfaces
- %3Cp%3E%3Cspan%20style%3D%22font-size%3A%2013px%3B%22%3EWe%20will%20repeat%20the%20same%20process%20for%20the%20spine%20devices%20defined%20earlier.%20We%20will%20be%20mapping%20it%20to%20the%20Juniper%20QFX%20devices%20as%20well.%3C/span%3E%3C/p%3E
- Next we will add a few racks
- Click on the rack type from the menu
- Click to create a rack type
- Add a name for the new rack
- Name the leaf switch
- Choose a logical leaf device that was previously defined
- Choose the desired logical device from the list
- Click to add a new Generic system
- Add a name to the Generic System Group
- Enter a desired name
- FInish the process of creating a new rack
- Let us add another generic system
- Click to edit the rack type
- Navigate to the leafs tab
- Click on generic systems tab
- Up the Generic system count to 2 and then update the rack type
- Bring everything together in the next steps
- Choose templates from the menu
- Click to create a template
- Add a name first
- Enter more details and then scroll down
- To choose a rack type click on the drop down menu
- Choose the rack type that we created earlier from the menu
- Click to select the desired spine logical device
- Choose the logical spine device from the list
- Enter the desired count
- Click on create to complete the configuration
- Next step is to create a blueprint for the entire Datacenter fabric
- Click to create a new blueprint
- Enter a name for the Blueprint
- Choose the template from the drop down menu
- Choose the desired template
- Click to display the links
- Click on create to finish the process
- Click to view the Blueprint
- Click on staged
- Select the spines to allocate an Autonomous ID
- Click on the edit icon
- Choose the IP address from the Pool
- Save the configuration
- Repeat the same process for the other leaf devices
- Next we need to configure the interface mappings
- Click on one of the spine devices
- Click on the edit icon
- Choose the interface mappings from the the drop down menu
- Make the desired selection
- Click to update the assignments
- Click to assign system IDs next
- Click on the Assigned System IDs tab
- Click on the edit icon
- Choose from the list of System IDs
- Finalize the assignments
- Click on links
- Recitify any cabling errors as shown automatically
- Update the cabling assingments
- Notice the success message once the cabling mapping is sorted out
- Click on commit
- Add the description and click on the commit button
- Success
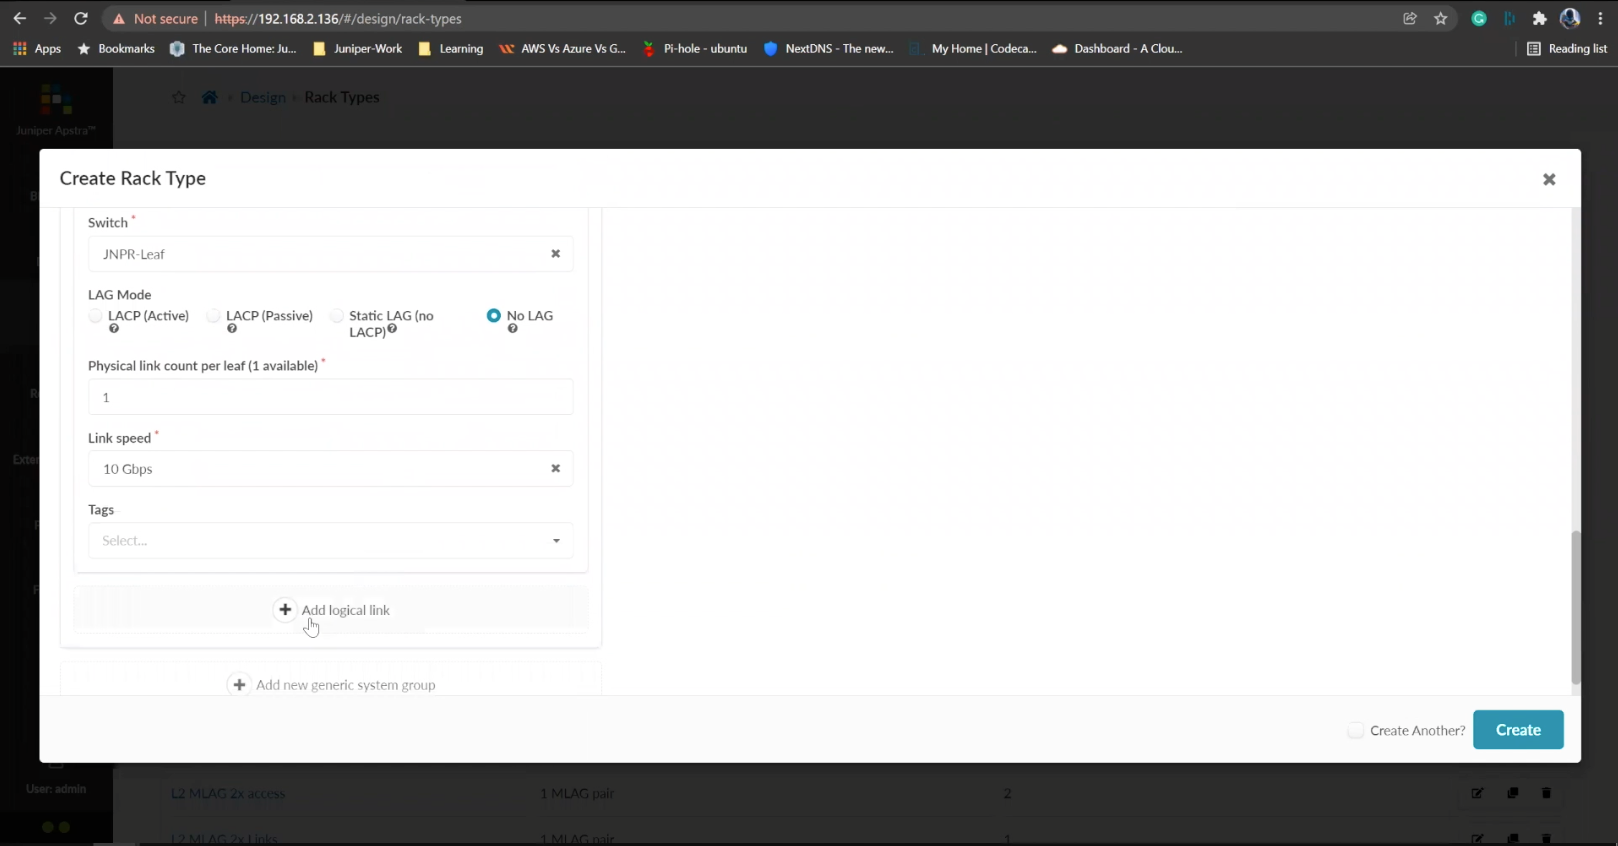
FInish the process of creating a new rack
- %3Cp%3EWe%20have%20our%20switches%20already%20managed%20by%20Apstra%2C%20a%20series%20of%20Juniper%20virtual%20QFX%20switches%20in%20this%20example.%20We%20wil%20start%20by%20creating%20logical%20devices.%3C/p%3E
- Click%20on%20logical%20devices%20option%20from%20the%20menu
- %3Cp%3E%3Cspan%20style%3D%22font-size%3A%2013px%3B%22%3ETo%20start%20the%20process%2C%20we%20will%20creat%20a%20leaf%20device%20first.%20%3C/span%3E%3C/p%3E%0A%3Cp%3E%3Cspan%20style%3D%22font-size%3A%2015px%3B%22%3EPlease%20Note%3A%20%3C/span%3E%3C/p%3E%0A%3Cp%3E%3Cspan%20style%3D%22font-size%3A%2013px%3B%22%3EThe%20same%20process%20can%20be%20replicated%20for%20a%20spine%20logical%20device%20too.%20For%20the%20purpose%20of%20this%20demo%2C%20we%20will%20skip%20the%20spine%20logical%20device%20creation%20process.%3C/span%3E%3C/p%3E
- Enter a name for the logical device
- Choose the number of ports
- Create a port group
- Click to finish the creation
- %3Cp%3E%3Cspan%20style%3D%22font-size%3A%2013px%3B%22%3E%3Cspan%20style%3D%22font-family%3A%20Calibri%2C%20sans-serif%3B%22%3ENext%20we%20will%20set%20up%20interface%20maps.%20An%20Interface%20map%20maps%20the%20logical%20device%20to%20the%20actual%20physical%20device.%20ie%3A%20a%20specific%20switch%20and%20model%20that%20is%20used%20in%20the%20actual%20typology.%3C/span%3E%3C/span%3E%3C/p%3E
- Click on the Interface maps option from the menu
- Click to create a new interface map
- Add a name
- Choose a logical device that will be mapped to a physical entity
- Choose from the drop down list
- Choose a device profile from the drop down menu
- Choose the Juniper QFX device as shown
- Choose the interfaces
- %3Cp%3E%3Cspan%20style%3D%22font-size%3A%2013px%3B%22%3EWe%20will%20repeat%20the%20same%20process%20for%20the%20spine%20devices%20defined%20earlier.%20We%20will%20be%20mapping%20it%20to%20the%20Juniper%20QFX%20devices%20as%20well.%3C/span%3E%3C/p%3E
- Next we will add a few racks
- Click on the rack type from the menu
- Click to create a rack type
- Add a name for the new rack
- Name the leaf switch
- Choose a logical leaf device that was previously defined
- Choose the desired logical device from the list
- Click to add a new Generic system
- Add a name to the Generic System Group
- Enter a desired name
- FInish the process of creating a new rack
- Let us add another generic system
- Click to edit the rack type
- Navigate to the leafs tab
- Click on generic systems tab
- Up the Generic system count to 2 and then update the rack type
- Bring everything together in the next steps
- Choose templates from the menu
- Click to create a template
- Add a name first
- Enter more details and then scroll down
- To choose a rack type click on the drop down menu
- Choose the rack type that we created earlier from the menu
- Click to select the desired spine logical device
- Choose the logical spine device from the list
- Enter the desired count
- Click on create to complete the configuration
- Next step is to create a blueprint for the entire Datacenter fabric
- Click to create a new blueprint
- Enter a name for the Blueprint
- Choose the template from the drop down menu
- Choose the desired template
- Click to display the links
- Click on create to finish the process
- Click to view the Blueprint
- Click on staged
- Select the spines to allocate an Autonomous ID
- Click on the edit icon
- Choose the IP address from the Pool
- Save the configuration
- Repeat the same process for the other leaf devices
- Next we need to configure the interface mappings
- Click on one of the spine devices
- Click on the edit icon
- Choose the interface mappings from the the drop down menu
- Make the desired selection
- Click to update the assignments
- Click to assign system IDs next
- Click on the Assigned System IDs tab
- Click on the edit icon
- Choose from the list of System IDs
- Finalize the assignments
- Click on links
- Recitify any cabling errors as shown automatically
- Update the cabling assingments
- Notice the success message once the cabling mapping is sorted out
- Click on commit
- Add the description and click on the commit button
- Success
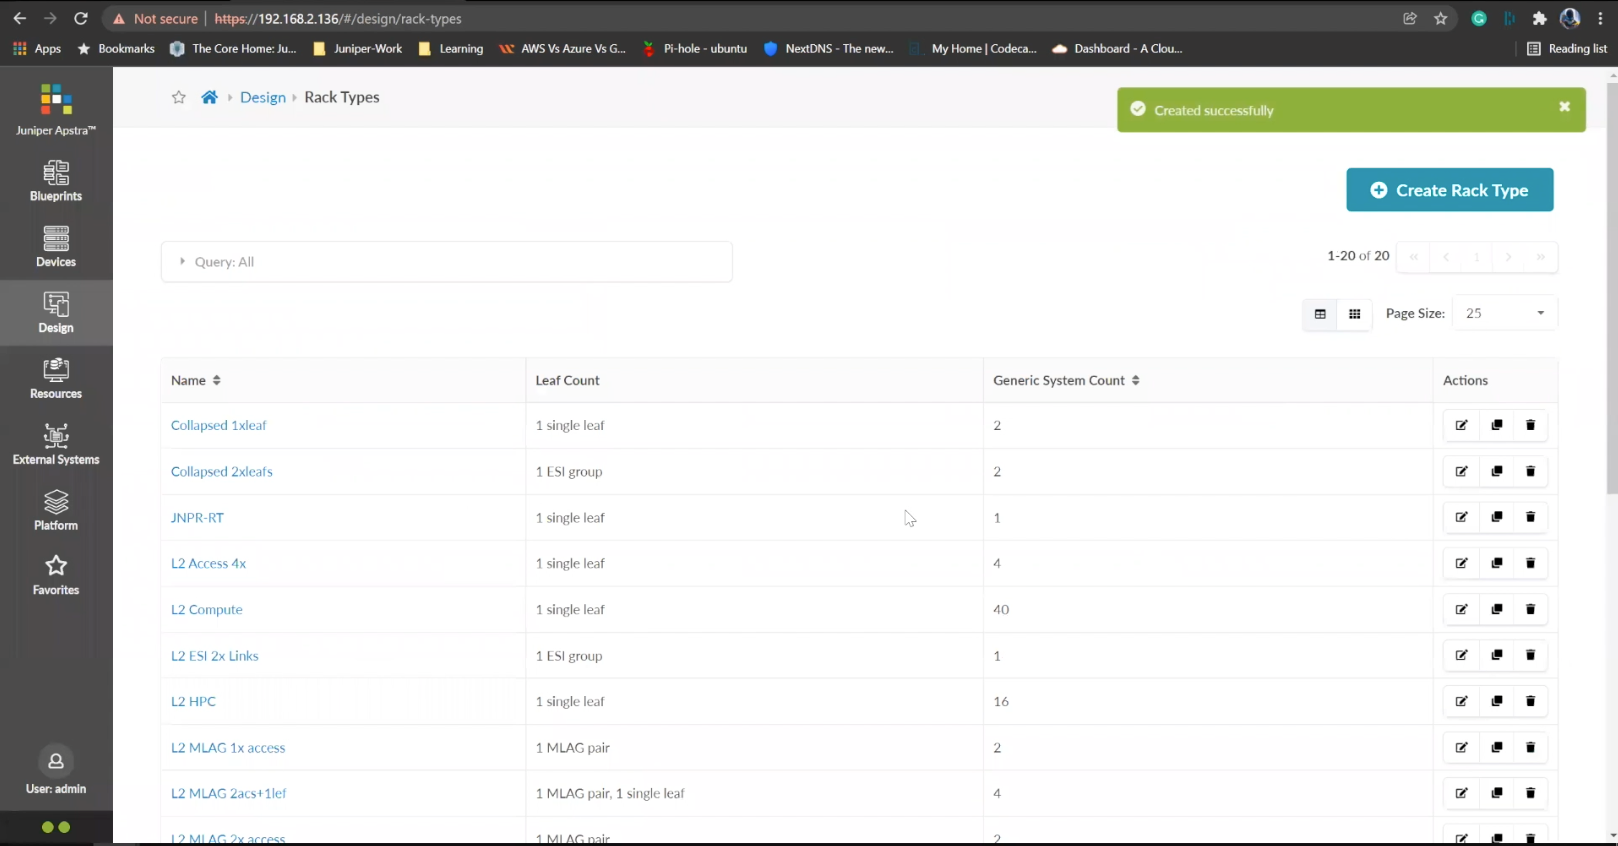
Let us add another generic system
- %3Cp%3EWe%20have%20our%20switches%20already%20managed%20by%20Apstra%2C%20a%20series%20of%20Juniper%20virtual%20QFX%20switches%20in%20this%20example.%20We%20wil%20start%20by%20creating%20logical%20devices.%3C/p%3E
- Click%20on%20logical%20devices%20option%20from%20the%20menu
- %3Cp%3E%3Cspan%20style%3D%22font-size%3A%2013px%3B%22%3ETo%20start%20the%20process%2C%20we%20will%20creat%20a%20leaf%20device%20first.%20%3C/span%3E%3C/p%3E%0A%3Cp%3E%3Cspan%20style%3D%22font-size%3A%2015px%3B%22%3EPlease%20Note%3A%20%3C/span%3E%3C/p%3E%0A%3Cp%3E%3Cspan%20style%3D%22font-size%3A%2013px%3B%22%3EThe%20same%20process%20can%20be%20replicated%20for%20a%20spine%20logical%20device%20too.%20For%20the%20purpose%20of%20this%20demo%2C%20we%20will%20skip%20the%20spine%20logical%20device%20creation%20process.%3C/span%3E%3C/p%3E
- Enter a name for the logical device
- Choose the number of ports
- Create a port group
- Click to finish the creation
- %3Cp%3E%3Cspan%20style%3D%22font-size%3A%2013px%3B%22%3E%3Cspan%20style%3D%22font-family%3A%20Calibri%2C%20sans-serif%3B%22%3ENext%20we%20will%20set%20up%20interface%20maps.%20An%20Interface%20map%20maps%20the%20logical%20device%20to%20the%20actual%20physical%20device.%20ie%3A%20a%20specific%20switch%20and%20model%20that%20is%20used%20in%20the%20actual%20typology.%3C/span%3E%3C/span%3E%3C/p%3E
- Click on the Interface maps option from the menu
- Click to create a new interface map
- Add a name
- Choose a logical device that will be mapped to a physical entity
- Choose from the drop down list
- Choose a device profile from the drop down menu
- Choose the Juniper QFX device as shown
- Choose the interfaces
- %3Cp%3E%3Cspan%20style%3D%22font-size%3A%2013px%3B%22%3EWe%20will%20repeat%20the%20same%20process%20for%20the%20spine%20devices%20defined%20earlier.%20We%20will%20be%20mapping%20it%20to%20the%20Juniper%20QFX%20devices%20as%20well.%3C/span%3E%3C/p%3E
- Next we will add a few racks
- Click on the rack type from the menu
- Click to create a rack type
- Add a name for the new rack
- Name the leaf switch
- Choose a logical leaf device that was previously defined
- Choose the desired logical device from the list
- Click to add a new Generic system
- Add a name to the Generic System Group
- Enter a desired name
- FInish the process of creating a new rack
- Let us add another generic system
- Click to edit the rack type
- Navigate to the leafs tab
- Click on generic systems tab
- Up the Generic system count to 2 and then update the rack type
- Bring everything together in the next steps
- Choose templates from the menu
- Click to create a template
- Add a name first
- Enter more details and then scroll down
- To choose a rack type click on the drop down menu
- Choose the rack type that we created earlier from the menu
- Click to select the desired spine logical device
- Choose the logical spine device from the list
- Enter the desired count
- Click on create to complete the configuration
- Next step is to create a blueprint for the entire Datacenter fabric
- Click to create a new blueprint
- Enter a name for the Blueprint
- Choose the template from the drop down menu
- Choose the desired template
- Click to display the links
- Click on create to finish the process
- Click to view the Blueprint
- Click on staged
- Select the spines to allocate an Autonomous ID
- Click on the edit icon
- Choose the IP address from the Pool
- Save the configuration
- Repeat the same process for the other leaf devices
- Next we need to configure the interface mappings
- Click on one of the spine devices
- Click on the edit icon
- Choose the interface mappings from the the drop down menu
- Make the desired selection
- Click to update the assignments
- Click to assign system IDs next
- Click on the Assigned System IDs tab
- Click on the edit icon
- Choose from the list of System IDs
- Finalize the assignments
- Click on links
- Recitify any cabling errors as shown automatically
- Update the cabling assingments
- Notice the success message once the cabling mapping is sorted out
- Click on commit
- Add the description and click on the commit button
- Success
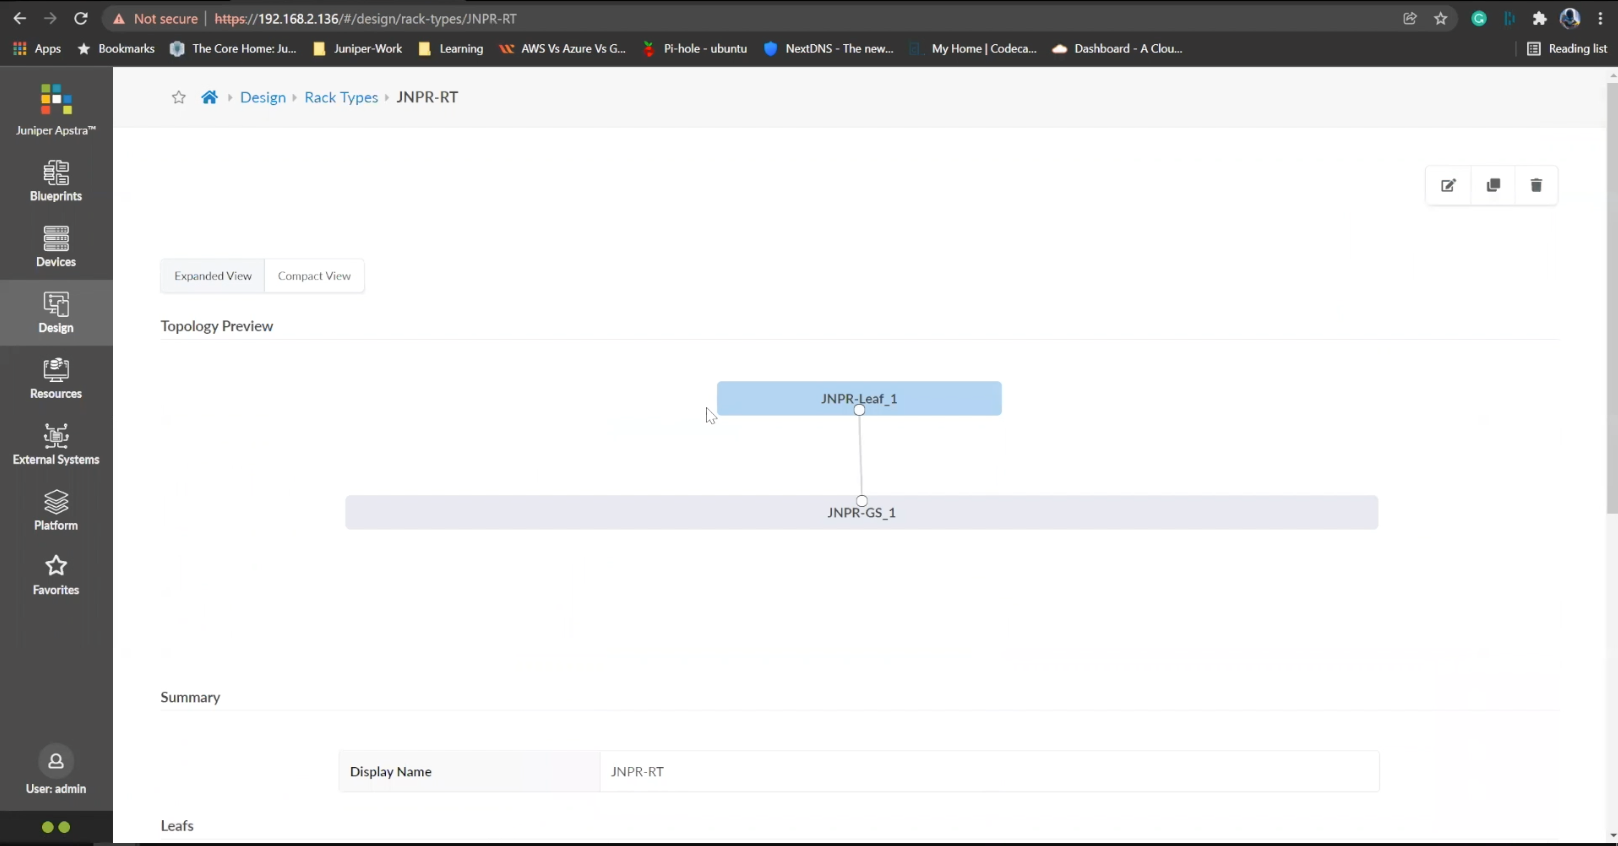
Click to edit the rack type
- %3Cp%3EWe%20have%20our%20switches%20already%20managed%20by%20Apstra%2C%20a%20series%20of%20Juniper%20virtual%20QFX%20switches%20in%20this%20example.%20We%20wil%20start%20by%20creating%20logical%20devices.%3C/p%3E
- Click%20on%20logical%20devices%20option%20from%20the%20menu
- %3Cp%3E%3Cspan%20style%3D%22font-size%3A%2013px%3B%22%3ETo%20start%20the%20process%2C%20we%20will%20creat%20a%20leaf%20device%20first.%20%3C/span%3E%3C/p%3E%0A%3Cp%3E%3Cspan%20style%3D%22font-size%3A%2015px%3B%22%3EPlease%20Note%3A%20%3C/span%3E%3C/p%3E%0A%3Cp%3E%3Cspan%20style%3D%22font-size%3A%2013px%3B%22%3EThe%20same%20process%20can%20be%20replicated%20for%20a%20spine%20logical%20device%20too.%20For%20the%20purpose%20of%20this%20demo%2C%20we%20will%20skip%20the%20spine%20logical%20device%20creation%20process.%3C/span%3E%3C/p%3E
- Enter a name for the logical device
- Choose the number of ports
- Create a port group
- Click to finish the creation
- %3Cp%3E%3Cspan%20style%3D%22font-size%3A%2013px%3B%22%3E%3Cspan%20style%3D%22font-family%3A%20Calibri%2C%20sans-serif%3B%22%3ENext%20we%20will%20set%20up%20interface%20maps.%20An%20Interface%20map%20maps%20the%20logical%20device%20to%20the%20actual%20physical%20device.%20ie%3A%20a%20specific%20switch%20and%20model%20that%20is%20used%20in%20the%20actual%20typology.%3C/span%3E%3C/span%3E%3C/p%3E
- Click on the Interface maps option from the menu
- Click to create a new interface map
- Add a name
- Choose a logical device that will be mapped to a physical entity
- Choose from the drop down list
- Choose a device profile from the drop down menu
- Choose the Juniper QFX device as shown
- Choose the interfaces
- %3Cp%3E%3Cspan%20style%3D%22font-size%3A%2013px%3B%22%3EWe%20will%20repeat%20the%20same%20process%20for%20the%20spine%20devices%20defined%20earlier.%20We%20will%20be%20mapping%20it%20to%20the%20Juniper%20QFX%20devices%20as%20well.%3C/span%3E%3C/p%3E
- Next we will add a few racks
- Click on the rack type from the menu
- Click to create a rack type
- Add a name for the new rack
- Name the leaf switch
- Choose a logical leaf device that was previously defined
- Choose the desired logical device from the list
- Click to add a new Generic system
- Add a name to the Generic System Group
- Enter a desired name
- FInish the process of creating a new rack
- Let us add another generic system
- Click to edit the rack type
- Navigate to the leafs tab
- Click on generic systems tab
- Up the Generic system count to 2 and then update the rack type
- Bring everything together in the next steps
- Choose templates from the menu
- Click to create a template
- Add a name first
- Enter more details and then scroll down
- To choose a rack type click on the drop down menu
- Choose the rack type that we created earlier from the menu
- Click to select the desired spine logical device
- Choose the logical spine device from the list
- Enter the desired count
- Click on create to complete the configuration
- Next step is to create a blueprint for the entire Datacenter fabric
- Click to create a new blueprint
- Enter a name for the Blueprint
- Choose the template from the drop down menu
- Choose the desired template
- Click to display the links
- Click on create to finish the process
- Click to view the Blueprint
- Click on staged
- Select the spines to allocate an Autonomous ID
- Click on the edit icon
- Choose the IP address from the Pool
- Save the configuration
- Repeat the same process for the other leaf devices
- Next we need to configure the interface mappings
- Click on one of the spine devices
- Click on the edit icon
- Choose the interface mappings from the the drop down menu
- Make the desired selection
- Click to update the assignments
- Click to assign system IDs next
- Click on the Assigned System IDs tab
- Click on the edit icon
- Choose from the list of System IDs
- Finalize the assignments
- Click on links
- Recitify any cabling errors as shown automatically
- Update the cabling assingments
- Notice the success message once the cabling mapping is sorted out
- Click on commit
- Add the description and click on the commit button
- Success
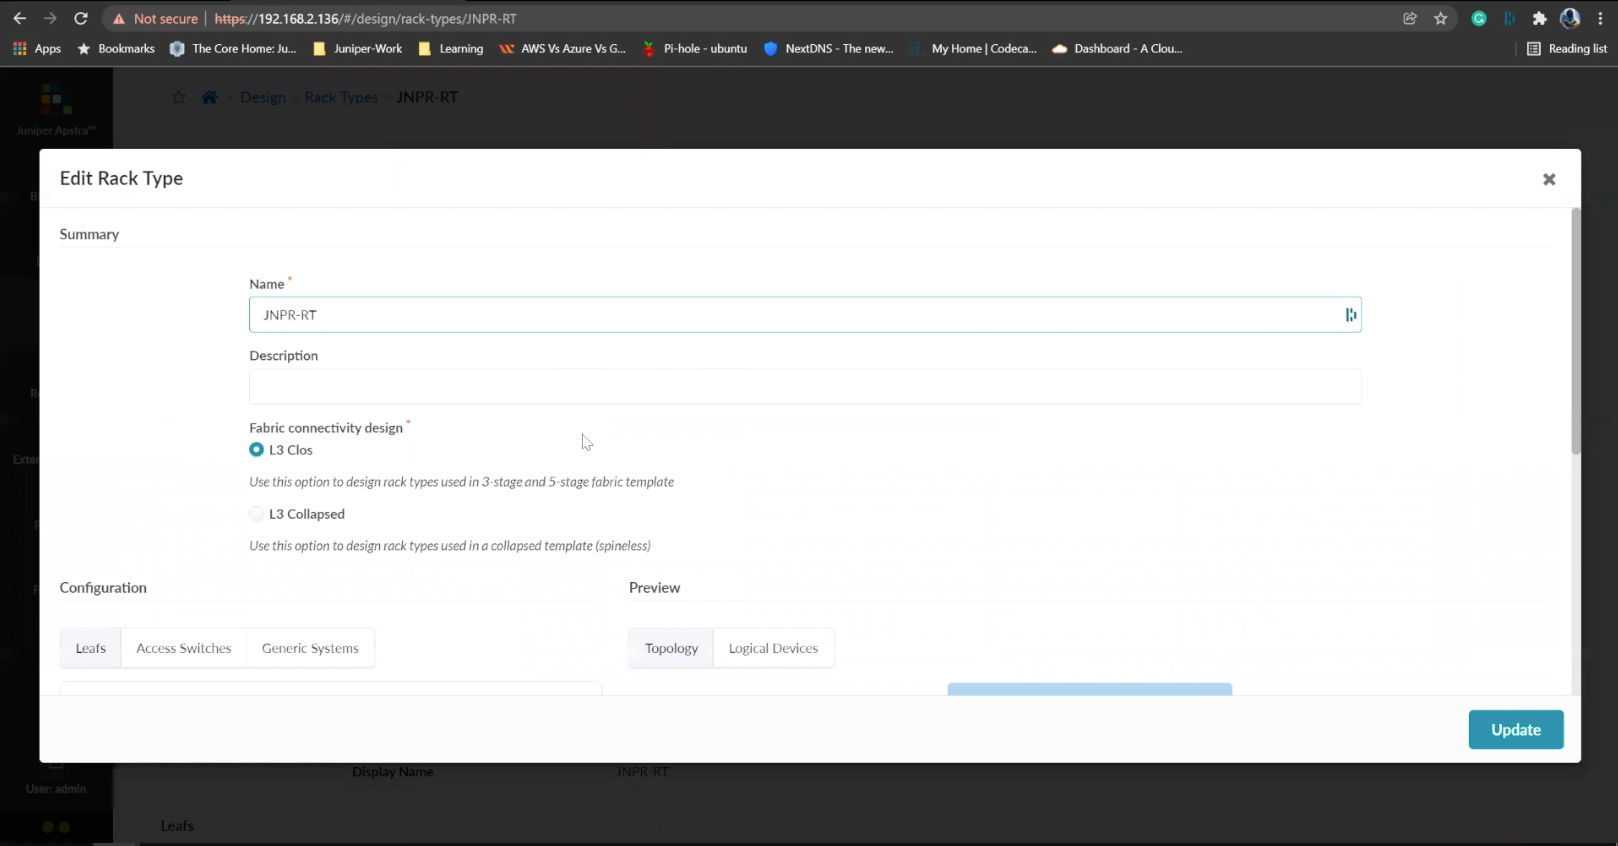
Navigate to the leafs tab
- %3Cp%3EWe%20have%20our%20switches%20already%20managed%20by%20Apstra%2C%20a%20series%20of%20Juniper%20virtual%20QFX%20switches%20in%20this%20example.%20We%20wil%20start%20by%20creating%20logical%20devices.%3C/p%3E
- Click%20on%20logical%20devices%20option%20from%20the%20menu
- %3Cp%3E%3Cspan%20style%3D%22font-size%3A%2013px%3B%22%3ETo%20start%20the%20process%2C%20we%20will%20creat%20a%20leaf%20device%20first.%20%3C/span%3E%3C/p%3E%0A%3Cp%3E%3Cspan%20style%3D%22font-size%3A%2015px%3B%22%3EPlease%20Note%3A%20%3C/span%3E%3C/p%3E%0A%3Cp%3E%3Cspan%20style%3D%22font-size%3A%2013px%3B%22%3EThe%20same%20process%20can%20be%20replicated%20for%20a%20spine%20logical%20device%20too.%20For%20the%20purpose%20of%20this%20demo%2C%20we%20will%20skip%20the%20spine%20logical%20device%20creation%20process.%3C/span%3E%3C/p%3E
- Enter a name for the logical device
- Choose the number of ports
- Create a port group
- Click to finish the creation
- %3Cp%3E%3Cspan%20style%3D%22font-size%3A%2013px%3B%22%3E%3Cspan%20style%3D%22font-family%3A%20Calibri%2C%20sans-serif%3B%22%3ENext%20we%20will%20set%20up%20interface%20maps.%20An%20Interface%20map%20maps%20the%20logical%20device%20to%20the%20actual%20physical%20device.%20ie%3A%20a%20specific%20switch%20and%20model%20that%20is%20used%20in%20the%20actual%20typology.%3C/span%3E%3C/span%3E%3C/p%3E
- Click on the Interface maps option from the menu
- Click to create a new interface map
- Add a name
- Choose a logical device that will be mapped to a physical entity
- Choose from the drop down list
- Choose a device profile from the drop down menu
- Choose the Juniper QFX device as shown
- Choose the interfaces
- %3Cp%3E%3Cspan%20style%3D%22font-size%3A%2013px%3B%22%3EWe%20will%20repeat%20the%20same%20process%20for%20the%20spine%20devices%20defined%20earlier.%20We%20will%20be%20mapping%20it%20to%20the%20Juniper%20QFX%20devices%20as%20well.%3C/span%3E%3C/p%3E
- Next we will add a few racks
- Click on the rack type from the menu
- Click to create a rack type
- Add a name for the new rack
- Name the leaf switch
- Choose a logical leaf device that was previously defined
- Choose the desired logical device from the list
- Click to add a new Generic system
- Add a name to the Generic System Group
- Enter a desired name
- FInish the process of creating a new rack
- Let us add another generic system
- Click to edit the rack type
- Navigate to the leafs tab
- Click on generic systems tab
- Up the Generic system count to 2 and then update the rack type
- Bring everything together in the next steps
- Choose templates from the menu
- Click to create a template
- Add a name first
- Enter more details and then scroll down
- To choose a rack type click on the drop down menu
- Choose the rack type that we created earlier from the menu
- Click to select the desired spine logical device
- Choose the logical spine device from the list
- Enter the desired count
- Click on create to complete the configuration
- Next step is to create a blueprint for the entire Datacenter fabric
- Click to create a new blueprint
- Enter a name for the Blueprint
- Choose the template from the drop down menu
- Choose the desired template
- Click to display the links
- Click on create to finish the process
- Click to view the Blueprint
- Click on staged
- Select the spines to allocate an Autonomous ID
- Click on the edit icon
- Choose the IP address from the Pool
- Save the configuration
- Repeat the same process for the other leaf devices
- Next we need to configure the interface mappings
- Click on one of the spine devices
- Click on the edit icon
- Choose the interface mappings from the the drop down menu
- Make the desired selection
- Click to update the assignments
- Click to assign system IDs next
- Click on the Assigned System IDs tab
- Click on the edit icon
- Choose from the list of System IDs
- Finalize the assignments
- Click on links
- Recitify any cabling errors as shown automatically
- Update the cabling assingments
- Notice the success message once the cabling mapping is sorted out
- Click on commit
- Add the description and click on the commit button
- Success
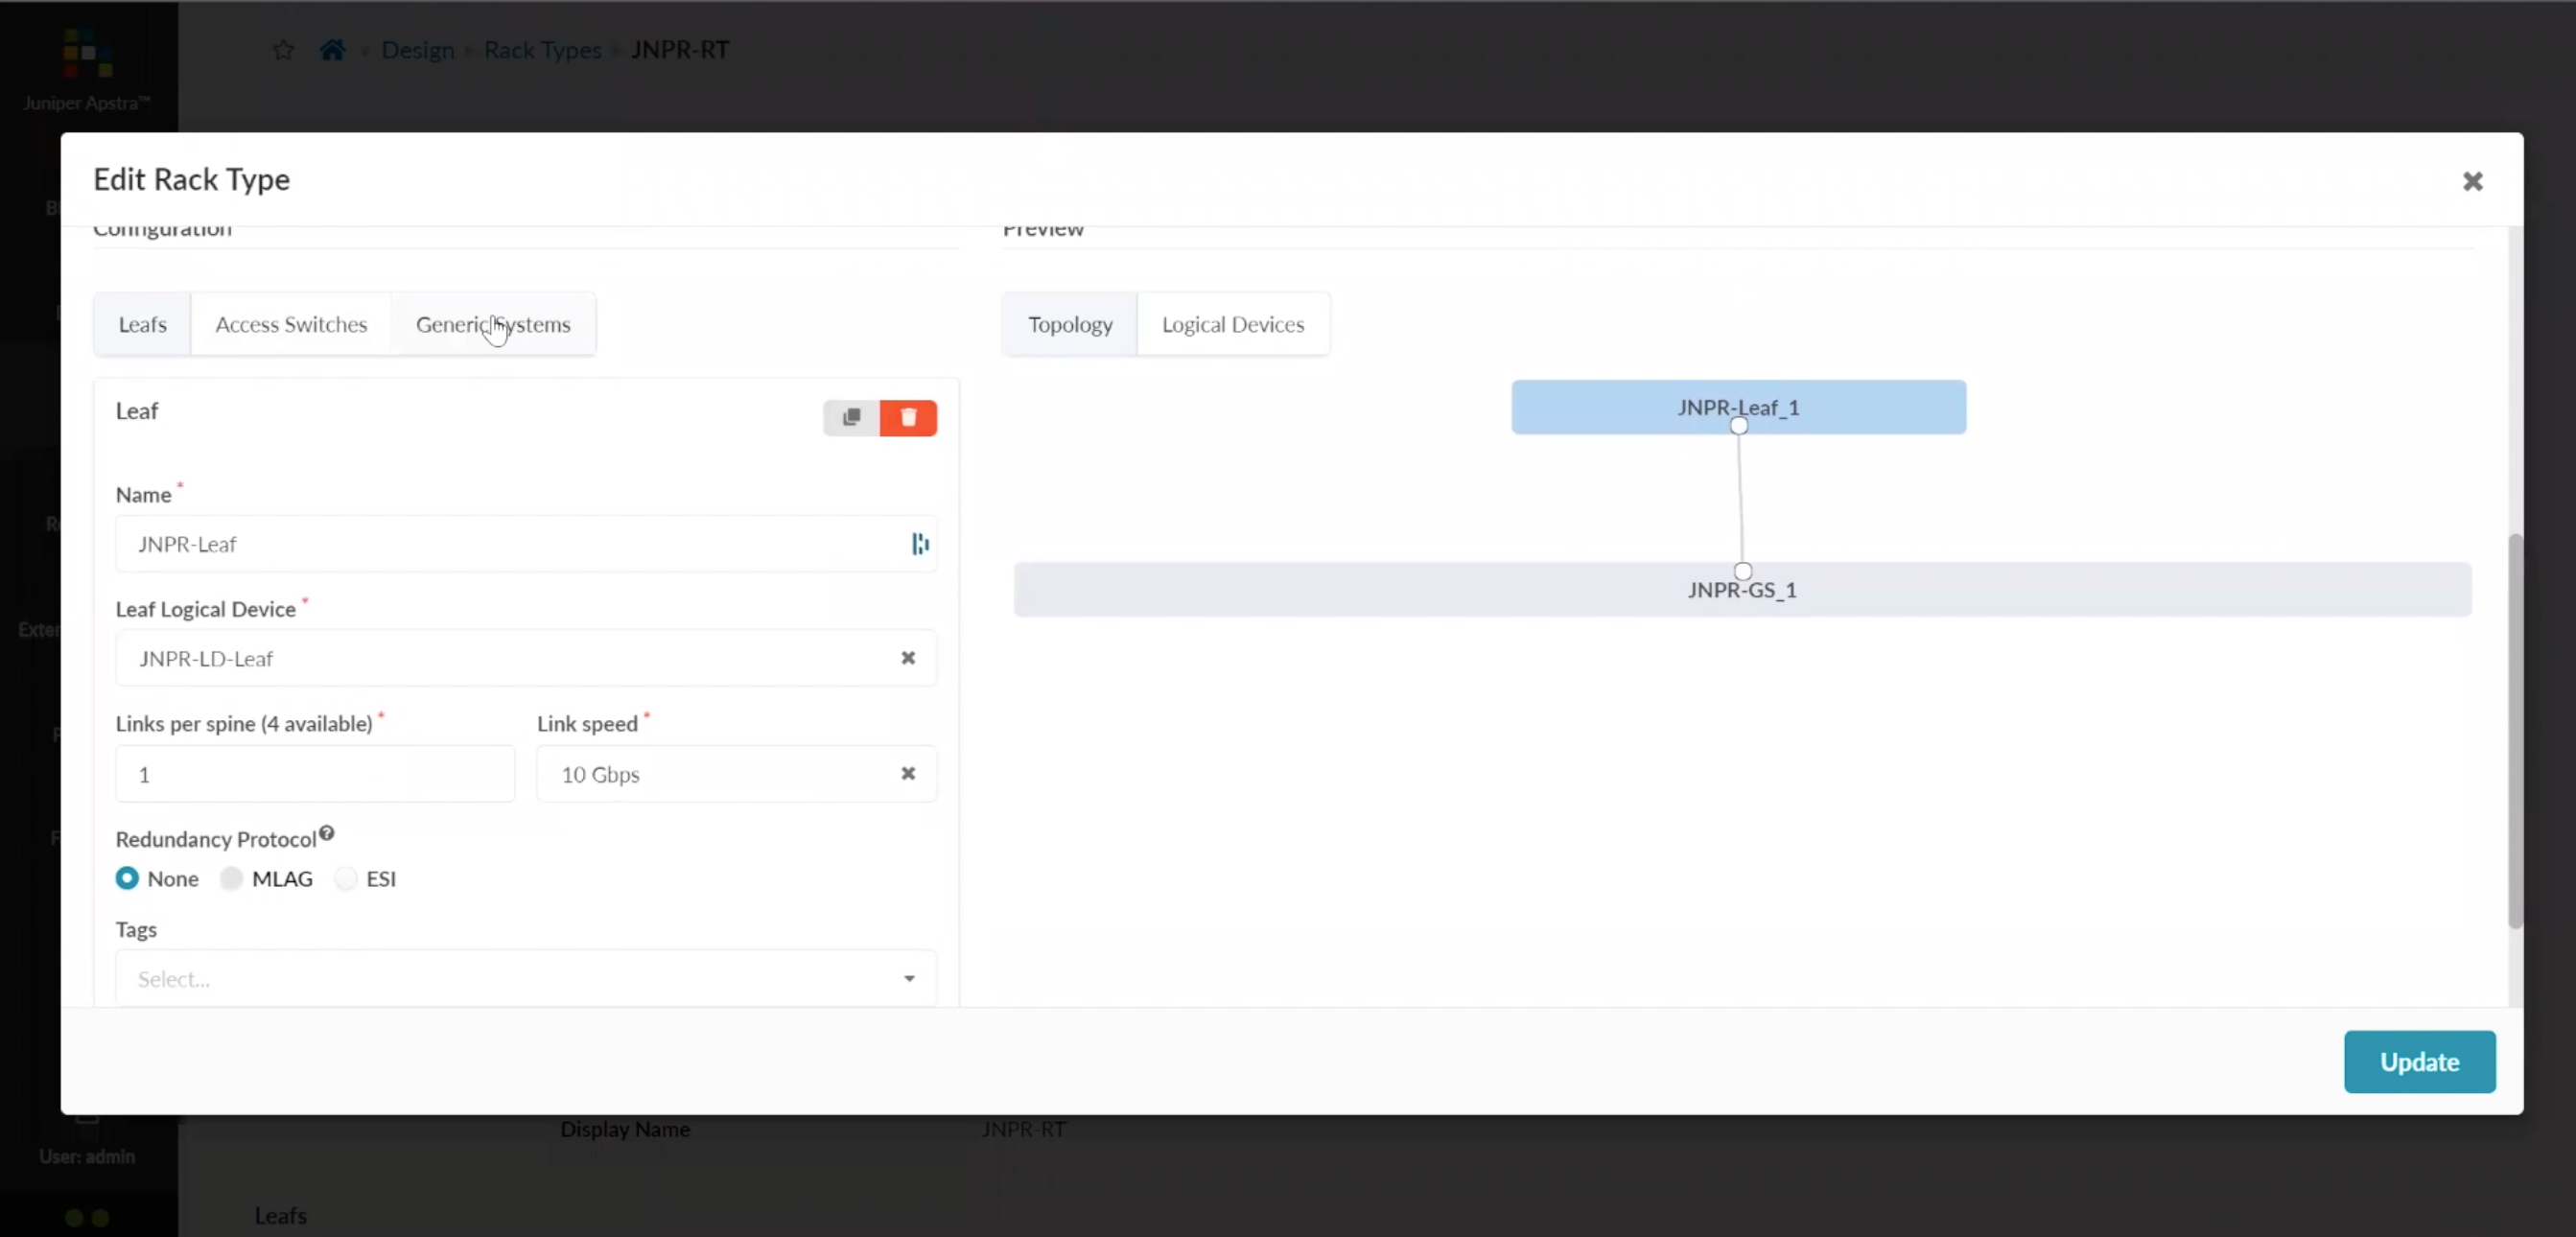
Click on generic systems tab
- %3Cp%3EWe%20have%20our%20switches%20already%20managed%20by%20Apstra%2C%20a%20series%20of%20Juniper%20virtual%20QFX%20switches%20in%20this%20example.%20We%20wil%20start%20by%20creating%20logical%20devices.%3C/p%3E
- Click%20on%20logical%20devices%20option%20from%20the%20menu
- %3Cp%3E%3Cspan%20style%3D%22font-size%3A%2013px%3B%22%3ETo%20start%20the%20process%2C%20we%20will%20creat%20a%20leaf%20device%20first.%20%3C/span%3E%3C/p%3E%0A%3Cp%3E%3Cspan%20style%3D%22font-size%3A%2015px%3B%22%3EPlease%20Note%3A%20%3C/span%3E%3C/p%3E%0A%3Cp%3E%3Cspan%20style%3D%22font-size%3A%2013px%3B%22%3EThe%20same%20process%20can%20be%20replicated%20for%20a%20spine%20logical%20device%20too.%20For%20the%20purpose%20of%20this%20demo%2C%20we%20will%20skip%20the%20spine%20logical%20device%20creation%20process.%3C/span%3E%3C/p%3E
- Enter a name for the logical device
- Choose the number of ports
- Create a port group
- Click to finish the creation
- %3Cp%3E%3Cspan%20style%3D%22font-size%3A%2013px%3B%22%3E%3Cspan%20style%3D%22font-family%3A%20Calibri%2C%20sans-serif%3B%22%3ENext%20we%20will%20set%20up%20interface%20maps.%20An%20Interface%20map%20maps%20the%20logical%20device%20to%20the%20actual%20physical%20device.%20ie%3A%20a%20specific%20switch%20and%20model%20that%20is%20used%20in%20the%20actual%20typology.%3C/span%3E%3C/span%3E%3C/p%3E
- Click on the Interface maps option from the menu
- Click to create a new interface map
- Add a name
- Choose a logical device that will be mapped to a physical entity
- Choose from the drop down list
- Choose a device profile from the drop down menu
- Choose the Juniper QFX device as shown
- Choose the interfaces
- %3Cp%3E%3Cspan%20style%3D%22font-size%3A%2013px%3B%22%3EWe%20will%20repeat%20the%20same%20process%20for%20the%20spine%20devices%20defined%20earlier.%20We%20will%20be%20mapping%20it%20to%20the%20Juniper%20QFX%20devices%20as%20well.%3C/span%3E%3C/p%3E
- Next we will add a few racks
- Click on the rack type from the menu
- Click to create a rack type
- Add a name for the new rack
- Name the leaf switch
- Choose a logical leaf device that was previously defined
- Choose the desired logical device from the list
- Click to add a new Generic system
- Add a name to the Generic System Group
- Enter a desired name
- FInish the process of creating a new rack
- Let us add another generic system
- Click to edit the rack type
- Navigate to the leafs tab
- Click on generic systems tab
- Up the Generic system count to 2 and then update the rack type
- Bring everything together in the next steps
- Choose templates from the menu
- Click to create a template
- Add a name first
- Enter more details and then scroll down
- To choose a rack type click on the drop down menu
- Choose the rack type that we created earlier from the menu
- Click to select the desired spine logical device
- Choose the logical spine device from the list
- Enter the desired count
- Click on create to complete the configuration
- Next step is to create a blueprint for the entire Datacenter fabric
- Click to create a new blueprint
- Enter a name for the Blueprint
- Choose the template from the drop down menu
- Choose the desired template
- Click to display the links
- Click on create to finish the process
- Click to view the Blueprint
- Click on staged
- Select the spines to allocate an Autonomous ID
- Click on the edit icon
- Choose the IP address from the Pool
- Save the configuration
- Repeat the same process for the other leaf devices
- Next we need to configure the interface mappings
- Click on one of the spine devices
- Click on the edit icon
- Choose the interface mappings from the the drop down menu
- Make the desired selection
- Click to update the assignments
- Click to assign system IDs next
- Click on the Assigned System IDs tab
- Click on the edit icon
- Choose from the list of System IDs
- Finalize the assignments
- Click on links
- Recitify any cabling errors as shown automatically
- Update the cabling assingments
- Notice the success message once the cabling mapping is sorted out
- Click on commit
- Add the description and click on the commit button
- Success
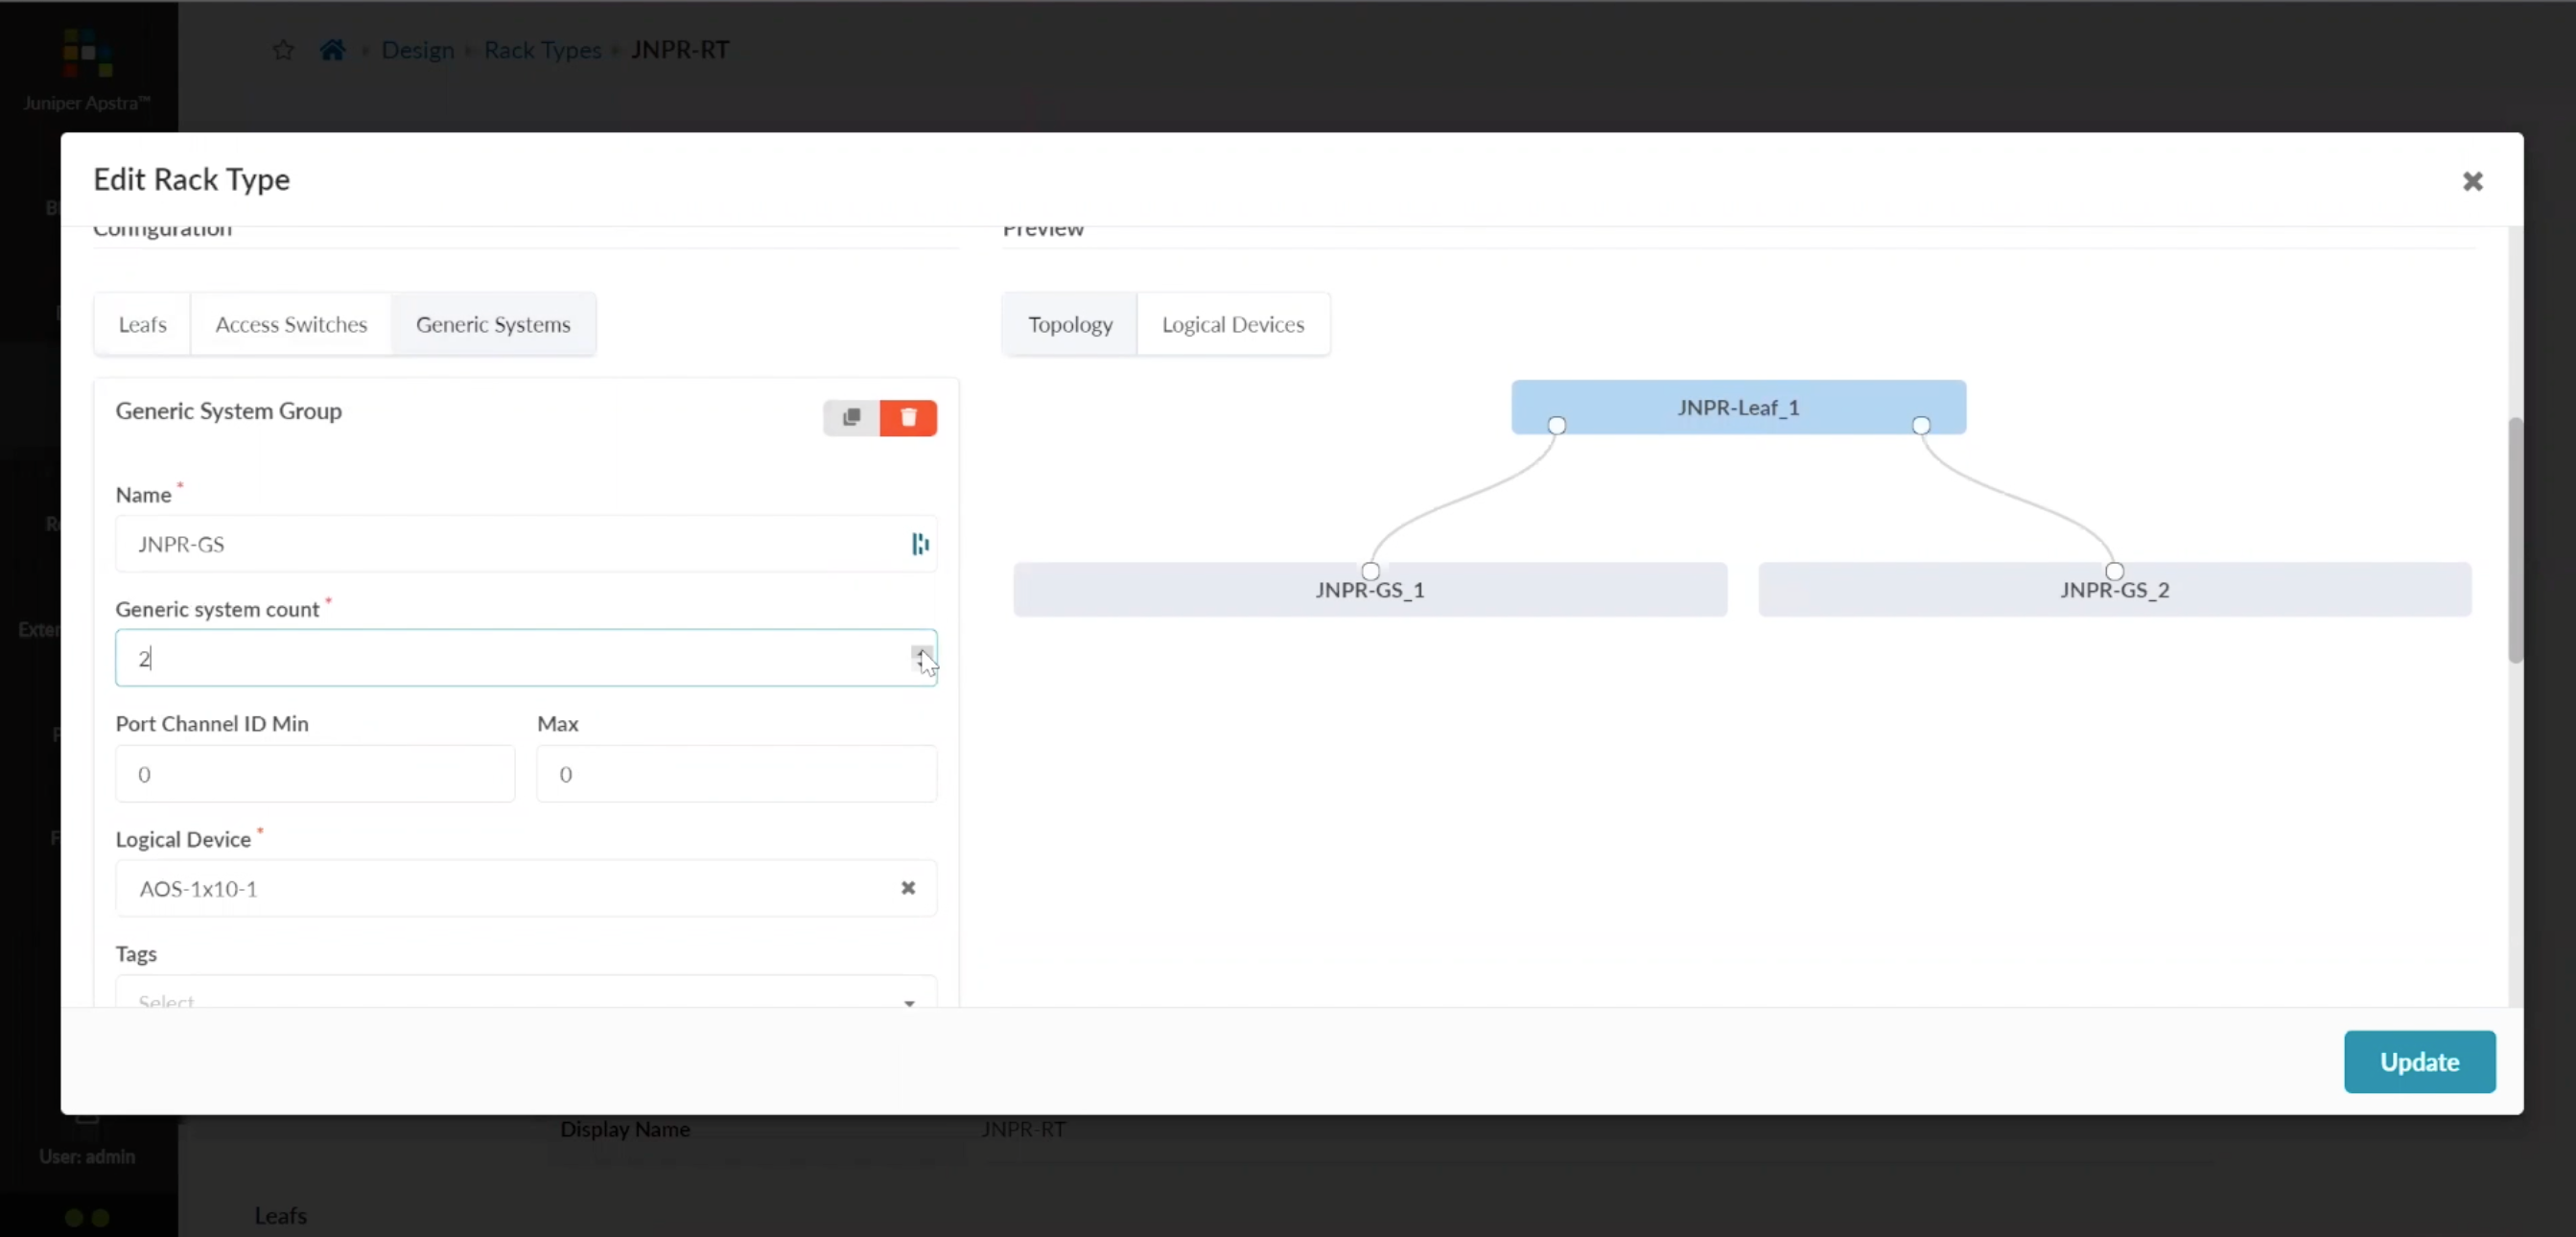
Up the system count from 1 to 2
Up the Generic system count to 2 and then update the rack type
- %3Cp%3EWe%20have%20our%20switches%20already%20managed%20by%20Apstra%2C%20a%20series%20of%20Juniper%20virtual%20QFX%20switches%20in%20this%20example.%20We%20wil%20start%20by%20creating%20logical%20devices.%3C/p%3E
- Click%20on%20logical%20devices%20option%20from%20the%20menu
- %3Cp%3E%3Cspan%20style%3D%22font-size%3A%2013px%3B%22%3ETo%20start%20the%20process%2C%20we%20will%20creat%20a%20leaf%20device%20first.%20%3C/span%3E%3C/p%3E%0A%3Cp%3E%3Cspan%20style%3D%22font-size%3A%2015px%3B%22%3EPlease%20Note%3A%20%3C/span%3E%3C/p%3E%0A%3Cp%3E%3Cspan%20style%3D%22font-size%3A%2013px%3B%22%3EThe%20same%20process%20can%20be%20replicated%20for%20a%20spine%20logical%20device%20too.%20For%20the%20purpose%20of%20this%20demo%2C%20we%20will%20skip%20the%20spine%20logical%20device%20creation%20process.%3C/span%3E%3C/p%3E
- Enter a name for the logical device
- Choose the number of ports
- Create a port group
- Click to finish the creation
- %3Cp%3E%3Cspan%20style%3D%22font-size%3A%2013px%3B%22%3E%3Cspan%20style%3D%22font-family%3A%20Calibri%2C%20sans-serif%3B%22%3ENext%20we%20will%20set%20up%20interface%20maps.%20An%20Interface%20map%20maps%20the%20logical%20device%20to%20the%20actual%20physical%20device.%20ie%3A%20a%20specific%20switch%20and%20model%20that%20is%20used%20in%20the%20actual%20typology.%3C/span%3E%3C/span%3E%3C/p%3E
- Click on the Interface maps option from the menu
- Click to create a new interface map
- Add a name
- Choose a logical device that will be mapped to a physical entity
- Choose from the drop down list
- Choose a device profile from the drop down menu
- Choose the Juniper QFX device as shown
- Choose the interfaces
- %3Cp%3E%3Cspan%20style%3D%22font-size%3A%2013px%3B%22%3EWe%20will%20repeat%20the%20same%20process%20for%20the%20spine%20devices%20defined%20earlier.%20We%20will%20be%20mapping%20it%20to%20the%20Juniper%20QFX%20devices%20as%20well.%3C/span%3E%3C/p%3E
- Next we will add a few racks
- Click on the rack type from the menu
- Click to create a rack type
- Add a name for the new rack
- Name the leaf switch
- Choose a logical leaf device that was previously defined
- Choose the desired logical device from the list
- Click to add a new Generic system
- Add a name to the Generic System Group
- Enter a desired name
- FInish the process of creating a new rack
- Let us add another generic system
- Click to edit the rack type
- Navigate to the leafs tab
- Click on generic systems tab
- Up the Generic system count to 2 and then update the rack type
- Bring everything together in the next steps
- Choose templates from the menu
- Click to create a template
- Add a name first
- Enter more details and then scroll down
- To choose a rack type click on the drop down menu
- Choose the rack type that we created earlier from the menu
- Click to select the desired spine logical device
- Choose the logical spine device from the list
- Enter the desired count
- Click on create to complete the configuration
- Next step is to create a blueprint for the entire Datacenter fabric
- Click to create a new blueprint
- Enter a name for the Blueprint
- Choose the template from the drop down menu
- Choose the desired template
- Click to display the links
- Click on create to finish the process
- Click to view the Blueprint
- Click on staged
- Select the spines to allocate an Autonomous ID
- Click on the edit icon
- Choose the IP address from the Pool
- Save the configuration
- Repeat the same process for the other leaf devices
- Next we need to configure the interface mappings
- Click on one of the spine devices
- Click on the edit icon
- Choose the interface mappings from the the drop down menu
- Make the desired selection
- Click to update the assignments
- Click to assign system IDs next
- Click on the Assigned System IDs tab
- Click on the edit icon
- Choose from the list of System IDs
- Finalize the assignments
- Click on links
- Recitify any cabling errors as shown automatically
- Update the cabling assingments
- Notice the success message once the cabling mapping is sorted out
- Click on commit
- Add the description and click on the commit button
- Success
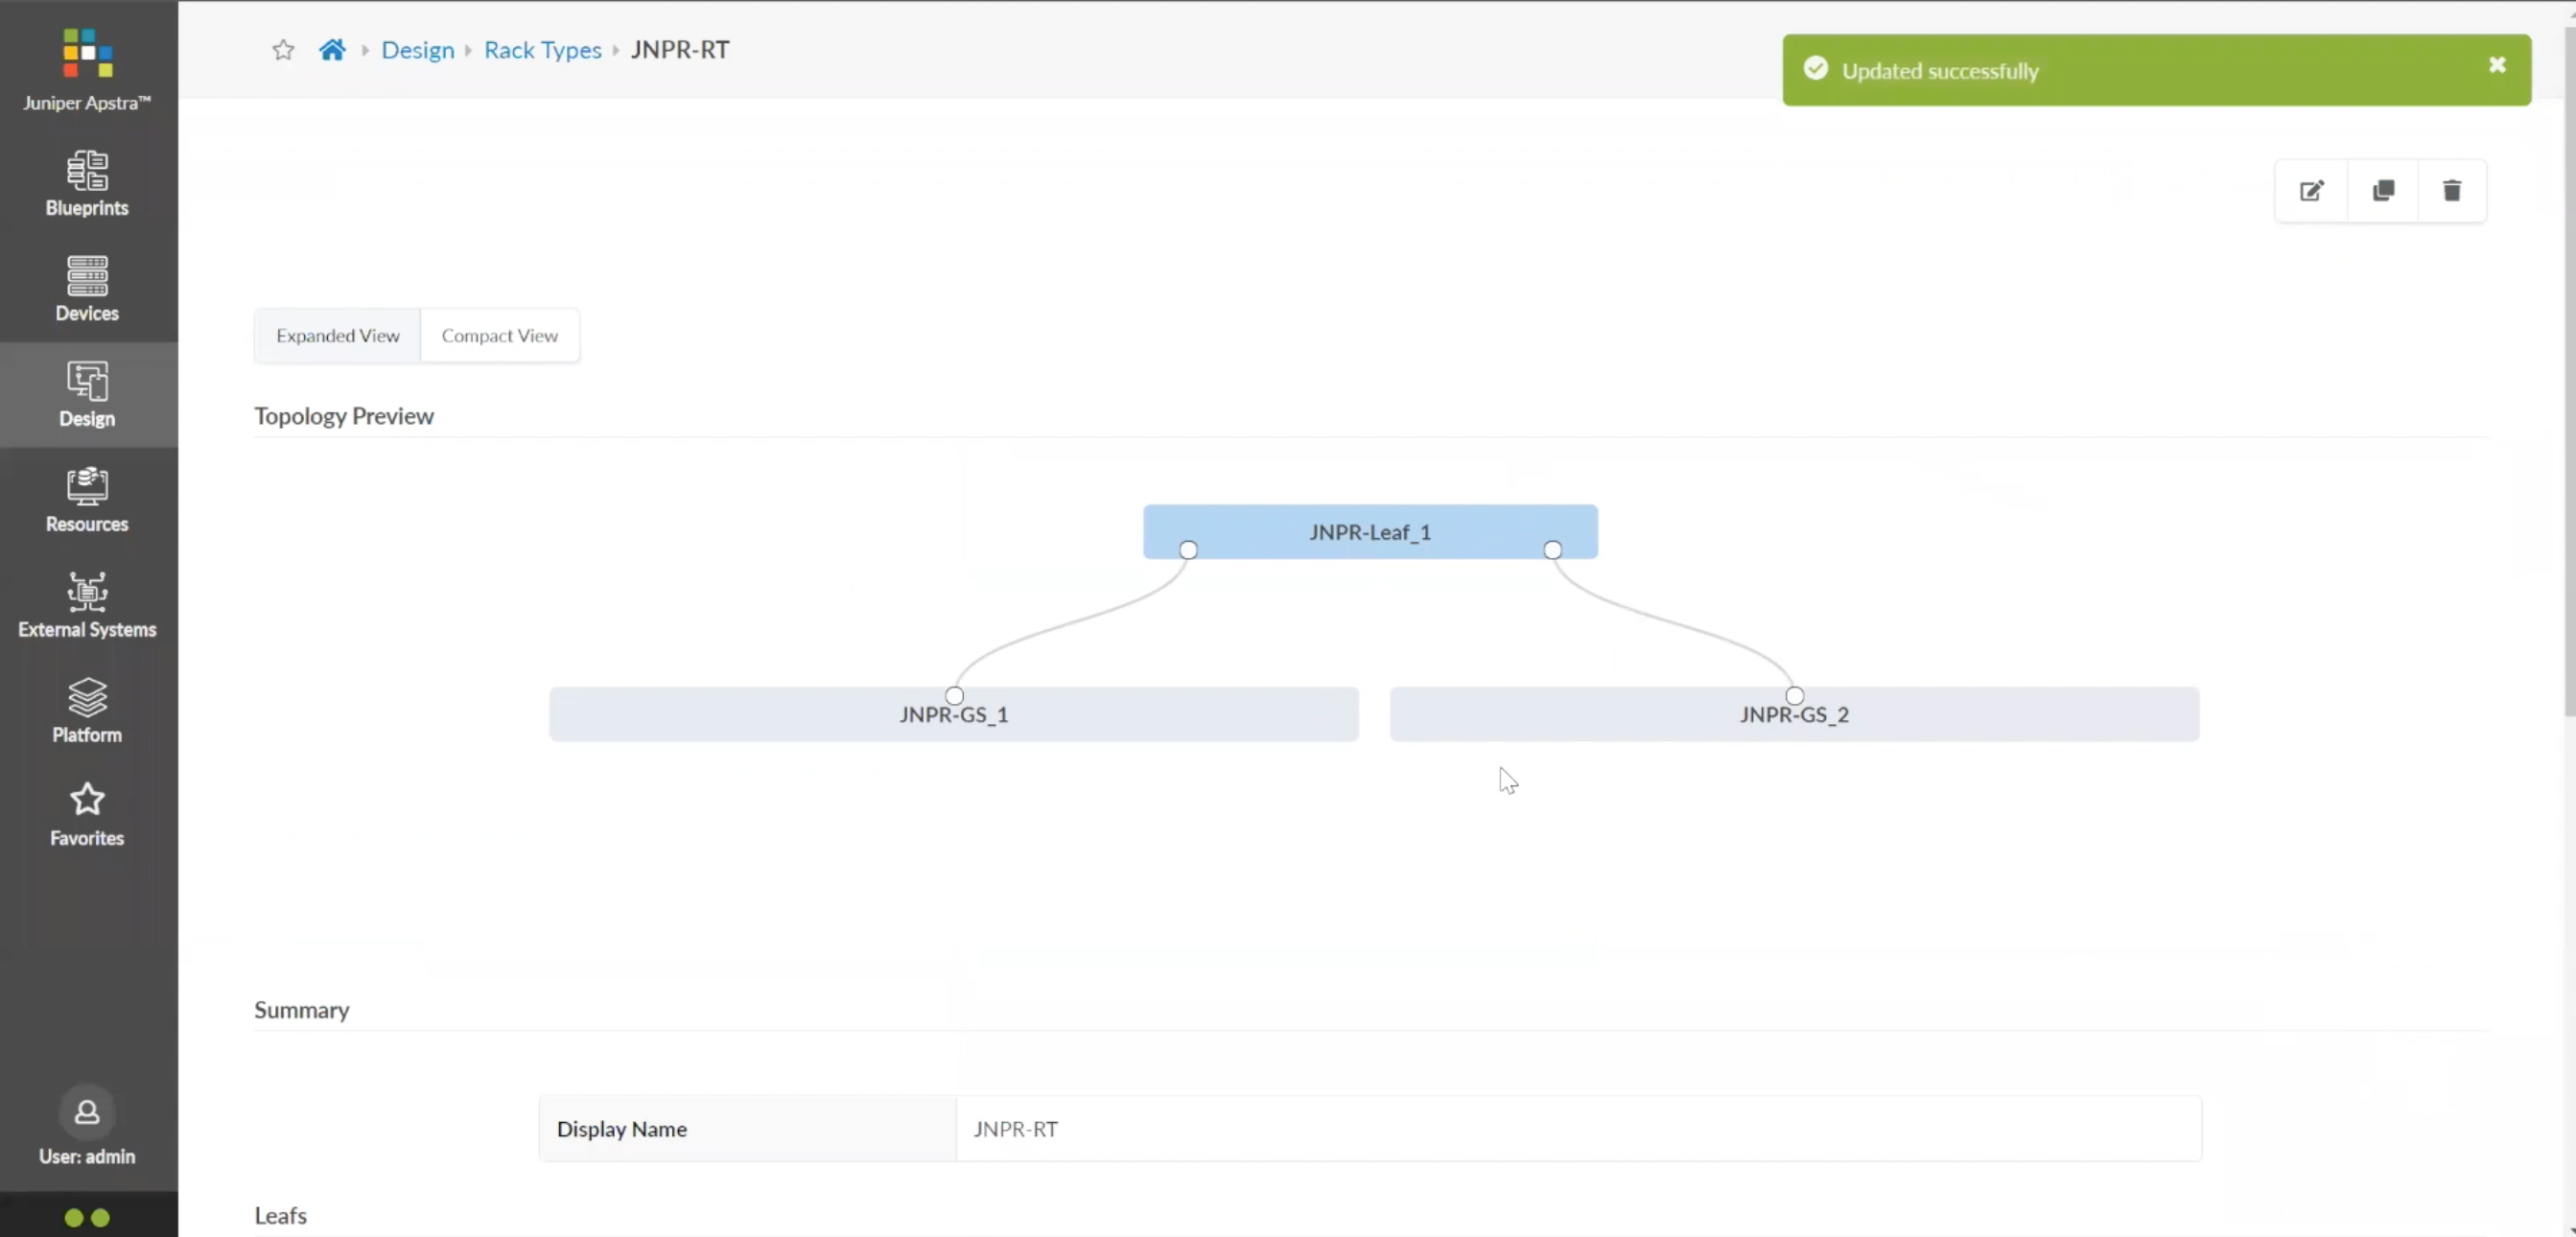
Bring everything together in the next steps
Notice the update Generic systems connected to the leaf switch as designed in the previous steps.
- %3Cp%3EWe%20have%20our%20switches%20already%20managed%20by%20Apstra%2C%20a%20series%20of%20Juniper%20virtual%20QFX%20switches%20in%20this%20example.%20We%20wil%20start%20by%20creating%20logical%20devices.%3C/p%3E
- Click%20on%20logical%20devices%20option%20from%20the%20menu
- %3Cp%3E%3Cspan%20style%3D%22font-size%3A%2013px%3B%22%3ETo%20start%20the%20process%2C%20we%20will%20creat%20a%20leaf%20device%20first.%20%3C/span%3E%3C/p%3E%0A%3Cp%3E%3Cspan%20style%3D%22font-size%3A%2015px%3B%22%3EPlease%20Note%3A%20%3C/span%3E%3C/p%3E%0A%3Cp%3E%3Cspan%20style%3D%22font-size%3A%2013px%3B%22%3EThe%20same%20process%20can%20be%20replicated%20for%20a%20spine%20logical%20device%20too.%20For%20the%20purpose%20of%20this%20demo%2C%20we%20will%20skip%20the%20spine%20logical%20device%20creation%20process.%3C/span%3E%3C/p%3E
- Enter a name for the logical device
- Choose the number of ports
- Create a port group
- Click to finish the creation
- %3Cp%3E%3Cspan%20style%3D%22font-size%3A%2013px%3B%22%3E%3Cspan%20style%3D%22font-family%3A%20Calibri%2C%20sans-serif%3B%22%3ENext%20we%20will%20set%20up%20interface%20maps.%20An%20Interface%20map%20maps%20the%20logical%20device%20to%20the%20actual%20physical%20device.%20ie%3A%20a%20specific%20switch%20and%20model%20that%20is%20used%20in%20the%20actual%20typology.%3C/span%3E%3C/span%3E%3C/p%3E
- Click on the Interface maps option from the menu
- Click to create a new interface map
- Add a name
- Choose a logical device that will be mapped to a physical entity
- Choose from the drop down list
- Choose a device profile from the drop down menu
- Choose the Juniper QFX device as shown
- Choose the interfaces
- %3Cp%3E%3Cspan%20style%3D%22font-size%3A%2013px%3B%22%3EWe%20will%20repeat%20the%20same%20process%20for%20the%20spine%20devices%20defined%20earlier.%20We%20will%20be%20mapping%20it%20to%20the%20Juniper%20QFX%20devices%20as%20well.%3C/span%3E%3C/p%3E
- Next we will add a few racks
- Click on the rack type from the menu
- Click to create a rack type
- Add a name for the new rack
- Name the leaf switch
- Choose a logical leaf device that was previously defined
- Choose the desired logical device from the list
- Click to add a new Generic system
- Add a name to the Generic System Group
- Enter a desired name
- FInish the process of creating a new rack
- Let us add another generic system
- Click to edit the rack type
- Navigate to the leafs tab
- Click on generic systems tab
- Up the Generic system count to 2 and then update the rack type
- Bring everything together in the next steps
- Choose templates from the menu
- Click to create a template
- Add a name first
- Enter more details and then scroll down
- To choose a rack type click on the drop down menu
- Choose the rack type that we created earlier from the menu
- Click to select the desired spine logical device
- Choose the logical spine device from the list
- Enter the desired count
- Click on create to complete the configuration
- Next step is to create a blueprint for the entire Datacenter fabric
- Click to create a new blueprint
- Enter a name for the Blueprint
- Choose the template from the drop down menu
- Choose the desired template
- Click to display the links
- Click on create to finish the process
- Click to view the Blueprint
- Click on staged
- Select the spines to allocate an Autonomous ID
- Click on the edit icon
- Choose the IP address from the Pool
- Save the configuration
- Repeat the same process for the other leaf devices
- Next we need to configure the interface mappings
- Click on one of the spine devices
- Click on the edit icon
- Choose the interface mappings from the the drop down menu
- Make the desired selection
- Click to update the assignments
- Click to assign system IDs next
- Click on the Assigned System IDs tab
- Click on the edit icon
- Choose from the list of System IDs
- Finalize the assignments
- Click on links
- Recitify any cabling errors as shown automatically
- Update the cabling assingments
- Notice the success message once the cabling mapping is sorted out
- Click on commit
- Add the description and click on the commit button
- Success
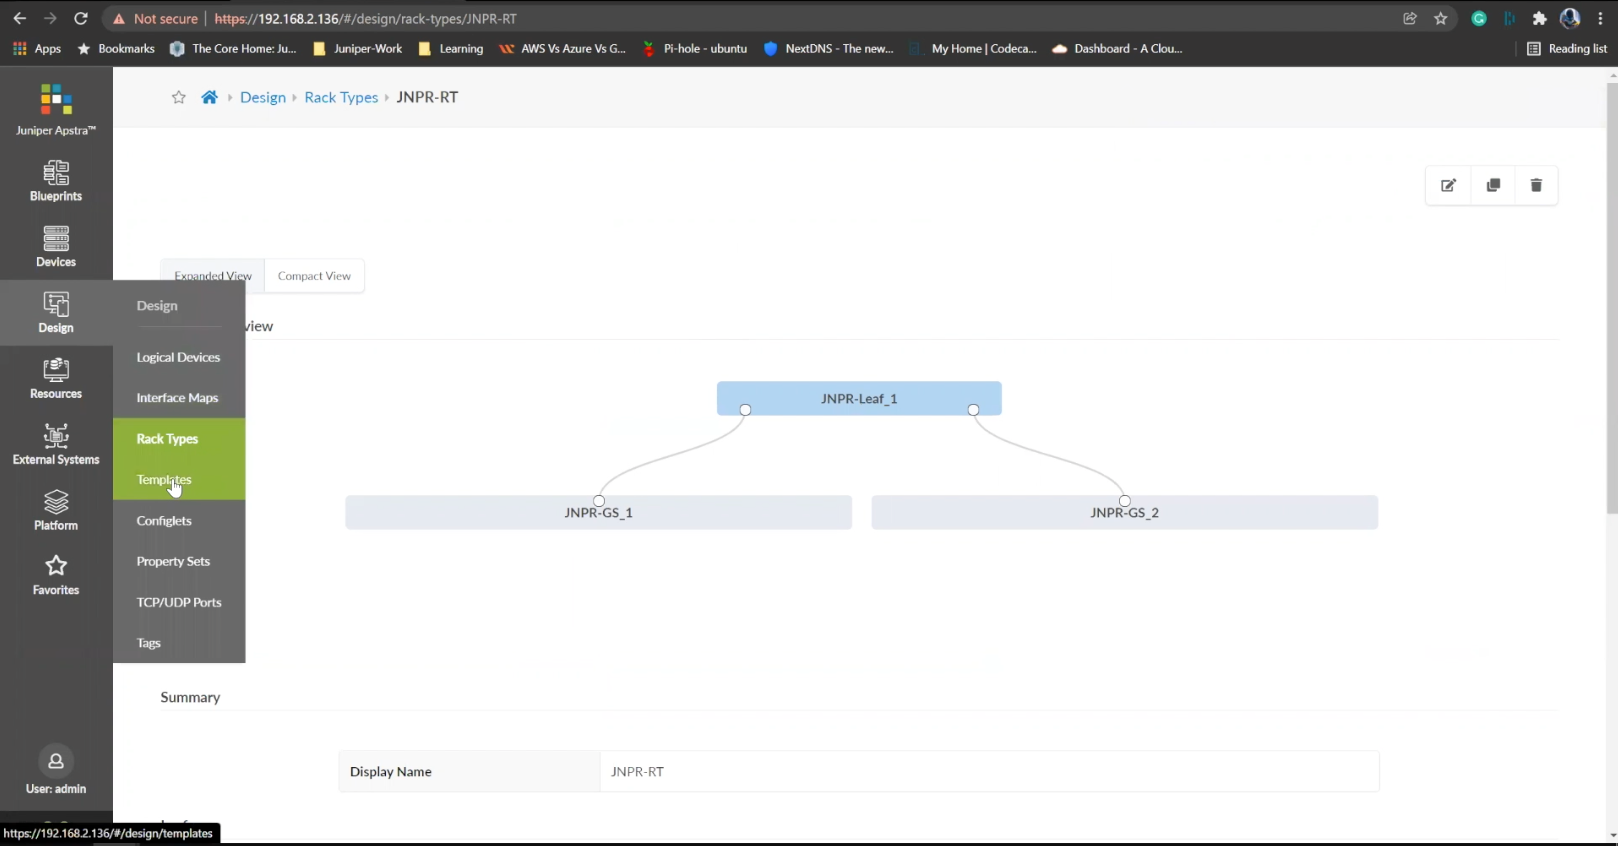
Choose templates from the menu
- %3Cp%3EWe%20have%20our%20switches%20already%20managed%20by%20Apstra%2C%20a%20series%20of%20Juniper%20virtual%20QFX%20switches%20in%20this%20example.%20We%20wil%20start%20by%20creating%20logical%20devices.%3C/p%3E
- Click%20on%20logical%20devices%20option%20from%20the%20menu
- %3Cp%3E%3Cspan%20style%3D%22font-size%3A%2013px%3B%22%3ETo%20start%20the%20process%2C%20we%20will%20creat%20a%20leaf%20device%20first.%20%3C/span%3E%3C/p%3E%0A%3Cp%3E%3Cspan%20style%3D%22font-size%3A%2015px%3B%22%3EPlease%20Note%3A%20%3C/span%3E%3C/p%3E%0A%3Cp%3E%3Cspan%20style%3D%22font-size%3A%2013px%3B%22%3EThe%20same%20process%20can%20be%20replicated%20for%20a%20spine%20logical%20device%20too.%20For%20the%20purpose%20of%20this%20demo%2C%20we%20will%20skip%20the%20spine%20logical%20device%20creation%20process.%3C/span%3E%3C/p%3E
- Enter a name for the logical device
- Choose the number of ports
- Create a port group
- Click to finish the creation
- %3Cp%3E%3Cspan%20style%3D%22font-size%3A%2013px%3B%22%3E%3Cspan%20style%3D%22font-family%3A%20Calibri%2C%20sans-serif%3B%22%3ENext%20we%20will%20set%20up%20interface%20maps.%20An%20Interface%20map%20maps%20the%20logical%20device%20to%20the%20actual%20physical%20device.%20ie%3A%20a%20specific%20switch%20and%20model%20that%20is%20used%20in%20the%20actual%20typology.%3C/span%3E%3C/span%3E%3C/p%3E
- Click on the Interface maps option from the menu
- Click to create a new interface map
- Add a name
- Choose a logical device that will be mapped to a physical entity
- Choose from the drop down list
- Choose a device profile from the drop down menu
- Choose the Juniper QFX device as shown
- Choose the interfaces
- %3Cp%3E%3Cspan%20style%3D%22font-size%3A%2013px%3B%22%3EWe%20will%20repeat%20the%20same%20process%20for%20the%20spine%20devices%20defined%20earlier.%20We%20will%20be%20mapping%20it%20to%20the%20Juniper%20QFX%20devices%20as%20well.%3C/span%3E%3C/p%3E
- Next we will add a few racks
- Click on the rack type from the menu
- Click to create a rack type
- Add a name for the new rack
- Name the leaf switch
- Choose a logical leaf device that was previously defined
- Choose the desired logical device from the list
- Click to add a new Generic system
- Add a name to the Generic System Group
- Enter a desired name
- FInish the process of creating a new rack
- Let us add another generic system
- Click to edit the rack type
- Navigate to the leafs tab
- Click on generic systems tab
- Up the Generic system count to 2 and then update the rack type
- Bring everything together in the next steps
- Choose templates from the menu
- Click to create a template
- Add a name first
- Enter more details and then scroll down
- To choose a rack type click on the drop down menu
- Choose the rack type that we created earlier from the menu
- Click to select the desired spine logical device
- Choose the logical spine device from the list
- Enter the desired count
- Click on create to complete the configuration
- Next step is to create a blueprint for the entire Datacenter fabric
- Click to create a new blueprint
- Enter a name for the Blueprint
- Choose the template from the drop down menu
- Choose the desired template
- Click to display the links
- Click on create to finish the process
- Click to view the Blueprint
- Click on staged
- Select the spines to allocate an Autonomous ID
- Click on the edit icon
- Choose the IP address from the Pool
- Save the configuration
- Repeat the same process for the other leaf devices
- Next we need to configure the interface mappings
- Click on one of the spine devices
- Click on the edit icon
- Choose the interface mappings from the the drop down menu
- Make the desired selection
- Click to update the assignments
- Click to assign system IDs next
- Click on the Assigned System IDs tab
- Click on the edit icon
- Choose from the list of System IDs
- Finalize the assignments
- Click on links
- Recitify any cabling errors as shown automatically
- Update the cabling assingments
- Notice the success message once the cabling mapping is sorted out
- Click on commit
- Add the description and click on the commit button
- Success
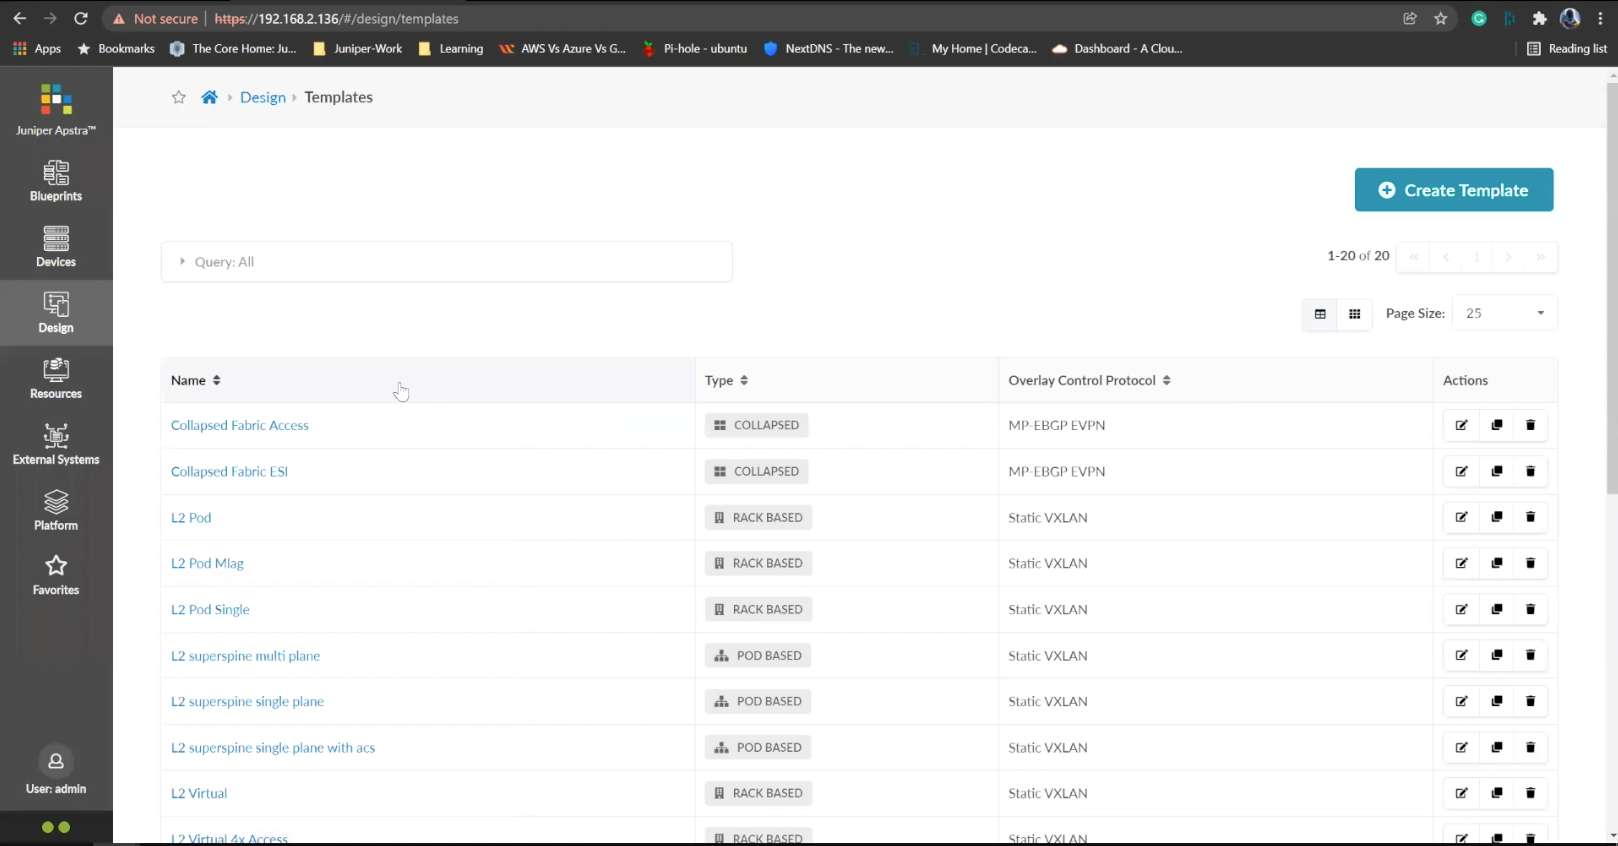
Click to create a template
- %3Cp%3EWe%20have%20our%20switches%20already%20managed%20by%20Apstra%2C%20a%20series%20of%20Juniper%20virtual%20QFX%20switches%20in%20this%20example.%20We%20wil%20start%20by%20creating%20logical%20devices.%3C/p%3E
- Click%20on%20logical%20devices%20option%20from%20the%20menu
- %3Cp%3E%3Cspan%20style%3D%22font-size%3A%2013px%3B%22%3ETo%20start%20the%20process%2C%20we%20will%20creat%20a%20leaf%20device%20first.%20%3C/span%3E%3C/p%3E%0A%3Cp%3E%3Cspan%20style%3D%22font-size%3A%2015px%3B%22%3EPlease%20Note%3A%20%3C/span%3E%3C/p%3E%0A%3Cp%3E%3Cspan%20style%3D%22font-size%3A%2013px%3B%22%3EThe%20same%20process%20can%20be%20replicated%20for%20a%20spine%20logical%20device%20too.%20For%20the%20purpose%20of%20this%20demo%2C%20we%20will%20skip%20the%20spine%20logical%20device%20creation%20process.%3C/span%3E%3C/p%3E
- Enter a name for the logical device
- Choose the number of ports
- Create a port group
- Click to finish the creation
- %3Cp%3E%3Cspan%20style%3D%22font-size%3A%2013px%3B%22%3E%3Cspan%20style%3D%22font-family%3A%20Calibri%2C%20sans-serif%3B%22%3ENext%20we%20will%20set%20up%20interface%20maps.%20An%20Interface%20map%20maps%20the%20logical%20device%20to%20the%20actual%20physical%20device.%20ie%3A%20a%20specific%20switch%20and%20model%20that%20is%20used%20in%20the%20actual%20typology.%3C/span%3E%3C/span%3E%3C/p%3E
- Click on the Interface maps option from the menu
- Click to create a new interface map
- Add a name
- Choose a logical device that will be mapped to a physical entity
- Choose from the drop down list
- Choose a device profile from the drop down menu
- Choose the Juniper QFX device as shown
- Choose the interfaces
- %3Cp%3E%3Cspan%20style%3D%22font-size%3A%2013px%3B%22%3EWe%20will%20repeat%20the%20same%20process%20for%20the%20spine%20devices%20defined%20earlier.%20We%20will%20be%20mapping%20it%20to%20the%20Juniper%20QFX%20devices%20as%20well.%3C/span%3E%3C/p%3E
- Next we will add a few racks
- Click on the rack type from the menu
- Click to create a rack type
- Add a name for the new rack
- Name the leaf switch
- Choose a logical leaf device that was previously defined
- Choose the desired logical device from the list
- Click to add a new Generic system
- Add a name to the Generic System Group
- Enter a desired name
- FInish the process of creating a new rack
- Let us add another generic system
- Click to edit the rack type
- Navigate to the leafs tab
- Click on generic systems tab
- Up the Generic system count to 2 and then update the rack type
- Bring everything together in the next steps
- Choose templates from the menu
- Click to create a template
- Add a name first
- Enter more details and then scroll down
- To choose a rack type click on the drop down menu
- Choose the rack type that we created earlier from the menu
- Click to select the desired spine logical device
- Choose the logical spine device from the list
- Enter the desired count
- Click on create to complete the configuration
- Next step is to create a blueprint for the entire Datacenter fabric
- Click to create a new blueprint
- Enter a name for the Blueprint
- Choose the template from the drop down menu
- Choose the desired template
- Click to display the links
- Click on create to finish the process
- Click to view the Blueprint
- Click on staged
- Select the spines to allocate an Autonomous ID
- Click on the edit icon
- Choose the IP address from the Pool
- Save the configuration
- Repeat the same process for the other leaf devices
- Next we need to configure the interface mappings
- Click on one of the spine devices
- Click on the edit icon
- Choose the interface mappings from the the drop down menu
- Make the desired selection
- Click to update the assignments
- Click to assign system IDs next
- Click on the Assigned System IDs tab
- Click on the edit icon
- Choose from the list of System IDs
- Finalize the assignments
- Click on links
- Recitify any cabling errors as shown automatically
- Update the cabling assingments
- Notice the success message once the cabling mapping is sorted out
- Click on commit
- Add the description and click on the commit button
- Success
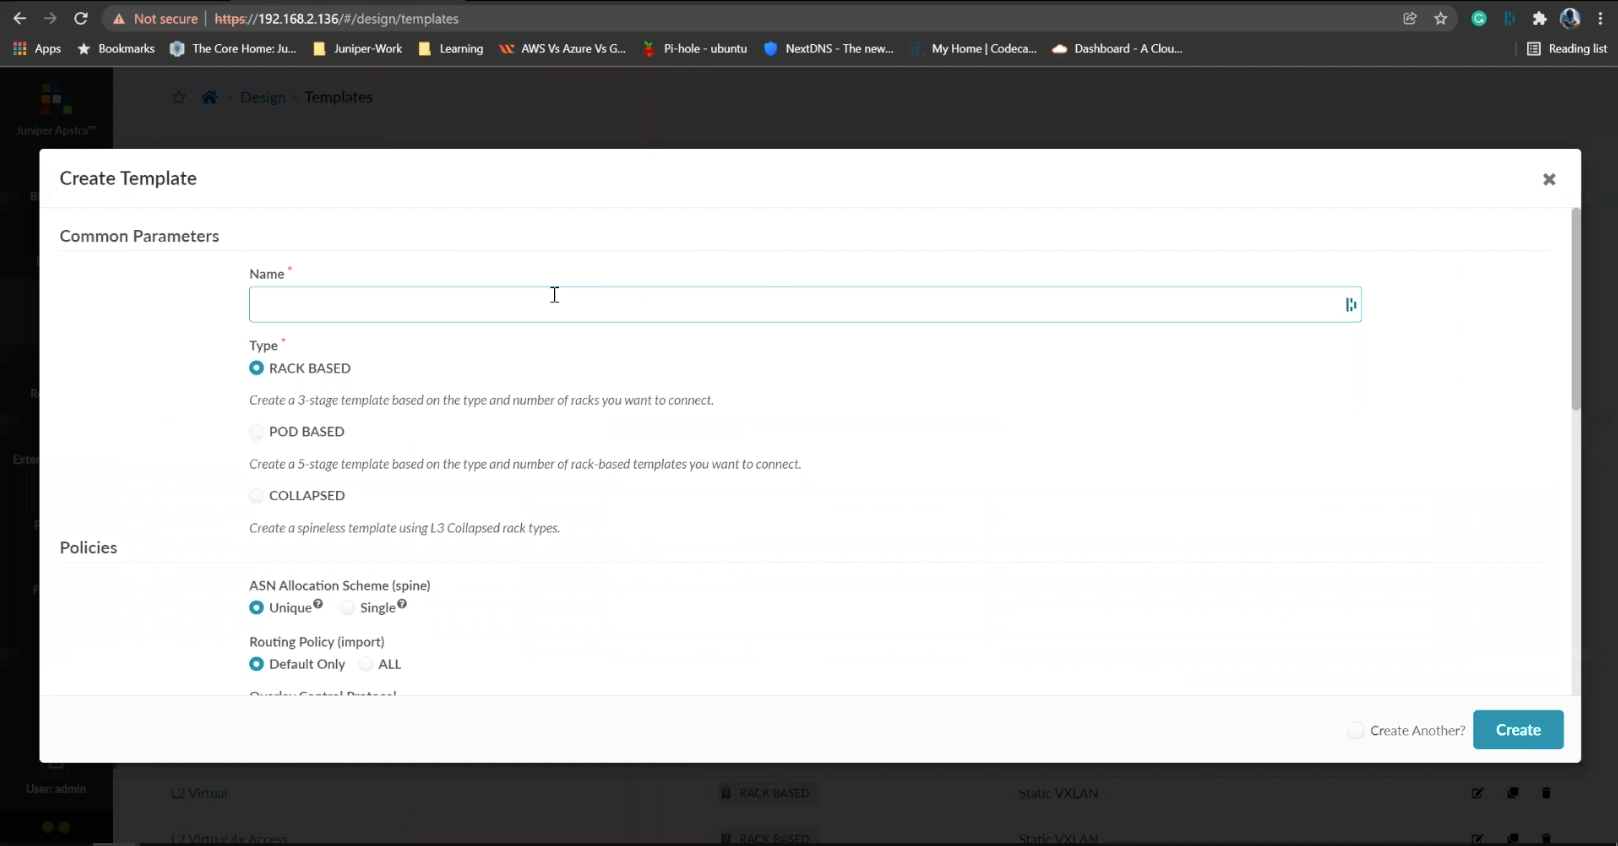
Add a name first
- %3Cp%3EWe%20have%20our%20switches%20already%20managed%20by%20Apstra%2C%20a%20series%20of%20Juniper%20virtual%20QFX%20switches%20in%20this%20example.%20We%20wil%20start%20by%20creating%20logical%20devices.%3C/p%3E
- Click%20on%20logical%20devices%20option%20from%20the%20menu
- %3Cp%3E%3Cspan%20style%3D%22font-size%3A%2013px%3B%22%3ETo%20start%20the%20process%2C%20we%20will%20creat%20a%20leaf%20device%20first.%20%3C/span%3E%3C/p%3E%0A%3Cp%3E%3Cspan%20style%3D%22font-size%3A%2015px%3B%22%3EPlease%20Note%3A%20%3C/span%3E%3C/p%3E%0A%3Cp%3E%3Cspan%20style%3D%22font-size%3A%2013px%3B%22%3EThe%20same%20process%20can%20be%20replicated%20for%20a%20spine%20logical%20device%20too.%20For%20the%20purpose%20of%20this%20demo%2C%20we%20will%20skip%20the%20spine%20logical%20device%20creation%20process.%3C/span%3E%3C/p%3E
- Enter a name for the logical device
- Choose the number of ports
- Create a port group
- Click to finish the creation
- %3Cp%3E%3Cspan%20style%3D%22font-size%3A%2013px%3B%22%3E%3Cspan%20style%3D%22font-family%3A%20Calibri%2C%20sans-serif%3B%22%3ENext%20we%20will%20set%20up%20interface%20maps.%20An%20Interface%20map%20maps%20the%20logical%20device%20to%20the%20actual%20physical%20device.%20ie%3A%20a%20specific%20switch%20and%20model%20that%20is%20used%20in%20the%20actual%20typology.%3C/span%3E%3C/span%3E%3C/p%3E
- Click on the Interface maps option from the menu
- Click to create a new interface map
- Add a name
- Choose a logical device that will be mapped to a physical entity
- Choose from the drop down list
- Choose a device profile from the drop down menu
- Choose the Juniper QFX device as shown
- Choose the interfaces
- %3Cp%3E%3Cspan%20style%3D%22font-size%3A%2013px%3B%22%3EWe%20will%20repeat%20the%20same%20process%20for%20the%20spine%20devices%20defined%20earlier.%20We%20will%20be%20mapping%20it%20to%20the%20Juniper%20QFX%20devices%20as%20well.%3C/span%3E%3C/p%3E
- Next we will add a few racks
- Click on the rack type from the menu
- Click to create a rack type
- Add a name for the new rack
- Name the leaf switch
- Choose a logical leaf device that was previously defined
- Choose the desired logical device from the list
- Click to add a new Generic system
- Add a name to the Generic System Group
- Enter a desired name
- FInish the process of creating a new rack
- Let us add another generic system
- Click to edit the rack type
- Navigate to the leafs tab
- Click on generic systems tab
- Up the Generic system count to 2 and then update the rack type
- Bring everything together in the next steps
- Choose templates from the menu
- Click to create a template
- Add a name first
- Enter more details and then scroll down
- To choose a rack type click on the drop down menu
- Choose the rack type that we created earlier from the menu
- Click to select the desired spine logical device
- Choose the logical spine device from the list
- Enter the desired count
- Click on create to complete the configuration
- Next step is to create a blueprint for the entire Datacenter fabric
- Click to create a new blueprint
- Enter a name for the Blueprint
- Choose the template from the drop down menu
- Choose the desired template
- Click to display the links
- Click on create to finish the process
- Click to view the Blueprint
- Click on staged
- Select the spines to allocate an Autonomous ID
- Click on the edit icon
- Choose the IP address from the Pool
- Save the configuration
- Repeat the same process for the other leaf devices
- Next we need to configure the interface mappings
- Click on one of the spine devices
- Click on the edit icon
- Choose the interface mappings from the the drop down menu
- Make the desired selection
- Click to update the assignments
- Click to assign system IDs next
- Click on the Assigned System IDs tab
- Click on the edit icon
- Choose from the list of System IDs
- Finalize the assignments
- Click on links
- Recitify any cabling errors as shown automatically
- Update the cabling assingments
- Notice the success message once the cabling mapping is sorted out
- Click on commit
- Add the description and click on the commit button
- Success
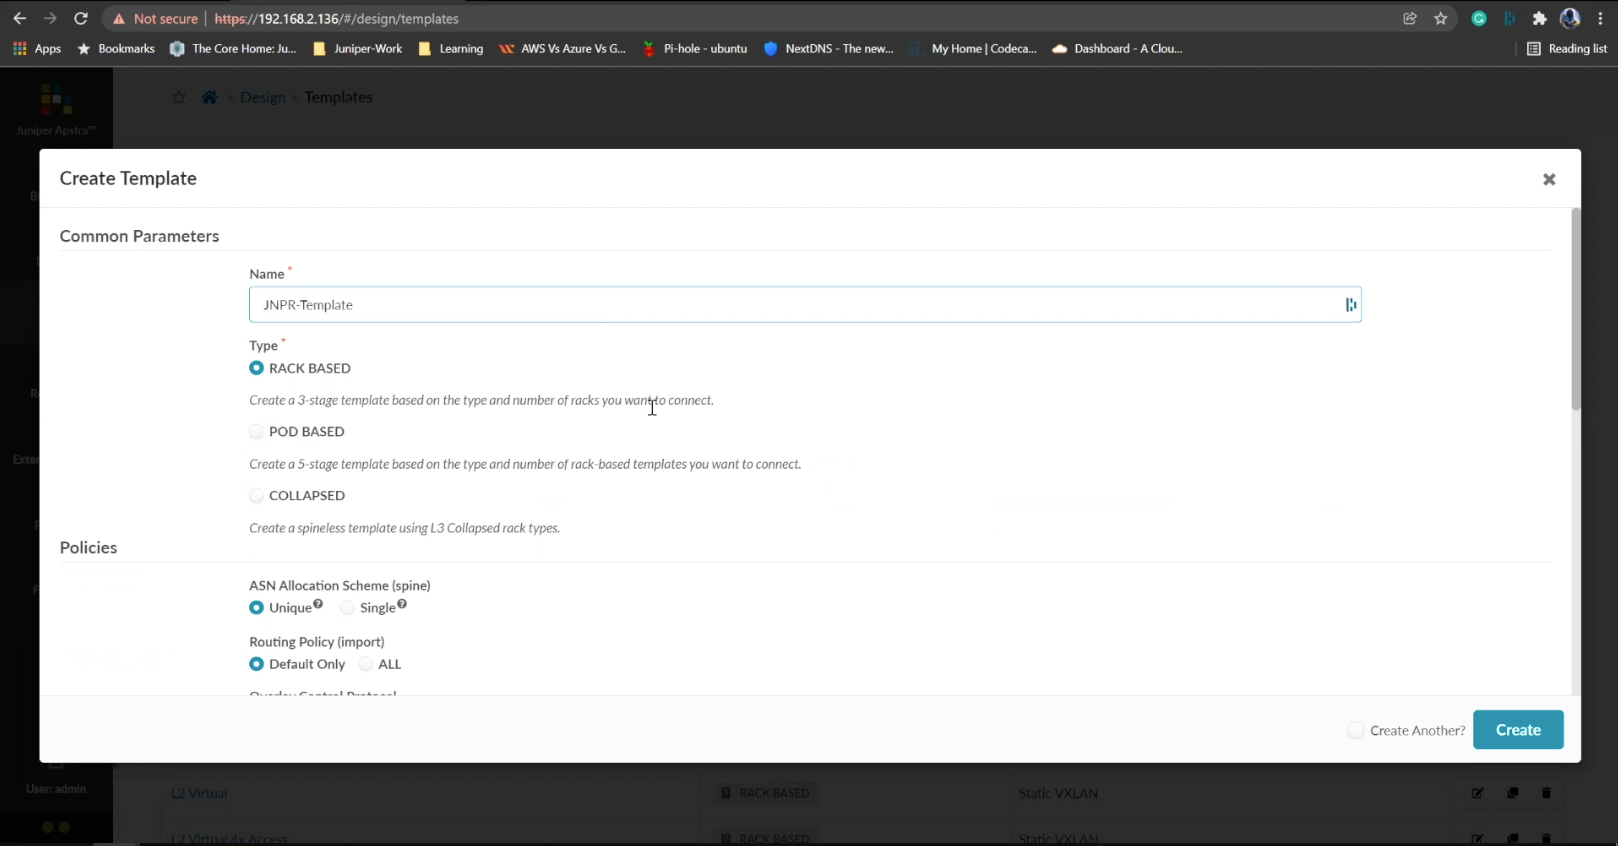
Enter more details and then scroll down
- %3Cp%3EWe%20have%20our%20switches%20already%20managed%20by%20Apstra%2C%20a%20series%20of%20Juniper%20virtual%20QFX%20switches%20in%20this%20example.%20We%20wil%20start%20by%20creating%20logical%20devices.%3C/p%3E
- Click%20on%20logical%20devices%20option%20from%20the%20menu
- %3Cp%3E%3Cspan%20style%3D%22font-size%3A%2013px%3B%22%3ETo%20start%20the%20process%2C%20we%20will%20creat%20a%20leaf%20device%20first.%20%3C/span%3E%3C/p%3E%0A%3Cp%3E%3Cspan%20style%3D%22font-size%3A%2015px%3B%22%3EPlease%20Note%3A%20%3C/span%3E%3C/p%3E%0A%3Cp%3E%3Cspan%20style%3D%22font-size%3A%2013px%3B%22%3EThe%20same%20process%20can%20be%20replicated%20for%20a%20spine%20logical%20device%20too.%20For%20the%20purpose%20of%20this%20demo%2C%20we%20will%20skip%20the%20spine%20logical%20device%20creation%20process.%3C/span%3E%3C/p%3E
- Enter a name for the logical device
- Choose the number of ports
- Create a port group
- Click to finish the creation
- %3Cp%3E%3Cspan%20style%3D%22font-size%3A%2013px%3B%22%3E%3Cspan%20style%3D%22font-family%3A%20Calibri%2C%20sans-serif%3B%22%3ENext%20we%20will%20set%20up%20interface%20maps.%20An%20Interface%20map%20maps%20the%20logical%20device%20to%20the%20actual%20physical%20device.%20ie%3A%20a%20specific%20switch%20and%20model%20that%20is%20used%20in%20the%20actual%20typology.%3C/span%3E%3C/span%3E%3C/p%3E
- Click on the Interface maps option from the menu
- Click to create a new interface map
- Add a name
- Choose a logical device that will be mapped to a physical entity
- Choose from the drop down list
- Choose a device profile from the drop down menu
- Choose the Juniper QFX device as shown
- Choose the interfaces
- %3Cp%3E%3Cspan%20style%3D%22font-size%3A%2013px%3B%22%3EWe%20will%20repeat%20the%20same%20process%20for%20the%20spine%20devices%20defined%20earlier.%20We%20will%20be%20mapping%20it%20to%20the%20Juniper%20QFX%20devices%20as%20well.%3C/span%3E%3C/p%3E
- Next we will add a few racks
- Click on the rack type from the menu
- Click to create a rack type
- Add a name for the new rack
- Name the leaf switch
- Choose a logical leaf device that was previously defined
- Choose the desired logical device from the list
- Click to add a new Generic system
- Add a name to the Generic System Group
- Enter a desired name
- FInish the process of creating a new rack
- Let us add another generic system
- Click to edit the rack type
- Navigate to the leafs tab
- Click on generic systems tab
- Up the Generic system count to 2 and then update the rack type
- Bring everything together in the next steps
- Choose templates from the menu
- Click to create a template
- Add a name first
- Enter more details and then scroll down
- To choose a rack type click on the drop down menu
- Choose the rack type that we created earlier from the menu
- Click to select the desired spine logical device
- Choose the logical spine device from the list
- Enter the desired count
- Click on create to complete the configuration
- Next step is to create a blueprint for the entire Datacenter fabric
- Click to create a new blueprint
- Enter a name for the Blueprint
- Choose the template from the drop down menu
- Choose the desired template
- Click to display the links
- Click on create to finish the process
- Click to view the Blueprint
- Click on staged
- Select the spines to allocate an Autonomous ID
- Click on the edit icon
- Choose the IP address from the Pool
- Save the configuration
- Repeat the same process for the other leaf devices
- Next we need to configure the interface mappings
- Click on one of the spine devices
- Click on the edit icon
- Choose the interface mappings from the the drop down menu
- Make the desired selection
- Click to update the assignments
- Click to assign system IDs next
- Click on the Assigned System IDs tab
- Click on the edit icon
- Choose from the list of System IDs
- Finalize the assignments
- Click on links
- Recitify any cabling errors as shown automatically
- Update the cabling assingments
- Notice the success message once the cabling mapping is sorted out
- Click on commit
- Add the description and click on the commit button
- Success
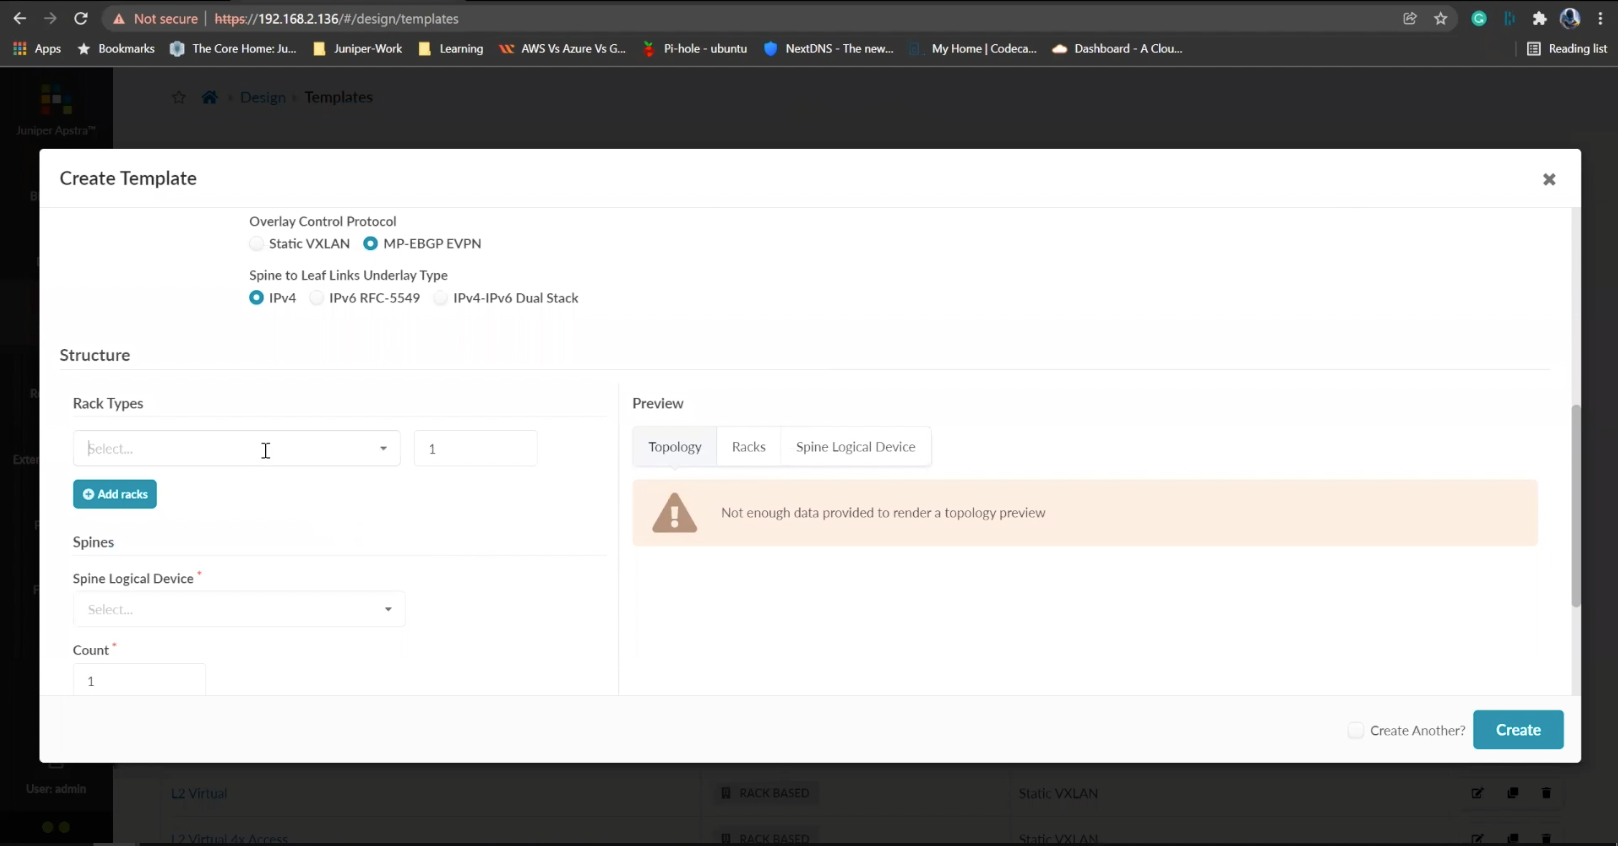
To choose a rack type click on the drop down menu
- %3Cp%3EWe%20have%20our%20switches%20already%20managed%20by%20Apstra%2C%20a%20series%20of%20Juniper%20virtual%20QFX%20switches%20in%20this%20example.%20We%20wil%20start%20by%20creating%20logical%20devices.%3C/p%3E
- Click%20on%20logical%20devices%20option%20from%20the%20menu
- %3Cp%3E%3Cspan%20style%3D%22font-size%3A%2013px%3B%22%3ETo%20start%20the%20process%2C%20we%20will%20creat%20a%20leaf%20device%20first.%20%3C/span%3E%3C/p%3E%0A%3Cp%3E%3Cspan%20style%3D%22font-size%3A%2015px%3B%22%3EPlease%20Note%3A%20%3C/span%3E%3C/p%3E%0A%3Cp%3E%3Cspan%20style%3D%22font-size%3A%2013px%3B%22%3EThe%20same%20process%20can%20be%20replicated%20for%20a%20spine%20logical%20device%20too.%20For%20the%20purpose%20of%20this%20demo%2C%20we%20will%20skip%20the%20spine%20logical%20device%20creation%20process.%3C/span%3E%3C/p%3E
- Enter a name for the logical device
- Choose the number of ports
- Create a port group
- Click to finish the creation
- %3Cp%3E%3Cspan%20style%3D%22font-size%3A%2013px%3B%22%3E%3Cspan%20style%3D%22font-family%3A%20Calibri%2C%20sans-serif%3B%22%3ENext%20we%20will%20set%20up%20interface%20maps.%20An%20Interface%20map%20maps%20the%20logical%20device%20to%20the%20actual%20physical%20device.%20ie%3A%20a%20specific%20switch%20and%20model%20that%20is%20used%20in%20the%20actual%20typology.%3C/span%3E%3C/span%3E%3C/p%3E
- Click on the Interface maps option from the menu
- Click to create a new interface map
- Add a name
- Choose a logical device that will be mapped to a physical entity
- Choose from the drop down list
- Choose a device profile from the drop down menu
- Choose the Juniper QFX device as shown
- Choose the interfaces
- %3Cp%3E%3Cspan%20style%3D%22font-size%3A%2013px%3B%22%3EWe%20will%20repeat%20the%20same%20process%20for%20the%20spine%20devices%20defined%20earlier.%20We%20will%20be%20mapping%20it%20to%20the%20Juniper%20QFX%20devices%20as%20well.%3C/span%3E%3C/p%3E
- Next we will add a few racks
- Click on the rack type from the menu
- Click to create a rack type
- Add a name for the new rack
- Name the leaf switch
- Choose a logical leaf device that was previously defined
- Choose the desired logical device from the list
- Click to add a new Generic system
- Add a name to the Generic System Group
- Enter a desired name
- FInish the process of creating a new rack
- Let us add another generic system
- Click to edit the rack type
- Navigate to the leafs tab
- Click on generic systems tab
- Up the Generic system count to 2 and then update the rack type
- Bring everything together in the next steps
- Choose templates from the menu
- Click to create a template
- Add a name first
- Enter more details and then scroll down
- To choose a rack type click on the drop down menu
- Choose the rack type that we created earlier from the menu
- Click to select the desired spine logical device
- Choose the logical spine device from the list
- Enter the desired count
- Click on create to complete the configuration
- Next step is to create a blueprint for the entire Datacenter fabric
- Click to create a new blueprint
- Enter a name for the Blueprint
- Choose the template from the drop down menu
- Choose the desired template
- Click to display the links
- Click on create to finish the process
- Click to view the Blueprint
- Click on staged
- Select the spines to allocate an Autonomous ID
- Click on the edit icon
- Choose the IP address from the Pool
- Save the configuration
- Repeat the same process for the other leaf devices
- Next we need to configure the interface mappings
- Click on one of the spine devices
- Click on the edit icon
- Choose the interface mappings from the the drop down menu
- Make the desired selection
- Click to update the assignments
- Click to assign system IDs next
- Click on the Assigned System IDs tab
- Click on the edit icon
- Choose from the list of System IDs
- Finalize the assignments
- Click on links
- Recitify any cabling errors as shown automatically
- Update the cabling assingments
- Notice the success message once the cabling mapping is sorted out
- Click on commit
- Add the description and click on the commit button
- Success
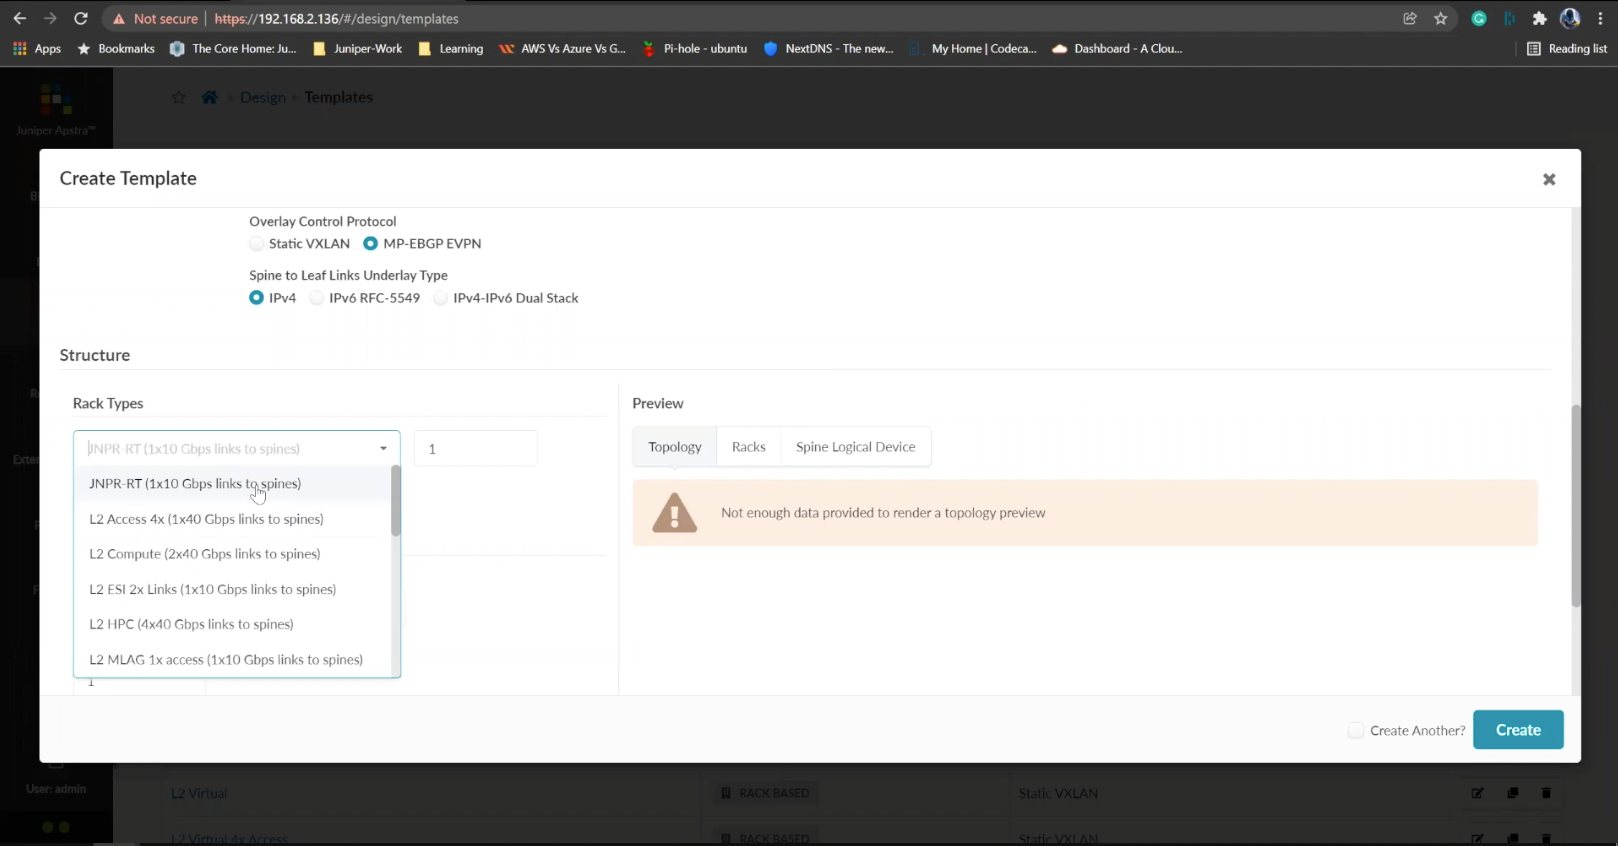
Choose the rack type that we created earlier from the menu
- %3Cp%3EWe%20have%20our%20switches%20already%20managed%20by%20Apstra%2C%20a%20series%20of%20Juniper%20virtual%20QFX%20switches%20in%20this%20example.%20We%20wil%20start%20by%20creating%20logical%20devices.%3C/p%3E
- Click%20on%20logical%20devices%20option%20from%20the%20menu
- %3Cp%3E%3Cspan%20style%3D%22font-size%3A%2013px%3B%22%3ETo%20start%20the%20process%2C%20we%20will%20creat%20a%20leaf%20device%20first.%20%3C/span%3E%3C/p%3E%0A%3Cp%3E%3Cspan%20style%3D%22font-size%3A%2015px%3B%22%3EPlease%20Note%3A%20%3C/span%3E%3C/p%3E%0A%3Cp%3E%3Cspan%20style%3D%22font-size%3A%2013px%3B%22%3EThe%20same%20process%20can%20be%20replicated%20for%20a%20spine%20logical%20device%20too.%20For%20the%20purpose%20of%20this%20demo%2C%20we%20will%20skip%20the%20spine%20logical%20device%20creation%20process.%3C/span%3E%3C/p%3E
- Enter a name for the logical device
- Choose the number of ports
- Create a port group
- Click to finish the creation
- %3Cp%3E%3Cspan%20style%3D%22font-size%3A%2013px%3B%22%3E%3Cspan%20style%3D%22font-family%3A%20Calibri%2C%20sans-serif%3B%22%3ENext%20we%20will%20set%20up%20interface%20maps.%20An%20Interface%20map%20maps%20the%20logical%20device%20to%20the%20actual%20physical%20device.%20ie%3A%20a%20specific%20switch%20and%20model%20that%20is%20used%20in%20the%20actual%20typology.%3C/span%3E%3C/span%3E%3C/p%3E
- Click on the Interface maps option from the menu
- Click to create a new interface map
- Add a name
- Choose a logical device that will be mapped to a physical entity
- Choose from the drop down list
- Choose a device profile from the drop down menu
- Choose the Juniper QFX device as shown
- Choose the interfaces
- %3Cp%3E%3Cspan%20style%3D%22font-size%3A%2013px%3B%22%3EWe%20will%20repeat%20the%20same%20process%20for%20the%20spine%20devices%20defined%20earlier.%20We%20will%20be%20mapping%20it%20to%20the%20Juniper%20QFX%20devices%20as%20well.%3C/span%3E%3C/p%3E
- Next we will add a few racks
- Click on the rack type from the menu
- Click to create a rack type
- Add a name for the new rack
- Name the leaf switch
- Choose a logical leaf device that was previously defined
- Choose the desired logical device from the list
- Click to add a new Generic system
- Add a name to the Generic System Group
- Enter a desired name
- FInish the process of creating a new rack
- Let us add another generic system
- Click to edit the rack type
- Navigate to the leafs tab
- Click on generic systems tab
- Up the Generic system count to 2 and then update the rack type
- Bring everything together in the next steps
- Choose templates from the menu
- Click to create a template
- Add a name first
- Enter more details and then scroll down
- To choose a rack type click on the drop down menu
- Choose the rack type that we created earlier from the menu
- Click to select the desired spine logical device
- Choose the logical spine device from the list
- Enter the desired count
- Click on create to complete the configuration
- Next step is to create a blueprint for the entire Datacenter fabric
- Click to create a new blueprint
- Enter a name for the Blueprint
- Choose the template from the drop down menu
- Choose the desired template
- Click to display the links
- Click on create to finish the process
- Click to view the Blueprint
- Click on staged
- Select the spines to allocate an Autonomous ID
- Click on the edit icon
- Choose the IP address from the Pool
- Save the configuration
- Repeat the same process for the other leaf devices
- Next we need to configure the interface mappings
- Click on one of the spine devices
- Click on the edit icon
- Choose the interface mappings from the the drop down menu
- Make the desired selection
- Click to update the assignments
- Click to assign system IDs next
- Click on the Assigned System IDs tab
- Click on the edit icon
- Choose from the list of System IDs
- Finalize the assignments
- Click on links
- Recitify any cabling errors as shown automatically
- Update the cabling assingments
- Notice the success message once the cabling mapping is sorted out
- Click on commit
- Add the description and click on the commit button
- Success
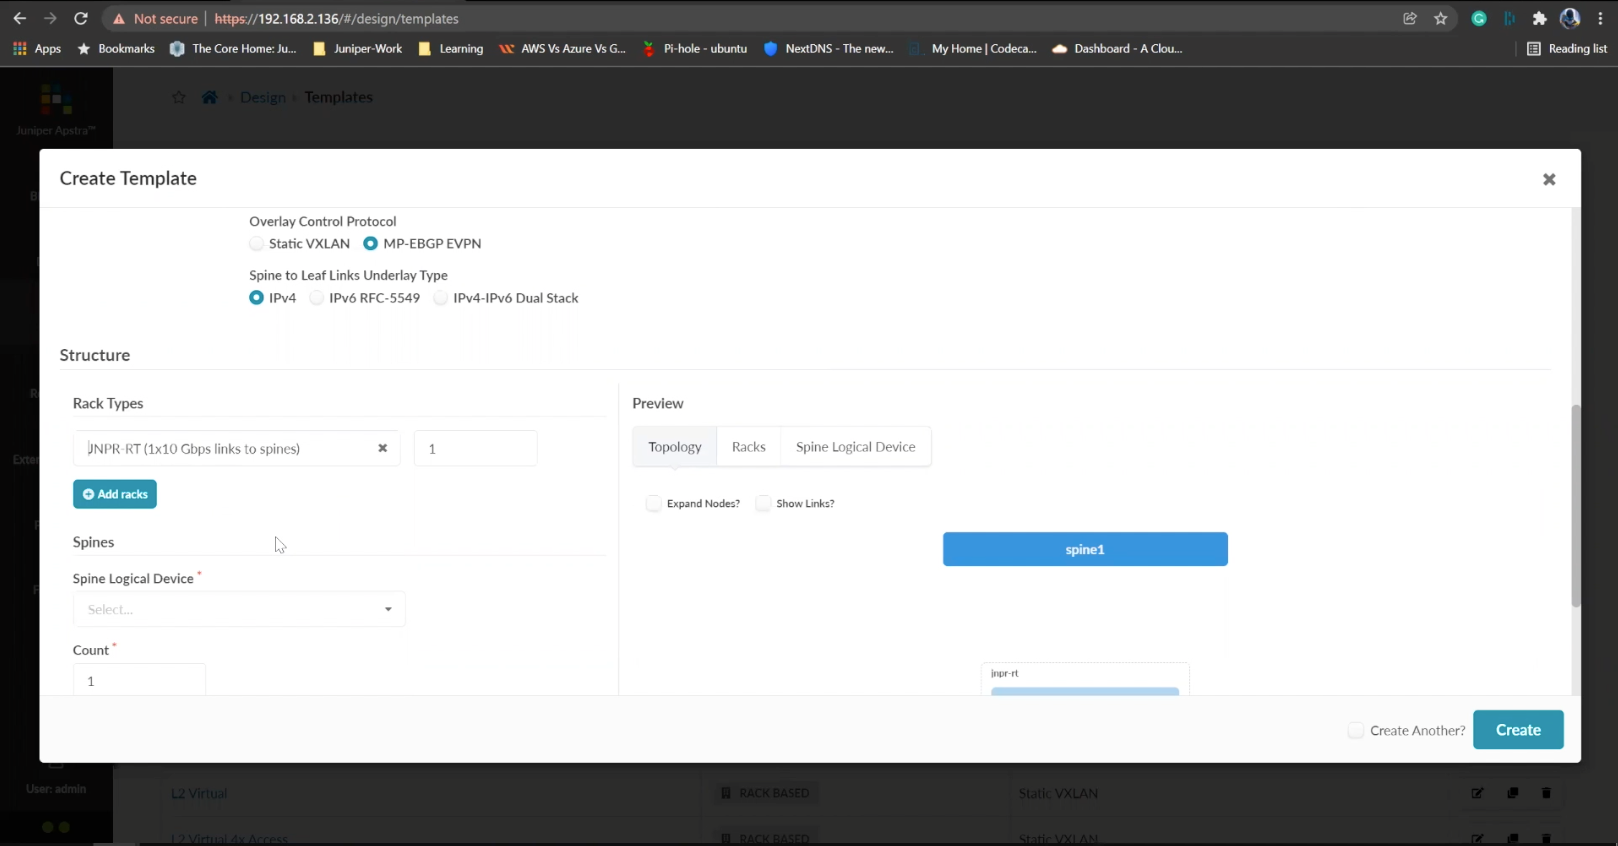
Click to select the desired spine logical device
- %3Cp%3EWe%20have%20our%20switches%20already%20managed%20by%20Apstra%2C%20a%20series%20of%20Juniper%20virtual%20QFX%20switches%20in%20this%20example.%20We%20wil%20start%20by%20creating%20logical%20devices.%3C/p%3E
- Click%20on%20logical%20devices%20option%20from%20the%20menu
- %3Cp%3E%3Cspan%20style%3D%22font-size%3A%2013px%3B%22%3ETo%20start%20the%20process%2C%20we%20will%20creat%20a%20leaf%20device%20first.%20%3C/span%3E%3C/p%3E%0A%3Cp%3E%3Cspan%20style%3D%22font-size%3A%2015px%3B%22%3EPlease%20Note%3A%20%3C/span%3E%3C/p%3E%0A%3Cp%3E%3Cspan%20style%3D%22font-size%3A%2013px%3B%22%3EThe%20same%20process%20can%20be%20replicated%20for%20a%20spine%20logical%20device%20too.%20For%20the%20purpose%20of%20this%20demo%2C%20we%20will%20skip%20the%20spine%20logical%20device%20creation%20process.%3C/span%3E%3C/p%3E
- Enter a name for the logical device
- Choose the number of ports
- Create a port group
- Click to finish the creation
- %3Cp%3E%3Cspan%20style%3D%22font-size%3A%2013px%3B%22%3E%3Cspan%20style%3D%22font-family%3A%20Calibri%2C%20sans-serif%3B%22%3ENext%20we%20will%20set%20up%20interface%20maps.%20An%20Interface%20map%20maps%20the%20logical%20device%20to%20the%20actual%20physical%20device.%20ie%3A%20a%20specific%20switch%20and%20model%20that%20is%20used%20in%20the%20actual%20typology.%3C/span%3E%3C/span%3E%3C/p%3E
- Click on the Interface maps option from the menu
- Click to create a new interface map
- Add a name
- Choose a logical device that will be mapped to a physical entity
- Choose from the drop down list
- Choose a device profile from the drop down menu
- Choose the Juniper QFX device as shown
- Choose the interfaces
- %3Cp%3E%3Cspan%20style%3D%22font-size%3A%2013px%3B%22%3EWe%20will%20repeat%20the%20same%20process%20for%20the%20spine%20devices%20defined%20earlier.%20We%20will%20be%20mapping%20it%20to%20the%20Juniper%20QFX%20devices%20as%20well.%3C/span%3E%3C/p%3E
- Next we will add a few racks
- Click on the rack type from the menu
- Click to create a rack type
- Add a name for the new rack
- Name the leaf switch
- Choose a logical leaf device that was previously defined
- Choose the desired logical device from the list
- Click to add a new Generic system
- Add a name to the Generic System Group
- Enter a desired name
- FInish the process of creating a new rack
- Let us add another generic system
- Click to edit the rack type
- Navigate to the leafs tab
- Click on generic systems tab
- Up the Generic system count to 2 and then update the rack type
- Bring everything together in the next steps
- Choose templates from the menu
- Click to create a template
- Add a name first
- Enter more details and then scroll down
- To choose a rack type click on the drop down menu
- Choose the rack type that we created earlier from the menu
- Click to select the desired spine logical device
- Choose the logical spine device from the list
- Enter the desired count
- Click on create to complete the configuration
- Next step is to create a blueprint for the entire Datacenter fabric
- Click to create a new blueprint
- Enter a name for the Blueprint
- Choose the template from the drop down menu
- Choose the desired template
- Click to display the links
- Click on create to finish the process
- Click to view the Blueprint
- Click on staged
- Select the spines to allocate an Autonomous ID
- Click on the edit icon
- Choose the IP address from the Pool
- Save the configuration
- Repeat the same process for the other leaf devices
- Next we need to configure the interface mappings
- Click on one of the spine devices
- Click on the edit icon
- Choose the interface mappings from the the drop down menu
- Make the desired selection
- Click to update the assignments
- Click to assign system IDs next
- Click on the Assigned System IDs tab
- Click on the edit icon
- Choose from the list of System IDs
- Finalize the assignments
- Click on links
- Recitify any cabling errors as shown automatically
- Update the cabling assingments
- Notice the success message once the cabling mapping is sorted out
- Click on commit
- Add the description and click on the commit button
- Success
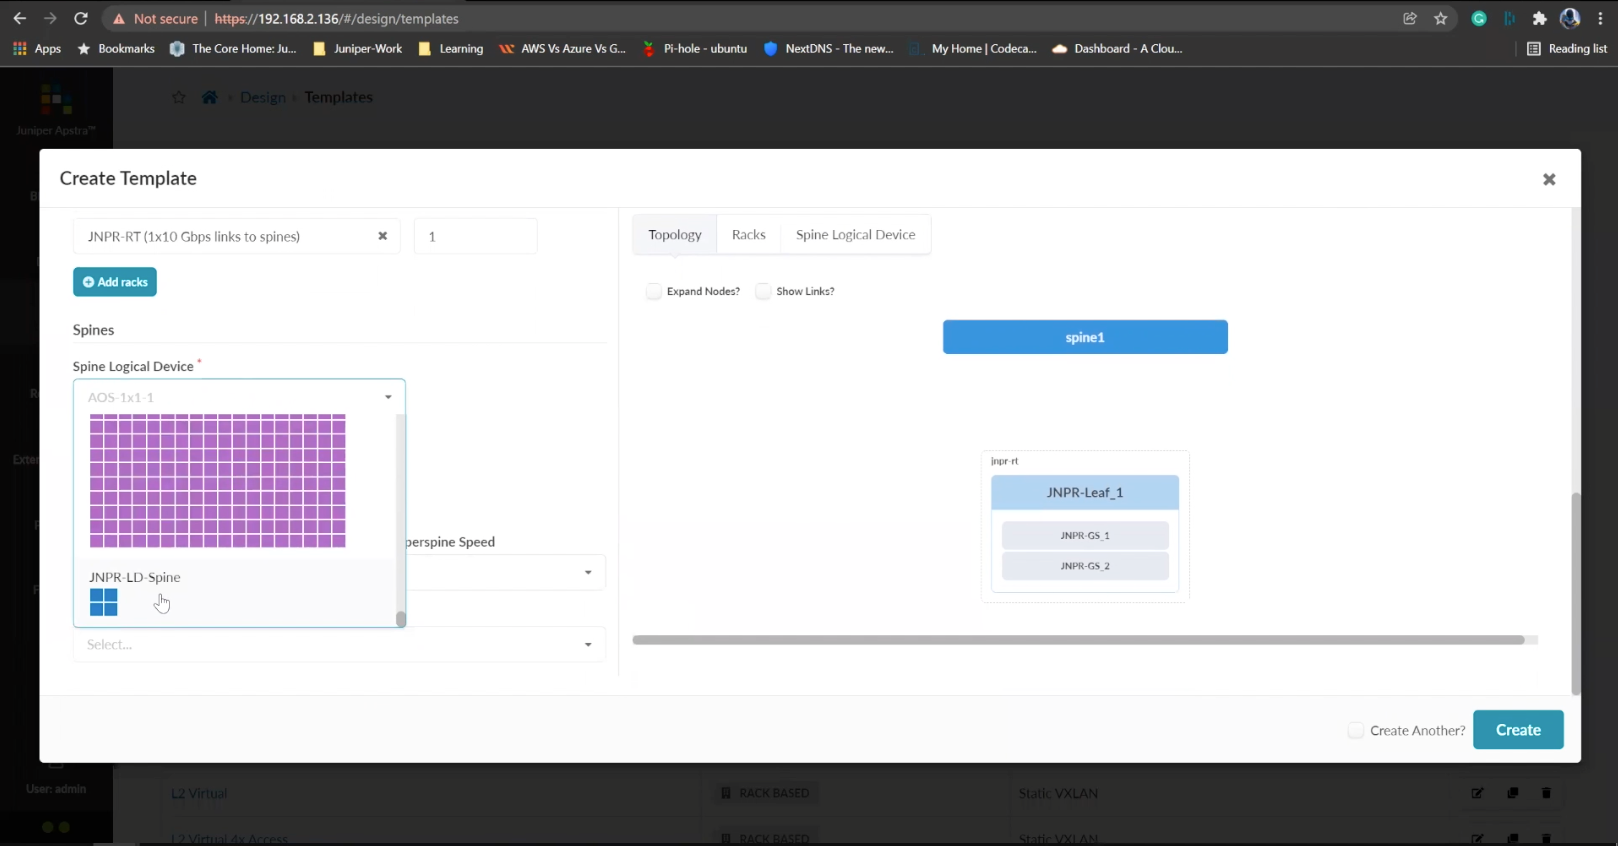
Choose the logical spine device from the list
- %3Cp%3EWe%20have%20our%20switches%20already%20managed%20by%20Apstra%2C%20a%20series%20of%20Juniper%20virtual%20QFX%20switches%20in%20this%20example.%20We%20wil%20start%20by%20creating%20logical%20devices.%3C/p%3E
- Click%20on%20logical%20devices%20option%20from%20the%20menu
- %3Cp%3E%3Cspan%20style%3D%22font-size%3A%2013px%3B%22%3ETo%20start%20the%20process%2C%20we%20will%20creat%20a%20leaf%20device%20first.%20%3C/span%3E%3C/p%3E%0A%3Cp%3E%3Cspan%20style%3D%22font-size%3A%2015px%3B%22%3EPlease%20Note%3A%20%3C/span%3E%3C/p%3E%0A%3Cp%3E%3Cspan%20style%3D%22font-size%3A%2013px%3B%22%3EThe%20same%20process%20can%20be%20replicated%20for%20a%20spine%20logical%20device%20too.%20For%20the%20purpose%20of%20this%20demo%2C%20we%20will%20skip%20the%20spine%20logical%20device%20creation%20process.%3C/span%3E%3C/p%3E
- Enter a name for the logical device
- Choose the number of ports
- Create a port group
- Click to finish the creation
- %3Cp%3E%3Cspan%20style%3D%22font-size%3A%2013px%3B%22%3E%3Cspan%20style%3D%22font-family%3A%20Calibri%2C%20sans-serif%3B%22%3ENext%20we%20will%20set%20up%20interface%20maps.%20An%20Interface%20map%20maps%20the%20logical%20device%20to%20the%20actual%20physical%20device.%20ie%3A%20a%20specific%20switch%20and%20model%20that%20is%20used%20in%20the%20actual%20typology.%3C/span%3E%3C/span%3E%3C/p%3E
- Click on the Interface maps option from the menu
- Click to create a new interface map
- Add a name
- Choose a logical device that will be mapped to a physical entity
- Choose from the drop down list
- Choose a device profile from the drop down menu
- Choose the Juniper QFX device as shown
- Choose the interfaces
- %3Cp%3E%3Cspan%20style%3D%22font-size%3A%2013px%3B%22%3EWe%20will%20repeat%20the%20same%20process%20for%20the%20spine%20devices%20defined%20earlier.%20We%20will%20be%20mapping%20it%20to%20the%20Juniper%20QFX%20devices%20as%20well.%3C/span%3E%3C/p%3E
- Next we will add a few racks
- Click on the rack type from the menu
- Click to create a rack type
- Add a name for the new rack
- Name the leaf switch
- Choose a logical leaf device that was previously defined
- Choose the desired logical device from the list
- Click to add a new Generic system
- Add a name to the Generic System Group
- Enter a desired name
- FInish the process of creating a new rack
- Let us add another generic system
- Click to edit the rack type
- Navigate to the leafs tab
- Click on generic systems tab
- Up the Generic system count to 2 and then update the rack type
- Bring everything together in the next steps
- Choose templates from the menu
- Click to create a template
- Add a name first
- Enter more details and then scroll down
- To choose a rack type click on the drop down menu
- Choose the rack type that we created earlier from the menu
- Click to select the desired spine logical device
- Choose the logical spine device from the list
- Enter the desired count
- Click on create to complete the configuration
- Next step is to create a blueprint for the entire Datacenter fabric
- Click to create a new blueprint
- Enter a name for the Blueprint
- Choose the template from the drop down menu
- Choose the desired template
- Click to display the links
- Click on create to finish the process
- Click to view the Blueprint
- Click on staged
- Select the spines to allocate an Autonomous ID
- Click on the edit icon
- Choose the IP address from the Pool
- Save the configuration
- Repeat the same process for the other leaf devices
- Next we need to configure the interface mappings
- Click on one of the spine devices
- Click on the edit icon
- Choose the interface mappings from the the drop down menu
- Make the desired selection
- Click to update the assignments
- Click to assign system IDs next
- Click on the Assigned System IDs tab
- Click on the edit icon
- Choose from the list of System IDs
- Finalize the assignments
- Click on links
- Recitify any cabling errors as shown automatically
- Update the cabling assingments
- Notice the success message once the cabling mapping is sorted out
- Click on commit
- Add the description and click on the commit button
- Success
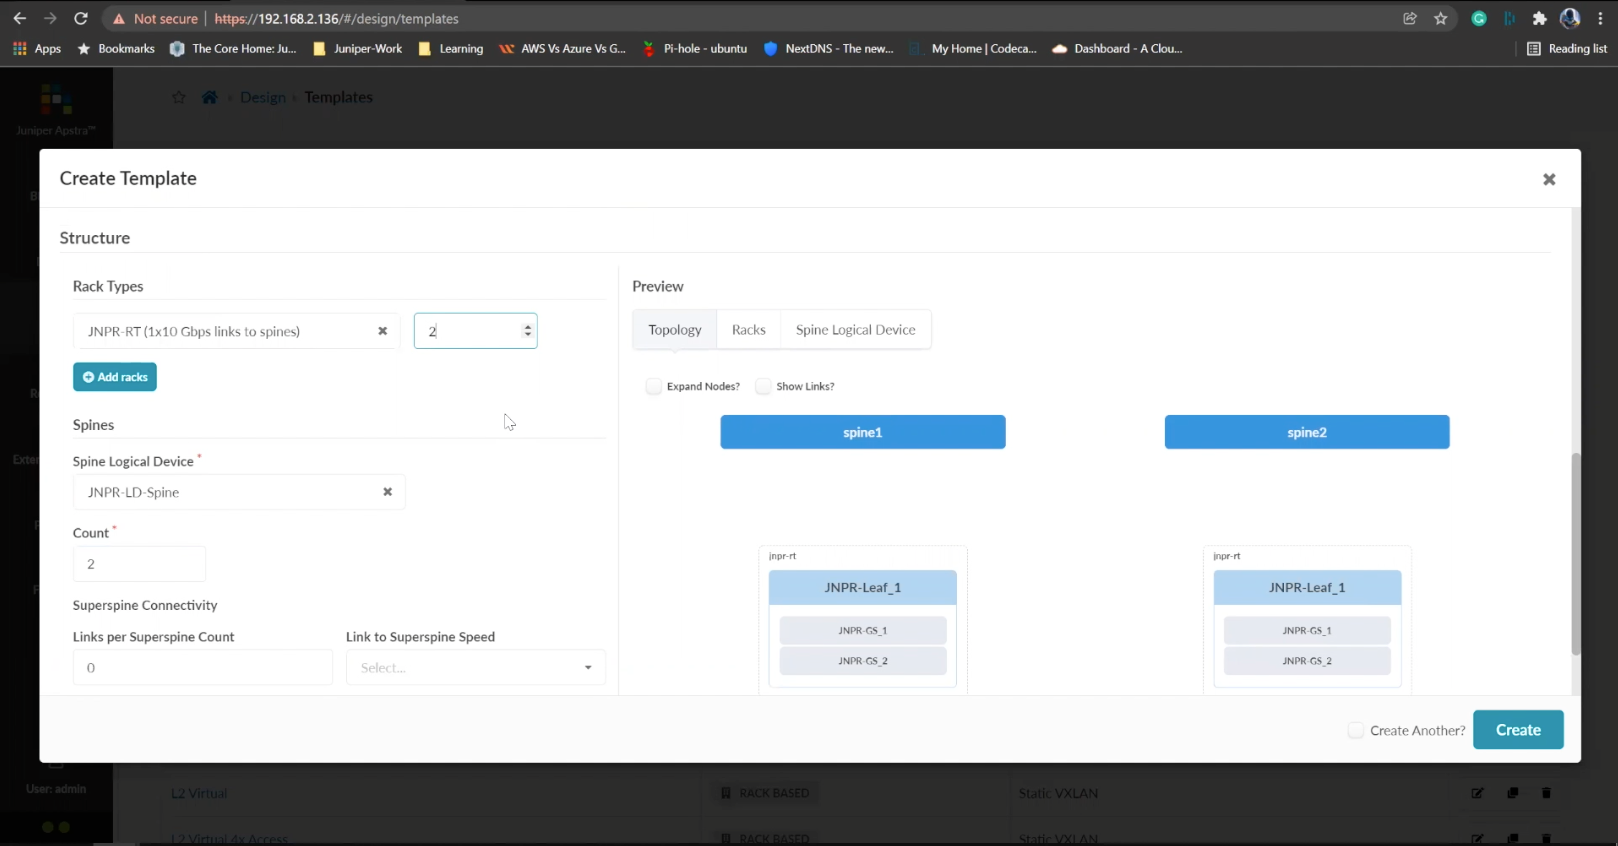
Enter the desired count
- %3Cp%3EWe%20have%20our%20switches%20already%20managed%20by%20Apstra%2C%20a%20series%20of%20Juniper%20virtual%20QFX%20switches%20in%20this%20example.%20We%20wil%20start%20by%20creating%20logical%20devices.%3C/p%3E
- Click%20on%20logical%20devices%20option%20from%20the%20menu
- %3Cp%3E%3Cspan%20style%3D%22font-size%3A%2013px%3B%22%3ETo%20start%20the%20process%2C%20we%20will%20creat%20a%20leaf%20device%20first.%20%3C/span%3E%3C/p%3E%0A%3Cp%3E%3Cspan%20style%3D%22font-size%3A%2015px%3B%22%3EPlease%20Note%3A%20%3C/span%3E%3C/p%3E%0A%3Cp%3E%3Cspan%20style%3D%22font-size%3A%2013px%3B%22%3EThe%20same%20process%20can%20be%20replicated%20for%20a%20spine%20logical%20device%20too.%20For%20the%20purpose%20of%20this%20demo%2C%20we%20will%20skip%20the%20spine%20logical%20device%20creation%20process.%3C/span%3E%3C/p%3E
- Enter a name for the logical device
- Choose the number of ports
- Create a port group
- Click to finish the creation
- %3Cp%3E%3Cspan%20style%3D%22font-size%3A%2013px%3B%22%3E%3Cspan%20style%3D%22font-family%3A%20Calibri%2C%20sans-serif%3B%22%3ENext%20we%20will%20set%20up%20interface%20maps.%20An%20Interface%20map%20maps%20the%20logical%20device%20to%20the%20actual%20physical%20device.%20ie%3A%20a%20specific%20switch%20and%20model%20that%20is%20used%20in%20the%20actual%20typology.%3C/span%3E%3C/span%3E%3C/p%3E
- Click on the Interface maps option from the menu
- Click to create a new interface map
- Add a name
- Choose a logical device that will be mapped to a physical entity
- Choose from the drop down list
- Choose a device profile from the drop down menu
- Choose the Juniper QFX device as shown
- Choose the interfaces
- %3Cp%3E%3Cspan%20style%3D%22font-size%3A%2013px%3B%22%3EWe%20will%20repeat%20the%20same%20process%20for%20the%20spine%20devices%20defined%20earlier.%20We%20will%20be%20mapping%20it%20to%20the%20Juniper%20QFX%20devices%20as%20well.%3C/span%3E%3C/p%3E
- Next we will add a few racks
- Click on the rack type from the menu
- Click to create a rack type
- Add a name for the new rack
- Name the leaf switch
- Choose a logical leaf device that was previously defined
- Choose the desired logical device from the list
- Click to add a new Generic system
- Add a name to the Generic System Group
- Enter a desired name
- FInish the process of creating a new rack
- Let us add another generic system
- Click to edit the rack type
- Navigate to the leafs tab
- Click on generic systems tab
- Up the Generic system count to 2 and then update the rack type
- Bring everything together in the next steps
- Choose templates from the menu
- Click to create a template
- Add a name first
- Enter more details and then scroll down
- To choose a rack type click on the drop down menu
- Choose the rack type that we created earlier from the menu
- Click to select the desired spine logical device
- Choose the logical spine device from the list
- Enter the desired count
- Click on create to complete the configuration
- Next step is to create a blueprint for the entire Datacenter fabric
- Click to create a new blueprint
- Enter a name for the Blueprint
- Choose the template from the drop down menu
- Choose the desired template
- Click to display the links
- Click on create to finish the process
- Click to view the Blueprint
- Click on staged
- Select the spines to allocate an Autonomous ID
- Click on the edit icon
- Choose the IP address from the Pool
- Save the configuration
- Repeat the same process for the other leaf devices
- Next we need to configure the interface mappings
- Click on one of the spine devices
- Click on the edit icon
- Choose the interface mappings from the the drop down menu
- Make the desired selection
- Click to update the assignments
- Click to assign system IDs next
- Click on the Assigned System IDs tab
- Click on the edit icon
- Choose from the list of System IDs
- Finalize the assignments
- Click on links
- Recitify any cabling errors as shown automatically
- Update the cabling assingments
- Notice the success message once the cabling mapping is sorted out
- Click on commit
- Add the description and click on the commit button
- Success
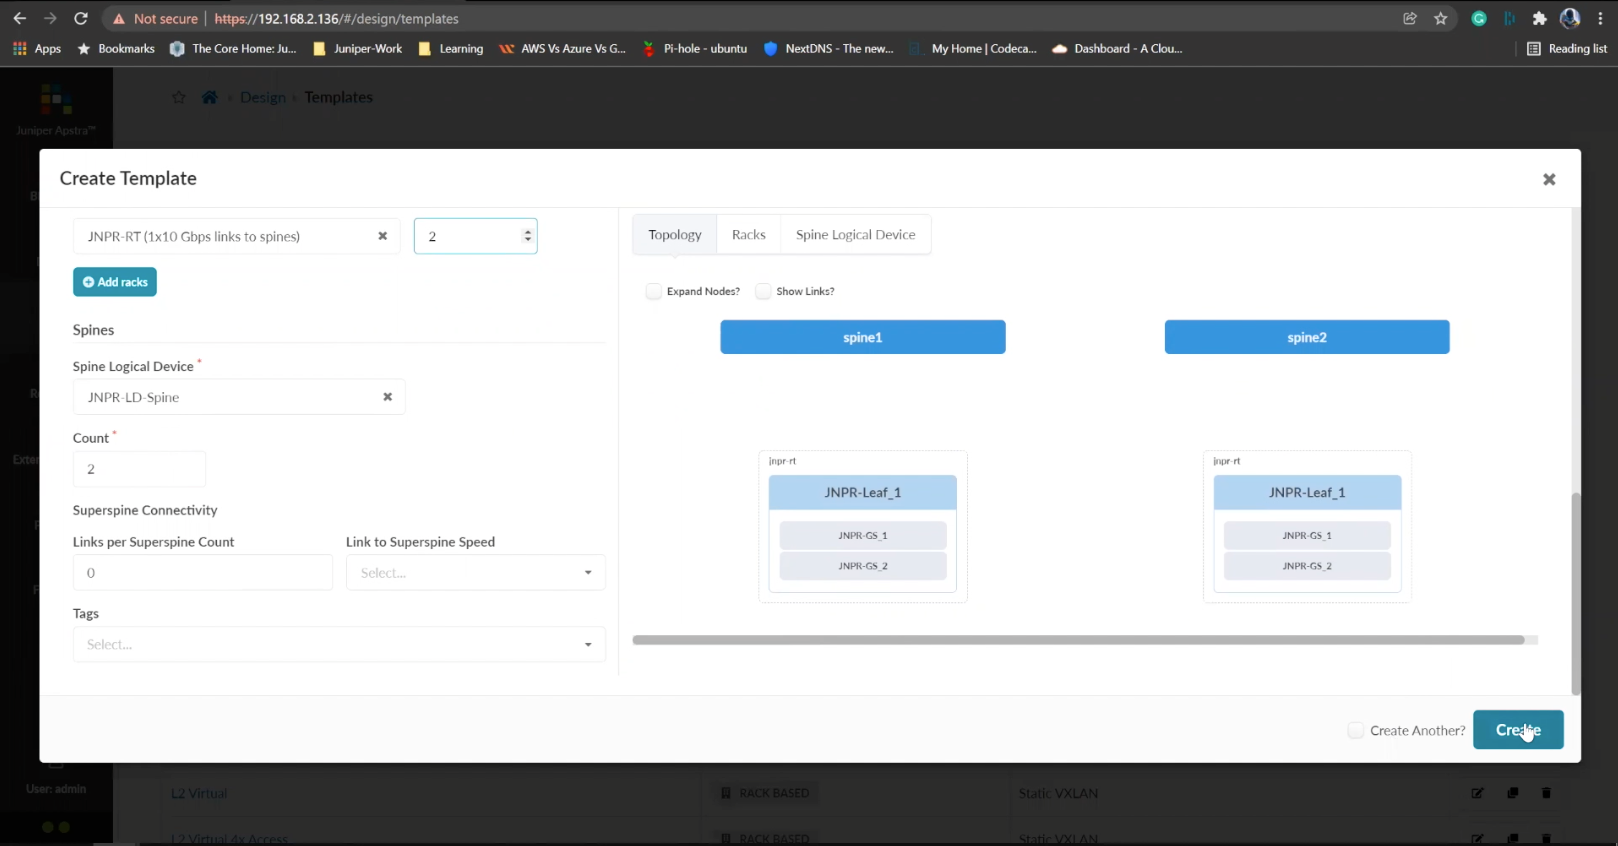
Click on create to complete the configuration
- %3Cp%3EWe%20have%20our%20switches%20already%20managed%20by%20Apstra%2C%20a%20series%20of%20Juniper%20virtual%20QFX%20switches%20in%20this%20example.%20We%20wil%20start%20by%20creating%20logical%20devices.%3C/p%3E
- Click%20on%20logical%20devices%20option%20from%20the%20menu
- %3Cp%3E%3Cspan%20style%3D%22font-size%3A%2013px%3B%22%3ETo%20start%20the%20process%2C%20we%20will%20creat%20a%20leaf%20device%20first.%20%3C/span%3E%3C/p%3E%0A%3Cp%3E%3Cspan%20style%3D%22font-size%3A%2015px%3B%22%3EPlease%20Note%3A%20%3C/span%3E%3C/p%3E%0A%3Cp%3E%3Cspan%20style%3D%22font-size%3A%2013px%3B%22%3EThe%20same%20process%20can%20be%20replicated%20for%20a%20spine%20logical%20device%20too.%20For%20the%20purpose%20of%20this%20demo%2C%20we%20will%20skip%20the%20spine%20logical%20device%20creation%20process.%3C/span%3E%3C/p%3E
- Enter a name for the logical device
- Choose the number of ports
- Create a port group
- Click to finish the creation
- %3Cp%3E%3Cspan%20style%3D%22font-size%3A%2013px%3B%22%3E%3Cspan%20style%3D%22font-family%3A%20Calibri%2C%20sans-serif%3B%22%3ENext%20we%20will%20set%20up%20interface%20maps.%20An%20Interface%20map%20maps%20the%20logical%20device%20to%20the%20actual%20physical%20device.%20ie%3A%20a%20specific%20switch%20and%20model%20that%20is%20used%20in%20the%20actual%20typology.%3C/span%3E%3C/span%3E%3C/p%3E
- Click on the Interface maps option from the menu
- Click to create a new interface map
- Add a name
- Choose a logical device that will be mapped to a physical entity
- Choose from the drop down list
- Choose a device profile from the drop down menu
- Choose the Juniper QFX device as shown
- Choose the interfaces
- %3Cp%3E%3Cspan%20style%3D%22font-size%3A%2013px%3B%22%3EWe%20will%20repeat%20the%20same%20process%20for%20the%20spine%20devices%20defined%20earlier.%20We%20will%20be%20mapping%20it%20to%20the%20Juniper%20QFX%20devices%20as%20well.%3C/span%3E%3C/p%3E
- Next we will add a few racks
- Click on the rack type from the menu
- Click to create a rack type
- Add a name for the new rack
- Name the leaf switch
- Choose a logical leaf device that was previously defined
- Choose the desired logical device from the list
- Click to add a new Generic system
- Add a name to the Generic System Group
- Enter a desired name
- FInish the process of creating a new rack
- Let us add another generic system
- Click to edit the rack type
- Navigate to the leafs tab
- Click on generic systems tab
- Up the Generic system count to 2 and then update the rack type
- Bring everything together in the next steps
- Choose templates from the menu
- Click to create a template
- Add a name first
- Enter more details and then scroll down
- To choose a rack type click on the drop down menu
- Choose the rack type that we created earlier from the menu
- Click to select the desired spine logical device
- Choose the logical spine device from the list
- Enter the desired count
- Click on create to complete the configuration
- Next step is to create a blueprint for the entire Datacenter fabric
- Click to create a new blueprint
- Enter a name for the Blueprint
- Choose the template from the drop down menu
- Choose the desired template
- Click to display the links
- Click on create to finish the process
- Click to view the Blueprint
- Click on staged
- Select the spines to allocate an Autonomous ID
- Click on the edit icon
- Choose the IP address from the Pool
- Save the configuration
- Repeat the same process for the other leaf devices
- Next we need to configure the interface mappings
- Click on one of the spine devices
- Click on the edit icon
- Choose the interface mappings from the the drop down menu
- Make the desired selection
- Click to update the assignments
- Click to assign system IDs next
- Click on the Assigned System IDs tab
- Click on the edit icon
- Choose from the list of System IDs
- Finalize the assignments
- Click on links
- Recitify any cabling errors as shown automatically
- Update the cabling assingments
- Notice the success message once the cabling mapping is sorted out
- Click on commit
- Add the description and click on the commit button
- Success
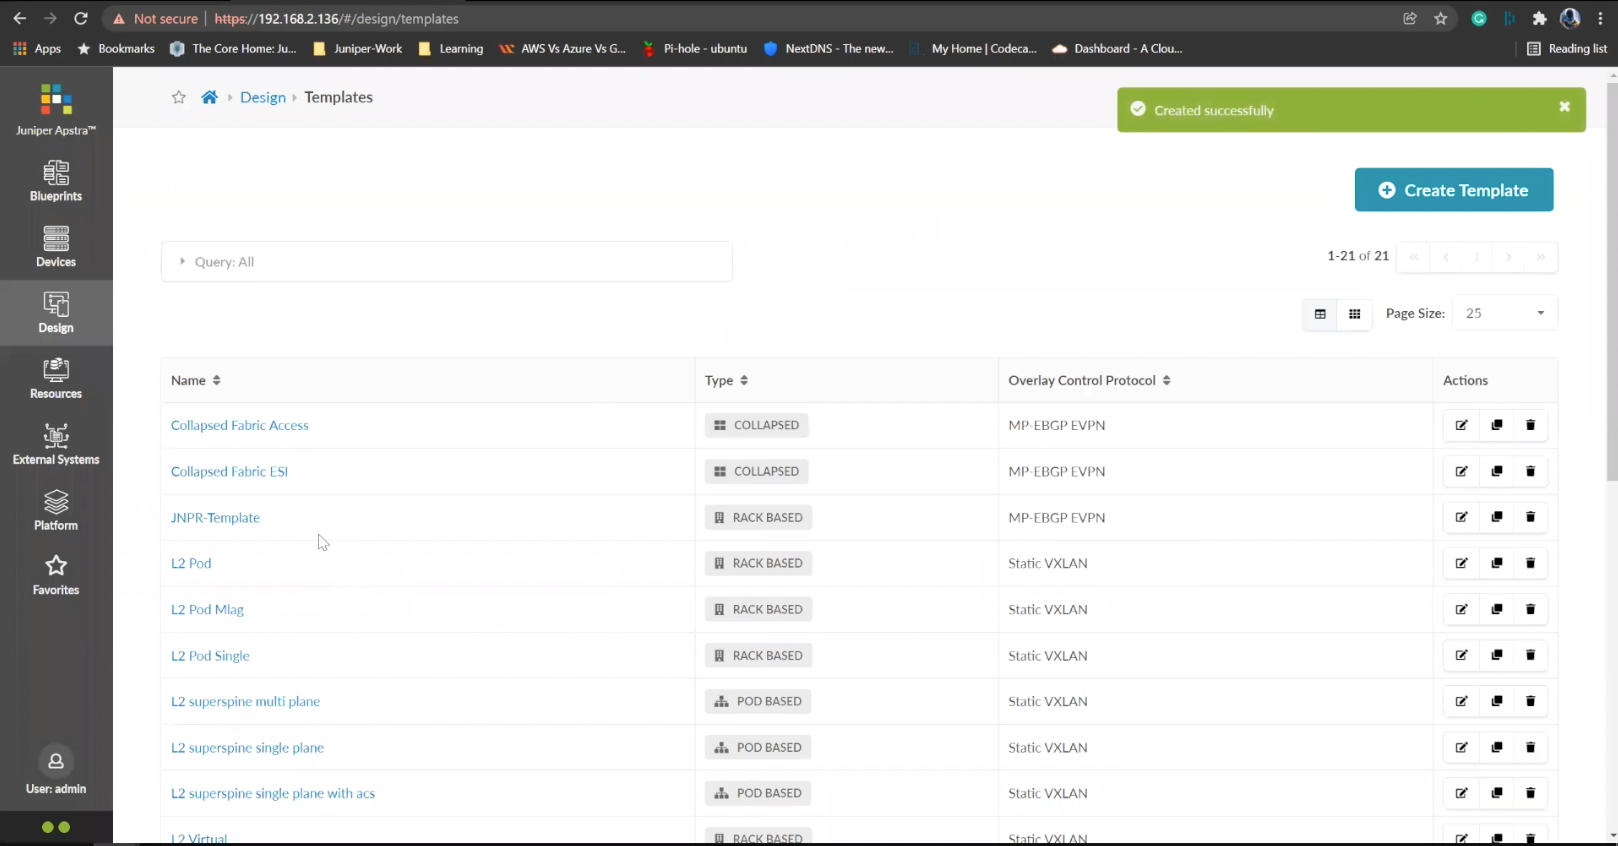
Next step is to create a blueprint for the entire Datacenter fabric
- %3Cp%3EWe%20have%20our%20switches%20already%20managed%20by%20Apstra%2C%20a%20series%20of%20Juniper%20virtual%20QFX%20switches%20in%20this%20example.%20We%20wil%20start%20by%20creating%20logical%20devices.%3C/p%3E
- Click%20on%20logical%20devices%20option%20from%20the%20menu
- %3Cp%3E%3Cspan%20style%3D%22font-size%3A%2013px%3B%22%3ETo%20start%20the%20process%2C%20we%20will%20creat%20a%20leaf%20device%20first.%20%3C/span%3E%3C/p%3E%0A%3Cp%3E%3Cspan%20style%3D%22font-size%3A%2015px%3B%22%3EPlease%20Note%3A%20%3C/span%3E%3C/p%3E%0A%3Cp%3E%3Cspan%20style%3D%22font-size%3A%2013px%3B%22%3EThe%20same%20process%20can%20be%20replicated%20for%20a%20spine%20logical%20device%20too.%20For%20the%20purpose%20of%20this%20demo%2C%20we%20will%20skip%20the%20spine%20logical%20device%20creation%20process.%3C/span%3E%3C/p%3E
- Enter a name for the logical device
- Choose the number of ports
- Create a port group
- Click to finish the creation
- %3Cp%3E%3Cspan%20style%3D%22font-size%3A%2013px%3B%22%3E%3Cspan%20style%3D%22font-family%3A%20Calibri%2C%20sans-serif%3B%22%3ENext%20we%20will%20set%20up%20interface%20maps.%20An%20Interface%20map%20maps%20the%20logical%20device%20to%20the%20actual%20physical%20device.%20ie%3A%20a%20specific%20switch%20and%20model%20that%20is%20used%20in%20the%20actual%20typology.%3C/span%3E%3C/span%3E%3C/p%3E
- Click on the Interface maps option from the menu
- Click to create a new interface map
- Add a name
- Choose a logical device that will be mapped to a physical entity
- Choose from the drop down list
- Choose a device profile from the drop down menu
- Choose the Juniper QFX device as shown
- Choose the interfaces
- %3Cp%3E%3Cspan%20style%3D%22font-size%3A%2013px%3B%22%3EWe%20will%20repeat%20the%20same%20process%20for%20the%20spine%20devices%20defined%20earlier.%20We%20will%20be%20mapping%20it%20to%20the%20Juniper%20QFX%20devices%20as%20well.%3C/span%3E%3C/p%3E
- Next we will add a few racks
- Click on the rack type from the menu
- Click to create a rack type
- Add a name for the new rack
- Name the leaf switch
- Choose a logical leaf device that was previously defined
- Choose the desired logical device from the list
- Click to add a new Generic system
- Add a name to the Generic System Group
- Enter a desired name
- FInish the process of creating a new rack
- Let us add another generic system
- Click to edit the rack type
- Navigate to the leafs tab
- Click on generic systems tab
- Up the Generic system count to 2 and then update the rack type
- Bring everything together in the next steps
- Choose templates from the menu
- Click to create a template
- Add a name first
- Enter more details and then scroll down
- To choose a rack type click on the drop down menu
- Choose the rack type that we created earlier from the menu
- Click to select the desired spine logical device
- Choose the logical spine device from the list
- Enter the desired count
- Click on create to complete the configuration
- Next step is to create a blueprint for the entire Datacenter fabric
- Click to create a new blueprint
- Enter a name for the Blueprint
- Choose the template from the drop down menu
- Choose the desired template
- Click to display the links
- Click on create to finish the process
- Click to view the Blueprint
- Click on staged
- Select the spines to allocate an Autonomous ID
- Click on the edit icon
- Choose the IP address from the Pool
- Save the configuration
- Repeat the same process for the other leaf devices
- Next we need to configure the interface mappings
- Click on one of the spine devices
- Click on the edit icon
- Choose the interface mappings from the the drop down menu
- Make the desired selection
- Click to update the assignments
- Click to assign system IDs next
- Click on the Assigned System IDs tab
- Click on the edit icon
- Choose from the list of System IDs
- Finalize the assignments
- Click on links
- Recitify any cabling errors as shown automatically
- Update the cabling assingments
- Notice the success message once the cabling mapping is sorted out
- Click on commit
- Add the description and click on the commit button
- Success
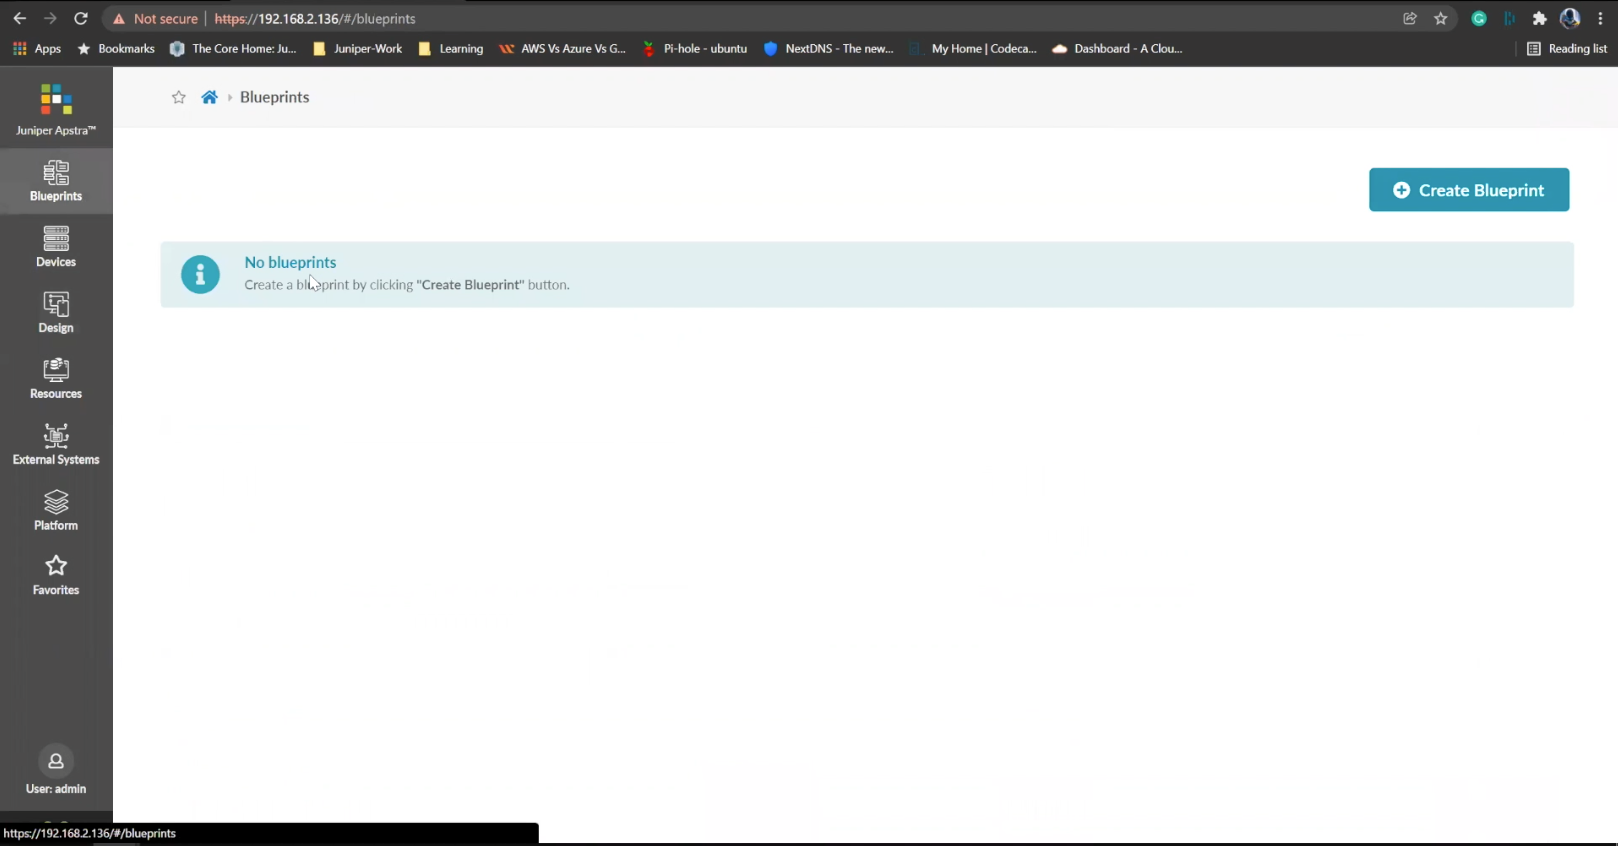
Click to create a new blueprint
- %3Cp%3EWe%20have%20our%20switches%20already%20managed%20by%20Apstra%2C%20a%20series%20of%20Juniper%20virtual%20QFX%20switches%20in%20this%20example.%20We%20wil%20start%20by%20creating%20logical%20devices.%3C/p%3E
- Click%20on%20logical%20devices%20option%20from%20the%20menu
- %3Cp%3E%3Cspan%20style%3D%22font-size%3A%2013px%3B%22%3ETo%20start%20the%20process%2C%20we%20will%20creat%20a%20leaf%20device%20first.%20%3C/span%3E%3C/p%3E%0A%3Cp%3E%3Cspan%20style%3D%22font-size%3A%2015px%3B%22%3EPlease%20Note%3A%20%3C/span%3E%3C/p%3E%0A%3Cp%3E%3Cspan%20style%3D%22font-size%3A%2013px%3B%22%3EThe%20same%20process%20can%20be%20replicated%20for%20a%20spine%20logical%20device%20too.%20For%20the%20purpose%20of%20this%20demo%2C%20we%20will%20skip%20the%20spine%20logical%20device%20creation%20process.%3C/span%3E%3C/p%3E
- Enter a name for the logical device
- Choose the number of ports
- Create a port group
- Click to finish the creation
- %3Cp%3E%3Cspan%20style%3D%22font-size%3A%2013px%3B%22%3E%3Cspan%20style%3D%22font-family%3A%20Calibri%2C%20sans-serif%3B%22%3ENext%20we%20will%20set%20up%20interface%20maps.%20An%20Interface%20map%20maps%20the%20logical%20device%20to%20the%20actual%20physical%20device.%20ie%3A%20a%20specific%20switch%20and%20model%20that%20is%20used%20in%20the%20actual%20typology.%3C/span%3E%3C/span%3E%3C/p%3E
- Click on the Interface maps option from the menu
- Click to create a new interface map
- Add a name
- Choose a logical device that will be mapped to a physical entity
- Choose from the drop down list
- Choose a device profile from the drop down menu
- Choose the Juniper QFX device as shown
- Choose the interfaces
- %3Cp%3E%3Cspan%20style%3D%22font-size%3A%2013px%3B%22%3EWe%20will%20repeat%20the%20same%20process%20for%20the%20spine%20devices%20defined%20earlier.%20We%20will%20be%20mapping%20it%20to%20the%20Juniper%20QFX%20devices%20as%20well.%3C/span%3E%3C/p%3E
- Next we will add a few racks
- Click on the rack type from the menu
- Click to create a rack type
- Add a name for the new rack
- Name the leaf switch
- Choose a logical leaf device that was previously defined
- Choose the desired logical device from the list
- Click to add a new Generic system
- Add a name to the Generic System Group
- Enter a desired name
- FInish the process of creating a new rack
- Let us add another generic system
- Click to edit the rack type
- Navigate to the leafs tab
- Click on generic systems tab
- Up the Generic system count to 2 and then update the rack type
- Bring everything together in the next steps
- Choose templates from the menu
- Click to create a template
- Add a name first
- Enter more details and then scroll down
- To choose a rack type click on the drop down menu
- Choose the rack type that we created earlier from the menu
- Click to select the desired spine logical device
- Choose the logical spine device from the list
- Enter the desired count
- Click on create to complete the configuration
- Next step is to create a blueprint for the entire Datacenter fabric
- Click to create a new blueprint
- Enter a name for the Blueprint
- Choose the template from the drop down menu
- Choose the desired template
- Click to display the links
- Click on create to finish the process
- Click to view the Blueprint
- Click on staged
- Select the spines to allocate an Autonomous ID
- Click on the edit icon
- Choose the IP address from the Pool
- Save the configuration
- Repeat the same process for the other leaf devices
- Next we need to configure the interface mappings
- Click on one of the spine devices
- Click on the edit icon
- Choose the interface mappings from the the drop down menu
- Make the desired selection
- Click to update the assignments
- Click to assign system IDs next
- Click on the Assigned System IDs tab
- Click on the edit icon
- Choose from the list of System IDs
- Finalize the assignments
- Click on links
- Recitify any cabling errors as shown automatically
- Update the cabling assingments
- Notice the success message once the cabling mapping is sorted out
- Click on commit
- Add the description and click on the commit button
- Success
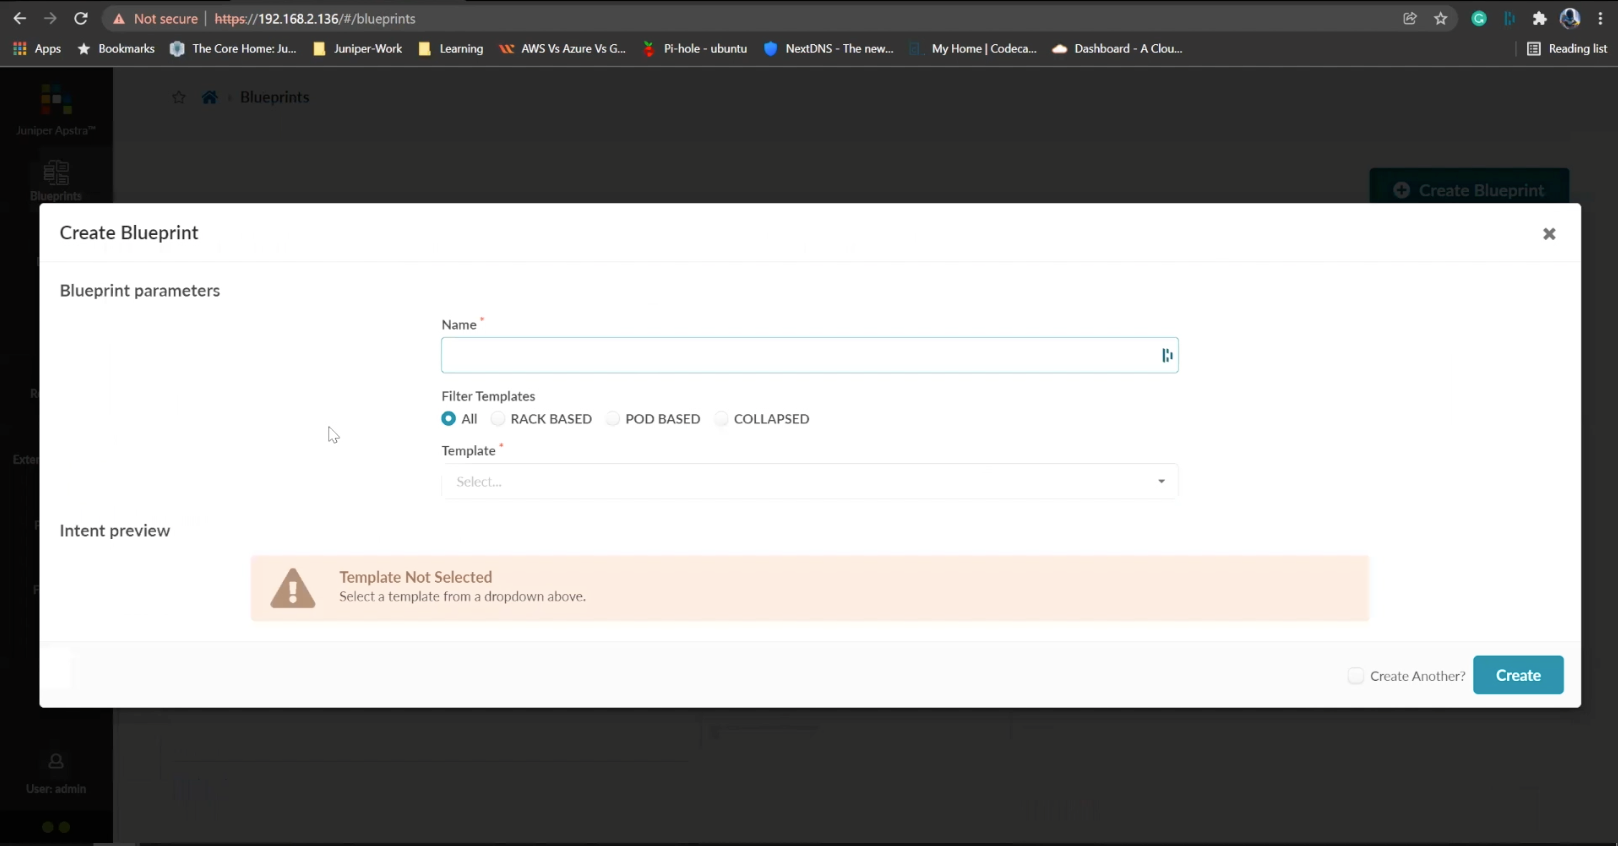
Enter a name for the Blueprint
- %3Cp%3EWe%20have%20our%20switches%20already%20managed%20by%20Apstra%2C%20a%20series%20of%20Juniper%20virtual%20QFX%20switches%20in%20this%20example.%20We%20wil%20start%20by%20creating%20logical%20devices.%3C/p%3E
- Click%20on%20logical%20devices%20option%20from%20the%20menu
- %3Cp%3E%3Cspan%20style%3D%22font-size%3A%2013px%3B%22%3ETo%20start%20the%20process%2C%20we%20will%20creat%20a%20leaf%20device%20first.%20%3C/span%3E%3C/p%3E%0A%3Cp%3E%3Cspan%20style%3D%22font-size%3A%2015px%3B%22%3EPlease%20Note%3A%20%3C/span%3E%3C/p%3E%0A%3Cp%3E%3Cspan%20style%3D%22font-size%3A%2013px%3B%22%3EThe%20same%20process%20can%20be%20replicated%20for%20a%20spine%20logical%20device%20too.%20For%20the%20purpose%20of%20this%20demo%2C%20we%20will%20skip%20the%20spine%20logical%20device%20creation%20process.%3C/span%3E%3C/p%3E
- Enter a name for the logical device
- Choose the number of ports
- Create a port group
- Click to finish the creation
- %3Cp%3E%3Cspan%20style%3D%22font-size%3A%2013px%3B%22%3E%3Cspan%20style%3D%22font-family%3A%20Calibri%2C%20sans-serif%3B%22%3ENext%20we%20will%20set%20up%20interface%20maps.%20An%20Interface%20map%20maps%20the%20logical%20device%20to%20the%20actual%20physical%20device.%20ie%3A%20a%20specific%20switch%20and%20model%20that%20is%20used%20in%20the%20actual%20typology.%3C/span%3E%3C/span%3E%3C/p%3E
- Click on the Interface maps option from the menu
- Click to create a new interface map
- Add a name
- Choose a logical device that will be mapped to a physical entity
- Choose from the drop down list
- Choose a device profile from the drop down menu
- Choose the Juniper QFX device as shown
- Choose the interfaces
- %3Cp%3E%3Cspan%20style%3D%22font-size%3A%2013px%3B%22%3EWe%20will%20repeat%20the%20same%20process%20for%20the%20spine%20devices%20defined%20earlier.%20We%20will%20be%20mapping%20it%20to%20the%20Juniper%20QFX%20devices%20as%20well.%3C/span%3E%3C/p%3E
- Next we will add a few racks
- Click on the rack type from the menu
- Click to create a rack type
- Add a name for the new rack
- Name the leaf switch
- Choose a logical leaf device that was previously defined
- Choose the desired logical device from the list
- Click to add a new Generic system
- Add a name to the Generic System Group
- Enter a desired name
- FInish the process of creating a new rack
- Let us add another generic system
- Click to edit the rack type
- Navigate to the leafs tab
- Click on generic systems tab
- Up the Generic system count to 2 and then update the rack type
- Bring everything together in the next steps
- Choose templates from the menu
- Click to create a template
- Add a name first
- Enter more details and then scroll down
- To choose a rack type click on the drop down menu
- Choose the rack type that we created earlier from the menu
- Click to select the desired spine logical device
- Choose the logical spine device from the list
- Enter the desired count
- Click on create to complete the configuration
- Next step is to create a blueprint for the entire Datacenter fabric
- Click to create a new blueprint
- Enter a name for the Blueprint
- Choose the template from the drop down menu
- Choose the desired template
- Click to display the links
- Click on create to finish the process
- Click to view the Blueprint
- Click on staged
- Select the spines to allocate an Autonomous ID
- Click on the edit icon
- Choose the IP address from the Pool
- Save the configuration
- Repeat the same process for the other leaf devices
- Next we need to configure the interface mappings
- Click on one of the spine devices
- Click on the edit icon
- Choose the interface mappings from the the drop down menu
- Make the desired selection
- Click to update the assignments
- Click to assign system IDs next
- Click on the Assigned System IDs tab
- Click on the edit icon
- Choose from the list of System IDs
- Finalize the assignments
- Click on links
- Recitify any cabling errors as shown automatically
- Update the cabling assingments
- Notice the success message once the cabling mapping is sorted out
- Click on commit
- Add the description and click on the commit button
- Success
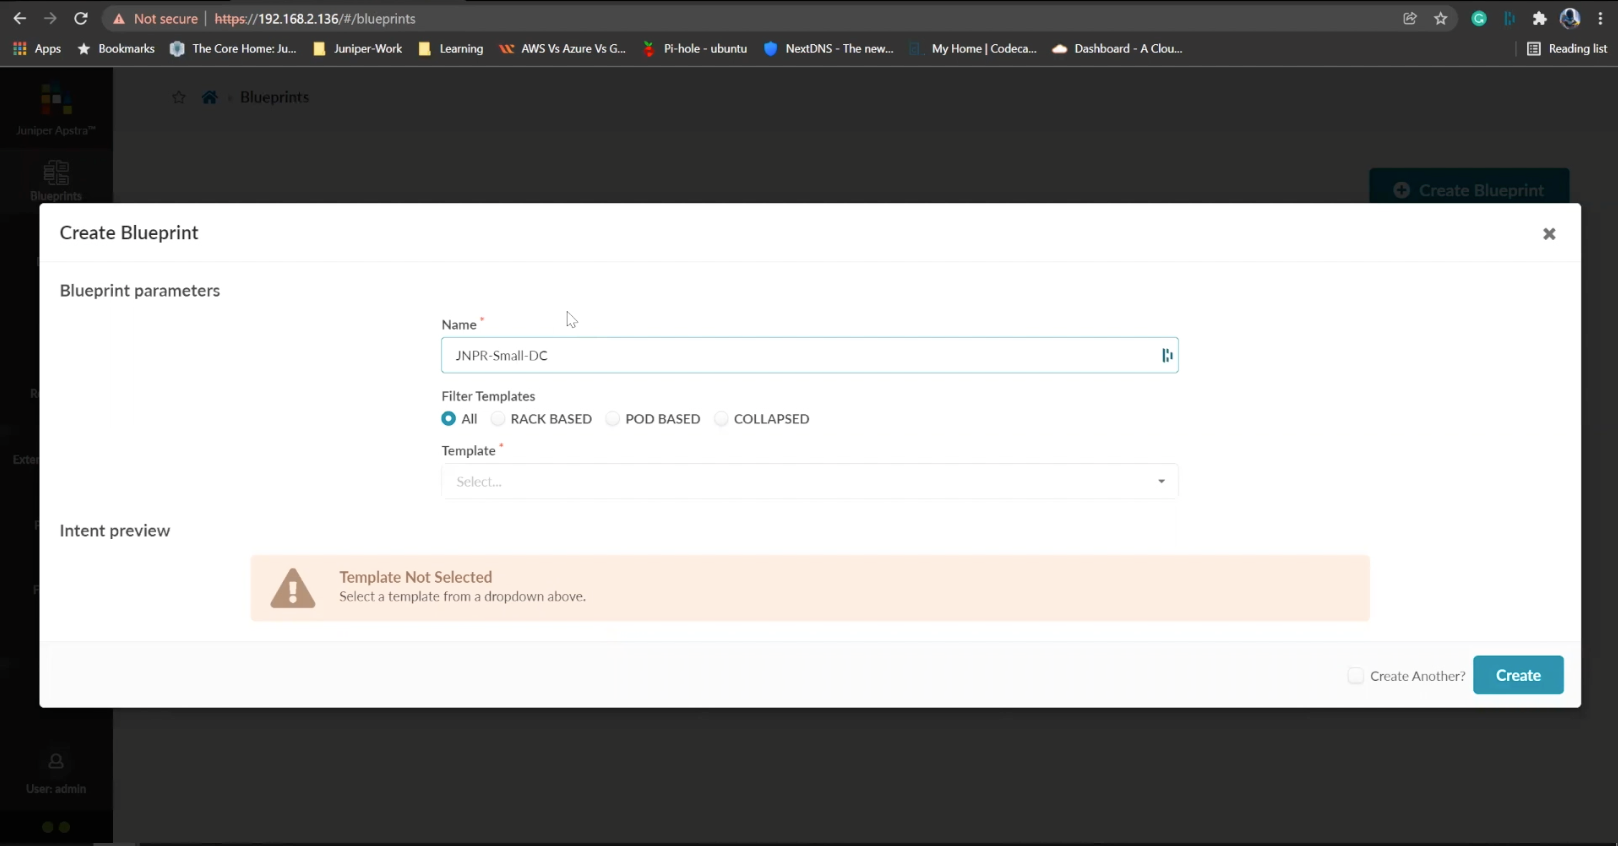
Choose the template from the drop down menu
- %3Cp%3EWe%20have%20our%20switches%20already%20managed%20by%20Apstra%2C%20a%20series%20of%20Juniper%20virtual%20QFX%20switches%20in%20this%20example.%20We%20wil%20start%20by%20creating%20logical%20devices.%3C/p%3E
- Click%20on%20logical%20devices%20option%20from%20the%20menu
- %3Cp%3E%3Cspan%20style%3D%22font-size%3A%2013px%3B%22%3ETo%20start%20the%20process%2C%20we%20will%20creat%20a%20leaf%20device%20first.%20%3C/span%3E%3C/p%3E%0A%3Cp%3E%3Cspan%20style%3D%22font-size%3A%2015px%3B%22%3EPlease%20Note%3A%20%3C/span%3E%3C/p%3E%0A%3Cp%3E%3Cspan%20style%3D%22font-size%3A%2013px%3B%22%3EThe%20same%20process%20can%20be%20replicated%20for%20a%20spine%20logical%20device%20too.%20For%20the%20purpose%20of%20this%20demo%2C%20we%20will%20skip%20the%20spine%20logical%20device%20creation%20process.%3C/span%3E%3C/p%3E
- Enter a name for the logical device
- Choose the number of ports
- Create a port group
- Click to finish the creation
- %3Cp%3E%3Cspan%20style%3D%22font-size%3A%2013px%3B%22%3E%3Cspan%20style%3D%22font-family%3A%20Calibri%2C%20sans-serif%3B%22%3ENext%20we%20will%20set%20up%20interface%20maps.%20An%20Interface%20map%20maps%20the%20logical%20device%20to%20the%20actual%20physical%20device.%20ie%3A%20a%20specific%20switch%20and%20model%20that%20is%20used%20in%20the%20actual%20typology.%3C/span%3E%3C/span%3E%3C/p%3E
- Click on the Interface maps option from the menu
- Click to create a new interface map
- Add a name
- Choose a logical device that will be mapped to a physical entity
- Choose from the drop down list
- Choose a device profile from the drop down menu
- Choose the Juniper QFX device as shown
- Choose the interfaces
- %3Cp%3E%3Cspan%20style%3D%22font-size%3A%2013px%3B%22%3EWe%20will%20repeat%20the%20same%20process%20for%20the%20spine%20devices%20defined%20earlier.%20We%20will%20be%20mapping%20it%20to%20the%20Juniper%20QFX%20devices%20as%20well.%3C/span%3E%3C/p%3E
- Next we will add a few racks
- Click on the rack type from the menu
- Click to create a rack type
- Add a name for the new rack
- Name the leaf switch
- Choose a logical leaf device that was previously defined
- Choose the desired logical device from the list
- Click to add a new Generic system
- Add a name to the Generic System Group
- Enter a desired name
- FInish the process of creating a new rack
- Let us add another generic system
- Click to edit the rack type
- Navigate to the leafs tab
- Click on generic systems tab
- Up the Generic system count to 2 and then update the rack type
- Bring everything together in the next steps
- Choose templates from the menu
- Click to create a template
- Add a name first
- Enter more details and then scroll down
- To choose a rack type click on the drop down menu
- Choose the rack type that we created earlier from the menu
- Click to select the desired spine logical device
- Choose the logical spine device from the list
- Enter the desired count
- Click on create to complete the configuration
- Next step is to create a blueprint for the entire Datacenter fabric
- Click to create a new blueprint
- Enter a name for the Blueprint
- Choose the template from the drop down menu
- Choose the desired template
- Click to display the links
- Click on create to finish the process
- Click to view the Blueprint
- Click on staged
- Select the spines to allocate an Autonomous ID
- Click on the edit icon
- Choose the IP address from the Pool
- Save the configuration
- Repeat the same process for the other leaf devices
- Next we need to configure the interface mappings
- Click on one of the spine devices
- Click on the edit icon
- Choose the interface mappings from the the drop down menu
- Make the desired selection
- Click to update the assignments
- Click to assign system IDs next
- Click on the Assigned System IDs tab
- Click on the edit icon
- Choose from the list of System IDs
- Finalize the assignments
- Click on links
- Recitify any cabling errors as shown automatically
- Update the cabling assingments
- Notice the success message once the cabling mapping is sorted out
- Click on commit
- Add the description and click on the commit button
- Success
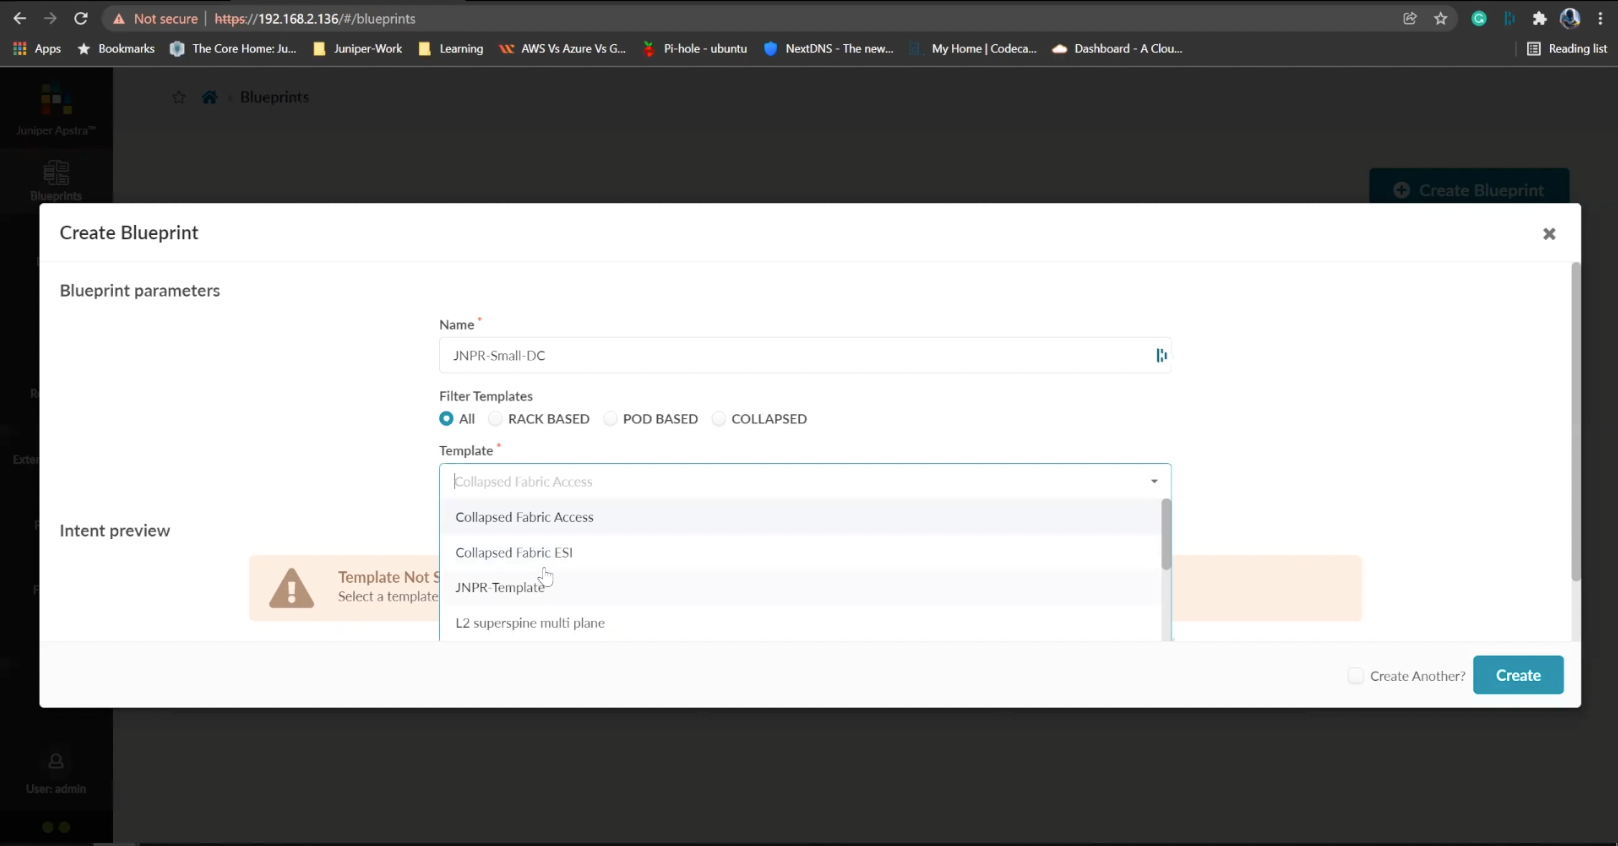
Choose the desired template
- %3Cp%3EWe%20have%20our%20switches%20already%20managed%20by%20Apstra%2C%20a%20series%20of%20Juniper%20virtual%20QFX%20switches%20in%20this%20example.%20We%20wil%20start%20by%20creating%20logical%20devices.%3C/p%3E
- Click%20on%20logical%20devices%20option%20from%20the%20menu
- %3Cp%3E%3Cspan%20style%3D%22font-size%3A%2013px%3B%22%3ETo%20start%20the%20process%2C%20we%20will%20creat%20a%20leaf%20device%20first.%20%3C/span%3E%3C/p%3E%0A%3Cp%3E%3Cspan%20style%3D%22font-size%3A%2015px%3B%22%3EPlease%20Note%3A%20%3C/span%3E%3C/p%3E%0A%3Cp%3E%3Cspan%20style%3D%22font-size%3A%2013px%3B%22%3EThe%20same%20process%20can%20be%20replicated%20for%20a%20spine%20logical%20device%20too.%20For%20the%20purpose%20of%20this%20demo%2C%20we%20will%20skip%20the%20spine%20logical%20device%20creation%20process.%3C/span%3E%3C/p%3E
- Enter a name for the logical device
- Choose the number of ports
- Create a port group
- Click to finish the creation
- %3Cp%3E%3Cspan%20style%3D%22font-size%3A%2013px%3B%22%3E%3Cspan%20style%3D%22font-family%3A%20Calibri%2C%20sans-serif%3B%22%3ENext%20we%20will%20set%20up%20interface%20maps.%20An%20Interface%20map%20maps%20the%20logical%20device%20to%20the%20actual%20physical%20device.%20ie%3A%20a%20specific%20switch%20and%20model%20that%20is%20used%20in%20the%20actual%20typology.%3C/span%3E%3C/span%3E%3C/p%3E
- Click on the Interface maps option from the menu
- Click to create a new interface map
- Add a name
- Choose a logical device that will be mapped to a physical entity
- Choose from the drop down list
- Choose a device profile from the drop down menu
- Choose the Juniper QFX device as shown
- Choose the interfaces
- %3Cp%3E%3Cspan%20style%3D%22font-size%3A%2013px%3B%22%3EWe%20will%20repeat%20the%20same%20process%20for%20the%20spine%20devices%20defined%20earlier.%20We%20will%20be%20mapping%20it%20to%20the%20Juniper%20QFX%20devices%20as%20well.%3C/span%3E%3C/p%3E
- Next we will add a few racks
- Click on the rack type from the menu
- Click to create a rack type
- Add a name for the new rack
- Name the leaf switch
- Choose a logical leaf device that was previously defined
- Choose the desired logical device from the list
- Click to add a new Generic system
- Add a name to the Generic System Group
- Enter a desired name
- FInish the process of creating a new rack
- Let us add another generic system
- Click to edit the rack type
- Navigate to the leafs tab
- Click on generic systems tab
- Up the Generic system count to 2 and then update the rack type
- Bring everything together in the next steps
- Choose templates from the menu
- Click to create a template
- Add a name first
- Enter more details and then scroll down
- To choose a rack type click on the drop down menu
- Choose the rack type that we created earlier from the menu
- Click to select the desired spine logical device
- Choose the logical spine device from the list
- Enter the desired count
- Click on create to complete the configuration
- Next step is to create a blueprint for the entire Datacenter fabric
- Click to create a new blueprint
- Enter a name for the Blueprint
- Choose the template from the drop down menu
- Choose the desired template
- Click to display the links
- Click on create to finish the process
- Click to view the Blueprint
- Click on staged
- Select the spines to allocate an Autonomous ID
- Click on the edit icon
- Choose the IP address from the Pool
- Save the configuration
- Repeat the same process for the other leaf devices
- Next we need to configure the interface mappings
- Click on one of the spine devices
- Click on the edit icon
- Choose the interface mappings from the the drop down menu
- Make the desired selection
- Click to update the assignments
- Click to assign system IDs next
- Click on the Assigned System IDs tab
- Click on the edit icon
- Choose from the list of System IDs
- Finalize the assignments
- Click on links
- Recitify any cabling errors as shown automatically
- Update the cabling assingments
- Notice the success message once the cabling mapping is sorted out
- Click on commit
- Add the description and click on the commit button
- Success
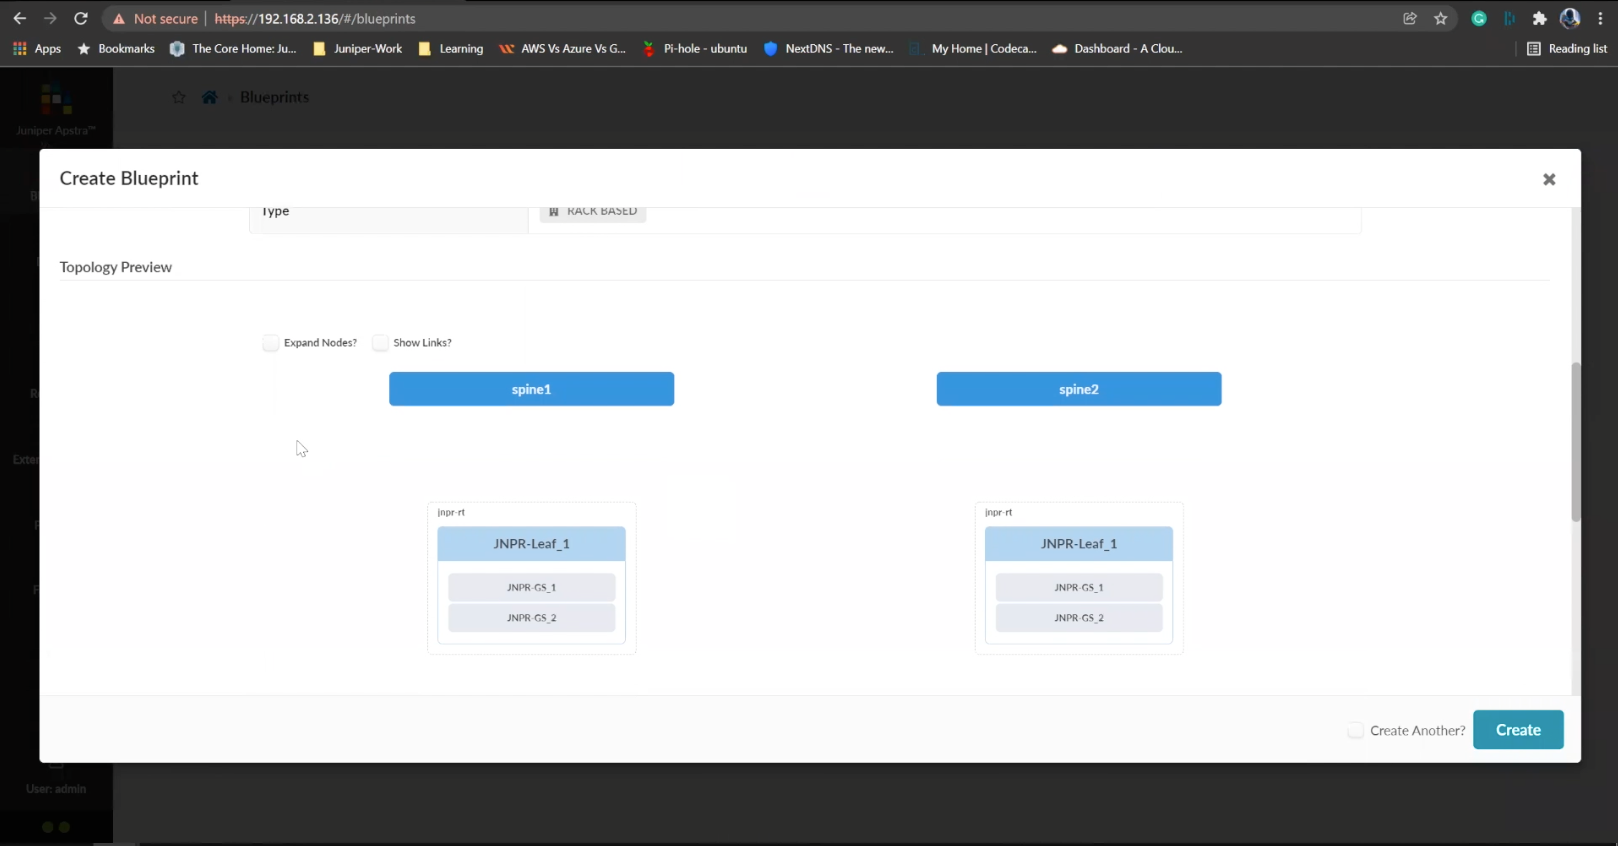
Click to display the links
- %3Cp%3EWe%20have%20our%20switches%20already%20managed%20by%20Apstra%2C%20a%20series%20of%20Juniper%20virtual%20QFX%20switches%20in%20this%20example.%20We%20wil%20start%20by%20creating%20logical%20devices.%3C/p%3E
- Click%20on%20logical%20devices%20option%20from%20the%20menu
- %3Cp%3E%3Cspan%20style%3D%22font-size%3A%2013px%3B%22%3ETo%20start%20the%20process%2C%20we%20will%20creat%20a%20leaf%20device%20first.%20%3C/span%3E%3C/p%3E%0A%3Cp%3E%3Cspan%20style%3D%22font-size%3A%2015px%3B%22%3EPlease%20Note%3A%20%3C/span%3E%3C/p%3E%0A%3Cp%3E%3Cspan%20style%3D%22font-size%3A%2013px%3B%22%3EThe%20same%20process%20can%20be%20replicated%20for%20a%20spine%20logical%20device%20too.%20For%20the%20purpose%20of%20this%20demo%2C%20we%20will%20skip%20the%20spine%20logical%20device%20creation%20process.%3C/span%3E%3C/p%3E
- Enter a name for the logical device
- Choose the number of ports
- Create a port group
- Click to finish the creation
- %3Cp%3E%3Cspan%20style%3D%22font-size%3A%2013px%3B%22%3E%3Cspan%20style%3D%22font-family%3A%20Calibri%2C%20sans-serif%3B%22%3ENext%20we%20will%20set%20up%20interface%20maps.%20An%20Interface%20map%20maps%20the%20logical%20device%20to%20the%20actual%20physical%20device.%20ie%3A%20a%20specific%20switch%20and%20model%20that%20is%20used%20in%20the%20actual%20typology.%3C/span%3E%3C/span%3E%3C/p%3E
- Click on the Interface maps option from the menu
- Click to create a new interface map
- Add a name
- Choose a logical device that will be mapped to a physical entity
- Choose from the drop down list
- Choose a device profile from the drop down menu
- Choose the Juniper QFX device as shown
- Choose the interfaces
- %3Cp%3E%3Cspan%20style%3D%22font-size%3A%2013px%3B%22%3EWe%20will%20repeat%20the%20same%20process%20for%20the%20spine%20devices%20defined%20earlier.%20We%20will%20be%20mapping%20it%20to%20the%20Juniper%20QFX%20devices%20as%20well.%3C/span%3E%3C/p%3E
- Next we will add a few racks
- Click on the rack type from the menu
- Click to create a rack type
- Add a name for the new rack
- Name the leaf switch
- Choose a logical leaf device that was previously defined
- Choose the desired logical device from the list
- Click to add a new Generic system
- Add a name to the Generic System Group
- Enter a desired name
- FInish the process of creating a new rack
- Let us add another generic system
- Click to edit the rack type
- Navigate to the leafs tab
- Click on generic systems tab
- Up the Generic system count to 2 and then update the rack type
- Bring everything together in the next steps
- Choose templates from the menu
- Click to create a template
- Add a name first
- Enter more details and then scroll down
- To choose a rack type click on the drop down menu
- Choose the rack type that we created earlier from the menu
- Click to select the desired spine logical device
- Choose the logical spine device from the list
- Enter the desired count
- Click on create to complete the configuration
- Next step is to create a blueprint for the entire Datacenter fabric
- Click to create a new blueprint
- Enter a name for the Blueprint
- Choose the template from the drop down menu
- Choose the desired template
- Click to display the links
- Click on create to finish the process
- Click to view the Blueprint
- Click on staged
- Select the spines to allocate an Autonomous ID
- Click on the edit icon
- Choose the IP address from the Pool
- Save the configuration
- Repeat the same process for the other leaf devices
- Next we need to configure the interface mappings
- Click on one of the spine devices
- Click on the edit icon
- Choose the interface mappings from the the drop down menu
- Make the desired selection
- Click to update the assignments
- Click to assign system IDs next
- Click on the Assigned System IDs tab
- Click on the edit icon
- Choose from the list of System IDs
- Finalize the assignments
- Click on links
- Recitify any cabling errors as shown automatically
- Update the cabling assingments
- Notice the success message once the cabling mapping is sorted out
- Click on commit
- Add the description and click on the commit button
- Success
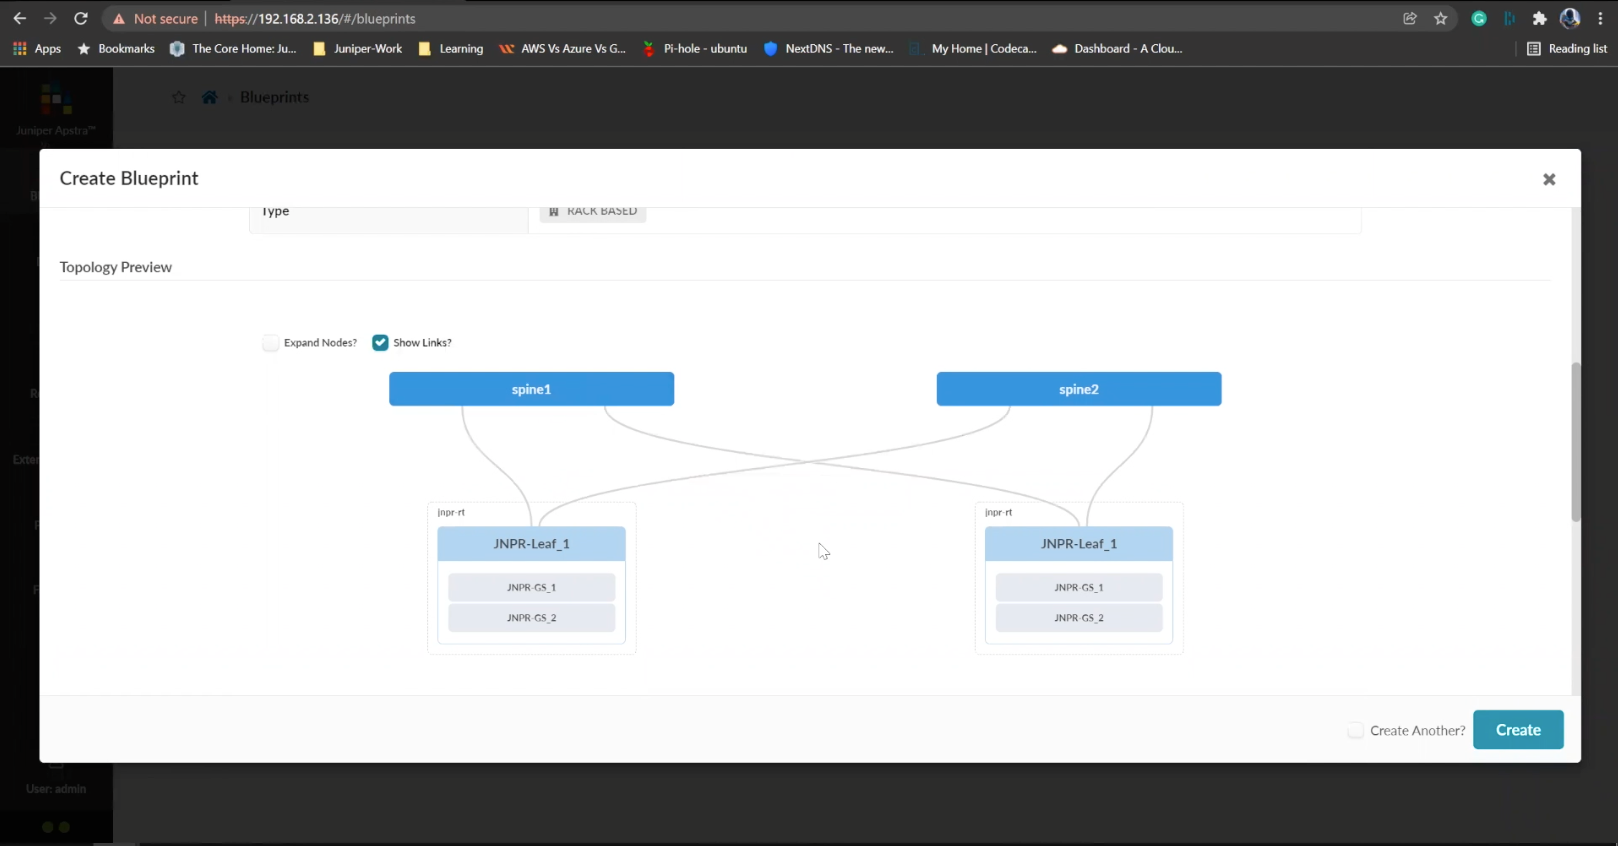
Click on create to finish the process
- %3Cp%3EWe%20have%20our%20switches%20already%20managed%20by%20Apstra%2C%20a%20series%20of%20Juniper%20virtual%20QFX%20switches%20in%20this%20example.%20We%20wil%20start%20by%20creating%20logical%20devices.%3C/p%3E
- Click%20on%20logical%20devices%20option%20from%20the%20menu
- %3Cp%3E%3Cspan%20style%3D%22font-size%3A%2013px%3B%22%3ETo%20start%20the%20process%2C%20we%20will%20creat%20a%20leaf%20device%20first.%20%3C/span%3E%3C/p%3E%0A%3Cp%3E%3Cspan%20style%3D%22font-size%3A%2015px%3B%22%3EPlease%20Note%3A%20%3C/span%3E%3C/p%3E%0A%3Cp%3E%3Cspan%20style%3D%22font-size%3A%2013px%3B%22%3EThe%20same%20process%20can%20be%20replicated%20for%20a%20spine%20logical%20device%20too.%20For%20the%20purpose%20of%20this%20demo%2C%20we%20will%20skip%20the%20spine%20logical%20device%20creation%20process.%3C/span%3E%3C/p%3E
- Enter a name for the logical device
- Choose the number of ports
- Create a port group
- Click to finish the creation
- %3Cp%3E%3Cspan%20style%3D%22font-size%3A%2013px%3B%22%3E%3Cspan%20style%3D%22font-family%3A%20Calibri%2C%20sans-serif%3B%22%3ENext%20we%20will%20set%20up%20interface%20maps.%20An%20Interface%20map%20maps%20the%20logical%20device%20to%20the%20actual%20physical%20device.%20ie%3A%20a%20specific%20switch%20and%20model%20that%20is%20used%20in%20the%20actual%20typology.%3C/span%3E%3C/span%3E%3C/p%3E
- Click on the Interface maps option from the menu
- Click to create a new interface map
- Add a name
- Choose a logical device that will be mapped to a physical entity
- Choose from the drop down list
- Choose a device profile from the drop down menu
- Choose the Juniper QFX device as shown
- Choose the interfaces
- %3Cp%3E%3Cspan%20style%3D%22font-size%3A%2013px%3B%22%3EWe%20will%20repeat%20the%20same%20process%20for%20the%20spine%20devices%20defined%20earlier.%20We%20will%20be%20mapping%20it%20to%20the%20Juniper%20QFX%20devices%20as%20well.%3C/span%3E%3C/p%3E
- Next we will add a few racks
- Click on the rack type from the menu
- Click to create a rack type
- Add a name for the new rack
- Name the leaf switch
- Choose a logical leaf device that was previously defined
- Choose the desired logical device from the list
- Click to add a new Generic system
- Add a name to the Generic System Group
- Enter a desired name
- FInish the process of creating a new rack
- Let us add another generic system
- Click to edit the rack type
- Navigate to the leafs tab
- Click on generic systems tab
- Up the Generic system count to 2 and then update the rack type
- Bring everything together in the next steps
- Choose templates from the menu
- Click to create a template
- Add a name first
- Enter more details and then scroll down
- To choose a rack type click on the drop down menu
- Choose the rack type that we created earlier from the menu
- Click to select the desired spine logical device
- Choose the logical spine device from the list
- Enter the desired count
- Click on create to complete the configuration
- Next step is to create a blueprint for the entire Datacenter fabric
- Click to create a new blueprint
- Enter a name for the Blueprint
- Choose the template from the drop down menu
- Choose the desired template
- Click to display the links
- Click on create to finish the process
- Click to view the Blueprint
- Click on staged
- Select the spines to allocate an Autonomous ID
- Click on the edit icon
- Choose the IP address from the Pool
- Save the configuration
- Repeat the same process for the other leaf devices
- Next we need to configure the interface mappings
- Click on one of the spine devices
- Click on the edit icon
- Choose the interface mappings from the the drop down menu
- Make the desired selection
- Click to update the assignments
- Click to assign system IDs next
- Click on the Assigned System IDs tab
- Click on the edit icon
- Choose from the list of System IDs
- Finalize the assignments
- Click on links
- Recitify any cabling errors as shown automatically
- Update the cabling assingments
- Notice the success message once the cabling mapping is sorted out
- Click on commit
- Add the description and click on the commit button
- Success
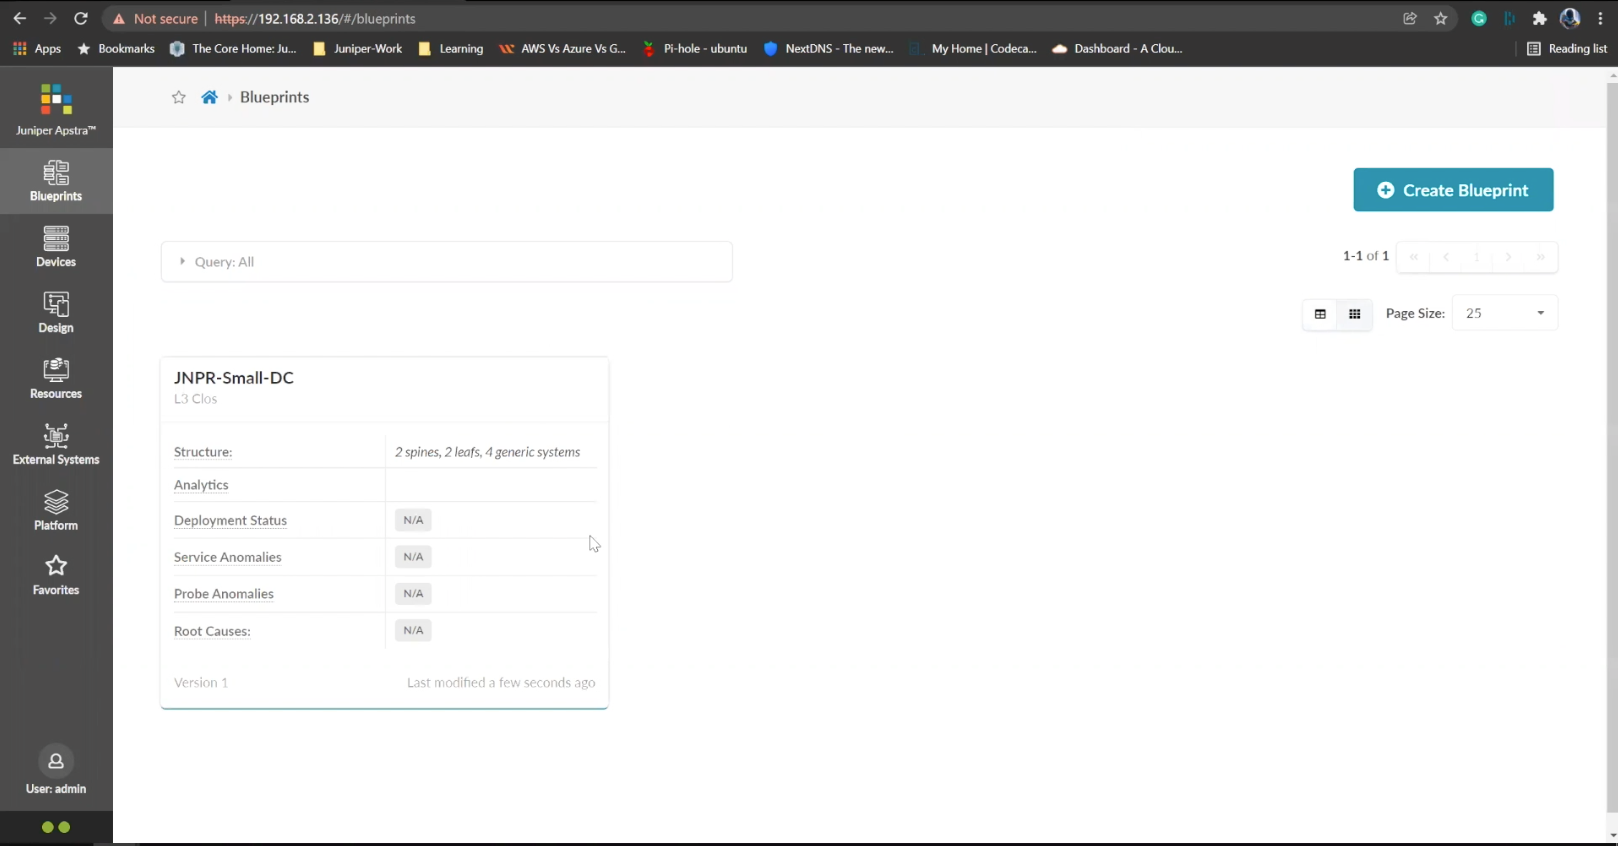
Click to view the Blueprint
- %3Cp%3EWe%20have%20our%20switches%20already%20managed%20by%20Apstra%2C%20a%20series%20of%20Juniper%20virtual%20QFX%20switches%20in%20this%20example.%20We%20wil%20start%20by%20creating%20logical%20devices.%3C/p%3E
- Click%20on%20logical%20devices%20option%20from%20the%20menu
- %3Cp%3E%3Cspan%20style%3D%22font-size%3A%2013px%3B%22%3ETo%20start%20the%20process%2C%20we%20will%20creat%20a%20leaf%20device%20first.%20%3C/span%3E%3C/p%3E%0A%3Cp%3E%3Cspan%20style%3D%22font-size%3A%2015px%3B%22%3EPlease%20Note%3A%20%3C/span%3E%3C/p%3E%0A%3Cp%3E%3Cspan%20style%3D%22font-size%3A%2013px%3B%22%3EThe%20same%20process%20can%20be%20replicated%20for%20a%20spine%20logical%20device%20too.%20For%20the%20purpose%20of%20this%20demo%2C%20we%20will%20skip%20the%20spine%20logical%20device%20creation%20process.%3C/span%3E%3C/p%3E
- Enter a name for the logical device
- Choose the number of ports
- Create a port group
- Click to finish the creation
- %3Cp%3E%3Cspan%20style%3D%22font-size%3A%2013px%3B%22%3E%3Cspan%20style%3D%22font-family%3A%20Calibri%2C%20sans-serif%3B%22%3ENext%20we%20will%20set%20up%20interface%20maps.%20An%20Interface%20map%20maps%20the%20logical%20device%20to%20the%20actual%20physical%20device.%20ie%3A%20a%20specific%20switch%20and%20model%20that%20is%20used%20in%20the%20actual%20typology.%3C/span%3E%3C/span%3E%3C/p%3E
- Click on the Interface maps option from the menu
- Click to create a new interface map
- Add a name
- Choose a logical device that will be mapped to a physical entity
- Choose from the drop down list
- Choose a device profile from the drop down menu
- Choose the Juniper QFX device as shown
- Choose the interfaces
- %3Cp%3E%3Cspan%20style%3D%22font-size%3A%2013px%3B%22%3EWe%20will%20repeat%20the%20same%20process%20for%20the%20spine%20devices%20defined%20earlier.%20We%20will%20be%20mapping%20it%20to%20the%20Juniper%20QFX%20devices%20as%20well.%3C/span%3E%3C/p%3E
- Next we will add a few racks
- Click on the rack type from the menu
- Click to create a rack type
- Add a name for the new rack
- Name the leaf switch
- Choose a logical leaf device that was previously defined
- Choose the desired logical device from the list
- Click to add a new Generic system
- Add a name to the Generic System Group
- Enter a desired name
- FInish the process of creating a new rack
- Let us add another generic system
- Click to edit the rack type
- Navigate to the leafs tab
- Click on generic systems tab
- Up the Generic system count to 2 and then update the rack type
- Bring everything together in the next steps
- Choose templates from the menu
- Click to create a template
- Add a name first
- Enter more details and then scroll down
- To choose a rack type click on the drop down menu
- Choose the rack type that we created earlier from the menu
- Click to select the desired spine logical device
- Choose the logical spine device from the list
- Enter the desired count
- Click on create to complete the configuration
- Next step is to create a blueprint for the entire Datacenter fabric
- Click to create a new blueprint
- Enter a name for the Blueprint
- Choose the template from the drop down menu
- Choose the desired template
- Click to display the links
- Click on create to finish the process
- Click to view the Blueprint
- Click on staged
- Select the spines to allocate an Autonomous ID
- Click on the edit icon
- Choose the IP address from the Pool
- Save the configuration
- Repeat the same process for the other leaf devices
- Next we need to configure the interface mappings
- Click on one of the spine devices
- Click on the edit icon
- Choose the interface mappings from the the drop down menu
- Make the desired selection
- Click to update the assignments
- Click to assign system IDs next
- Click on the Assigned System IDs tab
- Click on the edit icon
- Choose from the list of System IDs
- Finalize the assignments
- Click on links
- Recitify any cabling errors as shown automatically
- Update the cabling assingments
- Notice the success message once the cabling mapping is sorted out
- Click on commit
- Add the description and click on the commit button
- Success
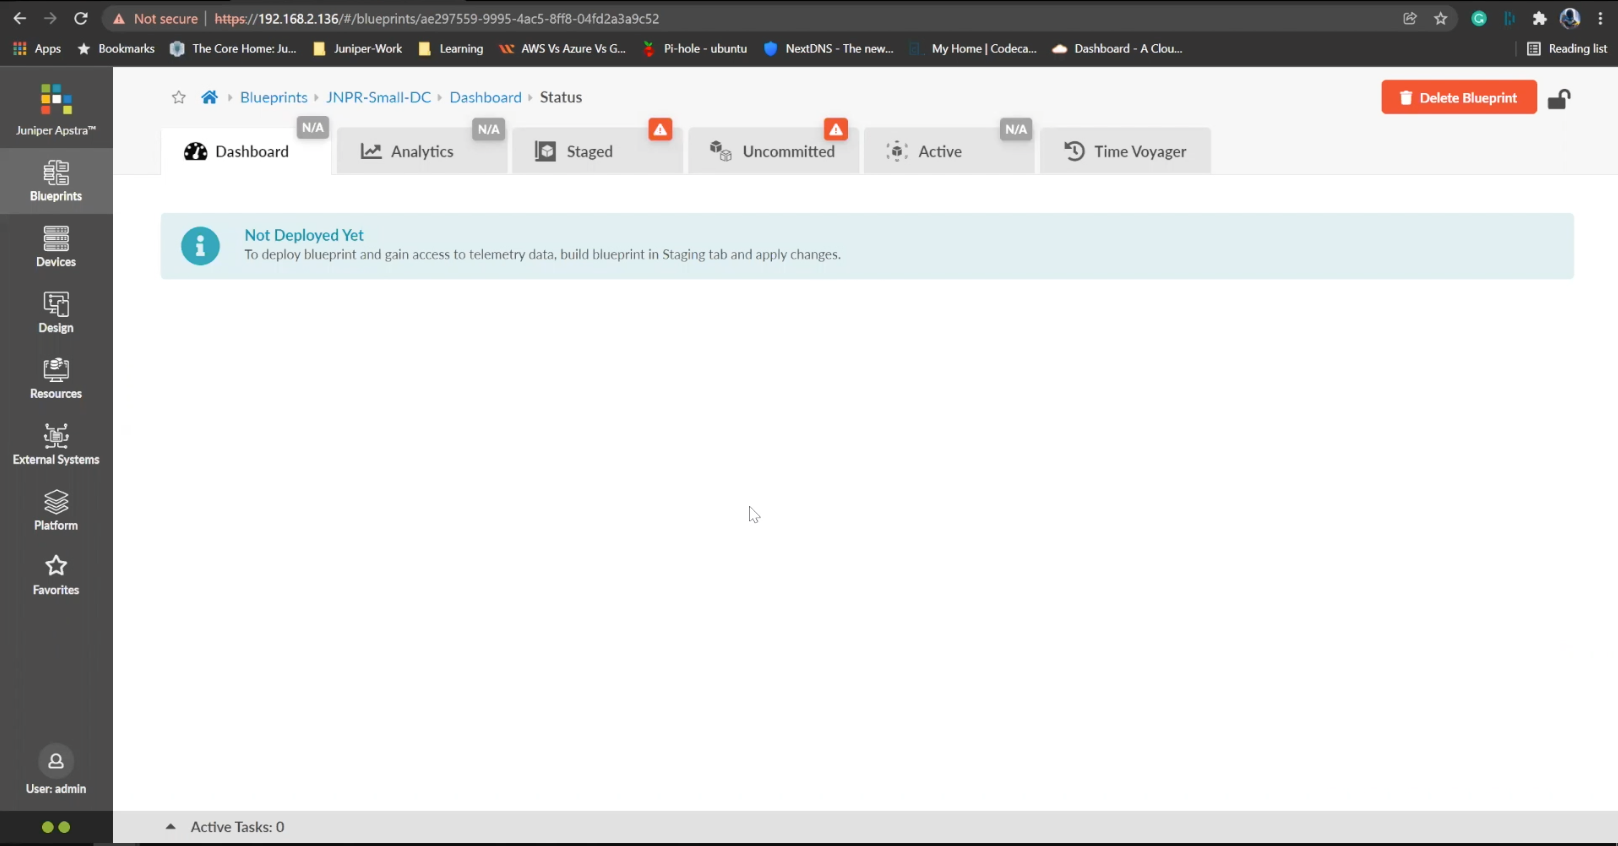
Click on staged
At this point, everything has been rendered in software, but the devices have not been actually configured. We notice the staged tab here with the red alert icon indicating a few assignement are to be updated. We need to assign some autonomous system numbers for our leafs and spines, loop back addresses and spine to link IP addresses.
- %3Cp%3EWe%20have%20our%20switches%20already%20managed%20by%20Apstra%2C%20a%20series%20of%20Juniper%20virtual%20QFX%20switches%20in%20this%20example.%20We%20wil%20start%20by%20creating%20logical%20devices.%3C/p%3E
- Click%20on%20logical%20devices%20option%20from%20the%20menu
- %3Cp%3E%3Cspan%20style%3D%22font-size%3A%2013px%3B%22%3ETo%20start%20the%20process%2C%20we%20will%20creat%20a%20leaf%20device%20first.%20%3C/span%3E%3C/p%3E%0A%3Cp%3E%3Cspan%20style%3D%22font-size%3A%2015px%3B%22%3EPlease%20Note%3A%20%3C/span%3E%3C/p%3E%0A%3Cp%3E%3Cspan%20style%3D%22font-size%3A%2013px%3B%22%3EThe%20same%20process%20can%20be%20replicated%20for%20a%20spine%20logical%20device%20too.%20For%20the%20purpose%20of%20this%20demo%2C%20we%20will%20skip%20the%20spine%20logical%20device%20creation%20process.%3C/span%3E%3C/p%3E
- Enter a name for the logical device
- Choose the number of ports
- Create a port group
- Click to finish the creation
- %3Cp%3E%3Cspan%20style%3D%22font-size%3A%2013px%3B%22%3E%3Cspan%20style%3D%22font-family%3A%20Calibri%2C%20sans-serif%3B%22%3ENext%20we%20will%20set%20up%20interface%20maps.%20An%20Interface%20map%20maps%20the%20logical%20device%20to%20the%20actual%20physical%20device.%20ie%3A%20a%20specific%20switch%20and%20model%20that%20is%20used%20in%20the%20actual%20typology.%3C/span%3E%3C/span%3E%3C/p%3E
- Click on the Interface maps option from the menu
- Click to create a new interface map
- Add a name
- Choose a logical device that will be mapped to a physical entity
- Choose from the drop down list
- Choose a device profile from the drop down menu
- Choose the Juniper QFX device as shown
- Choose the interfaces
- %3Cp%3E%3Cspan%20style%3D%22font-size%3A%2013px%3B%22%3EWe%20will%20repeat%20the%20same%20process%20for%20the%20spine%20devices%20defined%20earlier.%20We%20will%20be%20mapping%20it%20to%20the%20Juniper%20QFX%20devices%20as%20well.%3C/span%3E%3C/p%3E
- Next we will add a few racks
- Click on the rack type from the menu
- Click to create a rack type
- Add a name for the new rack
- Name the leaf switch
- Choose a logical leaf device that was previously defined
- Choose the desired logical device from the list
- Click to add a new Generic system
- Add a name to the Generic System Group
- Enter a desired name
- FInish the process of creating a new rack
- Let us add another generic system
- Click to edit the rack type
- Navigate to the leafs tab
- Click on generic systems tab
- Up the Generic system count to 2 and then update the rack type
- Bring everything together in the next steps
- Choose templates from the menu
- Click to create a template
- Add a name first
- Enter more details and then scroll down
- To choose a rack type click on the drop down menu
- Choose the rack type that we created earlier from the menu
- Click to select the desired spine logical device
- Choose the logical spine device from the list
- Enter the desired count
- Click on create to complete the configuration
- Next step is to create a blueprint for the entire Datacenter fabric
- Click to create a new blueprint
- Enter a name for the Blueprint
- Choose the template from the drop down menu
- Choose the desired template
- Click to display the links
- Click on create to finish the process
- Click to view the Blueprint
- Click on staged
- Select the spines to allocate an Autonomous ID
- Click on the edit icon
- Choose the IP address from the Pool
- Save the configuration
- Repeat the same process for the other leaf devices
- Next we need to configure the interface mappings
- Click on one of the spine devices
- Click on the edit icon
- Choose the interface mappings from the the drop down menu
- Make the desired selection
- Click to update the assignments
- Click to assign system IDs next
- Click on the Assigned System IDs tab
- Click on the edit icon
- Choose from the list of System IDs
- Finalize the assignments
- Click on links
- Recitify any cabling errors as shown automatically
- Update the cabling assingments
- Notice the success message once the cabling mapping is sorted out
- Click on commit
- Add the description and click on the commit button
- Success
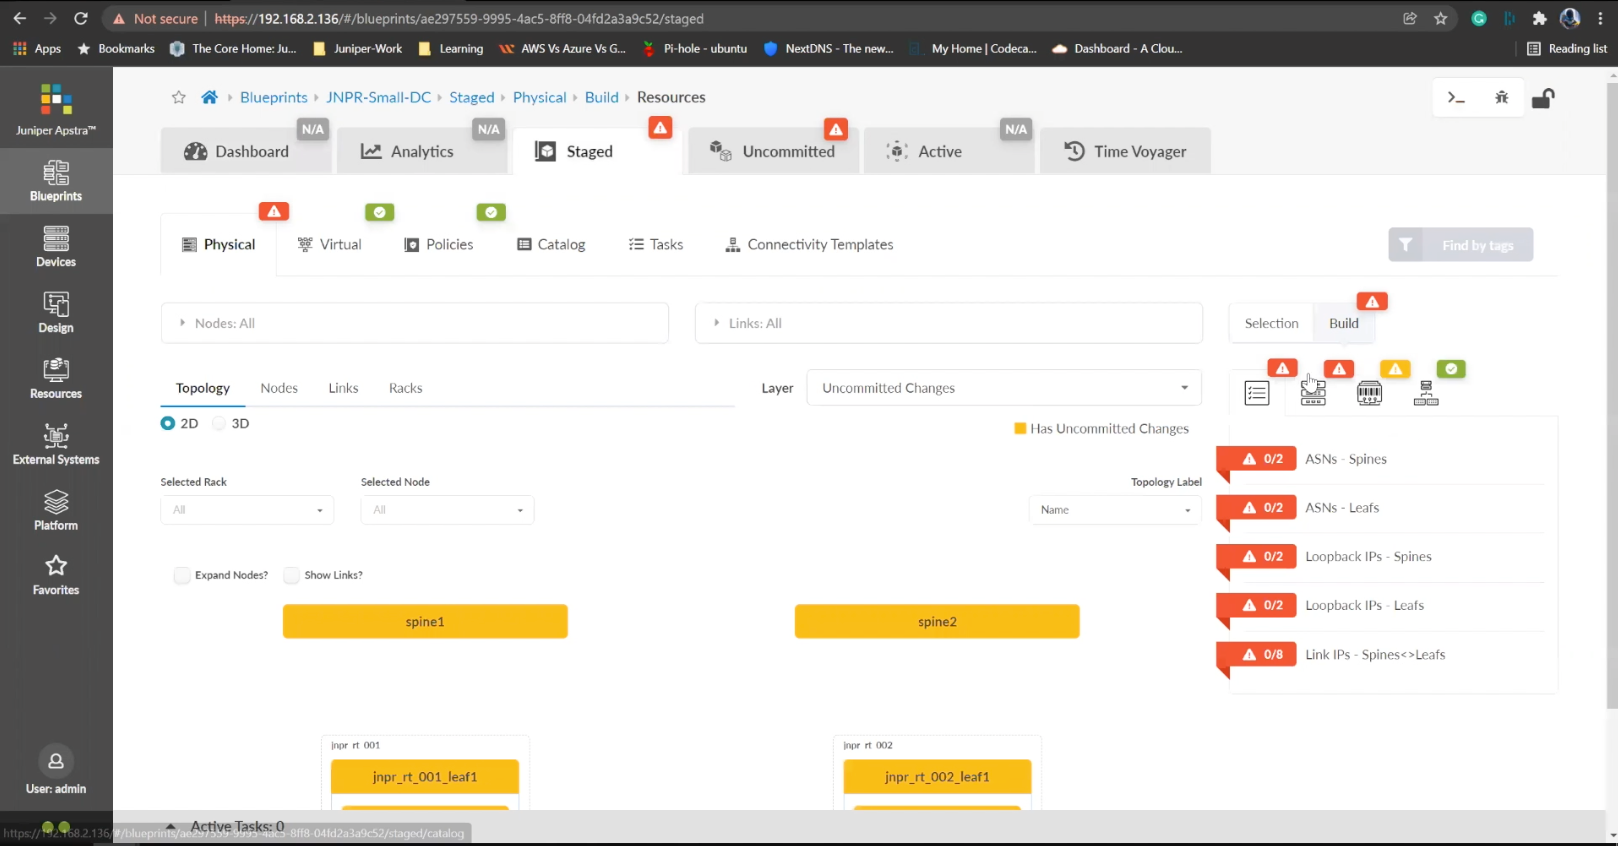
Select the spines to allocate an Autonomous ID
- %3Cp%3EWe%20have%20our%20switches%20already%20managed%20by%20Apstra%2C%20a%20series%20of%20Juniper%20virtual%20QFX%20switches%20in%20this%20example.%20We%20wil%20start%20by%20creating%20logical%20devices.%3C/p%3E
- Click%20on%20logical%20devices%20option%20from%20the%20menu
- %3Cp%3E%3Cspan%20style%3D%22font-size%3A%2013px%3B%22%3ETo%20start%20the%20process%2C%20we%20will%20creat%20a%20leaf%20device%20first.%20%3C/span%3E%3C/p%3E%0A%3Cp%3E%3Cspan%20style%3D%22font-size%3A%2015px%3B%22%3EPlease%20Note%3A%20%3C/span%3E%3C/p%3E%0A%3Cp%3E%3Cspan%20style%3D%22font-size%3A%2013px%3B%22%3EThe%20same%20process%20can%20be%20replicated%20for%20a%20spine%20logical%20device%20too.%20For%20the%20purpose%20of%20this%20demo%2C%20we%20will%20skip%20the%20spine%20logical%20device%20creation%20process.%3C/span%3E%3C/p%3E
- Enter a name for the logical device
- Choose the number of ports
- Create a port group
- Click to finish the creation
- %3Cp%3E%3Cspan%20style%3D%22font-size%3A%2013px%3B%22%3E%3Cspan%20style%3D%22font-family%3A%20Calibri%2C%20sans-serif%3B%22%3ENext%20we%20will%20set%20up%20interface%20maps.%20An%20Interface%20map%20maps%20the%20logical%20device%20to%20the%20actual%20physical%20device.%20ie%3A%20a%20specific%20switch%20and%20model%20that%20is%20used%20in%20the%20actual%20typology.%3C/span%3E%3C/span%3E%3C/p%3E
- Click on the Interface maps option from the menu
- Click to create a new interface map
- Add a name
- Choose a logical device that will be mapped to a physical entity
- Choose from the drop down list
- Choose a device profile from the drop down menu
- Choose the Juniper QFX device as shown
- Choose the interfaces
- %3Cp%3E%3Cspan%20style%3D%22font-size%3A%2013px%3B%22%3EWe%20will%20repeat%20the%20same%20process%20for%20the%20spine%20devices%20defined%20earlier.%20We%20will%20be%20mapping%20it%20to%20the%20Juniper%20QFX%20devices%20as%20well.%3C/span%3E%3C/p%3E
- Next we will add a few racks
- Click on the rack type from the menu
- Click to create a rack type
- Add a name for the new rack
- Name the leaf switch
- Choose a logical leaf device that was previously defined
- Choose the desired logical device from the list
- Click to add a new Generic system
- Add a name to the Generic System Group
- Enter a desired name
- FInish the process of creating a new rack
- Let us add another generic system
- Click to edit the rack type
- Navigate to the leafs tab
- Click on generic systems tab
- Up the Generic system count to 2 and then update the rack type
- Bring everything together in the next steps
- Choose templates from the menu
- Click to create a template
- Add a name first
- Enter more details and then scroll down
- To choose a rack type click on the drop down menu
- Choose the rack type that we created earlier from the menu
- Click to select the desired spine logical device
- Choose the logical spine device from the list
- Enter the desired count
- Click on create to complete the configuration
- Next step is to create a blueprint for the entire Datacenter fabric
- Click to create a new blueprint
- Enter a name for the Blueprint
- Choose the template from the drop down menu
- Choose the desired template
- Click to display the links
- Click on create to finish the process
- Click to view the Blueprint
- Click on staged
- Select the spines to allocate an Autonomous ID
- Click on the edit icon
- Choose the IP address from the Pool
- Save the configuration
- Repeat the same process for the other leaf devices
- Next we need to configure the interface mappings
- Click on one of the spine devices
- Click on the edit icon
- Choose the interface mappings from the the drop down menu
- Make the desired selection
- Click to update the assignments
- Click to assign system IDs next
- Click on the Assigned System IDs tab
- Click on the edit icon
- Choose from the list of System IDs
- Finalize the assignments
- Click on links
- Recitify any cabling errors as shown automatically
- Update the cabling assingments
- Notice the success message once the cabling mapping is sorted out
- Click on commit
- Add the description and click on the commit button
- Success
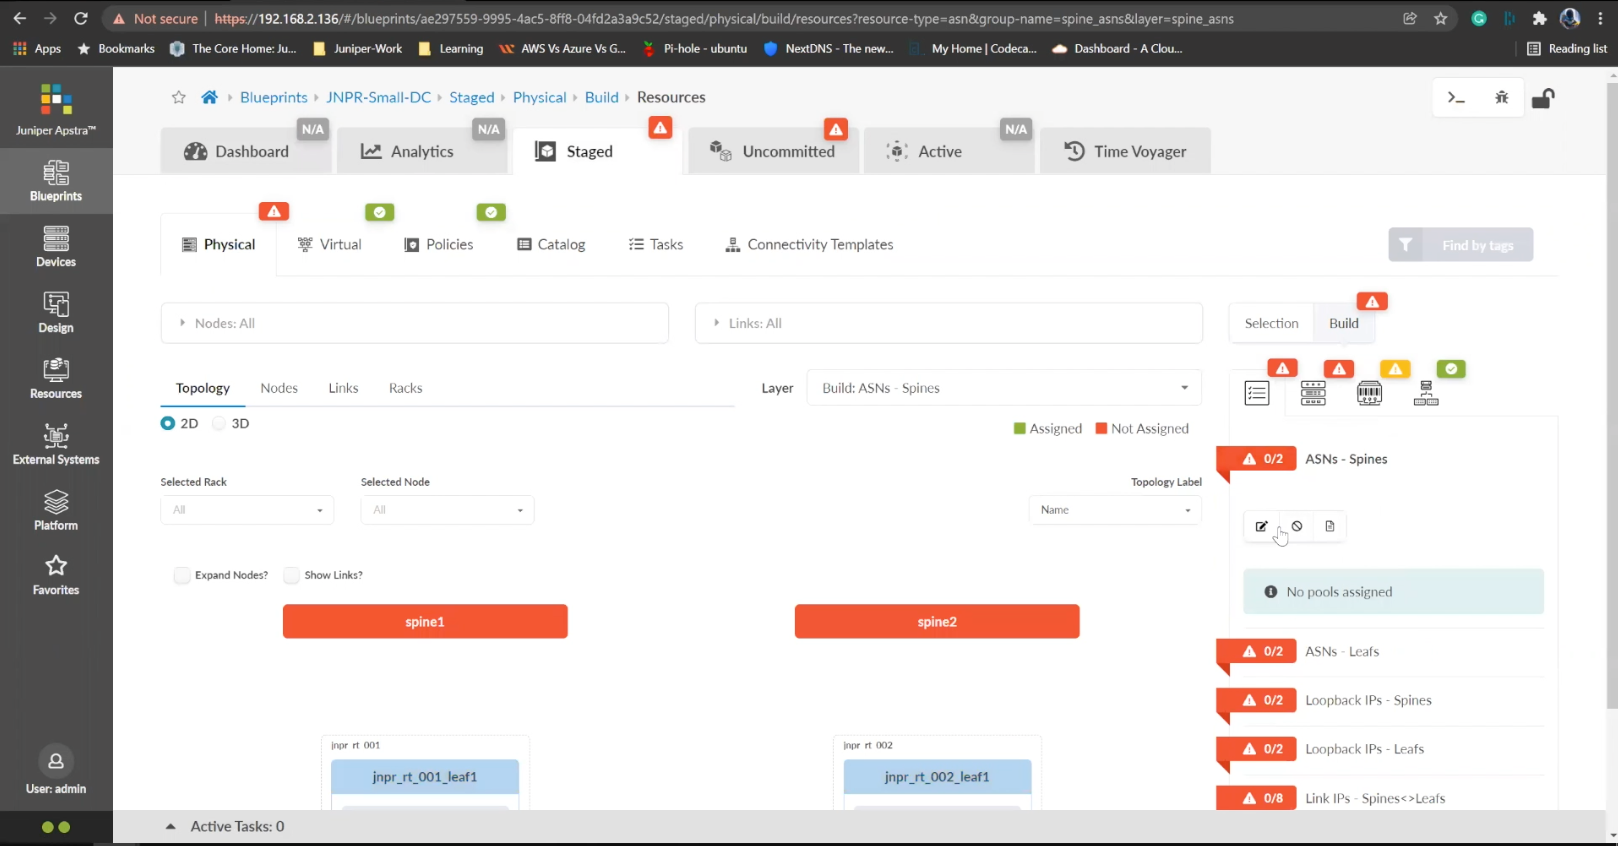
Click on the edit icon
- %3Cp%3EWe%20have%20our%20switches%20already%20managed%20by%20Apstra%2C%20a%20series%20of%20Juniper%20virtual%20QFX%20switches%20in%20this%20example.%20We%20wil%20start%20by%20creating%20logical%20devices.%3C/p%3E
- Click%20on%20logical%20devices%20option%20from%20the%20menu
- %3Cp%3E%3Cspan%20style%3D%22font-size%3A%2013px%3B%22%3ETo%20start%20the%20process%2C%20we%20will%20creat%20a%20leaf%20device%20first.%20%3C/span%3E%3C/p%3E%0A%3Cp%3E%3Cspan%20style%3D%22font-size%3A%2015px%3B%22%3EPlease%20Note%3A%20%3C/span%3E%3C/p%3E%0A%3Cp%3E%3Cspan%20style%3D%22font-size%3A%2013px%3B%22%3EThe%20same%20process%20can%20be%20replicated%20for%20a%20spine%20logical%20device%20too.%20For%20the%20purpose%20of%20this%20demo%2C%20we%20will%20skip%20the%20spine%20logical%20device%20creation%20process.%3C/span%3E%3C/p%3E
- Enter a name for the logical device
- Choose the number of ports
- Create a port group
- Click to finish the creation
- %3Cp%3E%3Cspan%20style%3D%22font-size%3A%2013px%3B%22%3E%3Cspan%20style%3D%22font-family%3A%20Calibri%2C%20sans-serif%3B%22%3ENext%20we%20will%20set%20up%20interface%20maps.%20An%20Interface%20map%20maps%20the%20logical%20device%20to%20the%20actual%20physical%20device.%20ie%3A%20a%20specific%20switch%20and%20model%20that%20is%20used%20in%20the%20actual%20typology.%3C/span%3E%3C/span%3E%3C/p%3E
- Click on the Interface maps option from the menu
- Click to create a new interface map
- Add a name
- Choose a logical device that will be mapped to a physical entity
- Choose from the drop down list
- Choose a device profile from the drop down menu
- Choose the Juniper QFX device as shown
- Choose the interfaces
- %3Cp%3E%3Cspan%20style%3D%22font-size%3A%2013px%3B%22%3EWe%20will%20repeat%20the%20same%20process%20for%20the%20spine%20devices%20defined%20earlier.%20We%20will%20be%20mapping%20it%20to%20the%20Juniper%20QFX%20devices%20as%20well.%3C/span%3E%3C/p%3E
- Next we will add a few racks
- Click on the rack type from the menu
- Click to create a rack type
- Add a name for the new rack
- Name the leaf switch
- Choose a logical leaf device that was previously defined
- Choose the desired logical device from the list
- Click to add a new Generic system
- Add a name to the Generic System Group
- Enter a desired name
- FInish the process of creating a new rack
- Let us add another generic system
- Click to edit the rack type
- Navigate to the leafs tab
- Click on generic systems tab
- Up the Generic system count to 2 and then update the rack type
- Bring everything together in the next steps
- Choose templates from the menu
- Click to create a template
- Add a name first
- Enter more details and then scroll down
- To choose a rack type click on the drop down menu
- Choose the rack type that we created earlier from the menu
- Click to select the desired spine logical device
- Choose the logical spine device from the list
- Enter the desired count
- Click on create to complete the configuration
- Next step is to create a blueprint for the entire Datacenter fabric
- Click to create a new blueprint
- Enter a name for the Blueprint
- Choose the template from the drop down menu
- Choose the desired template
- Click to display the links
- Click on create to finish the process
- Click to view the Blueprint
- Click on staged
- Select the spines to allocate an Autonomous ID
- Click on the edit icon
- Choose the IP address from the Pool
- Save the configuration
- Repeat the same process for the other leaf devices
- Next we need to configure the interface mappings
- Click on one of the spine devices
- Click on the edit icon
- Choose the interface mappings from the the drop down menu
- Make the desired selection
- Click to update the assignments
- Click to assign system IDs next
- Click on the Assigned System IDs tab
- Click on the edit icon
- Choose from the list of System IDs
- Finalize the assignments
- Click on links
- Recitify any cabling errors as shown automatically
- Update the cabling assingments
- Notice the success message once the cabling mapping is sorted out
- Click on commit
- Add the description and click on the commit button
- Success
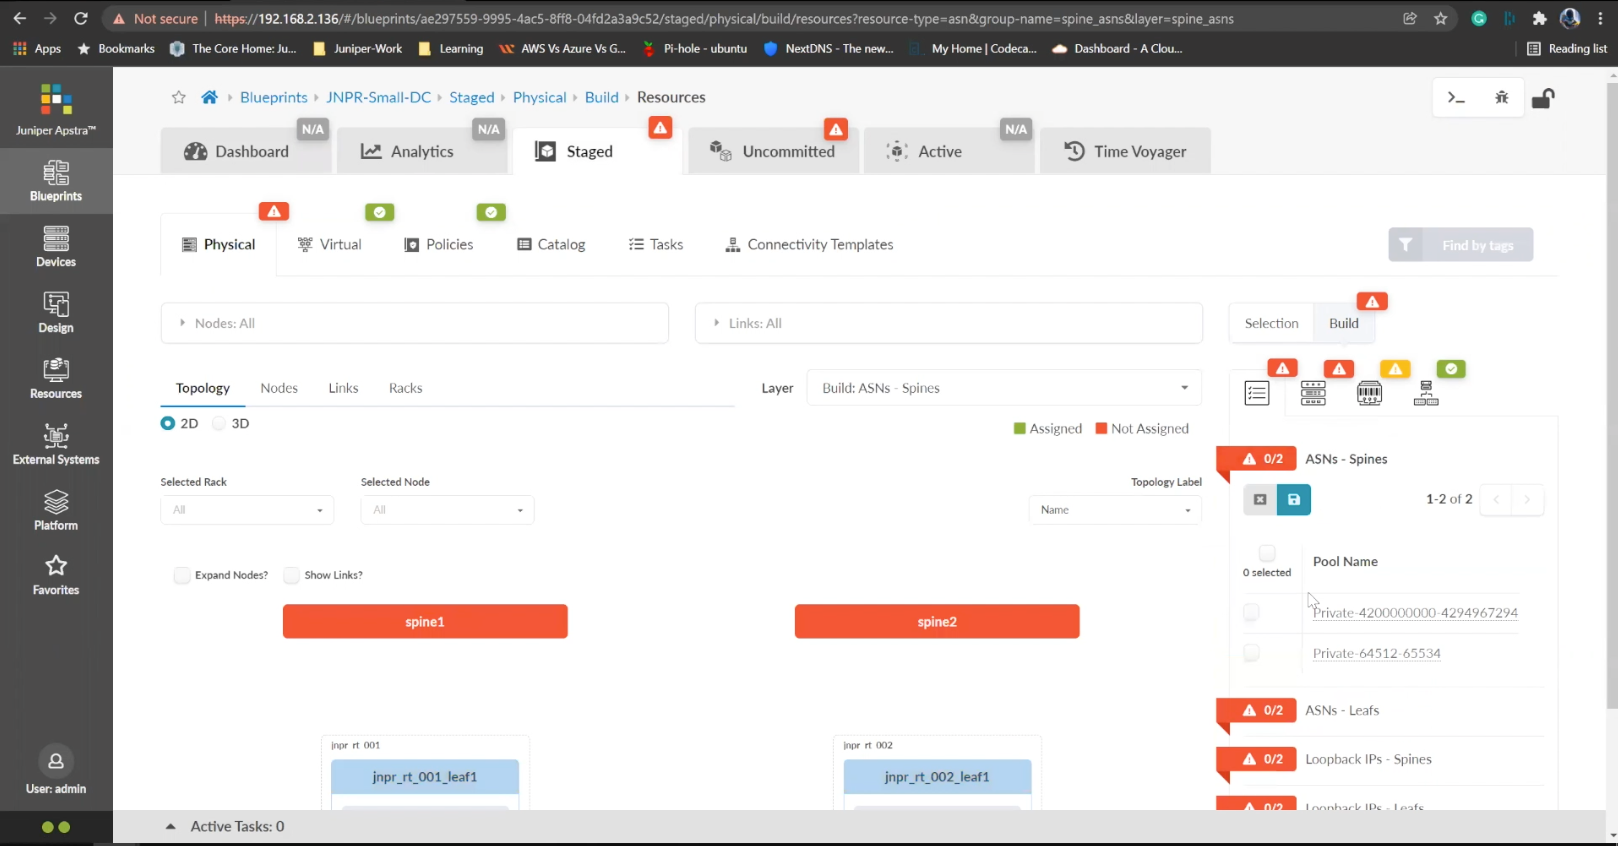
Choose the IP address from the Pool
- %3Cp%3EWe%20have%20our%20switches%20already%20managed%20by%20Apstra%2C%20a%20series%20of%20Juniper%20virtual%20QFX%20switches%20in%20this%20example.%20We%20wil%20start%20by%20creating%20logical%20devices.%3C/p%3E
- Click%20on%20logical%20devices%20option%20from%20the%20menu
- %3Cp%3E%3Cspan%20style%3D%22font-size%3A%2013px%3B%22%3ETo%20start%20the%20process%2C%20we%20will%20creat%20a%20leaf%20device%20first.%20%3C/span%3E%3C/p%3E%0A%3Cp%3E%3Cspan%20style%3D%22font-size%3A%2015px%3B%22%3EPlease%20Note%3A%20%3C/span%3E%3C/p%3E%0A%3Cp%3E%3Cspan%20style%3D%22font-size%3A%2013px%3B%22%3EThe%20same%20process%20can%20be%20replicated%20for%20a%20spine%20logical%20device%20too.%20For%20the%20purpose%20of%20this%20demo%2C%20we%20will%20skip%20the%20spine%20logical%20device%20creation%20process.%3C/span%3E%3C/p%3E
- Enter a name for the logical device
- Choose the number of ports
- Create a port group
- Click to finish the creation
- %3Cp%3E%3Cspan%20style%3D%22font-size%3A%2013px%3B%22%3E%3Cspan%20style%3D%22font-family%3A%20Calibri%2C%20sans-serif%3B%22%3ENext%20we%20will%20set%20up%20interface%20maps.%20An%20Interface%20map%20maps%20the%20logical%20device%20to%20the%20actual%20physical%20device.%20ie%3A%20a%20specific%20switch%20and%20model%20that%20is%20used%20in%20the%20actual%20typology.%3C/span%3E%3C/span%3E%3C/p%3E
- Click on the Interface maps option from the menu
- Click to create a new interface map
- Add a name
- Choose a logical device that will be mapped to a physical entity
- Choose from the drop down list
- Choose a device profile from the drop down menu
- Choose the Juniper QFX device as shown
- Choose the interfaces
- %3Cp%3E%3Cspan%20style%3D%22font-size%3A%2013px%3B%22%3EWe%20will%20repeat%20the%20same%20process%20for%20the%20spine%20devices%20defined%20earlier.%20We%20will%20be%20mapping%20it%20to%20the%20Juniper%20QFX%20devices%20as%20well.%3C/span%3E%3C/p%3E
- Next we will add a few racks
- Click on the rack type from the menu
- Click to create a rack type
- Add a name for the new rack
- Name the leaf switch
- Choose a logical leaf device that was previously defined
- Choose the desired logical device from the list
- Click to add a new Generic system
- Add a name to the Generic System Group
- Enter a desired name
- FInish the process of creating a new rack
- Let us add another generic system
- Click to edit the rack type
- Navigate to the leafs tab
- Click on generic systems tab
- Up the Generic system count to 2 and then update the rack type
- Bring everything together in the next steps
- Choose templates from the menu
- Click to create a template
- Add a name first
- Enter more details and then scroll down
- To choose a rack type click on the drop down menu
- Choose the rack type that we created earlier from the menu
- Click to select the desired spine logical device
- Choose the logical spine device from the list
- Enter the desired count
- Click on create to complete the configuration
- Next step is to create a blueprint for the entire Datacenter fabric
- Click to create a new blueprint
- Enter a name for the Blueprint
- Choose the template from the drop down menu
- Choose the desired template
- Click to display the links
- Click on create to finish the process
- Click to view the Blueprint
- Click on staged
- Select the spines to allocate an Autonomous ID
- Click on the edit icon
- Choose the IP address from the Pool
- Save the configuration
- Repeat the same process for the other leaf devices
- Next we need to configure the interface mappings
- Click on one of the spine devices
- Click on the edit icon
- Choose the interface mappings from the the drop down menu
- Make the desired selection
- Click to update the assignments
- Click to assign system IDs next
- Click on the Assigned System IDs tab
- Click on the edit icon
- Choose from the list of System IDs
- Finalize the assignments
- Click on links
- Recitify any cabling errors as shown automatically
- Update the cabling assingments
- Notice the success message once the cabling mapping is sorted out
- Click on commit
- Add the description and click on the commit button
- Success
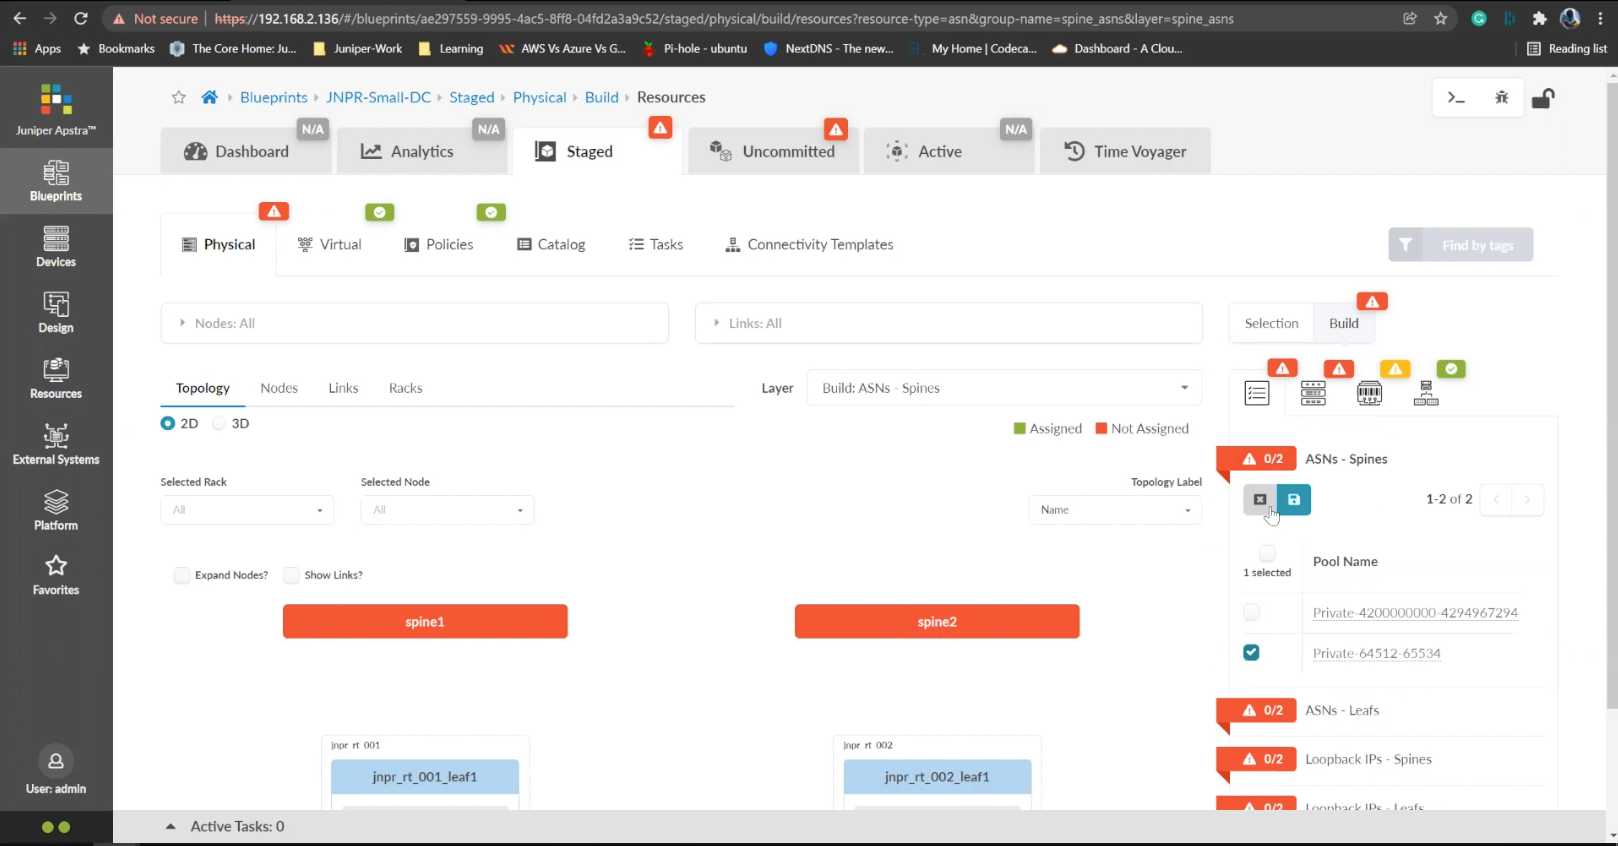
Save the configuration
- %3Cp%3EWe%20have%20our%20switches%20already%20managed%20by%20Apstra%2C%20a%20series%20of%20Juniper%20virtual%20QFX%20switches%20in%20this%20example.%20We%20wil%20start%20by%20creating%20logical%20devices.%3C/p%3E
- Click%20on%20logical%20devices%20option%20from%20the%20menu
- %3Cp%3E%3Cspan%20style%3D%22font-size%3A%2013px%3B%22%3ETo%20start%20the%20process%2C%20we%20will%20creat%20a%20leaf%20device%20first.%20%3C/span%3E%3C/p%3E%0A%3Cp%3E%3Cspan%20style%3D%22font-size%3A%2015px%3B%22%3EPlease%20Note%3A%20%3C/span%3E%3C/p%3E%0A%3Cp%3E%3Cspan%20style%3D%22font-size%3A%2013px%3B%22%3EThe%20same%20process%20can%20be%20replicated%20for%20a%20spine%20logical%20device%20too.%20For%20the%20purpose%20of%20this%20demo%2C%20we%20will%20skip%20the%20spine%20logical%20device%20creation%20process.%3C/span%3E%3C/p%3E
- Enter a name for the logical device
- Choose the number of ports
- Create a port group
- Click to finish the creation
- %3Cp%3E%3Cspan%20style%3D%22font-size%3A%2013px%3B%22%3E%3Cspan%20style%3D%22font-family%3A%20Calibri%2C%20sans-serif%3B%22%3ENext%20we%20will%20set%20up%20interface%20maps.%20An%20Interface%20map%20maps%20the%20logical%20device%20to%20the%20actual%20physical%20device.%20ie%3A%20a%20specific%20switch%20and%20model%20that%20is%20used%20in%20the%20actual%20typology.%3C/span%3E%3C/span%3E%3C/p%3E
- Click on the Interface maps option from the menu
- Click to create a new interface map
- Add a name
- Choose a logical device that will be mapped to a physical entity
- Choose from the drop down list
- Choose a device profile from the drop down menu
- Choose the Juniper QFX device as shown
- Choose the interfaces
- %3Cp%3E%3Cspan%20style%3D%22font-size%3A%2013px%3B%22%3EWe%20will%20repeat%20the%20same%20process%20for%20the%20spine%20devices%20defined%20earlier.%20We%20will%20be%20mapping%20it%20to%20the%20Juniper%20QFX%20devices%20as%20well.%3C/span%3E%3C/p%3E
- Next we will add a few racks
- Click on the rack type from the menu
- Click to create a rack type
- Add a name for the new rack
- Name the leaf switch
- Choose a logical leaf device that was previously defined
- Choose the desired logical device from the list
- Click to add a new Generic system
- Add a name to the Generic System Group
- Enter a desired name
- FInish the process of creating a new rack
- Let us add another generic system
- Click to edit the rack type
- Navigate to the leafs tab
- Click on generic systems tab
- Up the Generic system count to 2 and then update the rack type
- Bring everything together in the next steps
- Choose templates from the menu
- Click to create a template
- Add a name first
- Enter more details and then scroll down
- To choose a rack type click on the drop down menu
- Choose the rack type that we created earlier from the menu
- Click to select the desired spine logical device
- Choose the logical spine device from the list
- Enter the desired count
- Click on create to complete the configuration
- Next step is to create a blueprint for the entire Datacenter fabric
- Click to create a new blueprint
- Enter a name for the Blueprint
- Choose the template from the drop down menu
- Choose the desired template
- Click to display the links
- Click on create to finish the process
- Click to view the Blueprint
- Click on staged
- Select the spines to allocate an Autonomous ID
- Click on the edit icon
- Choose the IP address from the Pool
- Save the configuration
- Repeat the same process for the other leaf devices
- Next we need to configure the interface mappings
- Click on one of the spine devices
- Click on the edit icon
- Choose the interface mappings from the the drop down menu
- Make the desired selection
- Click to update the assignments
- Click to assign system IDs next
- Click on the Assigned System IDs tab
- Click on the edit icon
- Choose from the list of System IDs
- Finalize the assignments
- Click on links
- Recitify any cabling errors as shown automatically
- Update the cabling assingments
- Notice the success message once the cabling mapping is sorted out
- Click on commit
- Add the description and click on the commit button
- Success
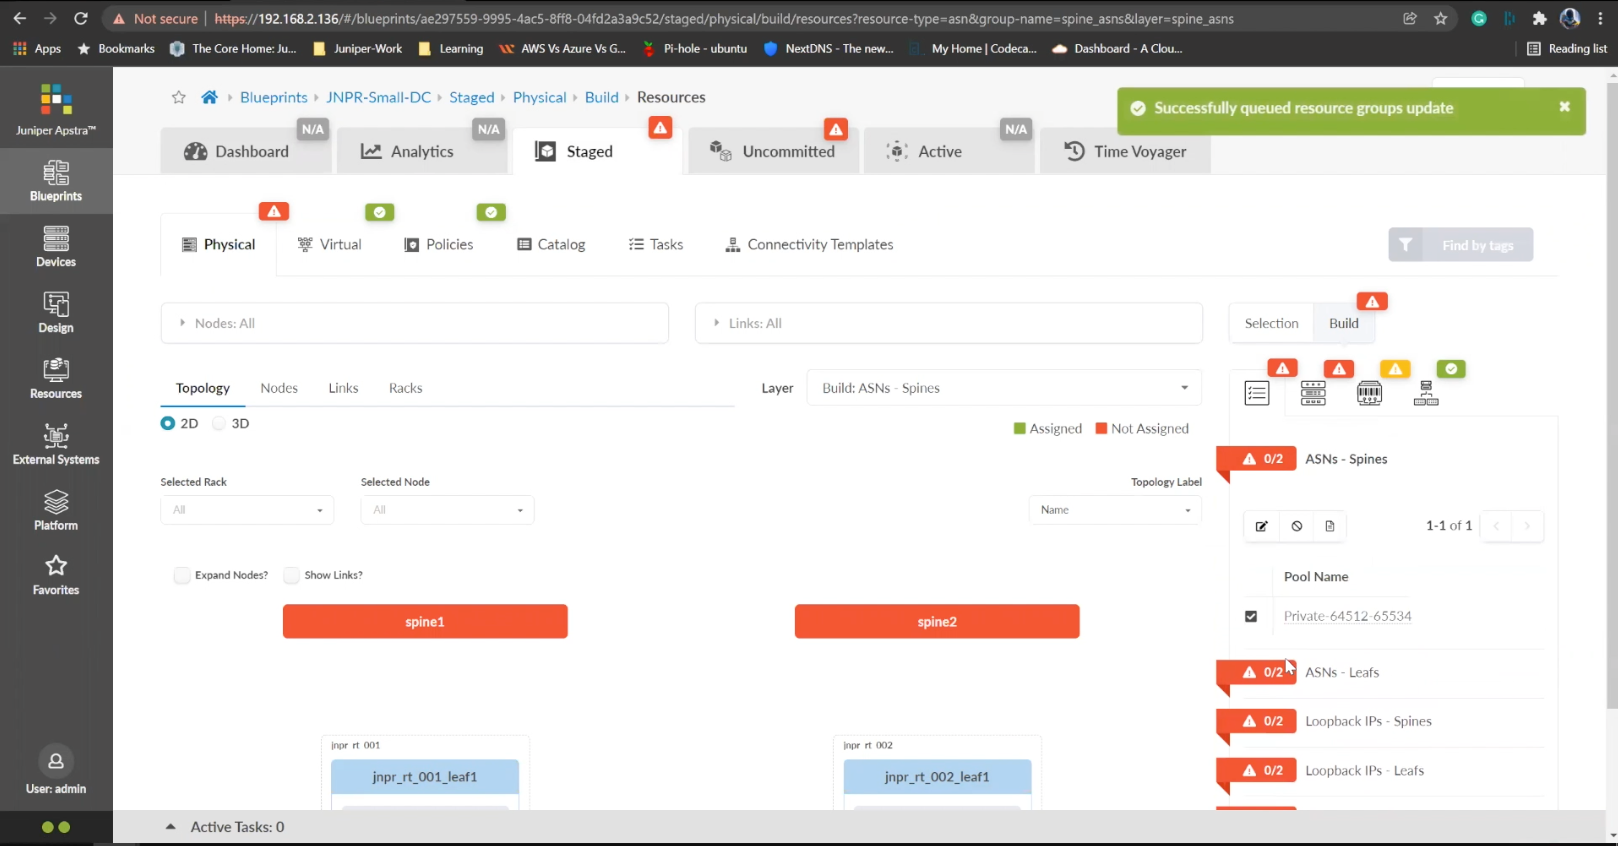
Repeat the same process for the other leaf devices
- %3Cp%3EWe%20have%20our%20switches%20already%20managed%20by%20Apstra%2C%20a%20series%20of%20Juniper%20virtual%20QFX%20switches%20in%20this%20example.%20We%20wil%20start%20by%20creating%20logical%20devices.%3C/p%3E
- Click%20on%20logical%20devices%20option%20from%20the%20menu
- %3Cp%3E%3Cspan%20style%3D%22font-size%3A%2013px%3B%22%3ETo%20start%20the%20process%2C%20we%20will%20creat%20a%20leaf%20device%20first.%20%3C/span%3E%3C/p%3E%0A%3Cp%3E%3Cspan%20style%3D%22font-size%3A%2015px%3B%22%3EPlease%20Note%3A%20%3C/span%3E%3C/p%3E%0A%3Cp%3E%3Cspan%20style%3D%22font-size%3A%2013px%3B%22%3EThe%20same%20process%20can%20be%20replicated%20for%20a%20spine%20logical%20device%20too.%20For%20the%20purpose%20of%20this%20demo%2C%20we%20will%20skip%20the%20spine%20logical%20device%20creation%20process.%3C/span%3E%3C/p%3E
- Enter a name for the logical device
- Choose the number of ports
- Create a port group
- Click to finish the creation
- %3Cp%3E%3Cspan%20style%3D%22font-size%3A%2013px%3B%22%3E%3Cspan%20style%3D%22font-family%3A%20Calibri%2C%20sans-serif%3B%22%3ENext%20we%20will%20set%20up%20interface%20maps.%20An%20Interface%20map%20maps%20the%20logical%20device%20to%20the%20actual%20physical%20device.%20ie%3A%20a%20specific%20switch%20and%20model%20that%20is%20used%20in%20the%20actual%20typology.%3C/span%3E%3C/span%3E%3C/p%3E
- Click on the Interface maps option from the menu
- Click to create a new interface map
- Add a name
- Choose a logical device that will be mapped to a physical entity
- Choose from the drop down list
- Choose a device profile from the drop down menu
- Choose the Juniper QFX device as shown
- Choose the interfaces
- %3Cp%3E%3Cspan%20style%3D%22font-size%3A%2013px%3B%22%3EWe%20will%20repeat%20the%20same%20process%20for%20the%20spine%20devices%20defined%20earlier.%20We%20will%20be%20mapping%20it%20to%20the%20Juniper%20QFX%20devices%20as%20well.%3C/span%3E%3C/p%3E
- Next we will add a few racks
- Click on the rack type from the menu
- Click to create a rack type
- Add a name for the new rack
- Name the leaf switch
- Choose a logical leaf device that was previously defined
- Choose the desired logical device from the list
- Click to add a new Generic system
- Add a name to the Generic System Group
- Enter a desired name
- FInish the process of creating a new rack
- Let us add another generic system
- Click to edit the rack type
- Navigate to the leafs tab
- Click on generic systems tab
- Up the Generic system count to 2 and then update the rack type
- Bring everything together in the next steps
- Choose templates from the menu
- Click to create a template
- Add a name first
- Enter more details and then scroll down
- To choose a rack type click on the drop down menu
- Choose the rack type that we created earlier from the menu
- Click to select the desired spine logical device
- Choose the logical spine device from the list
- Enter the desired count
- Click on create to complete the configuration
- Next step is to create a blueprint for the entire Datacenter fabric
- Click to create a new blueprint
- Enter a name for the Blueprint
- Choose the template from the drop down menu
- Choose the desired template
- Click to display the links
- Click on create to finish the process
- Click to view the Blueprint
- Click on staged
- Select the spines to allocate an Autonomous ID
- Click on the edit icon
- Choose the IP address from the Pool
- Save the configuration
- Repeat the same process for the other leaf devices
- Next we need to configure the interface mappings
- Click on one of the spine devices
- Click on the edit icon
- Choose the interface mappings from the the drop down menu
- Make the desired selection
- Click to update the assignments
- Click to assign system IDs next
- Click on the Assigned System IDs tab
- Click on the edit icon
- Choose from the list of System IDs
- Finalize the assignments
- Click on links
- Recitify any cabling errors as shown automatically
- Update the cabling assingments
- Notice the success message once the cabling mapping is sorted out
- Click on commit
- Add the description and click on the commit button
- Success
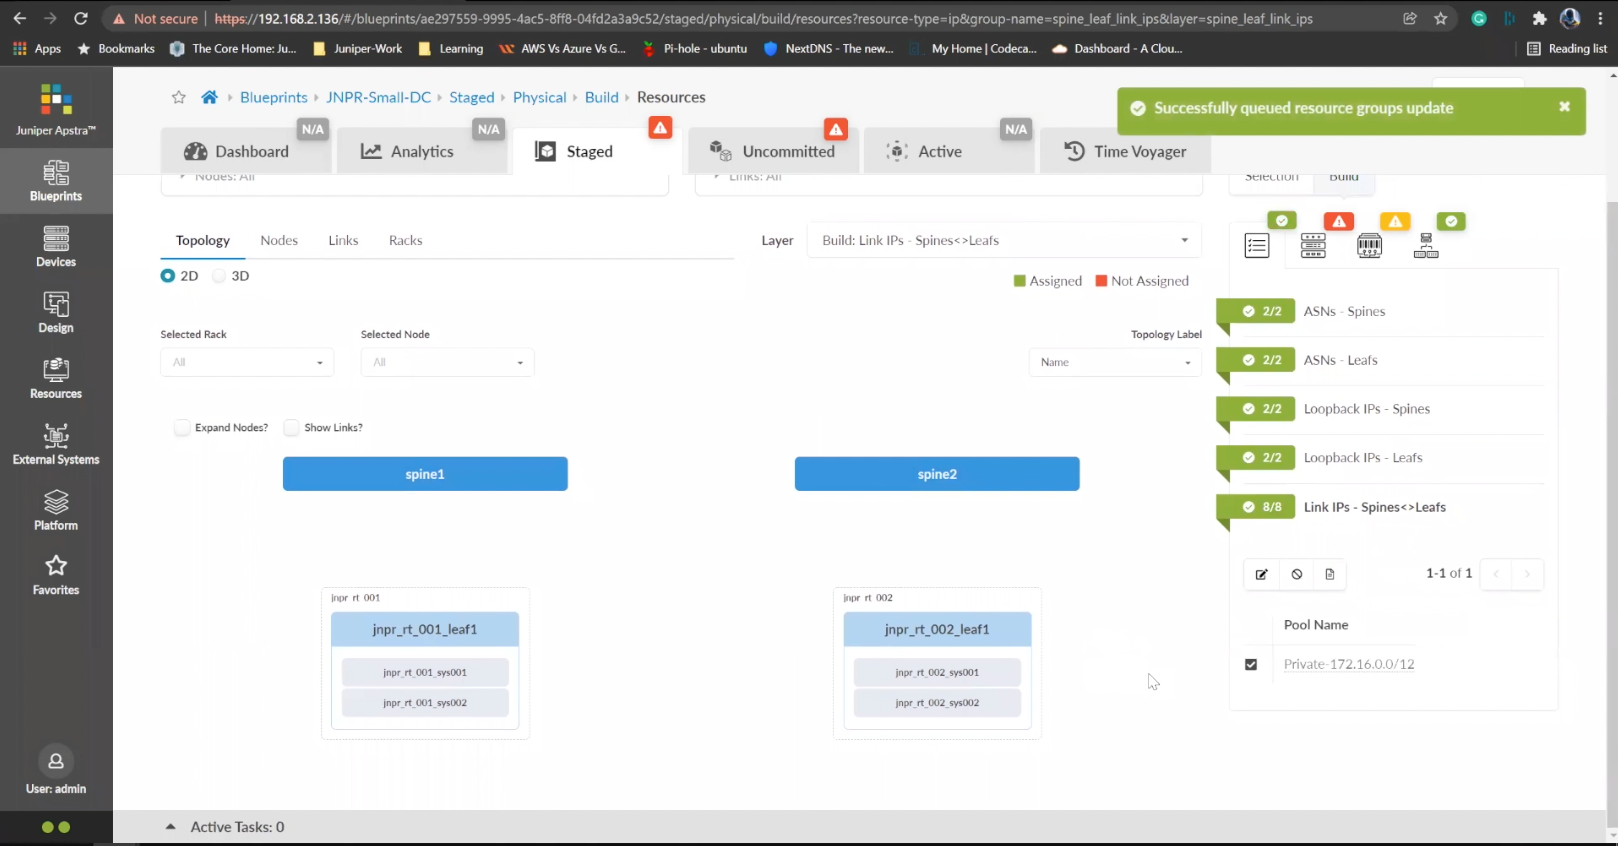
Next we need to configure the interface mappings
- %3Cp%3EWe%20have%20our%20switches%20already%20managed%20by%20Apstra%2C%20a%20series%20of%20Juniper%20virtual%20QFX%20switches%20in%20this%20example.%20We%20wil%20start%20by%20creating%20logical%20devices.%3C/p%3E
- Click%20on%20logical%20devices%20option%20from%20the%20menu
- %3Cp%3E%3Cspan%20style%3D%22font-size%3A%2013px%3B%22%3ETo%20start%20the%20process%2C%20we%20will%20creat%20a%20leaf%20device%20first.%20%3C/span%3E%3C/p%3E%0A%3Cp%3E%3Cspan%20style%3D%22font-size%3A%2015px%3B%22%3EPlease%20Note%3A%20%3C/span%3E%3C/p%3E%0A%3Cp%3E%3Cspan%20style%3D%22font-size%3A%2013px%3B%22%3EThe%20same%20process%20can%20be%20replicated%20for%20a%20spine%20logical%20device%20too.%20For%20the%20purpose%20of%20this%20demo%2C%20we%20will%20skip%20the%20spine%20logical%20device%20creation%20process.%3C/span%3E%3C/p%3E
- Enter a name for the logical device
- Choose the number of ports
- Create a port group
- Click to finish the creation
- %3Cp%3E%3Cspan%20style%3D%22font-size%3A%2013px%3B%22%3E%3Cspan%20style%3D%22font-family%3A%20Calibri%2C%20sans-serif%3B%22%3ENext%20we%20will%20set%20up%20interface%20maps.%20An%20Interface%20map%20maps%20the%20logical%20device%20to%20the%20actual%20physical%20device.%20ie%3A%20a%20specific%20switch%20and%20model%20that%20is%20used%20in%20the%20actual%20typology.%3C/span%3E%3C/span%3E%3C/p%3E
- Click on the Interface maps option from the menu
- Click to create a new interface map
- Add a name
- Choose a logical device that will be mapped to a physical entity
- Choose from the drop down list
- Choose a device profile from the drop down menu
- Choose the Juniper QFX device as shown
- Choose the interfaces
- %3Cp%3E%3Cspan%20style%3D%22font-size%3A%2013px%3B%22%3EWe%20will%20repeat%20the%20same%20process%20for%20the%20spine%20devices%20defined%20earlier.%20We%20will%20be%20mapping%20it%20to%20the%20Juniper%20QFX%20devices%20as%20well.%3C/span%3E%3C/p%3E
- Next we will add a few racks
- Click on the rack type from the menu
- Click to create a rack type
- Add a name for the new rack
- Name the leaf switch
- Choose a logical leaf device that was previously defined
- Choose the desired logical device from the list
- Click to add a new Generic system
- Add a name to the Generic System Group
- Enter a desired name
- FInish the process of creating a new rack
- Let us add another generic system
- Click to edit the rack type
- Navigate to the leafs tab
- Click on generic systems tab
- Up the Generic system count to 2 and then update the rack type
- Bring everything together in the next steps
- Choose templates from the menu
- Click to create a template
- Add a name first
- Enter more details and then scroll down
- To choose a rack type click on the drop down menu
- Choose the rack type that we created earlier from the menu
- Click to select the desired spine logical device
- Choose the logical spine device from the list
- Enter the desired count
- Click on create to complete the configuration
- Next step is to create a blueprint for the entire Datacenter fabric
- Click to create a new blueprint
- Enter a name for the Blueprint
- Choose the template from the drop down menu
- Choose the desired template
- Click to display the links
- Click on create to finish the process
- Click to view the Blueprint
- Click on staged
- Select the spines to allocate an Autonomous ID
- Click on the edit icon
- Choose the IP address from the Pool
- Save the configuration
- Repeat the same process for the other leaf devices
- Next we need to configure the interface mappings
- Click on one of the spine devices
- Click on the edit icon
- Choose the interface mappings from the the drop down menu
- Make the desired selection
- Click to update the assignments
- Click to assign system IDs next
- Click on the Assigned System IDs tab
- Click on the edit icon
- Choose from the list of System IDs
- Finalize the assignments
- Click on links
- Recitify any cabling errors as shown automatically
- Update the cabling assingments
- Notice the success message once the cabling mapping is sorted out
- Click on commit
- Add the description and click on the commit button
- Success
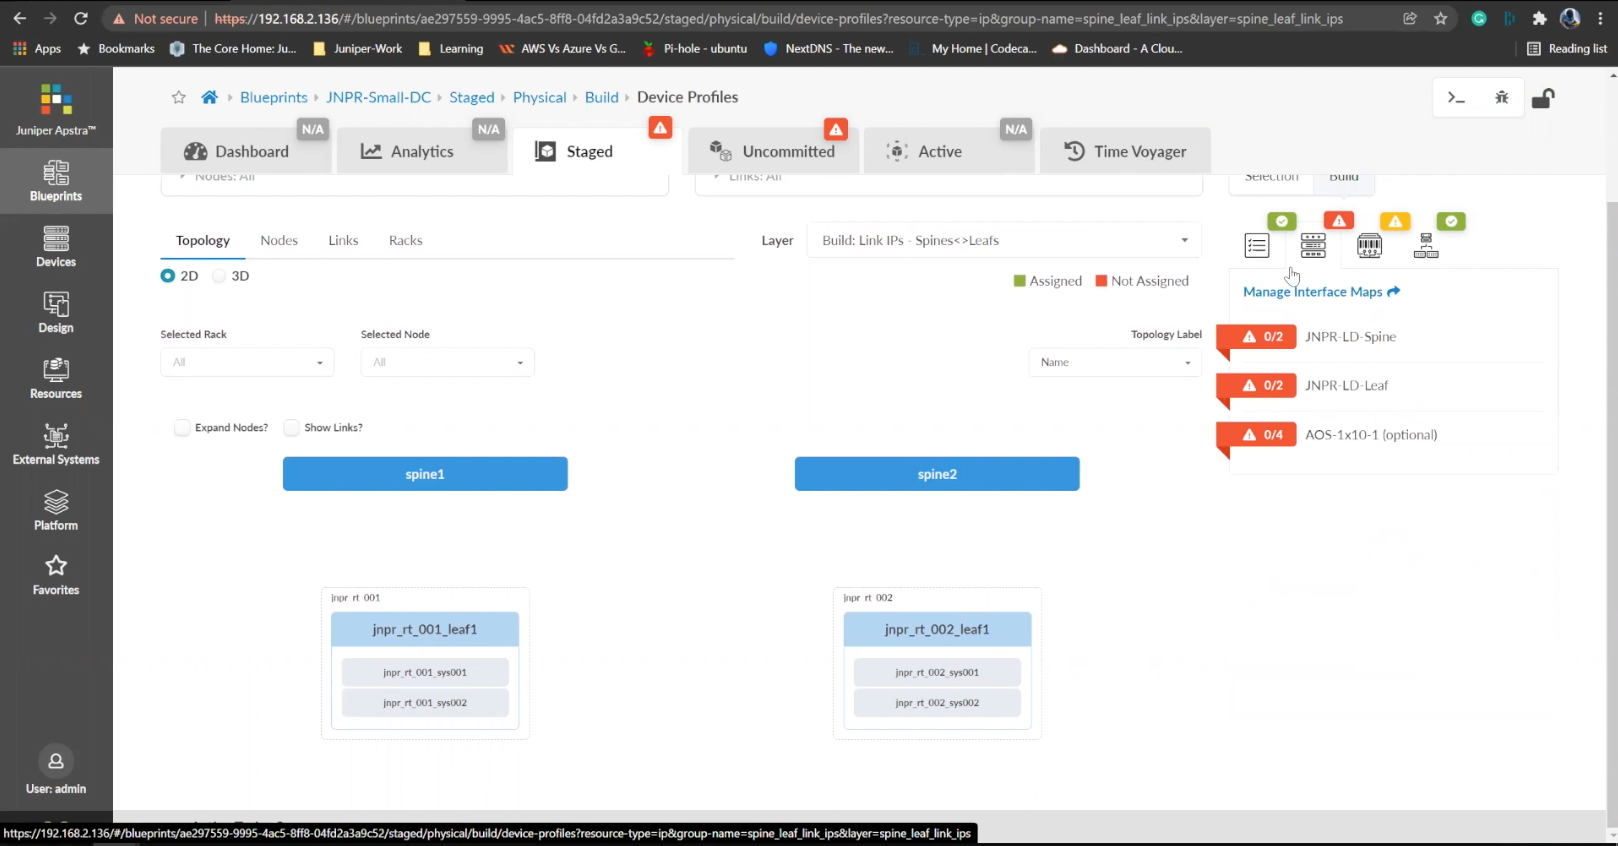
Click on one of the spine devices
- %3Cp%3EWe%20have%20our%20switches%20already%20managed%20by%20Apstra%2C%20a%20series%20of%20Juniper%20virtual%20QFX%20switches%20in%20this%20example.%20We%20wil%20start%20by%20creating%20logical%20devices.%3C/p%3E
- Click%20on%20logical%20devices%20option%20from%20the%20menu
- %3Cp%3E%3Cspan%20style%3D%22font-size%3A%2013px%3B%22%3ETo%20start%20the%20process%2C%20we%20will%20creat%20a%20leaf%20device%20first.%20%3C/span%3E%3C/p%3E%0A%3Cp%3E%3Cspan%20style%3D%22font-size%3A%2015px%3B%22%3EPlease%20Note%3A%20%3C/span%3E%3C/p%3E%0A%3Cp%3E%3Cspan%20style%3D%22font-size%3A%2013px%3B%22%3EThe%20same%20process%20can%20be%20replicated%20for%20a%20spine%20logical%20device%20too.%20For%20the%20purpose%20of%20this%20demo%2C%20we%20will%20skip%20the%20spine%20logical%20device%20creation%20process.%3C/span%3E%3C/p%3E
- Enter a name for the logical device
- Choose the number of ports
- Create a port group
- Click to finish the creation
- %3Cp%3E%3Cspan%20style%3D%22font-size%3A%2013px%3B%22%3E%3Cspan%20style%3D%22font-family%3A%20Calibri%2C%20sans-serif%3B%22%3ENext%20we%20will%20set%20up%20interface%20maps.%20An%20Interface%20map%20maps%20the%20logical%20device%20to%20the%20actual%20physical%20device.%20ie%3A%20a%20specific%20switch%20and%20model%20that%20is%20used%20in%20the%20actual%20typology.%3C/span%3E%3C/span%3E%3C/p%3E
- Click on the Interface maps option from the menu
- Click to create a new interface map
- Add a name
- Choose a logical device that will be mapped to a physical entity
- Choose from the drop down list
- Choose a device profile from the drop down menu
- Choose the Juniper QFX device as shown
- Choose the interfaces
- %3Cp%3E%3Cspan%20style%3D%22font-size%3A%2013px%3B%22%3EWe%20will%20repeat%20the%20same%20process%20for%20the%20spine%20devices%20defined%20earlier.%20We%20will%20be%20mapping%20it%20to%20the%20Juniper%20QFX%20devices%20as%20well.%3C/span%3E%3C/p%3E
- Next we will add a few racks
- Click on the rack type from the menu
- Click to create a rack type
- Add a name for the new rack
- Name the leaf switch
- Choose a logical leaf device that was previously defined
- Choose the desired logical device from the list
- Click to add a new Generic system
- Add a name to the Generic System Group
- Enter a desired name
- FInish the process of creating a new rack
- Let us add another generic system
- Click to edit the rack type
- Navigate to the leafs tab
- Click on generic systems tab
- Up the Generic system count to 2 and then update the rack type
- Bring everything together in the next steps
- Choose templates from the menu
- Click to create a template
- Add a name first
- Enter more details and then scroll down
- To choose a rack type click on the drop down menu
- Choose the rack type that we created earlier from the menu
- Click to select the desired spine logical device
- Choose the logical spine device from the list
- Enter the desired count
- Click on create to complete the configuration
- Next step is to create a blueprint for the entire Datacenter fabric
- Click to create a new blueprint
- Enter a name for the Blueprint
- Choose the template from the drop down menu
- Choose the desired template
- Click to display the links
- Click on create to finish the process
- Click to view the Blueprint
- Click on staged
- Select the spines to allocate an Autonomous ID
- Click on the edit icon
- Choose the IP address from the Pool
- Save the configuration
- Repeat the same process for the other leaf devices
- Next we need to configure the interface mappings
- Click on one of the spine devices
- Click on the edit icon
- Choose the interface mappings from the the drop down menu
- Make the desired selection
- Click to update the assignments
- Click to assign system IDs next
- Click on the Assigned System IDs tab
- Click on the edit icon
- Choose from the list of System IDs
- Finalize the assignments
- Click on links
- Recitify any cabling errors as shown automatically
- Update the cabling assingments
- Notice the success message once the cabling mapping is sorted out
- Click on commit
- Add the description and click on the commit button
- Success
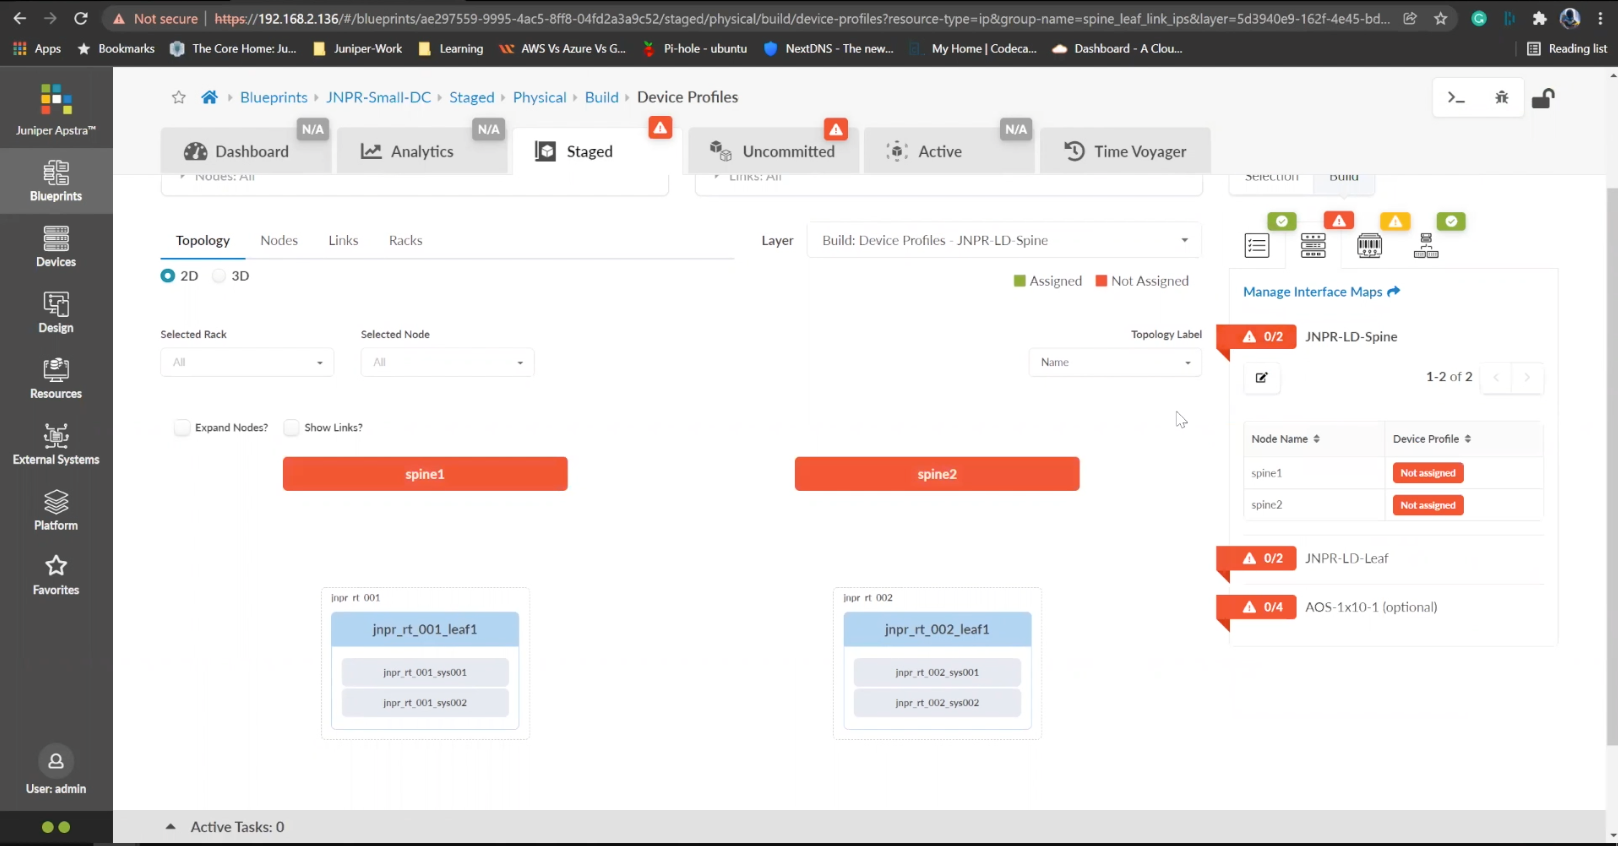
Click on the edit icon
- %3Cp%3EWe%20have%20our%20switches%20already%20managed%20by%20Apstra%2C%20a%20series%20of%20Juniper%20virtual%20QFX%20switches%20in%20this%20example.%20We%20wil%20start%20by%20creating%20logical%20devices.%3C/p%3E
- Click%20on%20logical%20devices%20option%20from%20the%20menu
- %3Cp%3E%3Cspan%20style%3D%22font-size%3A%2013px%3B%22%3ETo%20start%20the%20process%2C%20we%20will%20creat%20a%20leaf%20device%20first.%20%3C/span%3E%3C/p%3E%0A%3Cp%3E%3Cspan%20style%3D%22font-size%3A%2015px%3B%22%3EPlease%20Note%3A%20%3C/span%3E%3C/p%3E%0A%3Cp%3E%3Cspan%20style%3D%22font-size%3A%2013px%3B%22%3EThe%20same%20process%20can%20be%20replicated%20for%20a%20spine%20logical%20device%20too.%20For%20the%20purpose%20of%20this%20demo%2C%20we%20will%20skip%20the%20spine%20logical%20device%20creation%20process.%3C/span%3E%3C/p%3E
- Enter a name for the logical device
- Choose the number of ports
- Create a port group
- Click to finish the creation
- %3Cp%3E%3Cspan%20style%3D%22font-size%3A%2013px%3B%22%3E%3Cspan%20style%3D%22font-family%3A%20Calibri%2C%20sans-serif%3B%22%3ENext%20we%20will%20set%20up%20interface%20maps.%20An%20Interface%20map%20maps%20the%20logical%20device%20to%20the%20actual%20physical%20device.%20ie%3A%20a%20specific%20switch%20and%20model%20that%20is%20used%20in%20the%20actual%20typology.%3C/span%3E%3C/span%3E%3C/p%3E
- Click on the Interface maps option from the menu
- Click to create a new interface map
- Add a name
- Choose a logical device that will be mapped to a physical entity
- Choose from the drop down list
- Choose a device profile from the drop down menu
- Choose the Juniper QFX device as shown
- Choose the interfaces
- %3Cp%3E%3Cspan%20style%3D%22font-size%3A%2013px%3B%22%3EWe%20will%20repeat%20the%20same%20process%20for%20the%20spine%20devices%20defined%20earlier.%20We%20will%20be%20mapping%20it%20to%20the%20Juniper%20QFX%20devices%20as%20well.%3C/span%3E%3C/p%3E
- Next we will add a few racks
- Click on the rack type from the menu
- Click to create a rack type
- Add a name for the new rack
- Name the leaf switch
- Choose a logical leaf device that was previously defined
- Choose the desired logical device from the list
- Click to add a new Generic system
- Add a name to the Generic System Group
- Enter a desired name
- FInish the process of creating a new rack
- Let us add another generic system
- Click to edit the rack type
- Navigate to the leafs tab
- Click on generic systems tab
- Up the Generic system count to 2 and then update the rack type
- Bring everything together in the next steps
- Choose templates from the menu
- Click to create a template
- Add a name first
- Enter more details and then scroll down
- To choose a rack type click on the drop down menu
- Choose the rack type that we created earlier from the menu
- Click to select the desired spine logical device
- Choose the logical spine device from the list
- Enter the desired count
- Click on create to complete the configuration
- Next step is to create a blueprint for the entire Datacenter fabric
- Click to create a new blueprint
- Enter a name for the Blueprint
- Choose the template from the drop down menu
- Choose the desired template
- Click to display the links
- Click on create to finish the process
- Click to view the Blueprint
- Click on staged
- Select the spines to allocate an Autonomous ID
- Click on the edit icon
- Choose the IP address from the Pool
- Save the configuration
- Repeat the same process for the other leaf devices
- Next we need to configure the interface mappings
- Click on one of the spine devices
- Click on the edit icon
- Choose the interface mappings from the the drop down menu
- Make the desired selection
- Click to update the assignments
- Click to assign system IDs next
- Click on the Assigned System IDs tab
- Click on the edit icon
- Choose from the list of System IDs
- Finalize the assignments
- Click on links
- Recitify any cabling errors as shown automatically
- Update the cabling assingments
- Notice the success message once the cabling mapping is sorted out
- Click on commit
- Add the description and click on the commit button
- Success
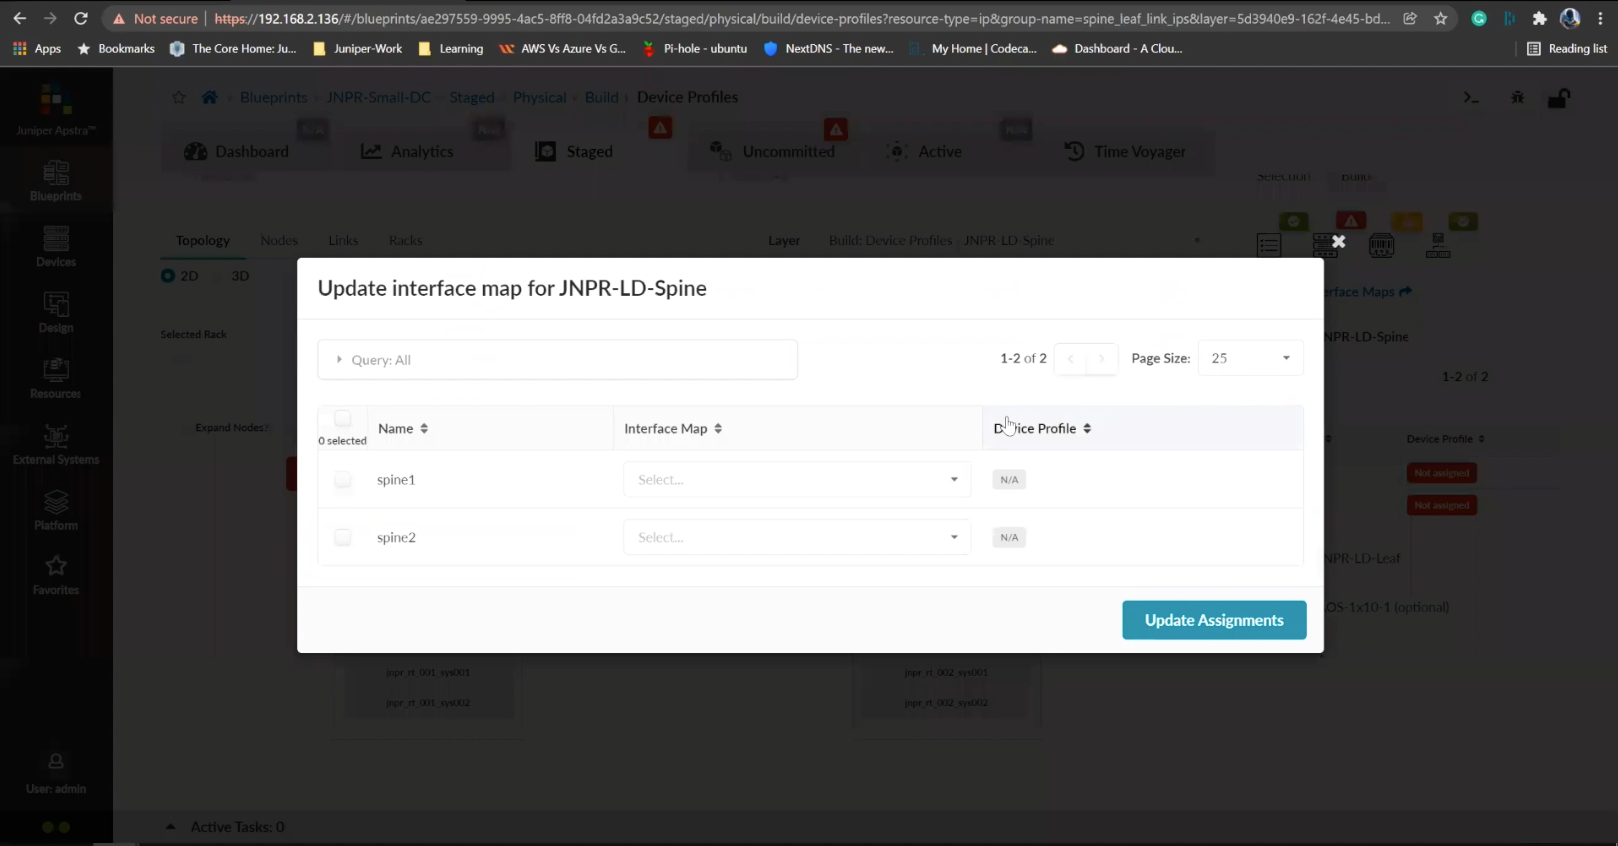
Choose the interface mappings from the the drop down menu
Please note the Interface maps were configured in the earlier steps.
- %3Cp%3EWe%20have%20our%20switches%20already%20managed%20by%20Apstra%2C%20a%20series%20of%20Juniper%20virtual%20QFX%20switches%20in%20this%20example.%20We%20wil%20start%20by%20creating%20logical%20devices.%3C/p%3E
- Click%20on%20logical%20devices%20option%20from%20the%20menu
- %3Cp%3E%3Cspan%20style%3D%22font-size%3A%2013px%3B%22%3ETo%20start%20the%20process%2C%20we%20will%20creat%20a%20leaf%20device%20first.%20%3C/span%3E%3C/p%3E%0A%3Cp%3E%3Cspan%20style%3D%22font-size%3A%2015px%3B%22%3EPlease%20Note%3A%20%3C/span%3E%3C/p%3E%0A%3Cp%3E%3Cspan%20style%3D%22font-size%3A%2013px%3B%22%3EThe%20same%20process%20can%20be%20replicated%20for%20a%20spine%20logical%20device%20too.%20For%20the%20purpose%20of%20this%20demo%2C%20we%20will%20skip%20the%20spine%20logical%20device%20creation%20process.%3C/span%3E%3C/p%3E
- Enter a name for the logical device
- Choose the number of ports
- Create a port group
- Click to finish the creation
- %3Cp%3E%3Cspan%20style%3D%22font-size%3A%2013px%3B%22%3E%3Cspan%20style%3D%22font-family%3A%20Calibri%2C%20sans-serif%3B%22%3ENext%20we%20will%20set%20up%20interface%20maps.%20An%20Interface%20map%20maps%20the%20logical%20device%20to%20the%20actual%20physical%20device.%20ie%3A%20a%20specific%20switch%20and%20model%20that%20is%20used%20in%20the%20actual%20typology.%3C/span%3E%3C/span%3E%3C/p%3E
- Click on the Interface maps option from the menu
- Click to create a new interface map
- Add a name
- Choose a logical device that will be mapped to a physical entity
- Choose from the drop down list
- Choose a device profile from the drop down menu
- Choose the Juniper QFX device as shown
- Choose the interfaces
- %3Cp%3E%3Cspan%20style%3D%22font-size%3A%2013px%3B%22%3EWe%20will%20repeat%20the%20same%20process%20for%20the%20spine%20devices%20defined%20earlier.%20We%20will%20be%20mapping%20it%20to%20the%20Juniper%20QFX%20devices%20as%20well.%3C/span%3E%3C/p%3E
- Next we will add a few racks
- Click on the rack type from the menu
- Click to create a rack type
- Add a name for the new rack
- Name the leaf switch
- Choose a logical leaf device that was previously defined
- Choose the desired logical device from the list
- Click to add a new Generic system
- Add a name to the Generic System Group
- Enter a desired name
- FInish the process of creating a new rack
- Let us add another generic system
- Click to edit the rack type
- Navigate to the leafs tab
- Click on generic systems tab
- Up the Generic system count to 2 and then update the rack type
- Bring everything together in the next steps
- Choose templates from the menu
- Click to create a template
- Add a name first
- Enter more details and then scroll down
- To choose a rack type click on the drop down menu
- Choose the rack type that we created earlier from the menu
- Click to select the desired spine logical device
- Choose the logical spine device from the list
- Enter the desired count
- Click on create to complete the configuration
- Next step is to create a blueprint for the entire Datacenter fabric
- Click to create a new blueprint
- Enter a name for the Blueprint
- Choose the template from the drop down menu
- Choose the desired template
- Click to display the links
- Click on create to finish the process
- Click to view the Blueprint
- Click on staged
- Select the spines to allocate an Autonomous ID
- Click on the edit icon
- Choose the IP address from the Pool
- Save the configuration
- Repeat the same process for the other leaf devices
- Next we need to configure the interface mappings
- Click on one of the spine devices
- Click on the edit icon
- Choose the interface mappings from the the drop down menu
- Make the desired selection
- Click to update the assignments
- Click to assign system IDs next
- Click on the Assigned System IDs tab
- Click on the edit icon
- Choose from the list of System IDs
- Finalize the assignments
- Click on links
- Recitify any cabling errors as shown automatically
- Update the cabling assingments
- Notice the success message once the cabling mapping is sorted out
- Click on commit
- Add the description and click on the commit button
- Success
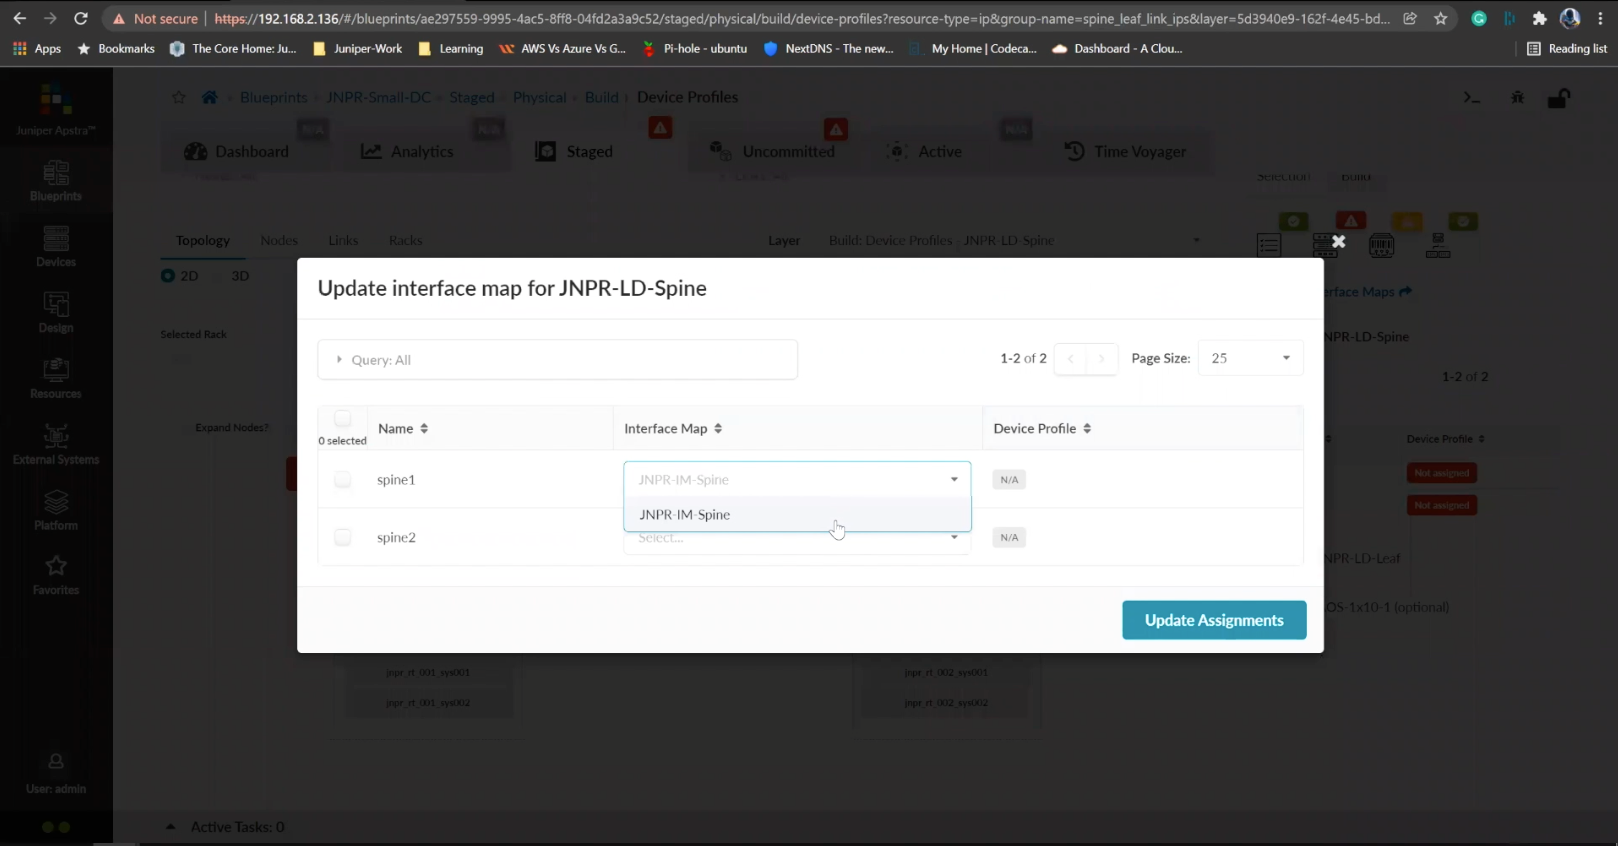
Make the desired selection
- %3Cp%3EWe%20have%20our%20switches%20already%20managed%20by%20Apstra%2C%20a%20series%20of%20Juniper%20virtual%20QFX%20switches%20in%20this%20example.%20We%20wil%20start%20by%20creating%20logical%20devices.%3C/p%3E
- Click%20on%20logical%20devices%20option%20from%20the%20menu
- %3Cp%3E%3Cspan%20style%3D%22font-size%3A%2013px%3B%22%3ETo%20start%20the%20process%2C%20we%20will%20creat%20a%20leaf%20device%20first.%20%3C/span%3E%3C/p%3E%0A%3Cp%3E%3Cspan%20style%3D%22font-size%3A%2015px%3B%22%3EPlease%20Note%3A%20%3C/span%3E%3C/p%3E%0A%3Cp%3E%3Cspan%20style%3D%22font-size%3A%2013px%3B%22%3EThe%20same%20process%20can%20be%20replicated%20for%20a%20spine%20logical%20device%20too.%20For%20the%20purpose%20of%20this%20demo%2C%20we%20will%20skip%20the%20spine%20logical%20device%20creation%20process.%3C/span%3E%3C/p%3E
- Enter a name for the logical device
- Choose the number of ports
- Create a port group
- Click to finish the creation
- %3Cp%3E%3Cspan%20style%3D%22font-size%3A%2013px%3B%22%3E%3Cspan%20style%3D%22font-family%3A%20Calibri%2C%20sans-serif%3B%22%3ENext%20we%20will%20set%20up%20interface%20maps.%20An%20Interface%20map%20maps%20the%20logical%20device%20to%20the%20actual%20physical%20device.%20ie%3A%20a%20specific%20switch%20and%20model%20that%20is%20used%20in%20the%20actual%20typology.%3C/span%3E%3C/span%3E%3C/p%3E
- Click on the Interface maps option from the menu
- Click to create a new interface map
- Add a name
- Choose a logical device that will be mapped to a physical entity
- Choose from the drop down list
- Choose a device profile from the drop down menu
- Choose the Juniper QFX device as shown
- Choose the interfaces
- %3Cp%3E%3Cspan%20style%3D%22font-size%3A%2013px%3B%22%3EWe%20will%20repeat%20the%20same%20process%20for%20the%20spine%20devices%20defined%20earlier.%20We%20will%20be%20mapping%20it%20to%20the%20Juniper%20QFX%20devices%20as%20well.%3C/span%3E%3C/p%3E
- Next we will add a few racks
- Click on the rack type from the menu
- Click to create a rack type
- Add a name for the new rack
- Name the leaf switch
- Choose a logical leaf device that was previously defined
- Choose the desired logical device from the list
- Click to add a new Generic system
- Add a name to the Generic System Group
- Enter a desired name
- FInish the process of creating a new rack
- Let us add another generic system
- Click to edit the rack type
- Navigate to the leafs tab
- Click on generic systems tab
- Up the Generic system count to 2 and then update the rack type
- Bring everything together in the next steps
- Choose templates from the menu
- Click to create a template
- Add a name first
- Enter more details and then scroll down
- To choose a rack type click on the drop down menu
- Choose the rack type that we created earlier from the menu
- Click to select the desired spine logical device
- Choose the logical spine device from the list
- Enter the desired count
- Click on create to complete the configuration
- Next step is to create a blueprint for the entire Datacenter fabric
- Click to create a new blueprint
- Enter a name for the Blueprint
- Choose the template from the drop down menu
- Choose the desired template
- Click to display the links
- Click on create to finish the process
- Click to view the Blueprint
- Click on staged
- Select the spines to allocate an Autonomous ID
- Click on the edit icon
- Choose the IP address from the Pool
- Save the configuration
- Repeat the same process for the other leaf devices
- Next we need to configure the interface mappings
- Click on one of the spine devices
- Click on the edit icon
- Choose the interface mappings from the the drop down menu
- Make the desired selection
- Click to update the assignments
- Click to assign system IDs next
- Click on the Assigned System IDs tab
- Click on the edit icon
- Choose from the list of System IDs
- Finalize the assignments
- Click on links
- Recitify any cabling errors as shown automatically
- Update the cabling assingments
- Notice the success message once the cabling mapping is sorted out
- Click on commit
- Add the description and click on the commit button
- Success
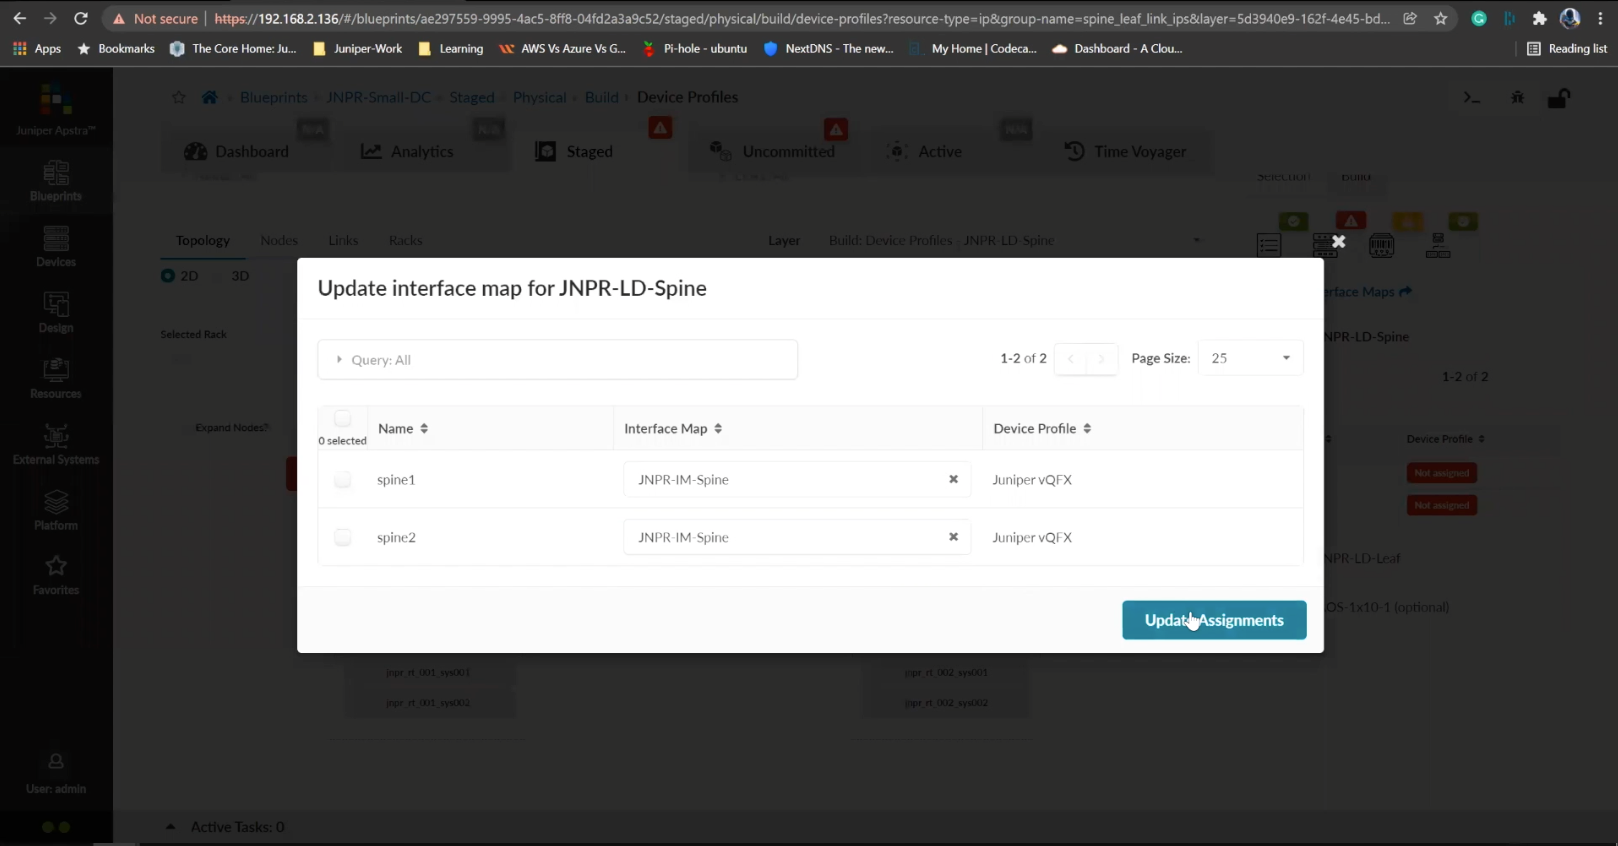
Click to update the assignments
- %3Cp%3EWe%20have%20our%20switches%20already%20managed%20by%20Apstra%2C%20a%20series%20of%20Juniper%20virtual%20QFX%20switches%20in%20this%20example.%20We%20wil%20start%20by%20creating%20logical%20devices.%3C/p%3E
- Click%20on%20logical%20devices%20option%20from%20the%20menu
- %3Cp%3E%3Cspan%20style%3D%22font-size%3A%2013px%3B%22%3ETo%20start%20the%20process%2C%20we%20will%20creat%20a%20leaf%20device%20first.%20%3C/span%3E%3C/p%3E%0A%3Cp%3E%3Cspan%20style%3D%22font-size%3A%2015px%3B%22%3EPlease%20Note%3A%20%3C/span%3E%3C/p%3E%0A%3Cp%3E%3Cspan%20style%3D%22font-size%3A%2013px%3B%22%3EThe%20same%20process%20can%20be%20replicated%20for%20a%20spine%20logical%20device%20too.%20For%20the%20purpose%20of%20this%20demo%2C%20we%20will%20skip%20the%20spine%20logical%20device%20creation%20process.%3C/span%3E%3C/p%3E
- Enter a name for the logical device
- Choose the number of ports
- Create a port group
- Click to finish the creation
- %3Cp%3E%3Cspan%20style%3D%22font-size%3A%2013px%3B%22%3E%3Cspan%20style%3D%22font-family%3A%20Calibri%2C%20sans-serif%3B%22%3ENext%20we%20will%20set%20up%20interface%20maps.%20An%20Interface%20map%20maps%20the%20logical%20device%20to%20the%20actual%20physical%20device.%20ie%3A%20a%20specific%20switch%20and%20model%20that%20is%20used%20in%20the%20actual%20typology.%3C/span%3E%3C/span%3E%3C/p%3E
- Click on the Interface maps option from the menu
- Click to create a new interface map
- Add a name
- Choose a logical device that will be mapped to a physical entity
- Choose from the drop down list
- Choose a device profile from the drop down menu
- Choose the Juniper QFX device as shown
- Choose the interfaces
- %3Cp%3E%3Cspan%20style%3D%22font-size%3A%2013px%3B%22%3EWe%20will%20repeat%20the%20same%20process%20for%20the%20spine%20devices%20defined%20earlier.%20We%20will%20be%20mapping%20it%20to%20the%20Juniper%20QFX%20devices%20as%20well.%3C/span%3E%3C/p%3E
- Next we will add a few racks
- Click on the rack type from the menu
- Click to create a rack type
- Add a name for the new rack
- Name the leaf switch
- Choose a logical leaf device that was previously defined
- Choose the desired logical device from the list
- Click to add a new Generic system
- Add a name to the Generic System Group
- Enter a desired name
- FInish the process of creating a new rack
- Let us add another generic system
- Click to edit the rack type
- Navigate to the leafs tab
- Click on generic systems tab
- Up the Generic system count to 2 and then update the rack type
- Bring everything together in the next steps
- Choose templates from the menu
- Click to create a template
- Add a name first
- Enter more details and then scroll down
- To choose a rack type click on the drop down menu
- Choose the rack type that we created earlier from the menu
- Click to select the desired spine logical device
- Choose the logical spine device from the list
- Enter the desired count
- Click on create to complete the configuration
- Next step is to create a blueprint for the entire Datacenter fabric
- Click to create a new blueprint
- Enter a name for the Blueprint
- Choose the template from the drop down menu
- Choose the desired template
- Click to display the links
- Click on create to finish the process
- Click to view the Blueprint
- Click on staged
- Select the spines to allocate an Autonomous ID
- Click on the edit icon
- Choose the IP address from the Pool
- Save the configuration
- Repeat the same process for the other leaf devices
- Next we need to configure the interface mappings
- Click on one of the spine devices
- Click on the edit icon
- Choose the interface mappings from the the drop down menu
- Make the desired selection
- Click to update the assignments
- Click to assign system IDs next
- Click on the Assigned System IDs tab
- Click on the edit icon
- Choose from the list of System IDs
- Finalize the assignments
- Click on links
- Recitify any cabling errors as shown automatically
- Update the cabling assingments
- Notice the success message once the cabling mapping is sorted out
- Click on commit
- Add the description and click on the commit button
- Success
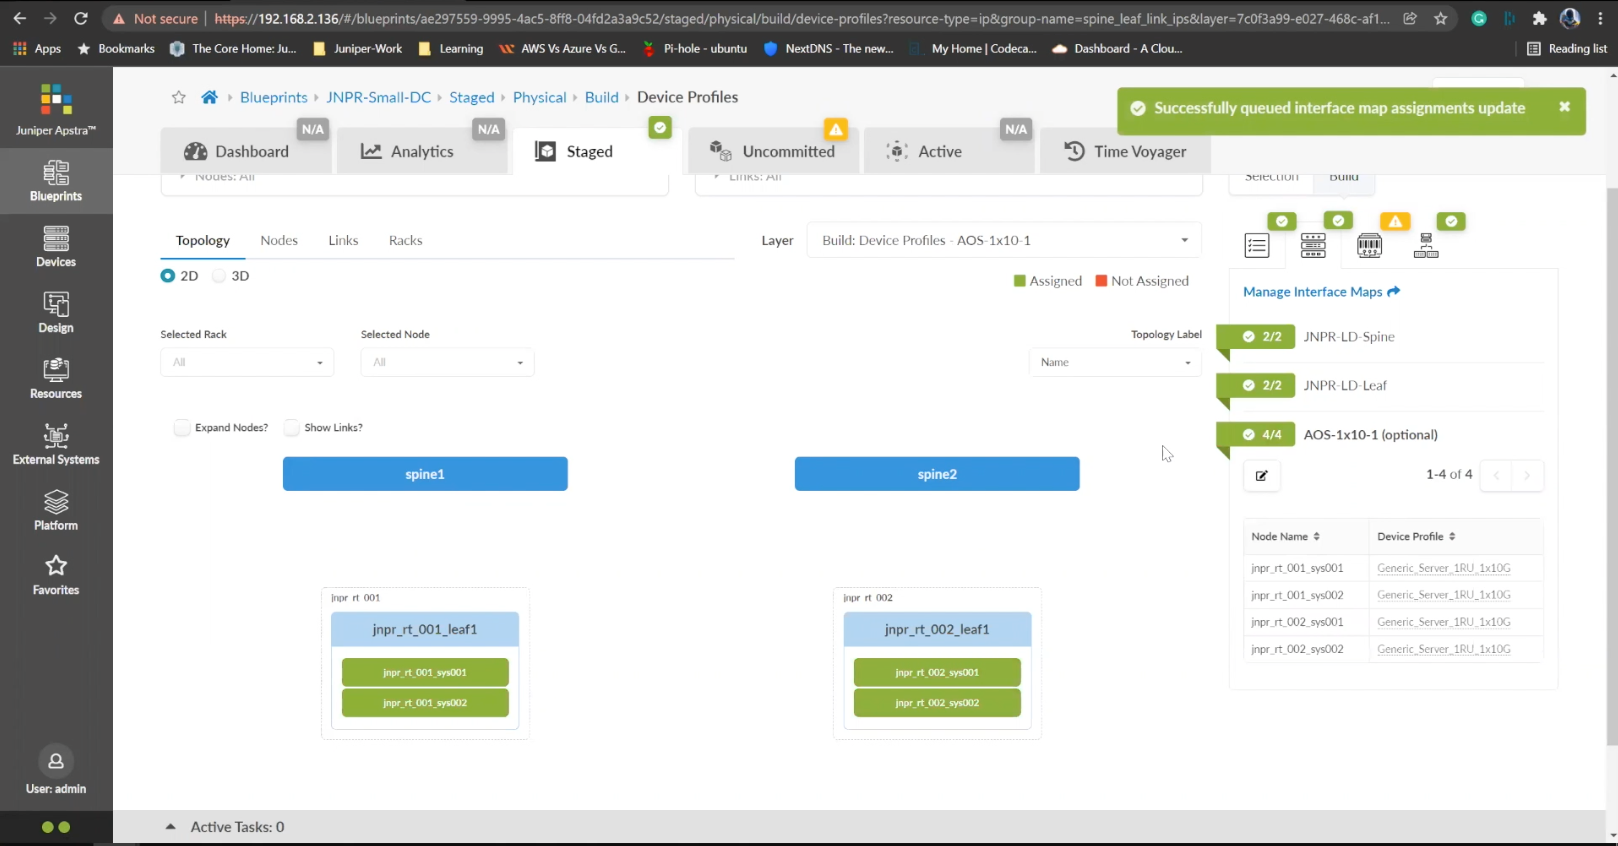
Click to assign system IDs next
- %3Cp%3EWe%20have%20our%20switches%20already%20managed%20by%20Apstra%2C%20a%20series%20of%20Juniper%20virtual%20QFX%20switches%20in%20this%20example.%20We%20wil%20start%20by%20creating%20logical%20devices.%3C/p%3E
- Click%20on%20logical%20devices%20option%20from%20the%20menu
- %3Cp%3E%3Cspan%20style%3D%22font-size%3A%2013px%3B%22%3ETo%20start%20the%20process%2C%20we%20will%20creat%20a%20leaf%20device%20first.%20%3C/span%3E%3C/p%3E%0A%3Cp%3E%3Cspan%20style%3D%22font-size%3A%2015px%3B%22%3EPlease%20Note%3A%20%3C/span%3E%3C/p%3E%0A%3Cp%3E%3Cspan%20style%3D%22font-size%3A%2013px%3B%22%3EThe%20same%20process%20can%20be%20replicated%20for%20a%20spine%20logical%20device%20too.%20For%20the%20purpose%20of%20this%20demo%2C%20we%20will%20skip%20the%20spine%20logical%20device%20creation%20process.%3C/span%3E%3C/p%3E
- Enter a name for the logical device
- Choose the number of ports
- Create a port group
- Click to finish the creation
- %3Cp%3E%3Cspan%20style%3D%22font-size%3A%2013px%3B%22%3E%3Cspan%20style%3D%22font-family%3A%20Calibri%2C%20sans-serif%3B%22%3ENext%20we%20will%20set%20up%20interface%20maps.%20An%20Interface%20map%20maps%20the%20logical%20device%20to%20the%20actual%20physical%20device.%20ie%3A%20a%20specific%20switch%20and%20model%20that%20is%20used%20in%20the%20actual%20typology.%3C/span%3E%3C/span%3E%3C/p%3E
- Click on the Interface maps option from the menu
- Click to create a new interface map
- Add a name
- Choose a logical device that will be mapped to a physical entity
- Choose from the drop down list
- Choose a device profile from the drop down menu
- Choose the Juniper QFX device as shown
- Choose the interfaces
- %3Cp%3E%3Cspan%20style%3D%22font-size%3A%2013px%3B%22%3EWe%20will%20repeat%20the%20same%20process%20for%20the%20spine%20devices%20defined%20earlier.%20We%20will%20be%20mapping%20it%20to%20the%20Juniper%20QFX%20devices%20as%20well.%3C/span%3E%3C/p%3E
- Next we will add a few racks
- Click on the rack type from the menu
- Click to create a rack type
- Add a name for the new rack
- Name the leaf switch
- Choose a logical leaf device that was previously defined
- Choose the desired logical device from the list
- Click to add a new Generic system
- Add a name to the Generic System Group
- Enter a desired name
- FInish the process of creating a new rack
- Let us add another generic system
- Click to edit the rack type
- Navigate to the leafs tab
- Click on generic systems tab
- Up the Generic system count to 2 and then update the rack type
- Bring everything together in the next steps
- Choose templates from the menu
- Click to create a template
- Add a name first
- Enter more details and then scroll down
- To choose a rack type click on the drop down menu
- Choose the rack type that we created earlier from the menu
- Click to select the desired spine logical device
- Choose the logical spine device from the list
- Enter the desired count
- Click on create to complete the configuration
- Next step is to create a blueprint for the entire Datacenter fabric
- Click to create a new blueprint
- Enter a name for the Blueprint
- Choose the template from the drop down menu
- Choose the desired template
- Click to display the links
- Click on create to finish the process
- Click to view the Blueprint
- Click on staged
- Select the spines to allocate an Autonomous ID
- Click on the edit icon
- Choose the IP address from the Pool
- Save the configuration
- Repeat the same process for the other leaf devices
- Next we need to configure the interface mappings
- Click on one of the spine devices
- Click on the edit icon
- Choose the interface mappings from the the drop down menu
- Make the desired selection
- Click to update the assignments
- Click to assign system IDs next
- Click on the Assigned System IDs tab
- Click on the edit icon
- Choose from the list of System IDs
- Finalize the assignments
- Click on links
- Recitify any cabling errors as shown automatically
- Update the cabling assingments
- Notice the success message once the cabling mapping is sorted out
- Click on commit
- Add the description and click on the commit button
- Success
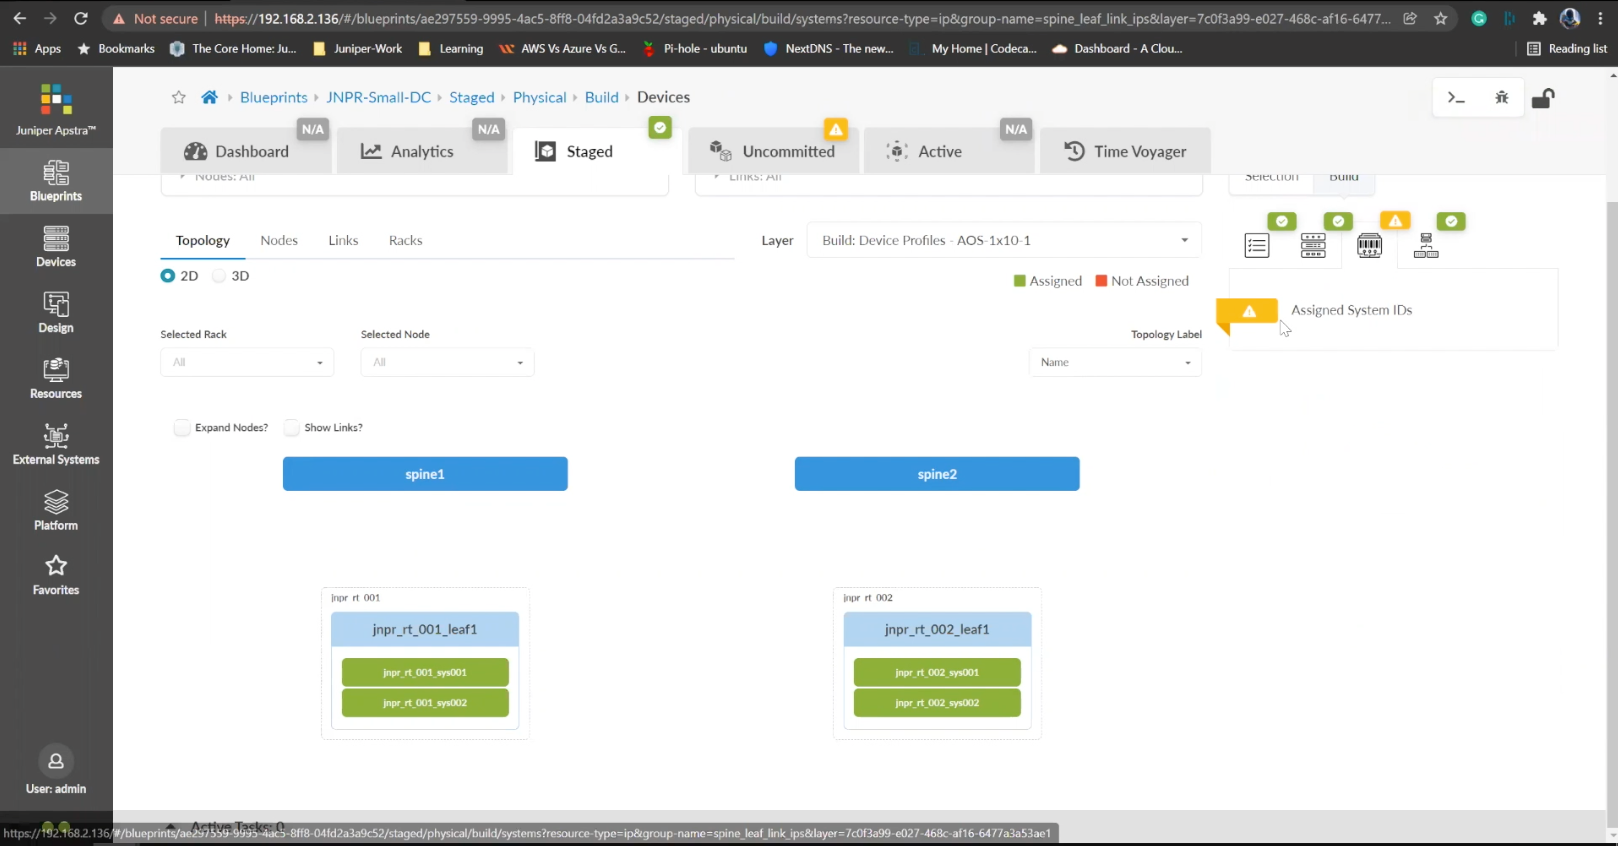
Click on the Assigned System IDs tab
- %3Cp%3EWe%20have%20our%20switches%20already%20managed%20by%20Apstra%2C%20a%20series%20of%20Juniper%20virtual%20QFX%20switches%20in%20this%20example.%20We%20wil%20start%20by%20creating%20logical%20devices.%3C/p%3E
- Click%20on%20logical%20devices%20option%20from%20the%20menu
- %3Cp%3E%3Cspan%20style%3D%22font-size%3A%2013px%3B%22%3ETo%20start%20the%20process%2C%20we%20will%20creat%20a%20leaf%20device%20first.%20%3C/span%3E%3C/p%3E%0A%3Cp%3E%3Cspan%20style%3D%22font-size%3A%2015px%3B%22%3EPlease%20Note%3A%20%3C/span%3E%3C/p%3E%0A%3Cp%3E%3Cspan%20style%3D%22font-size%3A%2013px%3B%22%3EThe%20same%20process%20can%20be%20replicated%20for%20a%20spine%20logical%20device%20too.%20For%20the%20purpose%20of%20this%20demo%2C%20we%20will%20skip%20the%20spine%20logical%20device%20creation%20process.%3C/span%3E%3C/p%3E
- Enter a name for the logical device
- Choose the number of ports
- Create a port group
- Click to finish the creation
- %3Cp%3E%3Cspan%20style%3D%22font-size%3A%2013px%3B%22%3E%3Cspan%20style%3D%22font-family%3A%20Calibri%2C%20sans-serif%3B%22%3ENext%20we%20will%20set%20up%20interface%20maps.%20An%20Interface%20map%20maps%20the%20logical%20device%20to%20the%20actual%20physical%20device.%20ie%3A%20a%20specific%20switch%20and%20model%20that%20is%20used%20in%20the%20actual%20typology.%3C/span%3E%3C/span%3E%3C/p%3E
- Click on the Interface maps option from the menu
- Click to create a new interface map
- Add a name
- Choose a logical device that will be mapped to a physical entity
- Choose from the drop down list
- Choose a device profile from the drop down menu
- Choose the Juniper QFX device as shown
- Choose the interfaces
- %3Cp%3E%3Cspan%20style%3D%22font-size%3A%2013px%3B%22%3EWe%20will%20repeat%20the%20same%20process%20for%20the%20spine%20devices%20defined%20earlier.%20We%20will%20be%20mapping%20it%20to%20the%20Juniper%20QFX%20devices%20as%20well.%3C/span%3E%3C/p%3E
- Next we will add a few racks
- Click on the rack type from the menu
- Click to create a rack type
- Add a name for the new rack
- Name the leaf switch
- Choose a logical leaf device that was previously defined
- Choose the desired logical device from the list
- Click to add a new Generic system
- Add a name to the Generic System Group
- Enter a desired name
- FInish the process of creating a new rack
- Let us add another generic system
- Click to edit the rack type
- Navigate to the leafs tab
- Click on generic systems tab
- Up the Generic system count to 2 and then update the rack type
- Bring everything together in the next steps
- Choose templates from the menu
- Click to create a template
- Add a name first
- Enter more details and then scroll down
- To choose a rack type click on the drop down menu
- Choose the rack type that we created earlier from the menu
- Click to select the desired spine logical device
- Choose the logical spine device from the list
- Enter the desired count
- Click on create to complete the configuration
- Next step is to create a blueprint for the entire Datacenter fabric
- Click to create a new blueprint
- Enter a name for the Blueprint
- Choose the template from the drop down menu
- Choose the desired template
- Click to display the links
- Click on create to finish the process
- Click to view the Blueprint
- Click on staged
- Select the spines to allocate an Autonomous ID
- Click on the edit icon
- Choose the IP address from the Pool
- Save the configuration
- Repeat the same process for the other leaf devices
- Next we need to configure the interface mappings
- Click on one of the spine devices
- Click on the edit icon
- Choose the interface mappings from the the drop down menu
- Make the desired selection
- Click to update the assignments
- Click to assign system IDs next
- Click on the Assigned System IDs tab
- Click on the edit icon
- Choose from the list of System IDs
- Finalize the assignments
- Click on links
- Recitify any cabling errors as shown automatically
- Update the cabling assingments
- Notice the success message once the cabling mapping is sorted out
- Click on commit
- Add the description and click on the commit button
- Success
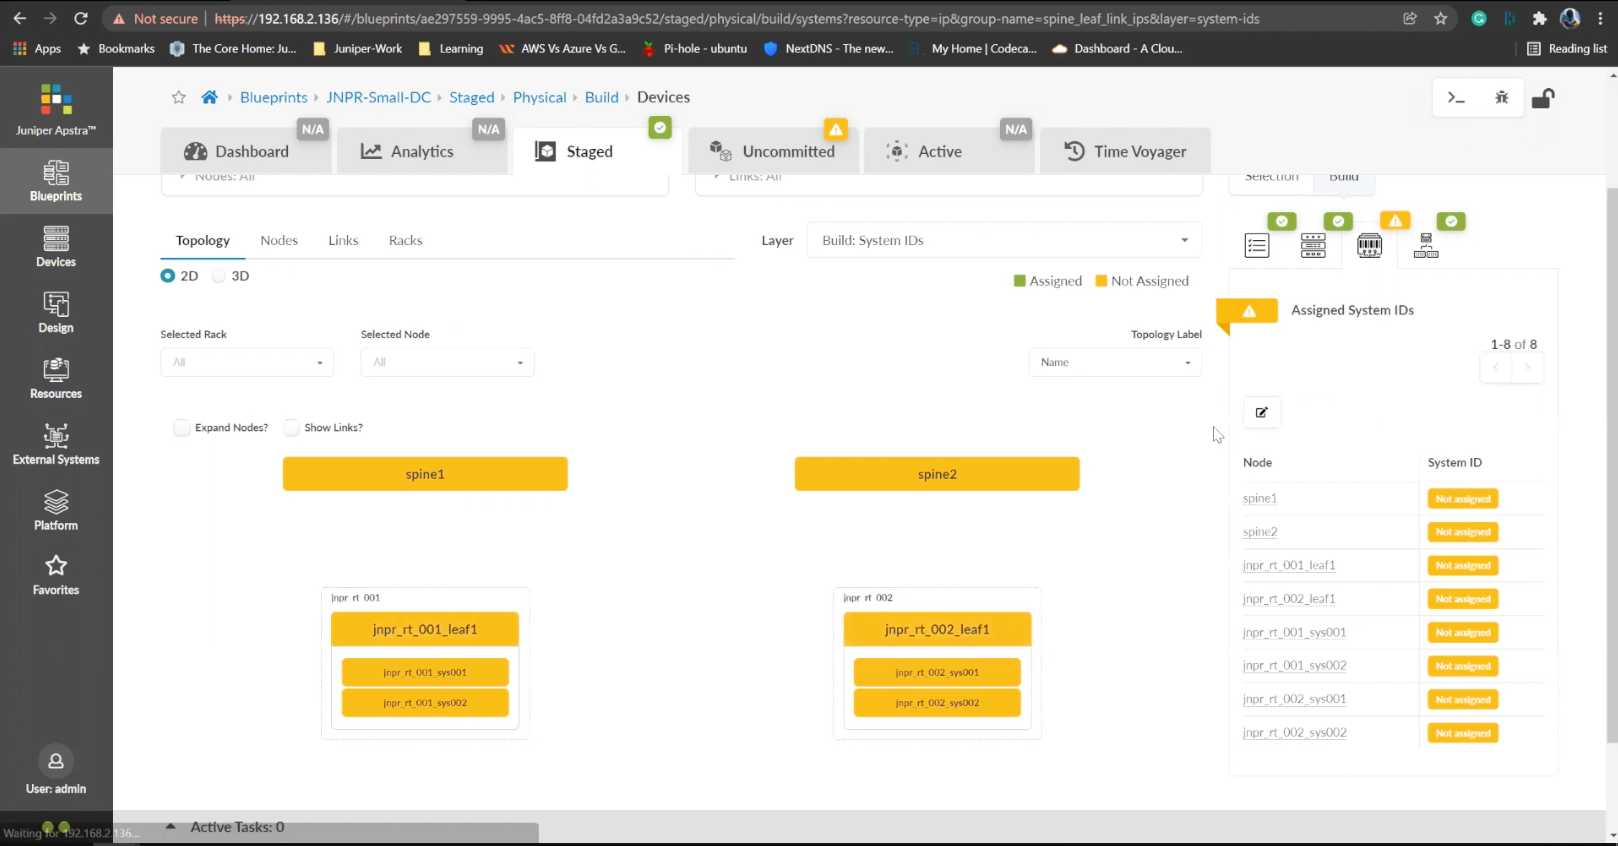
Click on the edit icon
- %3Cp%3EWe%20have%20our%20switches%20already%20managed%20by%20Apstra%2C%20a%20series%20of%20Juniper%20virtual%20QFX%20switches%20in%20this%20example.%20We%20wil%20start%20by%20creating%20logical%20devices.%3C/p%3E
- Click%20on%20logical%20devices%20option%20from%20the%20menu
- %3Cp%3E%3Cspan%20style%3D%22font-size%3A%2013px%3B%22%3ETo%20start%20the%20process%2C%20we%20will%20creat%20a%20leaf%20device%20first.%20%3C/span%3E%3C/p%3E%0A%3Cp%3E%3Cspan%20style%3D%22font-size%3A%2015px%3B%22%3EPlease%20Note%3A%20%3C/span%3E%3C/p%3E%0A%3Cp%3E%3Cspan%20style%3D%22font-size%3A%2013px%3B%22%3EThe%20same%20process%20can%20be%20replicated%20for%20a%20spine%20logical%20device%20too.%20For%20the%20purpose%20of%20this%20demo%2C%20we%20will%20skip%20the%20spine%20logical%20device%20creation%20process.%3C/span%3E%3C/p%3E
- Enter a name for the logical device
- Choose the number of ports
- Create a port group
- Click to finish the creation
- %3Cp%3E%3Cspan%20style%3D%22font-size%3A%2013px%3B%22%3E%3Cspan%20style%3D%22font-family%3A%20Calibri%2C%20sans-serif%3B%22%3ENext%20we%20will%20set%20up%20interface%20maps.%20An%20Interface%20map%20maps%20the%20logical%20device%20to%20the%20actual%20physical%20device.%20ie%3A%20a%20specific%20switch%20and%20model%20that%20is%20used%20in%20the%20actual%20typology.%3C/span%3E%3C/span%3E%3C/p%3E
- Click on the Interface maps option from the menu
- Click to create a new interface map
- Add a name
- Choose a logical device that will be mapped to a physical entity
- Choose from the drop down list
- Choose a device profile from the drop down menu
- Choose the Juniper QFX device as shown
- Choose the interfaces
- %3Cp%3E%3Cspan%20style%3D%22font-size%3A%2013px%3B%22%3EWe%20will%20repeat%20the%20same%20process%20for%20the%20spine%20devices%20defined%20earlier.%20We%20will%20be%20mapping%20it%20to%20the%20Juniper%20QFX%20devices%20as%20well.%3C/span%3E%3C/p%3E
- Next we will add a few racks
- Click on the rack type from the menu
- Click to create a rack type
- Add a name for the new rack
- Name the leaf switch
- Choose a logical leaf device that was previously defined
- Choose the desired logical device from the list
- Click to add a new Generic system
- Add a name to the Generic System Group
- Enter a desired name
- FInish the process of creating a new rack
- Let us add another generic system
- Click to edit the rack type
- Navigate to the leafs tab
- Click on generic systems tab
- Up the Generic system count to 2 and then update the rack type
- Bring everything together in the next steps
- Choose templates from the menu
- Click to create a template
- Add a name first
- Enter more details and then scroll down
- To choose a rack type click on the drop down menu
- Choose the rack type that we created earlier from the menu
- Click to select the desired spine logical device
- Choose the logical spine device from the list
- Enter the desired count
- Click on create to complete the configuration
- Next step is to create a blueprint for the entire Datacenter fabric
- Click to create a new blueprint
- Enter a name for the Blueprint
- Choose the template from the drop down menu
- Choose the desired template
- Click to display the links
- Click on create to finish the process
- Click to view the Blueprint
- Click on staged
- Select the spines to allocate an Autonomous ID
- Click on the edit icon
- Choose the IP address from the Pool
- Save the configuration
- Repeat the same process for the other leaf devices
- Next we need to configure the interface mappings
- Click on one of the spine devices
- Click on the edit icon
- Choose the interface mappings from the the drop down menu
- Make the desired selection
- Click to update the assignments
- Click to assign system IDs next
- Click on the Assigned System IDs tab
- Click on the edit icon
- Choose from the list of System IDs
- Finalize the assignments
- Click on links
- Recitify any cabling errors as shown automatically
- Update the cabling assingments
- Notice the success message once the cabling mapping is sorted out
- Click on commit
- Add the description and click on the commit button
- Success
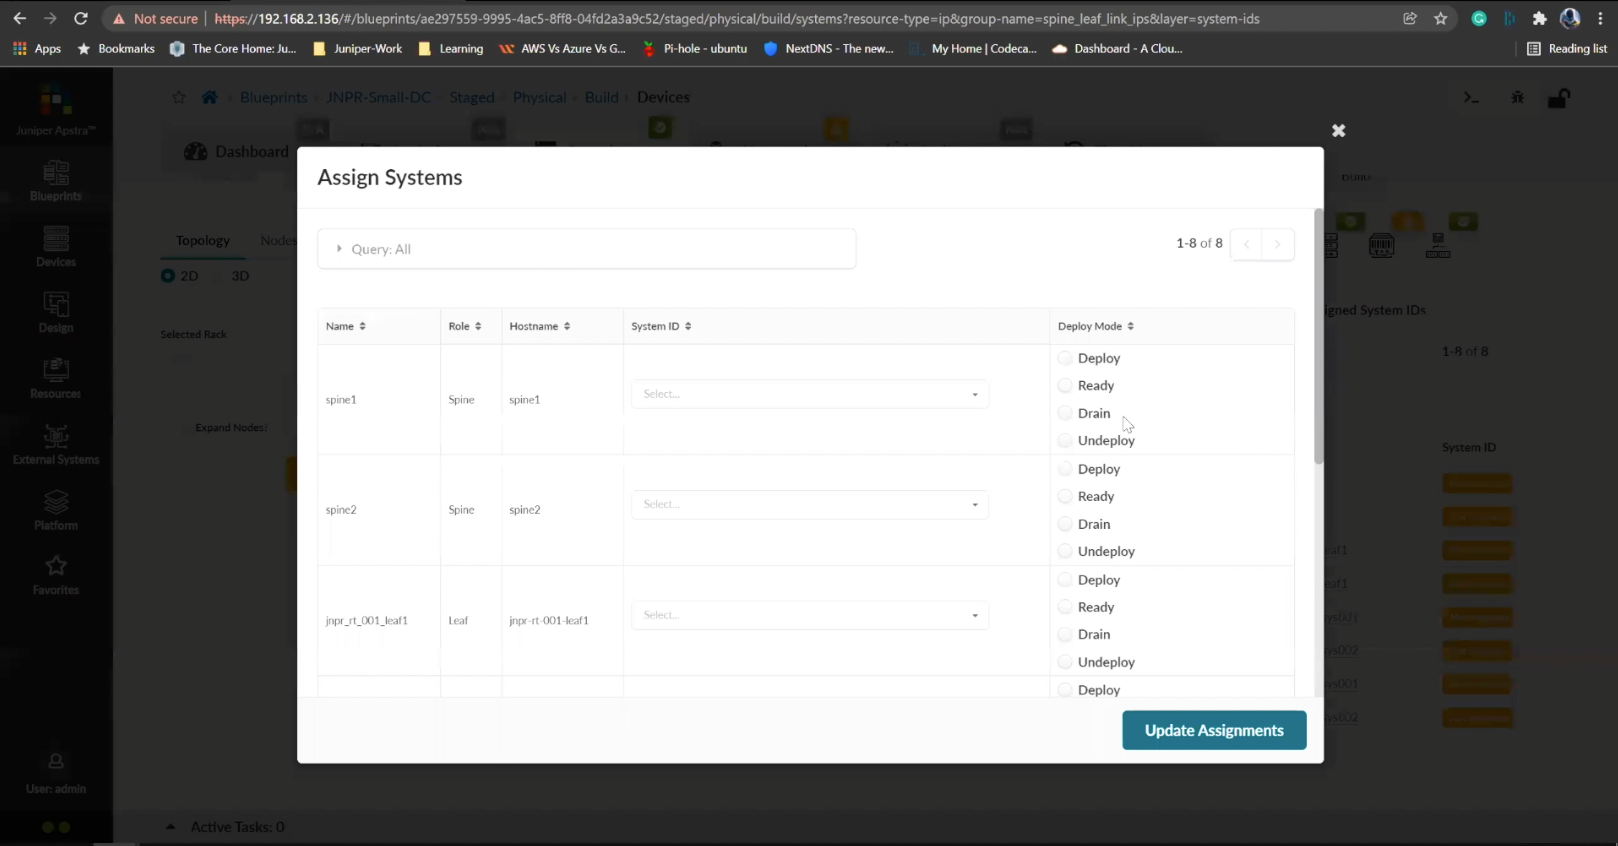
Choose from the list of System IDs
- %3Cp%3EWe%20have%20our%20switches%20already%20managed%20by%20Apstra%2C%20a%20series%20of%20Juniper%20virtual%20QFX%20switches%20in%20this%20example.%20We%20wil%20start%20by%20creating%20logical%20devices.%3C/p%3E
- Click%20on%20logical%20devices%20option%20from%20the%20menu
- %3Cp%3E%3Cspan%20style%3D%22font-size%3A%2013px%3B%22%3ETo%20start%20the%20process%2C%20we%20will%20creat%20a%20leaf%20device%20first.%20%3C/span%3E%3C/p%3E%0A%3Cp%3E%3Cspan%20style%3D%22font-size%3A%2015px%3B%22%3EPlease%20Note%3A%20%3C/span%3E%3C/p%3E%0A%3Cp%3E%3Cspan%20style%3D%22font-size%3A%2013px%3B%22%3EThe%20same%20process%20can%20be%20replicated%20for%20a%20spine%20logical%20device%20too.%20For%20the%20purpose%20of%20this%20demo%2C%20we%20will%20skip%20the%20spine%20logical%20device%20creation%20process.%3C/span%3E%3C/p%3E
- Enter a name for the logical device
- Choose the number of ports
- Create a port group
- Click to finish the creation
- %3Cp%3E%3Cspan%20style%3D%22font-size%3A%2013px%3B%22%3E%3Cspan%20style%3D%22font-family%3A%20Calibri%2C%20sans-serif%3B%22%3ENext%20we%20will%20set%20up%20interface%20maps.%20An%20Interface%20map%20maps%20the%20logical%20device%20to%20the%20actual%20physical%20device.%20ie%3A%20a%20specific%20switch%20and%20model%20that%20is%20used%20in%20the%20actual%20typology.%3C/span%3E%3C/span%3E%3C/p%3E
- Click on the Interface maps option from the menu
- Click to create a new interface map
- Add a name
- Choose a logical device that will be mapped to a physical entity
- Choose from the drop down list
- Choose a device profile from the drop down menu
- Choose the Juniper QFX device as shown
- Choose the interfaces
- %3Cp%3E%3Cspan%20style%3D%22font-size%3A%2013px%3B%22%3EWe%20will%20repeat%20the%20same%20process%20for%20the%20spine%20devices%20defined%20earlier.%20We%20will%20be%20mapping%20it%20to%20the%20Juniper%20QFX%20devices%20as%20well.%3C/span%3E%3C/p%3E
- Next we will add a few racks
- Click on the rack type from the menu
- Click to create a rack type
- Add a name for the new rack
- Name the leaf switch
- Choose a logical leaf device that was previously defined
- Choose the desired logical device from the list
- Click to add a new Generic system
- Add a name to the Generic System Group
- Enter a desired name
- FInish the process of creating a new rack
- Let us add another generic system
- Click to edit the rack type
- Navigate to the leafs tab
- Click on generic systems tab
- Up the Generic system count to 2 and then update the rack type
- Bring everything together in the next steps
- Choose templates from the menu
- Click to create a template
- Add a name first
- Enter more details and then scroll down
- To choose a rack type click on the drop down menu
- Choose the rack type that we created earlier from the menu
- Click to select the desired spine logical device
- Choose the logical spine device from the list
- Enter the desired count
- Click on create to complete the configuration
- Next step is to create a blueprint for the entire Datacenter fabric
- Click to create a new blueprint
- Enter a name for the Blueprint
- Choose the template from the drop down menu
- Choose the desired template
- Click to display the links
- Click on create to finish the process
- Click to view the Blueprint
- Click on staged
- Select the spines to allocate an Autonomous ID
- Click on the edit icon
- Choose the IP address from the Pool
- Save the configuration
- Repeat the same process for the other leaf devices
- Next we need to configure the interface mappings
- Click on one of the spine devices
- Click on the edit icon
- Choose the interface mappings from the the drop down menu
- Make the desired selection
- Click to update the assignments
- Click to assign system IDs next
- Click on the Assigned System IDs tab
- Click on the edit icon
- Choose from the list of System IDs
- Finalize the assignments
- Click on links
- Recitify any cabling errors as shown automatically
- Update the cabling assingments
- Notice the success message once the cabling mapping is sorted out
- Click on commit
- Add the description and click on the commit button
- Success
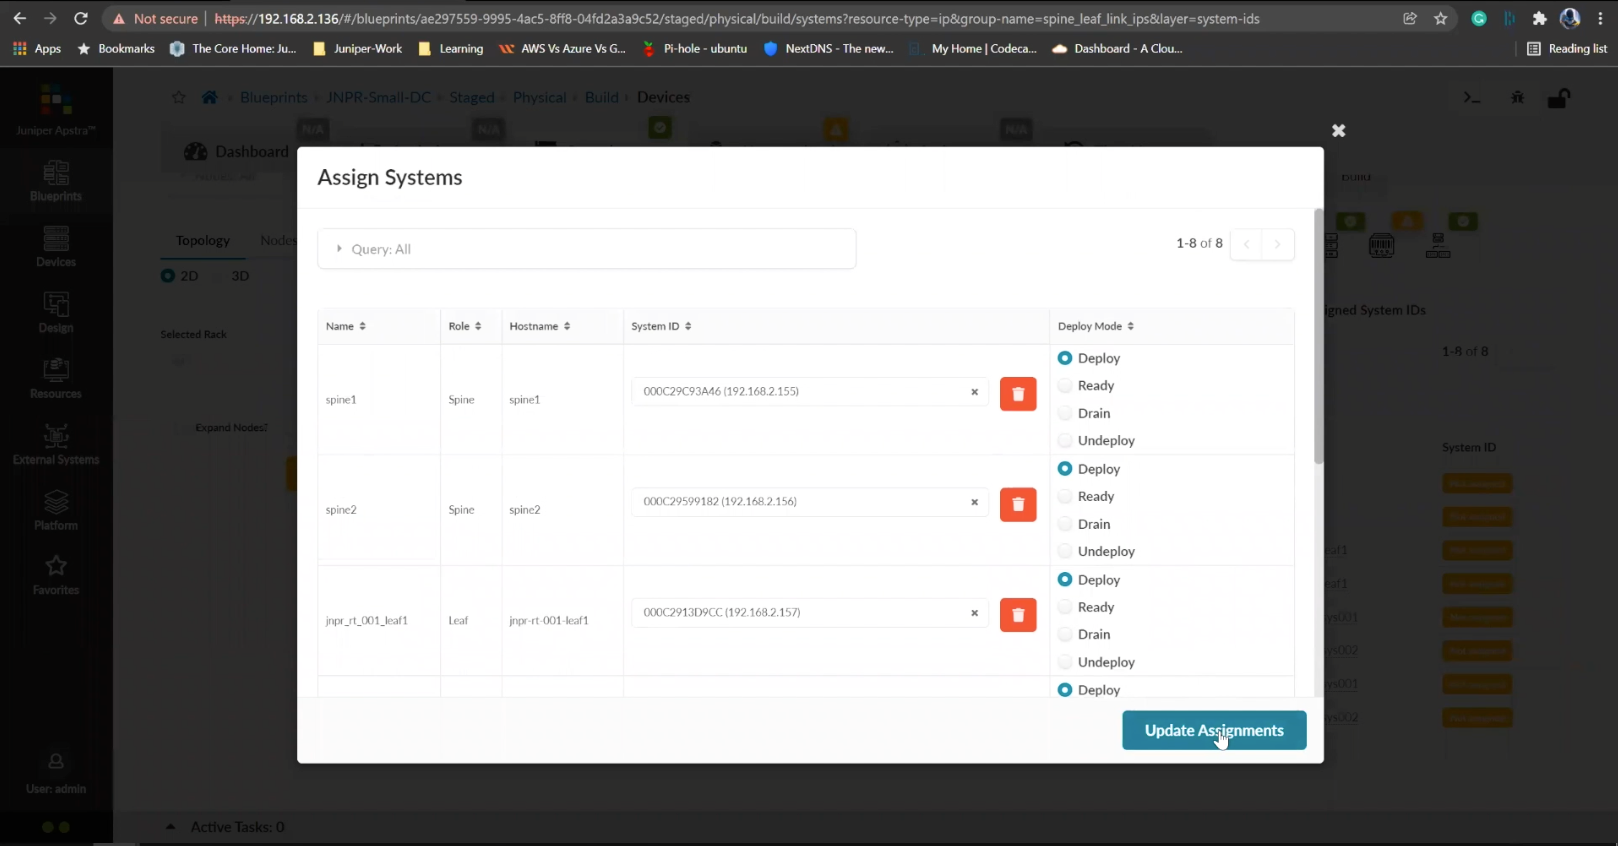
Finalize the assignments
- %3Cp%3EWe%20have%20our%20switches%20already%20managed%20by%20Apstra%2C%20a%20series%20of%20Juniper%20virtual%20QFX%20switches%20in%20this%20example.%20We%20wil%20start%20by%20creating%20logical%20devices.%3C/p%3E
- Click%20on%20logical%20devices%20option%20from%20the%20menu
- %3Cp%3E%3Cspan%20style%3D%22font-size%3A%2013px%3B%22%3ETo%20start%20the%20process%2C%20we%20will%20creat%20a%20leaf%20device%20first.%20%3C/span%3E%3C/p%3E%0A%3Cp%3E%3Cspan%20style%3D%22font-size%3A%2015px%3B%22%3EPlease%20Note%3A%20%3C/span%3E%3C/p%3E%0A%3Cp%3E%3Cspan%20style%3D%22font-size%3A%2013px%3B%22%3EThe%20same%20process%20can%20be%20replicated%20for%20a%20spine%20logical%20device%20too.%20For%20the%20purpose%20of%20this%20demo%2C%20we%20will%20skip%20the%20spine%20logical%20device%20creation%20process.%3C/span%3E%3C/p%3E
- Enter a name for the logical device
- Choose the number of ports
- Create a port group
- Click to finish the creation
- %3Cp%3E%3Cspan%20style%3D%22font-size%3A%2013px%3B%22%3E%3Cspan%20style%3D%22font-family%3A%20Calibri%2C%20sans-serif%3B%22%3ENext%20we%20will%20set%20up%20interface%20maps.%20An%20Interface%20map%20maps%20the%20logical%20device%20to%20the%20actual%20physical%20device.%20ie%3A%20a%20specific%20switch%20and%20model%20that%20is%20used%20in%20the%20actual%20typology.%3C/span%3E%3C/span%3E%3C/p%3E
- Click on the Interface maps option from the menu
- Click to create a new interface map
- Add a name
- Choose a logical device that will be mapped to a physical entity
- Choose from the drop down list
- Choose a device profile from the drop down menu
- Choose the Juniper QFX device as shown
- Choose the interfaces
- %3Cp%3E%3Cspan%20style%3D%22font-size%3A%2013px%3B%22%3EWe%20will%20repeat%20the%20same%20process%20for%20the%20spine%20devices%20defined%20earlier.%20We%20will%20be%20mapping%20it%20to%20the%20Juniper%20QFX%20devices%20as%20well.%3C/span%3E%3C/p%3E
- Next we will add a few racks
- Click on the rack type from the menu
- Click to create a rack type
- Add a name for the new rack
- Name the leaf switch
- Choose a logical leaf device that was previously defined
- Choose the desired logical device from the list
- Click to add a new Generic system
- Add a name to the Generic System Group
- Enter a desired name
- FInish the process of creating a new rack
- Let us add another generic system
- Click to edit the rack type
- Navigate to the leafs tab
- Click on generic systems tab
- Up the Generic system count to 2 and then update the rack type
- Bring everything together in the next steps
- Choose templates from the menu
- Click to create a template
- Add a name first
- Enter more details and then scroll down
- To choose a rack type click on the drop down menu
- Choose the rack type that we created earlier from the menu
- Click to select the desired spine logical device
- Choose the logical spine device from the list
- Enter the desired count
- Click on create to complete the configuration
- Next step is to create a blueprint for the entire Datacenter fabric
- Click to create a new blueprint
- Enter a name for the Blueprint
- Choose the template from the drop down menu
- Choose the desired template
- Click to display the links
- Click on create to finish the process
- Click to view the Blueprint
- Click on staged
- Select the spines to allocate an Autonomous ID
- Click on the edit icon
- Choose the IP address from the Pool
- Save the configuration
- Repeat the same process for the other leaf devices
- Next we need to configure the interface mappings
- Click on one of the spine devices
- Click on the edit icon
- Choose the interface mappings from the the drop down menu
- Make the desired selection
- Click to update the assignments
- Click to assign system IDs next
- Click on the Assigned System IDs tab
- Click on the edit icon
- Choose from the list of System IDs
- Finalize the assignments
- Click on links
- Recitify any cabling errors as shown automatically
- Update the cabling assingments
- Notice the success message once the cabling mapping is sorted out
- Click on commit
- Add the description and click on the commit button
- Success
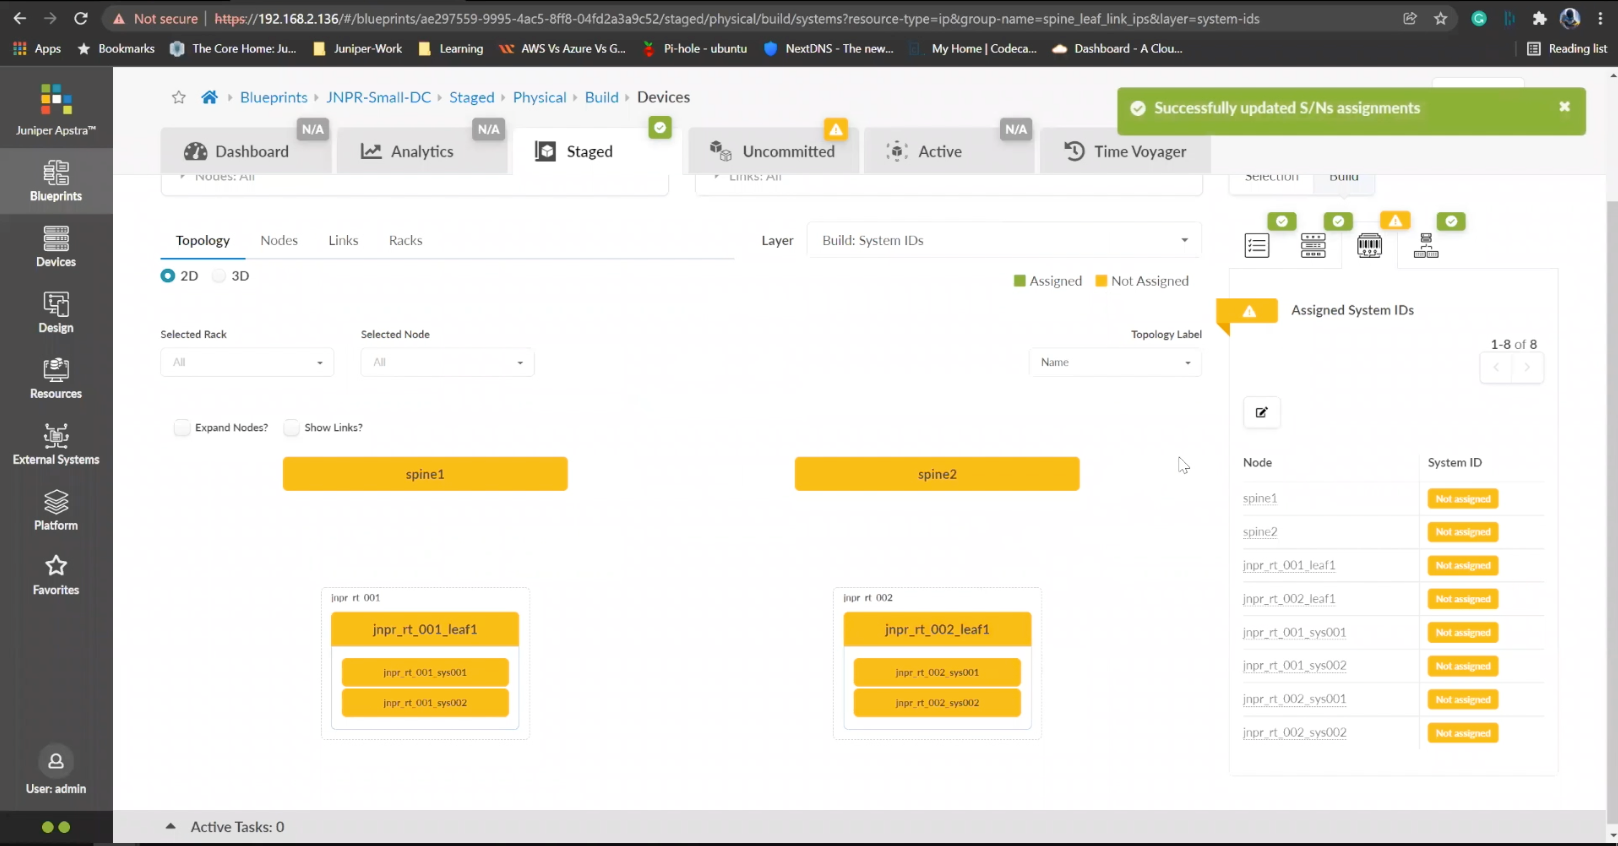
Click on links
- %3Cp%3EWe%20have%20our%20switches%20already%20managed%20by%20Apstra%2C%20a%20series%20of%20Juniper%20virtual%20QFX%20switches%20in%20this%20example.%20We%20wil%20start%20by%20creating%20logical%20devices.%3C/p%3E
- Click%20on%20logical%20devices%20option%20from%20the%20menu
- %3Cp%3E%3Cspan%20style%3D%22font-size%3A%2013px%3B%22%3ETo%20start%20the%20process%2C%20we%20will%20creat%20a%20leaf%20device%20first.%20%3C/span%3E%3C/p%3E%0A%3Cp%3E%3Cspan%20style%3D%22font-size%3A%2015px%3B%22%3EPlease%20Note%3A%20%3C/span%3E%3C/p%3E%0A%3Cp%3E%3Cspan%20style%3D%22font-size%3A%2013px%3B%22%3EThe%20same%20process%20can%20be%20replicated%20for%20a%20spine%20logical%20device%20too.%20For%20the%20purpose%20of%20this%20demo%2C%20we%20will%20skip%20the%20spine%20logical%20device%20creation%20process.%3C/span%3E%3C/p%3E
- Enter a name for the logical device
- Choose the number of ports
- Create a port group
- Click to finish the creation
- %3Cp%3E%3Cspan%20style%3D%22font-size%3A%2013px%3B%22%3E%3Cspan%20style%3D%22font-family%3A%20Calibri%2C%20sans-serif%3B%22%3ENext%20we%20will%20set%20up%20interface%20maps.%20An%20Interface%20map%20maps%20the%20logical%20device%20to%20the%20actual%20physical%20device.%20ie%3A%20a%20specific%20switch%20and%20model%20that%20is%20used%20in%20the%20actual%20typology.%3C/span%3E%3C/span%3E%3C/p%3E
- Click on the Interface maps option from the menu
- Click to create a new interface map
- Add a name
- Choose a logical device that will be mapped to a physical entity
- Choose from the drop down list
- Choose a device profile from the drop down menu
- Choose the Juniper QFX device as shown
- Choose the interfaces
- %3Cp%3E%3Cspan%20style%3D%22font-size%3A%2013px%3B%22%3EWe%20will%20repeat%20the%20same%20process%20for%20the%20spine%20devices%20defined%20earlier.%20We%20will%20be%20mapping%20it%20to%20the%20Juniper%20QFX%20devices%20as%20well.%3C/span%3E%3C/p%3E
- Next we will add a few racks
- Click on the rack type from the menu
- Click to create a rack type
- Add a name for the new rack
- Name the leaf switch
- Choose a logical leaf device that was previously defined
- Choose the desired logical device from the list
- Click to add a new Generic system
- Add a name to the Generic System Group
- Enter a desired name
- FInish the process of creating a new rack
- Let us add another generic system
- Click to edit the rack type
- Navigate to the leafs tab
- Click on generic systems tab
- Up the Generic system count to 2 and then update the rack type
- Bring everything together in the next steps
- Choose templates from the menu
- Click to create a template
- Add a name first
- Enter more details and then scroll down
- To choose a rack type click on the drop down menu
- Choose the rack type that we created earlier from the menu
- Click to select the desired spine logical device
- Choose the logical spine device from the list
- Enter the desired count
- Click on create to complete the configuration
- Next step is to create a blueprint for the entire Datacenter fabric
- Click to create a new blueprint
- Enter a name for the Blueprint
- Choose the template from the drop down menu
- Choose the desired template
- Click to display the links
- Click on create to finish the process
- Click to view the Blueprint
- Click on staged
- Select the spines to allocate an Autonomous ID
- Click on the edit icon
- Choose the IP address from the Pool
- Save the configuration
- Repeat the same process for the other leaf devices
- Next we need to configure the interface mappings
- Click on one of the spine devices
- Click on the edit icon
- Choose the interface mappings from the the drop down menu
- Make the desired selection
- Click to update the assignments
- Click to assign system IDs next
- Click on the Assigned System IDs tab
- Click on the edit icon
- Choose from the list of System IDs
- Finalize the assignments
- Click on links
- Recitify any cabling errors as shown automatically
- Update the cabling assingments
- Notice the success message once the cabling mapping is sorted out
- Click on commit
- Add the description and click on the commit button
- Success
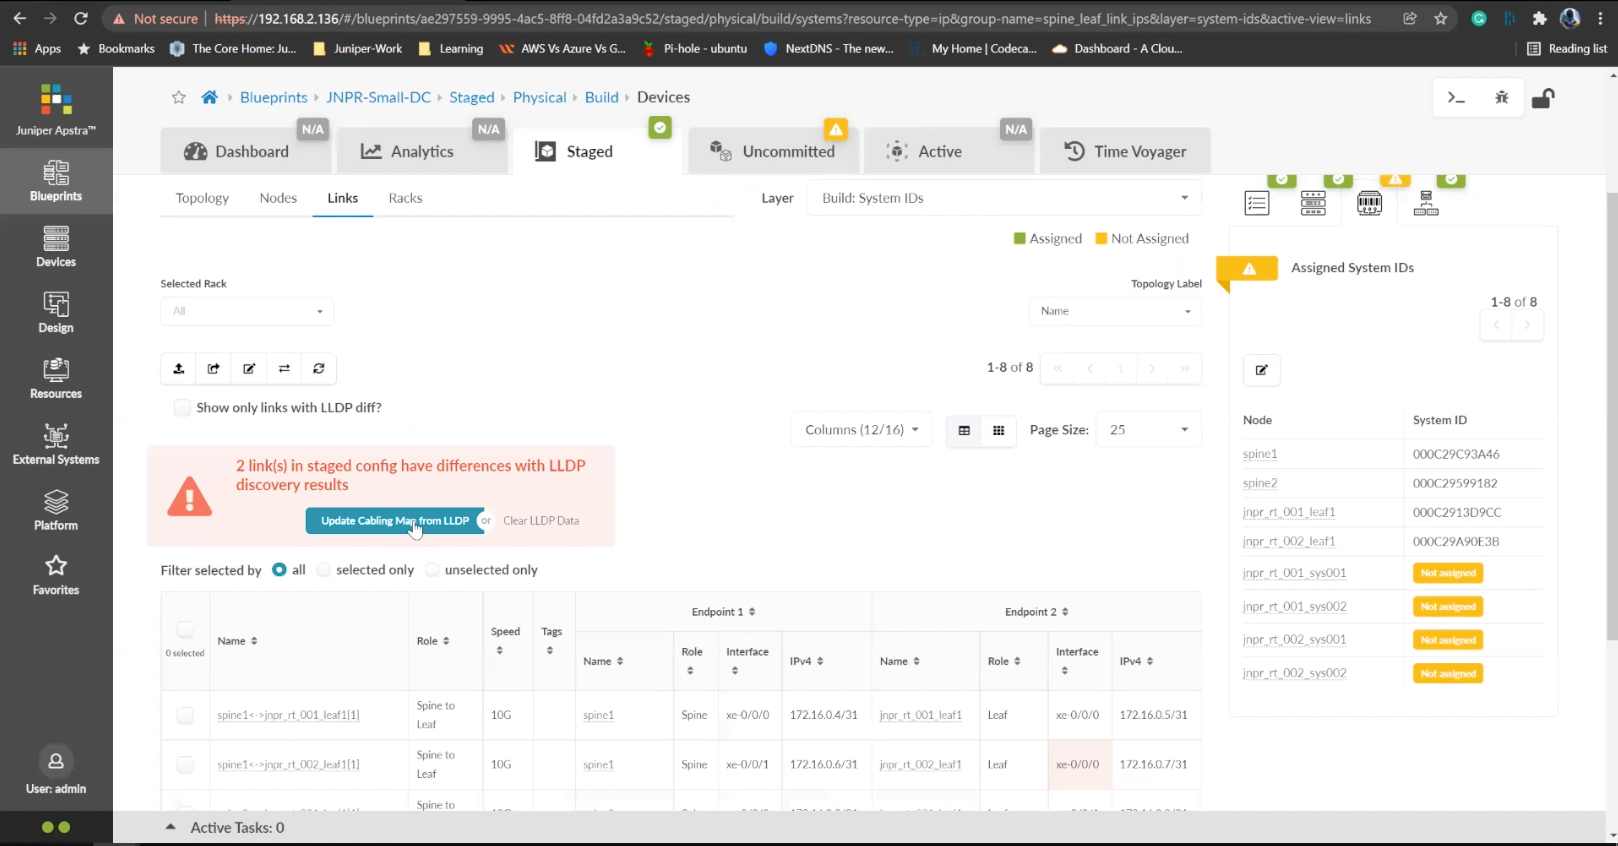
Recitify any cabling errors as shown automatically
Note: For demo purposes,  it turns out that a couple of the devices haven't been cabled correctly. Apstra fetched the LLDP information automatically. Without Apstra, we would need to send a cabling technician to fix this manually, but here, we can just remediate the connectivity within Apstra itself. We can tell Apstra what spine are connected to the leaf links and the updates will be made on the configuration automatically
Â
- %3Cp%3EWe%20have%20our%20switches%20already%20managed%20by%20Apstra%2C%20a%20series%20of%20Juniper%20virtual%20QFX%20switches%20in%20this%20example.%20We%20wil%20start%20by%20creating%20logical%20devices.%3C/p%3E
- Click%20on%20logical%20devices%20option%20from%20the%20menu
- %3Cp%3E%3Cspan%20style%3D%22font-size%3A%2013px%3B%22%3ETo%20start%20the%20process%2C%20we%20will%20creat%20a%20leaf%20device%20first.%20%3C/span%3E%3C/p%3E%0A%3Cp%3E%3Cspan%20style%3D%22font-size%3A%2015px%3B%22%3EPlease%20Note%3A%20%3C/span%3E%3C/p%3E%0A%3Cp%3E%3Cspan%20style%3D%22font-size%3A%2013px%3B%22%3EThe%20same%20process%20can%20be%20replicated%20for%20a%20spine%20logical%20device%20too.%20For%20the%20purpose%20of%20this%20demo%2C%20we%20will%20skip%20the%20spine%20logical%20device%20creation%20process.%3C/span%3E%3C/p%3E
- Enter a name for the logical device
- Choose the number of ports
- Create a port group
- Click to finish the creation
- %3Cp%3E%3Cspan%20style%3D%22font-size%3A%2013px%3B%22%3E%3Cspan%20style%3D%22font-family%3A%20Calibri%2C%20sans-serif%3B%22%3ENext%20we%20will%20set%20up%20interface%20maps.%20An%20Interface%20map%20maps%20the%20logical%20device%20to%20the%20actual%20physical%20device.%20ie%3A%20a%20specific%20switch%20and%20model%20that%20is%20used%20in%20the%20actual%20typology.%3C/span%3E%3C/span%3E%3C/p%3E
- Click on the Interface maps option from the menu
- Click to create a new interface map
- Add a name
- Choose a logical device that will be mapped to a physical entity
- Choose from the drop down list
- Choose a device profile from the drop down menu
- Choose the Juniper QFX device as shown
- Choose the interfaces
- %3Cp%3E%3Cspan%20style%3D%22font-size%3A%2013px%3B%22%3EWe%20will%20repeat%20the%20same%20process%20for%20the%20spine%20devices%20defined%20earlier.%20We%20will%20be%20mapping%20it%20to%20the%20Juniper%20QFX%20devices%20as%20well.%3C/span%3E%3C/p%3E
- Next we will add a few racks
- Click on the rack type from the menu
- Click to create a rack type
- Add a name for the new rack
- Name the leaf switch
- Choose a logical leaf device that was previously defined
- Choose the desired logical device from the list
- Click to add a new Generic system
- Add a name to the Generic System Group
- Enter a desired name
- FInish the process of creating a new rack
- Let us add another generic system
- Click to edit the rack type
- Navigate to the leafs tab
- Click on generic systems tab
- Up the Generic system count to 2 and then update the rack type
- Bring everything together in the next steps
- Choose templates from the menu
- Click to create a template
- Add a name first
- Enter more details and then scroll down
- To choose a rack type click on the drop down menu
- Choose the rack type that we created earlier from the menu
- Click to select the desired spine logical device
- Choose the logical spine device from the list
- Enter the desired count
- Click on create to complete the configuration
- Next step is to create a blueprint for the entire Datacenter fabric
- Click to create a new blueprint
- Enter a name for the Blueprint
- Choose the template from the drop down menu
- Choose the desired template
- Click to display the links
- Click on create to finish the process
- Click to view the Blueprint
- Click on staged
- Select the spines to allocate an Autonomous ID
- Click on the edit icon
- Choose the IP address from the Pool
- Save the configuration
- Repeat the same process for the other leaf devices
- Next we need to configure the interface mappings
- Click on one of the spine devices
- Click on the edit icon
- Choose the interface mappings from the the drop down menu
- Make the desired selection
- Click to update the assignments
- Click to assign system IDs next
- Click on the Assigned System IDs tab
- Click on the edit icon
- Choose from the list of System IDs
- Finalize the assignments
- Click on links
- Recitify any cabling errors as shown automatically
- Update the cabling assingments
- Notice the success message once the cabling mapping is sorted out
- Click on commit
- Add the description and click on the commit button
- Success
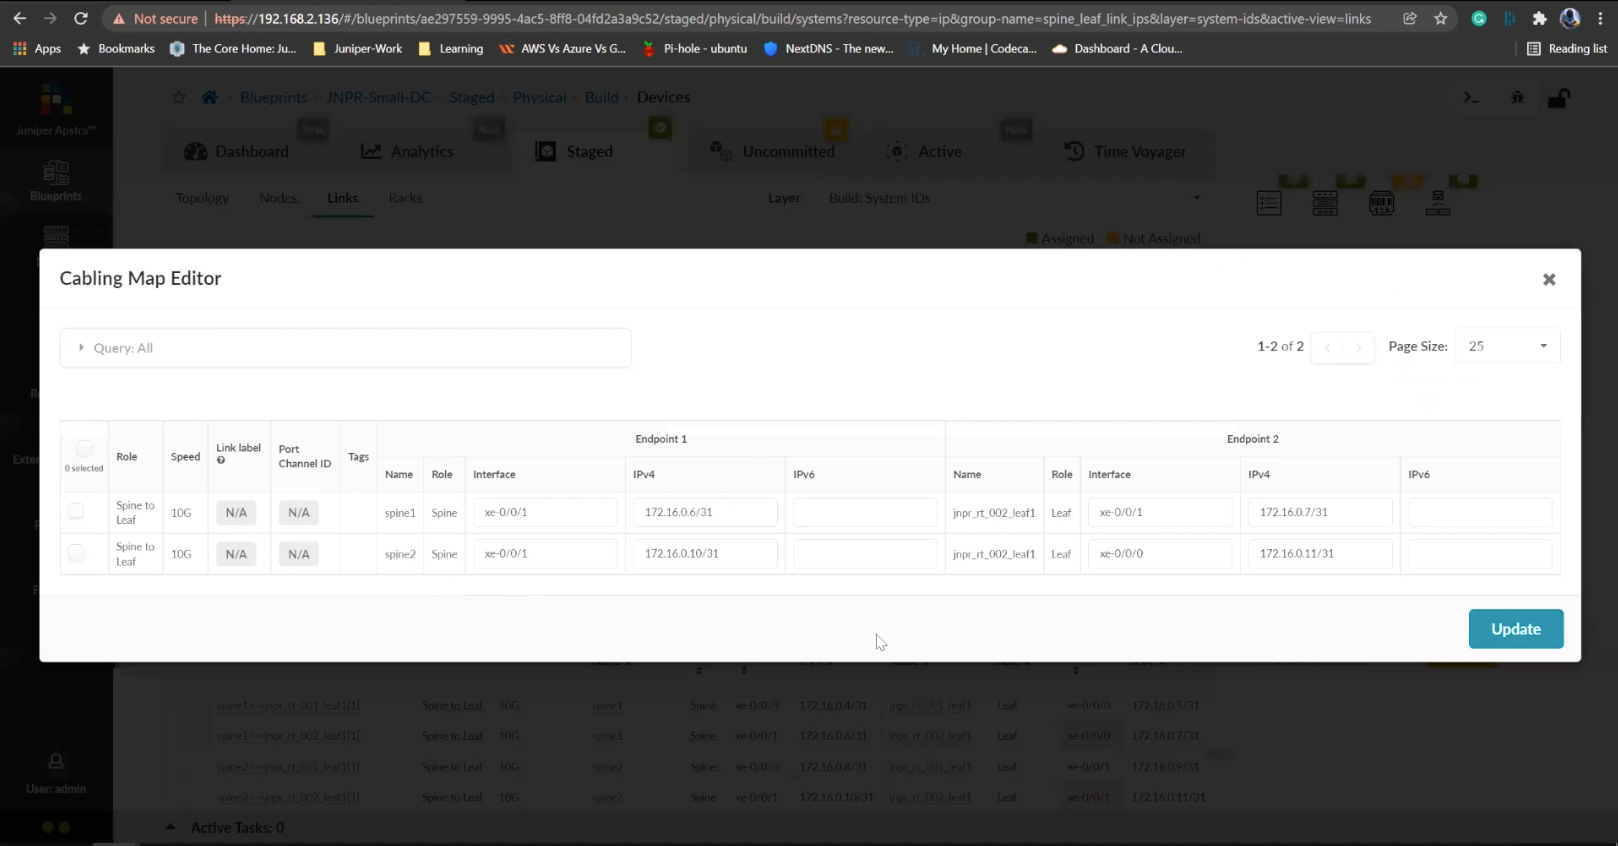
Update the cabling assingments
- %3Cp%3EWe%20have%20our%20switches%20already%20managed%20by%20Apstra%2C%20a%20series%20of%20Juniper%20virtual%20QFX%20switches%20in%20this%20example.%20We%20wil%20start%20by%20creating%20logical%20devices.%3C/p%3E
- Click%20on%20logical%20devices%20option%20from%20the%20menu
- %3Cp%3E%3Cspan%20style%3D%22font-size%3A%2013px%3B%22%3ETo%20start%20the%20process%2C%20we%20will%20creat%20a%20leaf%20device%20first.%20%3C/span%3E%3C/p%3E%0A%3Cp%3E%3Cspan%20style%3D%22font-size%3A%2015px%3B%22%3EPlease%20Note%3A%20%3C/span%3E%3C/p%3E%0A%3Cp%3E%3Cspan%20style%3D%22font-size%3A%2013px%3B%22%3EThe%20same%20process%20can%20be%20replicated%20for%20a%20spine%20logical%20device%20too.%20For%20the%20purpose%20of%20this%20demo%2C%20we%20will%20skip%20the%20spine%20logical%20device%20creation%20process.%3C/span%3E%3C/p%3E
- Enter a name for the logical device
- Choose the number of ports
- Create a port group
- Click to finish the creation
- %3Cp%3E%3Cspan%20style%3D%22font-size%3A%2013px%3B%22%3E%3Cspan%20style%3D%22font-family%3A%20Calibri%2C%20sans-serif%3B%22%3ENext%20we%20will%20set%20up%20interface%20maps.%20An%20Interface%20map%20maps%20the%20logical%20device%20to%20the%20actual%20physical%20device.%20ie%3A%20a%20specific%20switch%20and%20model%20that%20is%20used%20in%20the%20actual%20typology.%3C/span%3E%3C/span%3E%3C/p%3E
- Click on the Interface maps option from the menu
- Click to create a new interface map
- Add a name
- Choose a logical device that will be mapped to a physical entity
- Choose from the drop down list
- Choose a device profile from the drop down menu
- Choose the Juniper QFX device as shown
- Choose the interfaces
- %3Cp%3E%3Cspan%20style%3D%22font-size%3A%2013px%3B%22%3EWe%20will%20repeat%20the%20same%20process%20for%20the%20spine%20devices%20defined%20earlier.%20We%20will%20be%20mapping%20it%20to%20the%20Juniper%20QFX%20devices%20as%20well.%3C/span%3E%3C/p%3E
- Next we will add a few racks
- Click on the rack type from the menu
- Click to create a rack type
- Add a name for the new rack
- Name the leaf switch
- Choose a logical leaf device that was previously defined
- Choose the desired logical device from the list
- Click to add a new Generic system
- Add a name to the Generic System Group
- Enter a desired name
- FInish the process of creating a new rack
- Let us add another generic system
- Click to edit the rack type
- Navigate to the leafs tab
- Click on generic systems tab
- Up the Generic system count to 2 and then update the rack type
- Bring everything together in the next steps
- Choose templates from the menu
- Click to create a template
- Add a name first
- Enter more details and then scroll down
- To choose a rack type click on the drop down menu
- Choose the rack type that we created earlier from the menu
- Click to select the desired spine logical device
- Choose the logical spine device from the list
- Enter the desired count
- Click on create to complete the configuration
- Next step is to create a blueprint for the entire Datacenter fabric
- Click to create a new blueprint
- Enter a name for the Blueprint
- Choose the template from the drop down menu
- Choose the desired template
- Click to display the links
- Click on create to finish the process
- Click to view the Blueprint
- Click on staged
- Select the spines to allocate an Autonomous ID
- Click on the edit icon
- Choose the IP address from the Pool
- Save the configuration
- Repeat the same process for the other leaf devices
- Next we need to configure the interface mappings
- Click on one of the spine devices
- Click on the edit icon
- Choose the interface mappings from the the drop down menu
- Make the desired selection
- Click to update the assignments
- Click to assign system IDs next
- Click on the Assigned System IDs tab
- Click on the edit icon
- Choose from the list of System IDs
- Finalize the assignments
- Click on links
- Recitify any cabling errors as shown automatically
- Update the cabling assingments
- Notice the success message once the cabling mapping is sorted out
- Click on commit
- Add the description and click on the commit button
- Success
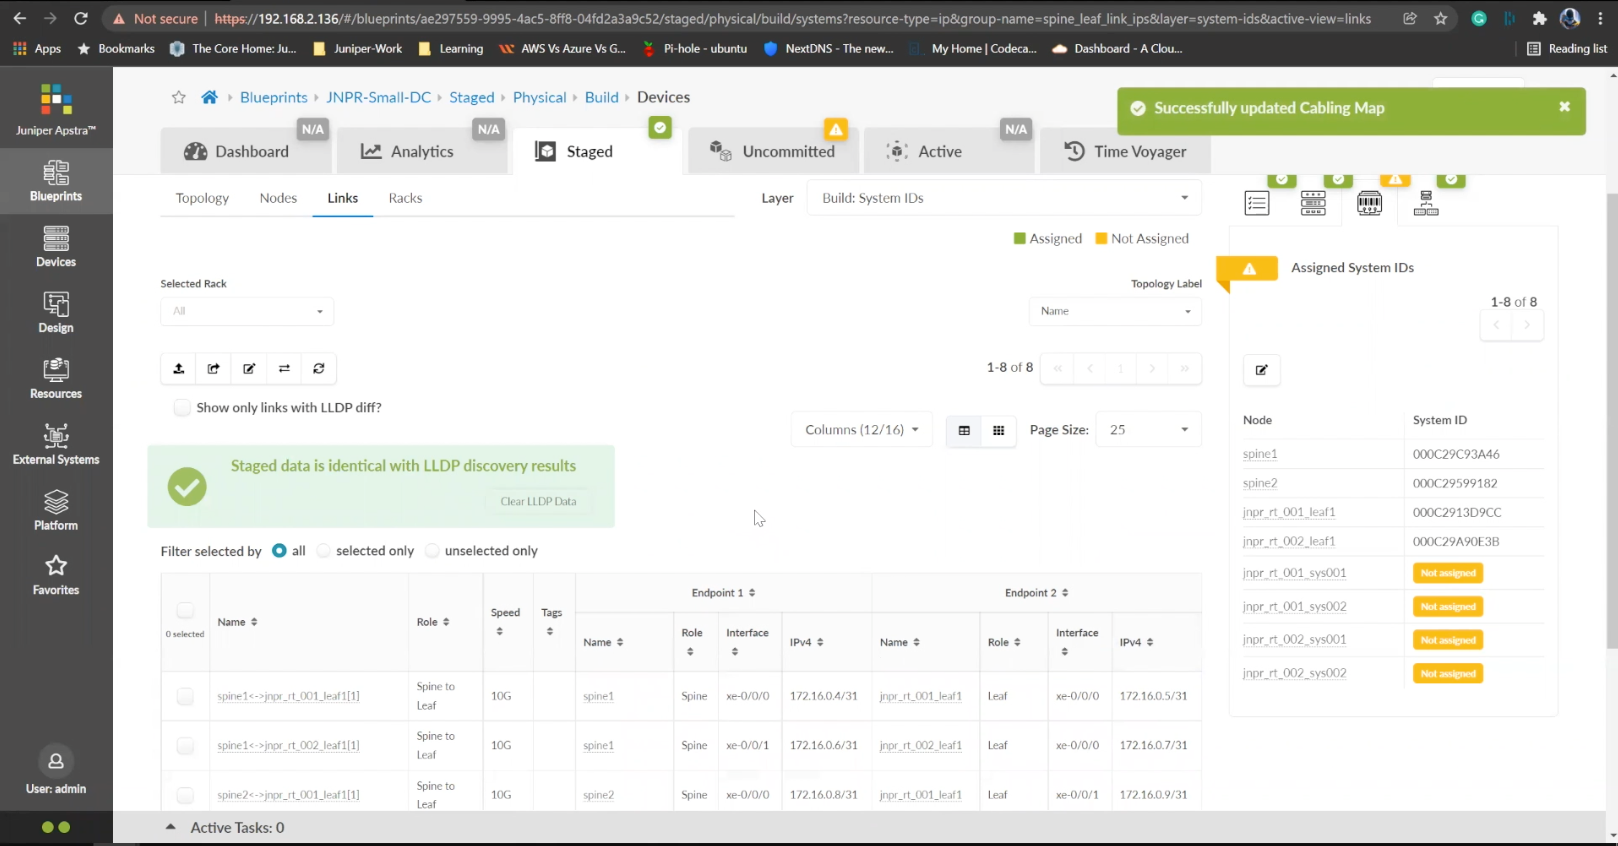
Notice the success message once the cabling mapping is sorted out
- %3Cp%3EWe%20have%20our%20switches%20already%20managed%20by%20Apstra%2C%20a%20series%20of%20Juniper%20virtual%20QFX%20switches%20in%20this%20example.%20We%20wil%20start%20by%20creating%20logical%20devices.%3C/p%3E
- Click%20on%20logical%20devices%20option%20from%20the%20menu
- %3Cp%3E%3Cspan%20style%3D%22font-size%3A%2013px%3B%22%3ETo%20start%20the%20process%2C%20we%20will%20creat%20a%20leaf%20device%20first.%20%3C/span%3E%3C/p%3E%0A%3Cp%3E%3Cspan%20style%3D%22font-size%3A%2015px%3B%22%3EPlease%20Note%3A%20%3C/span%3E%3C/p%3E%0A%3Cp%3E%3Cspan%20style%3D%22font-size%3A%2013px%3B%22%3EThe%20same%20process%20can%20be%20replicated%20for%20a%20spine%20logical%20device%20too.%20For%20the%20purpose%20of%20this%20demo%2C%20we%20will%20skip%20the%20spine%20logical%20device%20creation%20process.%3C/span%3E%3C/p%3E
- Enter a name for the logical device
- Choose the number of ports
- Create a port group
- Click to finish the creation
- %3Cp%3E%3Cspan%20style%3D%22font-size%3A%2013px%3B%22%3E%3Cspan%20style%3D%22font-family%3A%20Calibri%2C%20sans-serif%3B%22%3ENext%20we%20will%20set%20up%20interface%20maps.%20An%20Interface%20map%20maps%20the%20logical%20device%20to%20the%20actual%20physical%20device.%20ie%3A%20a%20specific%20switch%20and%20model%20that%20is%20used%20in%20the%20actual%20typology.%3C/span%3E%3C/span%3E%3C/p%3E
- Click on the Interface maps option from the menu
- Click to create a new interface map
- Add a name
- Choose a logical device that will be mapped to a physical entity
- Choose from the drop down list
- Choose a device profile from the drop down menu
- Choose the Juniper QFX device as shown
- Choose the interfaces
- %3Cp%3E%3Cspan%20style%3D%22font-size%3A%2013px%3B%22%3EWe%20will%20repeat%20the%20same%20process%20for%20the%20spine%20devices%20defined%20earlier.%20We%20will%20be%20mapping%20it%20to%20the%20Juniper%20QFX%20devices%20as%20well.%3C/span%3E%3C/p%3E
- Next we will add a few racks
- Click on the rack type from the menu
- Click to create a rack type
- Add a name for the new rack
- Name the leaf switch
- Choose a logical leaf device that was previously defined
- Choose the desired logical device from the list
- Click to add a new Generic system
- Add a name to the Generic System Group
- Enter a desired name
- FInish the process of creating a new rack
- Let us add another generic system
- Click to edit the rack type
- Navigate to the leafs tab
- Click on generic systems tab
- Up the Generic system count to 2 and then update the rack type
- Bring everything together in the next steps
- Choose templates from the menu
- Click to create a template
- Add a name first
- Enter more details and then scroll down
- To choose a rack type click on the drop down menu
- Choose the rack type that we created earlier from the menu
- Click to select the desired spine logical device
- Choose the logical spine device from the list
- Enter the desired count
- Click on create to complete the configuration
- Next step is to create a blueprint for the entire Datacenter fabric
- Click to create a new blueprint
- Enter a name for the Blueprint
- Choose the template from the drop down menu
- Choose the desired template
- Click to display the links
- Click on create to finish the process
- Click to view the Blueprint
- Click on staged
- Select the spines to allocate an Autonomous ID
- Click on the edit icon
- Choose the IP address from the Pool
- Save the configuration
- Repeat the same process for the other leaf devices
- Next we need to configure the interface mappings
- Click on one of the spine devices
- Click on the edit icon
- Choose the interface mappings from the the drop down menu
- Make the desired selection
- Click to update the assignments
- Click to assign system IDs next
- Click on the Assigned System IDs tab
- Click on the edit icon
- Choose from the list of System IDs
- Finalize the assignments
- Click on links
- Recitify any cabling errors as shown automatically
- Update the cabling assingments
- Notice the success message once the cabling mapping is sorted out
- Click on commit
- Add the description and click on the commit button
- Success
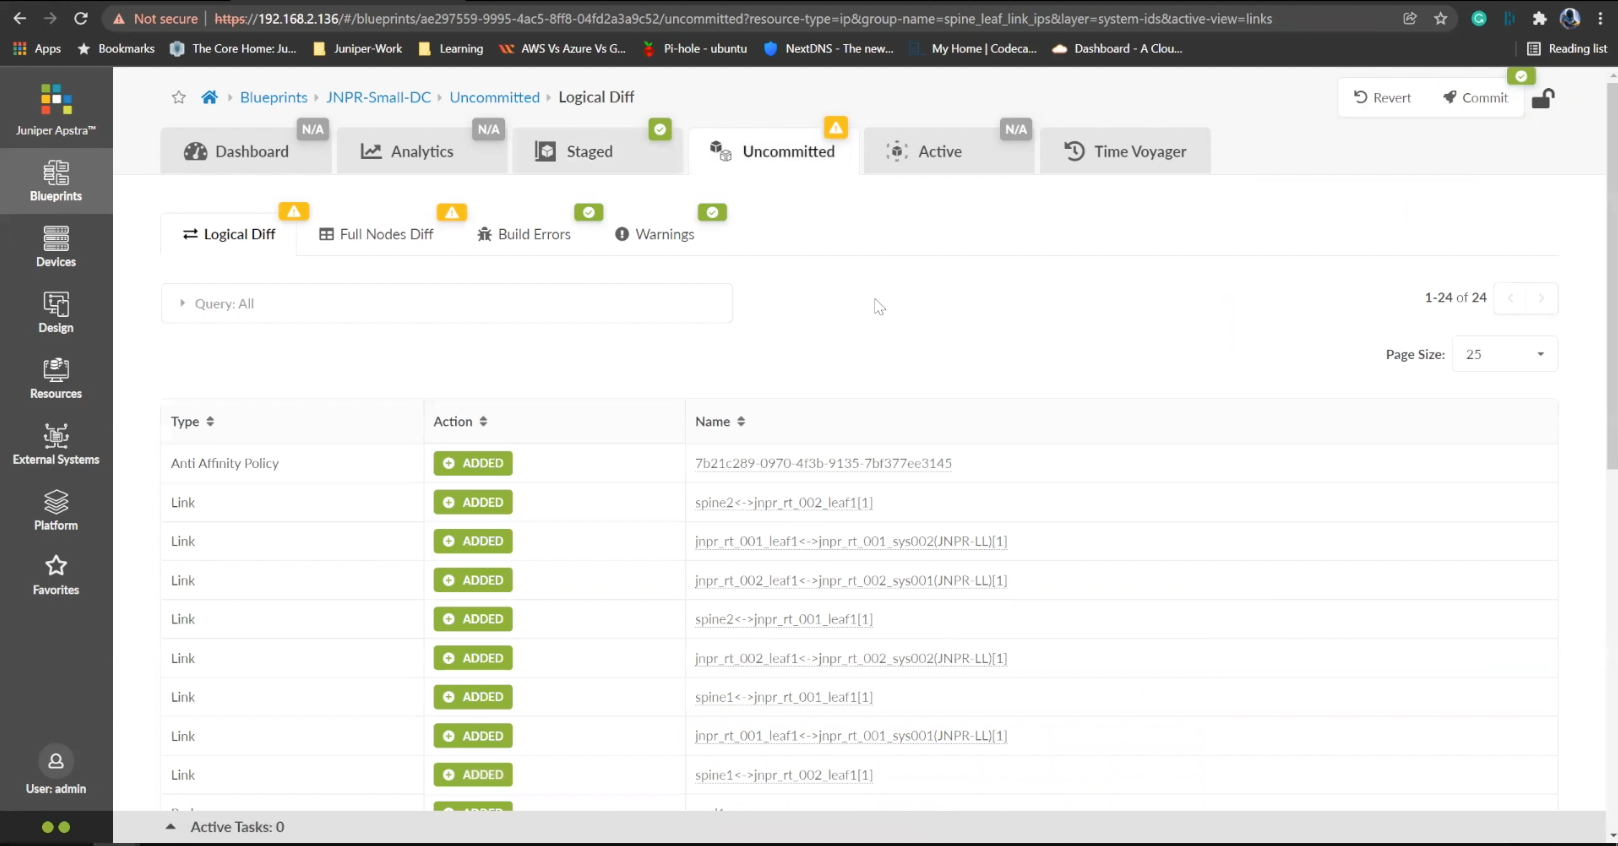
Click on commit
And finally, we click on commit, write a note on what this change is about for record. This action will push this configuration live, down to the fabric devices, the spine switches, and the leaf switches. In each step, Apstra has assured us that the intended configuration is correct, and made sure that all the ASN pools are assigned, the IP’s were assigned, we've mapped out all of our devices. Once the BGP peers have established connection, and then we should see a completely green dashboard and a functional Datacenter fabric.
- %3Cp%3EWe%20have%20our%20switches%20already%20managed%20by%20Apstra%2C%20a%20series%20of%20Juniper%20virtual%20QFX%20switches%20in%20this%20example.%20We%20wil%20start%20by%20creating%20logical%20devices.%3C/p%3E
- Click%20on%20logical%20devices%20option%20from%20the%20menu
- %3Cp%3E%3Cspan%20style%3D%22font-size%3A%2013px%3B%22%3ETo%20start%20the%20process%2C%20we%20will%20creat%20a%20leaf%20device%20first.%20%3C/span%3E%3C/p%3E%0A%3Cp%3E%3Cspan%20style%3D%22font-size%3A%2015px%3B%22%3EPlease%20Note%3A%20%3C/span%3E%3C/p%3E%0A%3Cp%3E%3Cspan%20style%3D%22font-size%3A%2013px%3B%22%3EThe%20same%20process%20can%20be%20replicated%20for%20a%20spine%20logical%20device%20too.%20For%20the%20purpose%20of%20this%20demo%2C%20we%20will%20skip%20the%20spine%20logical%20device%20creation%20process.%3C/span%3E%3C/p%3E
- Enter a name for the logical device
- Choose the number of ports
- Create a port group
- Click to finish the creation
- %3Cp%3E%3Cspan%20style%3D%22font-size%3A%2013px%3B%22%3E%3Cspan%20style%3D%22font-family%3A%20Calibri%2C%20sans-serif%3B%22%3ENext%20we%20will%20set%20up%20interface%20maps.%20An%20Interface%20map%20maps%20the%20logical%20device%20to%20the%20actual%20physical%20device.%20ie%3A%20a%20specific%20switch%20and%20model%20that%20is%20used%20in%20the%20actual%20typology.%3C/span%3E%3C/span%3E%3C/p%3E
- Click on the Interface maps option from the menu
- Click to create a new interface map
- Add a name
- Choose a logical device that will be mapped to a physical entity
- Choose from the drop down list
- Choose a device profile from the drop down menu
- Choose the Juniper QFX device as shown
- Choose the interfaces
- %3Cp%3E%3Cspan%20style%3D%22font-size%3A%2013px%3B%22%3EWe%20will%20repeat%20the%20same%20process%20for%20the%20spine%20devices%20defined%20earlier.%20We%20will%20be%20mapping%20it%20to%20the%20Juniper%20QFX%20devices%20as%20well.%3C/span%3E%3C/p%3E
- Next we will add a few racks
- Click on the rack type from the menu
- Click to create a rack type
- Add a name for the new rack
- Name the leaf switch
- Choose a logical leaf device that was previously defined
- Choose the desired logical device from the list
- Click to add a new Generic system
- Add a name to the Generic System Group
- Enter a desired name
- FInish the process of creating a new rack
- Let us add another generic system
- Click to edit the rack type
- Navigate to the leafs tab
- Click on generic systems tab
- Up the Generic system count to 2 and then update the rack type
- Bring everything together in the next steps
- Choose templates from the menu
- Click to create a template
- Add a name first
- Enter more details and then scroll down
- To choose a rack type click on the drop down menu
- Choose the rack type that we created earlier from the menu
- Click to select the desired spine logical device
- Choose the logical spine device from the list
- Enter the desired count
- Click on create to complete the configuration
- Next step is to create a blueprint for the entire Datacenter fabric
- Click to create a new blueprint
- Enter a name for the Blueprint
- Choose the template from the drop down menu
- Choose the desired template
- Click to display the links
- Click on create to finish the process
- Click to view the Blueprint
- Click on staged
- Select the spines to allocate an Autonomous ID
- Click on the edit icon
- Choose the IP address from the Pool
- Save the configuration
- Repeat the same process for the other leaf devices
- Next we need to configure the interface mappings
- Click on one of the spine devices
- Click on the edit icon
- Choose the interface mappings from the the drop down menu
- Make the desired selection
- Click to update the assignments
- Click to assign system IDs next
- Click on the Assigned System IDs tab
- Click on the edit icon
- Choose from the list of System IDs
- Finalize the assignments
- Click on links
- Recitify any cabling errors as shown automatically
- Update the cabling assingments
- Notice the success message once the cabling mapping is sorted out
- Click on commit
- Add the description and click on the commit button
- Success
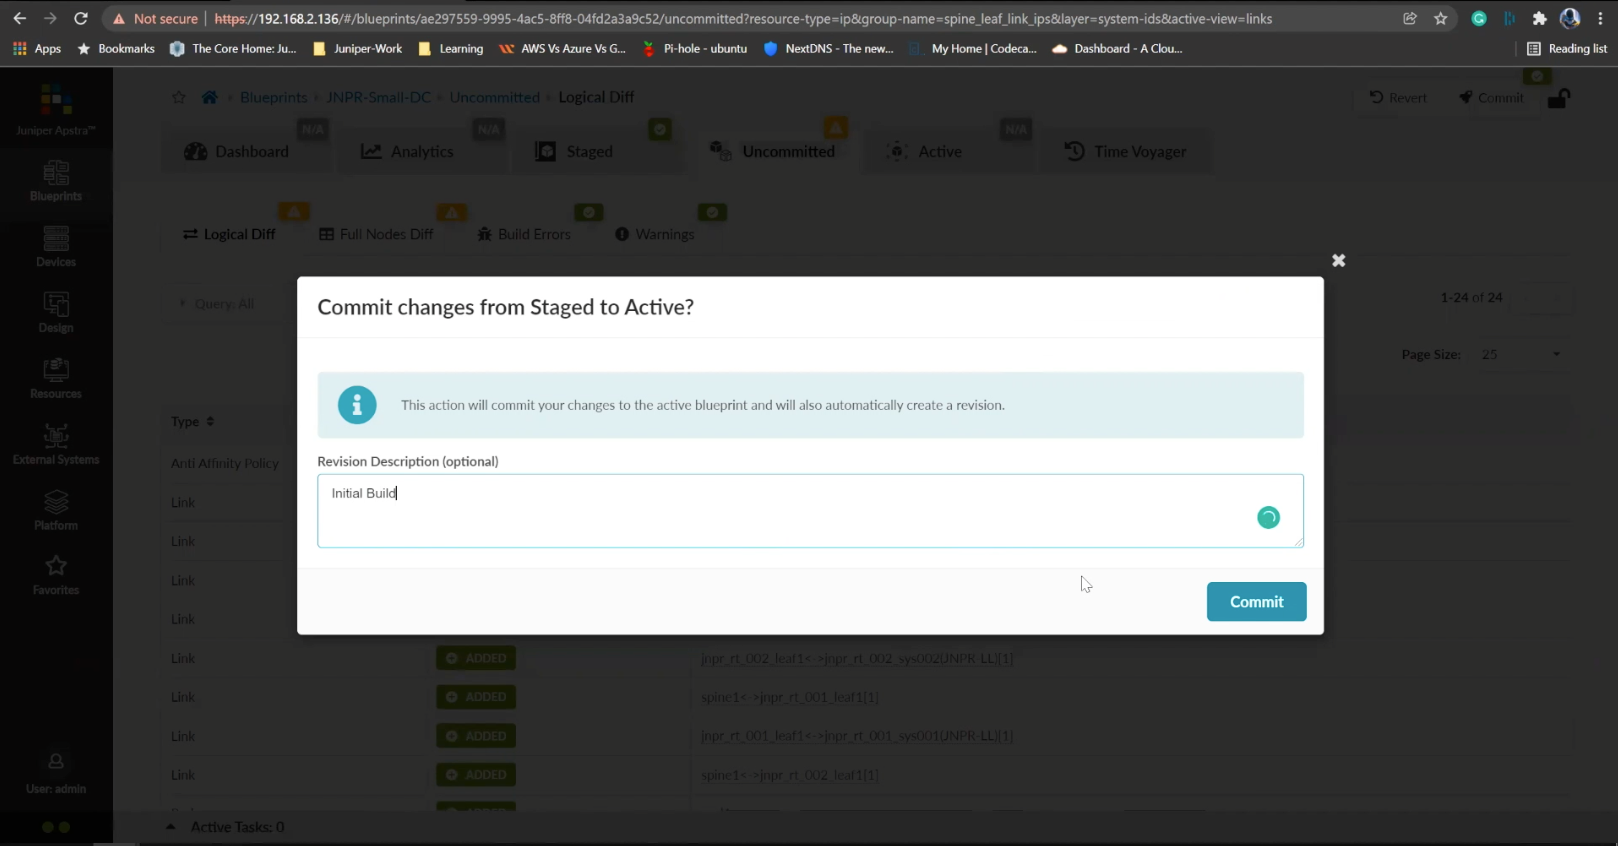
Add the description and click on the commit button
- %3Cp%3EWe%20have%20our%20switches%20already%20managed%20by%20Apstra%2C%20a%20series%20of%20Juniper%20virtual%20QFX%20switches%20in%20this%20example.%20We%20wil%20start%20by%20creating%20logical%20devices.%3C/p%3E
- Click%20on%20logical%20devices%20option%20from%20the%20menu
- %3Cp%3E%3Cspan%20style%3D%22font-size%3A%2013px%3B%22%3ETo%20start%20the%20process%2C%20we%20will%20creat%20a%20leaf%20device%20first.%20%3C/span%3E%3C/p%3E%0A%3Cp%3E%3Cspan%20style%3D%22font-size%3A%2015px%3B%22%3EPlease%20Note%3A%20%3C/span%3E%3C/p%3E%0A%3Cp%3E%3Cspan%20style%3D%22font-size%3A%2013px%3B%22%3EThe%20same%20process%20can%20be%20replicated%20for%20a%20spine%20logical%20device%20too.%20For%20the%20purpose%20of%20this%20demo%2C%20we%20will%20skip%20the%20spine%20logical%20device%20creation%20process.%3C/span%3E%3C/p%3E
- Enter a name for the logical device
- Choose the number of ports
- Create a port group
- Click to finish the creation
- %3Cp%3E%3Cspan%20style%3D%22font-size%3A%2013px%3B%22%3E%3Cspan%20style%3D%22font-family%3A%20Calibri%2C%20sans-serif%3B%22%3ENext%20we%20will%20set%20up%20interface%20maps.%20An%20Interface%20map%20maps%20the%20logical%20device%20to%20the%20actual%20physical%20device.%20ie%3A%20a%20specific%20switch%20and%20model%20that%20is%20used%20in%20the%20actual%20typology.%3C/span%3E%3C/span%3E%3C/p%3E
- Click on the Interface maps option from the menu
- Click to create a new interface map
- Add a name
- Choose a logical device that will be mapped to a physical entity
- Choose from the drop down list
- Choose a device profile from the drop down menu
- Choose the Juniper QFX device as shown
- Choose the interfaces
- %3Cp%3E%3Cspan%20style%3D%22font-size%3A%2013px%3B%22%3EWe%20will%20repeat%20the%20same%20process%20for%20the%20spine%20devices%20defined%20earlier.%20We%20will%20be%20mapping%20it%20to%20the%20Juniper%20QFX%20devices%20as%20well.%3C/span%3E%3C/p%3E
- Next we will add a few racks
- Click on the rack type from the menu
- Click to create a rack type
- Add a name for the new rack
- Name the leaf switch
- Choose a logical leaf device that was previously defined
- Choose the desired logical device from the list
- Click to add a new Generic system
- Add a name to the Generic System Group
- Enter a desired name
- FInish the process of creating a new rack
- Let us add another generic system
- Click to edit the rack type
- Navigate to the leafs tab
- Click on generic systems tab
- Up the Generic system count to 2 and then update the rack type
- Bring everything together in the next steps
- Choose templates from the menu
- Click to create a template
- Add a name first
- Enter more details and then scroll down
- To choose a rack type click on the drop down menu
- Choose the rack type that we created earlier from the menu
- Click to select the desired spine logical device
- Choose the logical spine device from the list
- Enter the desired count
- Click on create to complete the configuration
- Next step is to create a blueprint for the entire Datacenter fabric
- Click to create a new blueprint
- Enter a name for the Blueprint
- Choose the template from the drop down menu
- Choose the desired template
- Click to display the links
- Click on create to finish the process
- Click to view the Blueprint
- Click on staged
- Select the spines to allocate an Autonomous ID
- Click on the edit icon
- Choose the IP address from the Pool
- Save the configuration
- Repeat the same process for the other leaf devices
- Next we need to configure the interface mappings
- Click on one of the spine devices
- Click on the edit icon
- Choose the interface mappings from the the drop down menu
- Make the desired selection
- Click to update the assignments
- Click to assign system IDs next
- Click on the Assigned System IDs tab
- Click on the edit icon
- Choose from the list of System IDs
- Finalize the assignments
- Click on links
- Recitify any cabling errors as shown automatically
- Update the cabling assingments
- Notice the success message once the cabling mapping is sorted out
- Click on commit
- Add the description and click on the commit button
- Success
